TNC-Pi Setup Notes
Change Machine’s Hostname
Rename hostname to last nearspace + last 4 of mac address.
http://www.howtogeek.com/167195/how-to-change-your-raspberry-pi-or-other-linux-devices-hostname/
At the terminal, type the following command to open the hosts file:
sudo nano /etc/hosts
Leave all of the entries alone except for the very last entry labeled 127.0.1.1 with the hostname “raspberrypi”. This is the only line you want to edit. Replace “raspberrypi” with whatever hostname you desire. We replaced it on our device with “weatherstation”. Press CTRL+X to close the editor; agree to overwrite the existing file and save it.
Back at the terminal, type the following command to open the hostname file:
sudo nano /etc/hostname
This file only contains your current hostname:
Replace the default “raspberrypi” with the same hostname you put in the previous step (e.g. “weatherstation”). Again, press CTRL+X to close the editor, agree to overwrite the existing file and save it.
Finally, we need to commit the changes to the system and reboot the system for the changes to take effect. At the terminal, enter the following command to commit the changes:
sudo /etc/init.d/hostname.sh
Follow that command with:
sudo reboot
Install the OpenSSH Server:
http://elinux.org/RPi_Advanced_Setup#Setting_up_for_remote_access_.2F_headless_operation
https://www.raspberrypi.org/documentation/remote-access/ssh/passwordless.md
Reconfigure the Kernel Debug Console
If you are going to use the serial port to connect the TNC-Pi to the Raspberry Pi, you will need to make a couple of changes to the Pi configuration. Edit the cmdline.txt file in the boot directory and make the following changes:
- Remove the following (if it exists): console=ttyAMA0, 115200
- Remove the following (if it exists): kgdboc=ttyAMA0, 115200
Note: cmdline.txt is a single line of text.
Then edit the inittab file in the etc directory and remove the line that says:
T0:23:respawn:/sbin/getty –L ttyAMA0 115200 vt100
Note: With the Jessie distribution the inittab file no longer exists so you can ignore this step.
Keyboard to Keyboard Connections
Note: For the following steps the Raspberry Pi must be connected to the internet.
You can use the Linux AX.25 routines to do connected mode packet. To do this you need to install the ax25 apps and tools. From the command line enter the following:
sudo apt-get install ax25-tools
sudo apt-get install ax25-apps
You’ll need to configure it for your callsign by editing the /etc/ax25/axports file. You’ll find two lines that allow you to enter your callsign. I did so as follows:
1   W2FS-1 19200    236 2   TNC 1
2   W2FS-2 19200    236 2   TNC 2
The serial rate must be at 19200 , because that is the only baud rate support by TNC-Pi. The next two values ( 236 and 2 in the above example) are the values for paclen and maxframe . Don’t leave any blank lines in this file.
Now attach the serial port to the AX.25 system using kissattach:
sudo kissattach /dev/ttyAMA0 1 10.1.1.1
The number in blue above matches the port number from the axports file above.
The number in red is an IP address. It’s required here even though you aren’t using the IP protocol on it.
Note: If you are using the IP protocol on your TNC-Pi your address should conform to the local convention for IP routing. The address in that case will almost certainly start with 44.
You can monitor packets on this channel by entering:
sudo axlisten -a
You can connect to another station for keyboard to keyboard QSO’s as follows:
axcall 1 <hiscall>
where hiscall is the call station of the station to which you want to connect.
There seems to be a bug in the axcall routine. The first time you use it after calling kissattach, it will take significantly longer for the Pi to send a valid connect string to the TNC than it does in subsequent attempts. You may have to wait 10 - 15 seconds. Further attempts occur instantaneously. You can abort this first try by issuing a Ctrl-C and then issuing the axcall command again. It will then connect immediately.
Using Xastir
Another popular packet program that works well on the Pi is the APRS program Xastir.
Note: For the following steps the Raspberry Pi must be connected to the internet.
Update the package list
To install Xastir from the command line, first update the package list as follows:
sudo apt-get update
Then install Xastir
sudo apt-get install xastir
Kill kissattach
If you have been using the AX25 apps, you’ll need to unload kissattach before Xastir will work. You can do this by simply rebooting the Pi, or you can kill the kissattach process from the command line. To do the latter, first find out what process number it is by using a ps command to list running processes:
ps -A | grep kissattach
Inspect the list to see the process number of the kissattach process, then kill the process using the kill command. For example, if the process number is 2335, issue the command:
sudo kill 2335
At this point it may be a good idea to rerun the ps command to be certain that the kissattach process was successfully killed.
Note: If you have not been using the AX25 apps, it is still necessary to edit the cmdline.txt and inittab files as described in the section on configuring the Pi.
Start Xastir
Then start the X-Windows GUI system with the following command:
startx
Xastir can be found in the programs menu under “other”. The first time you run Xastir you’ll be asked to put in your station parameters. Then you’ll need to specify the port that the TNC-Pi is on.
- Click on Interface and then Interface Control. Click: “Add” and pick “Serial KISS TNC” off the list.
- Push Add and it will bring up a properties list. Under TNC Port enter: /dev/ttyAMA0
Running Xastir
Everything else is pretty self-explanatory. Do make sure you change the baud rate to 19200. This is not the default. You can select “Maps” and the Map Chooser to select a better set of maps than the default. If you currently have internet connectivity, one of the cloud map options is probably best. If you select a new map option, you should deselect the old one. I haven’t yet explored the option of caching the maps to the local SD card so that I don’t need an Internet connection, but I expect to look into that soon.
More information
A much more detailed discussion of running Xastir on the Pi in a mobile environment is contained in a paper presented at the 2013 ARRL/TAPR Digital Communications Conference. It can be found at: http://www.tnc-x.com/DCC2013.doc.
Note: In this paper I discussed using maps that were available from Cloudmade. Since the time that this paper Cloudmade has discontinued free access to these maps. However, the same maps are available from the following source:
http://download.geofabrik.de. Update 8/16/2016: The open street map tiles are currently functional. I don’t know about the cloudmate stuff.
UV-3R Mic and Earpiece Disassembly Notes:
- Wire Colors:
- Green: tip, likely speaker (output from radio)
- Blue: ring close to sleeve, shorted to ground by PTT button
- Red: ring close to tip, connected to + symbol on microphone
- Yellow: sleeve, likely ground
- TNC Connector Pinnout:
- Speaker, Green
- Ground, Yellow
- Microphone, Red
- PTT, Blue
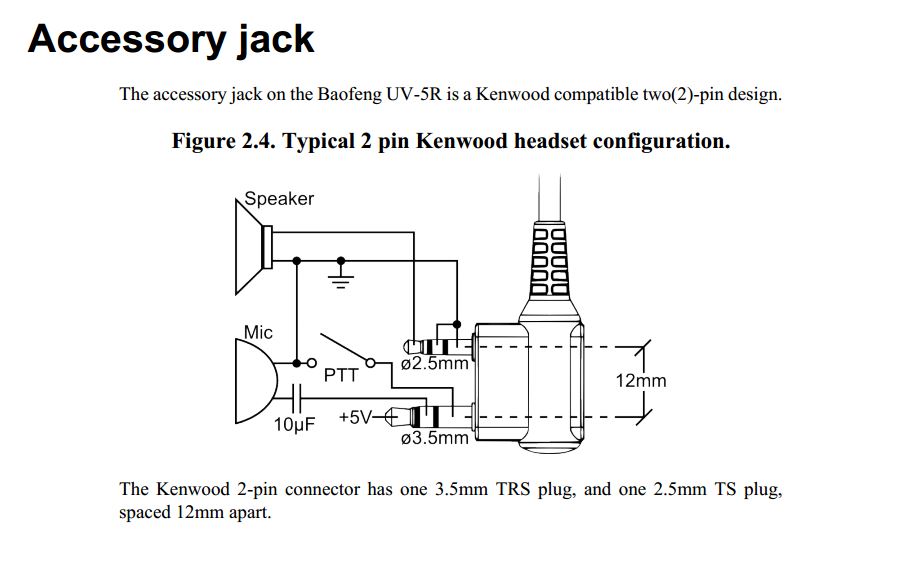
UV-5R Mic and Earpiece Disassembly Notes:
- Wire Colors:
- Green: tip (small plug), speaker (output from radio)
- Blue: sleeve (small plug), ground
- Red: ring (large plug), mic (in to radio)
- Yellow: sleeve (large plug), push to talk (PTT)
- TNC Connector Pinnout:
- Speaker, Green
- Ground, Blue
- Microphone, Red
- PTT, Yellow
More Links:
Linux Amateur Radio AX.25 HOWTO:
http://www.tldp.org/HOWTO/text/AX25-HOWTO
- Summary of AX.25-related Linux commands:
http://www.tldp.org/HOWTO/AX25-HOWTO/x2329.html
HowTo:AX.25 - Ubuntu/Debian:
http://xastir.org/index.php/HowTo:AX.25_-_Ubuntu/Debian
APRS – Raspberry Pi Virtual TNC:
http://www.wcares.org/special-interests-3/aprs/aprs-raspberry-pi-virtual-tnc/
Xastir Web Pages:
http://xastir.org/index.php/Main_Page
https://xastir.org/index.php/Downloads
APRS Specification(s) (grain of salt):
http://www.aprs.org/doc/APRS101.PDF
http://www.aprs.org/aprs11.html
http://www.aprs.org/aprs12.html
AX.25 Documentation:
Kissattach Trace:
~ $ sudo kissattach /dev/ttyAMA0 1 10.1.1.1
kissattach: Error setting line discipline: TIOCSETD: Device or resource busy
Are you sure you have enabled MKISS support in the kernel
or, if you made it a module, that the module is loaded?
~ $ sudo systemctl stop serial-getty@ttyAMA0.service
~ $ sudo systemctl disable serial-getty@ttyAMA0.service
~ $ sudo kissattach /dev/ttyAMA0 1 10.1.1.1
AX.25 port 1 bound to device ax0
~ $ beacon -s 1 'Test test!'
UV-5R Settings (working settings):
Warning, there are certain settings that cause the PTT not to work!!!
- SQL 1 - Squelch level
- STEP 2.5K - Frequency step
- TXP LOW - Transmit power (should be high for balloon flight)
- SAVE OFF - Battery save
- VOX OFF - Voice operated transmission
- WN WIDE - Wideband / narrowband
- ABR 5 - Display illumination
- TDR OFF - Dual watch / dual reception
- BEEP OFF - Keypad beep
- TOT 60 - Transmit timer
- R-DCS OFF - Reception digital coded squelch
- R-CTCS OFF - Reception continuous tone coded squelch
- T-DCS OFF - Transmission digital coded squelch
- T-CTCS OFF - Transmission continuous tone coded squelch
- VOICE OFF - Voice prompt
- ANI-ID 80808 - Automatic number identification of the radio (set by PC only)
- DTMFST DT+ANI - The DTMF tone of transmitting code
- S-CODE 1 - Signal code (set by PC only)
- SC-REV TO - Scan resume method
- PTT-ID OFF - Press or release the PTT button to transmit the signal code
- PTT-LT 5 - Delay the signal code sending
- MDF-A FREQ - Under channel mode, A channel displays (set by PC only)
- MDF-B FREQ - Under channel mode, B channel displays (set by PC only)
- BCL OFF - Busy channel lockout
- AUTOLK OFF - Keypad locked automatically
- SFT-D OFF - Direction of frequency shift
- OFFSET 000.000 - Frequency shift
- MEM-CH CH-000 - Stored in memory channels
- DEL-CH CH-000 - Delete the memory channels
- WT-LED PURPLE - Illumination display color of standby
- RX-LED BLUE - Illumination display color of reception
- TX-LED ORANGE - Illumination display color of transmitting
- AL-MOD TONE - Alarm mode
- BAND VHF - Band selection
- TDR-AB OFF - AKA: TX-AB, transmitting selection while in dual watch / reception
- STE OFF - Tail tone elimination (should this be off?)
- RP-STE 5 - Tail tone elimination in communication through repeater
- RPT-RL OFF - Delay the tail tone of repeater
- PONMSG FULL - Boot display
- ROGER OFF - Tone end of transmission
- RESET ALL - Restore to default settings (very useful when PPT is broken)
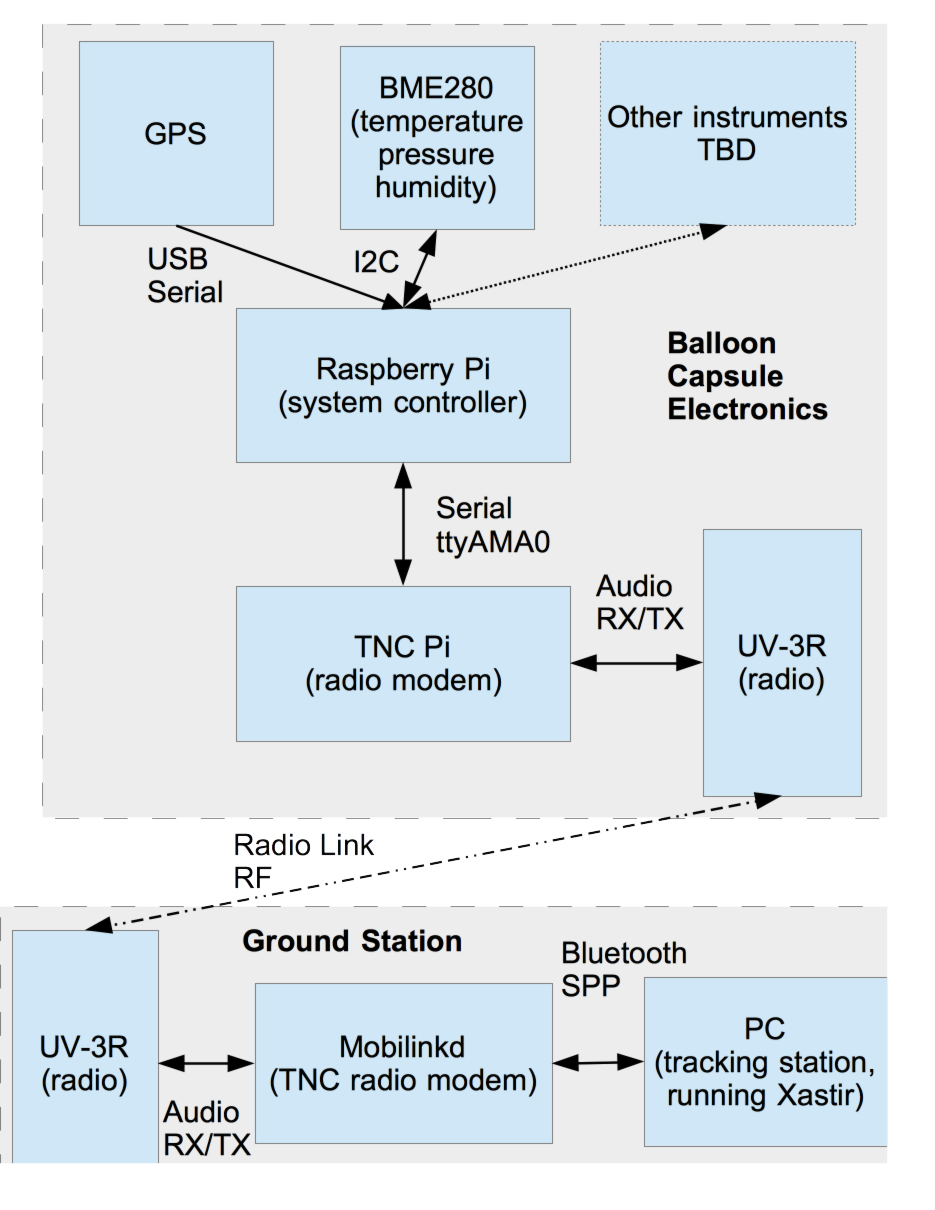
System Block Diagram
Electrical Connection List
Manuals
UV-3R Cheat Sheet pdf
UV-3R Manual pdf
UV-5R Manual pdf
UV-5R Manual pdf
TH-F6 Manual pdf
A Mobile Xastir-Based APRS Station jpg
Mobilinkd TNC2 Users Guide pdf
RFD900 Data Sheet pdf
RFD900 Software Manual pdf
Schematics and Layouts
UV-3R Schematic pdf
UV-5R Schematic pdf
TNC-Pi Schematic jpg
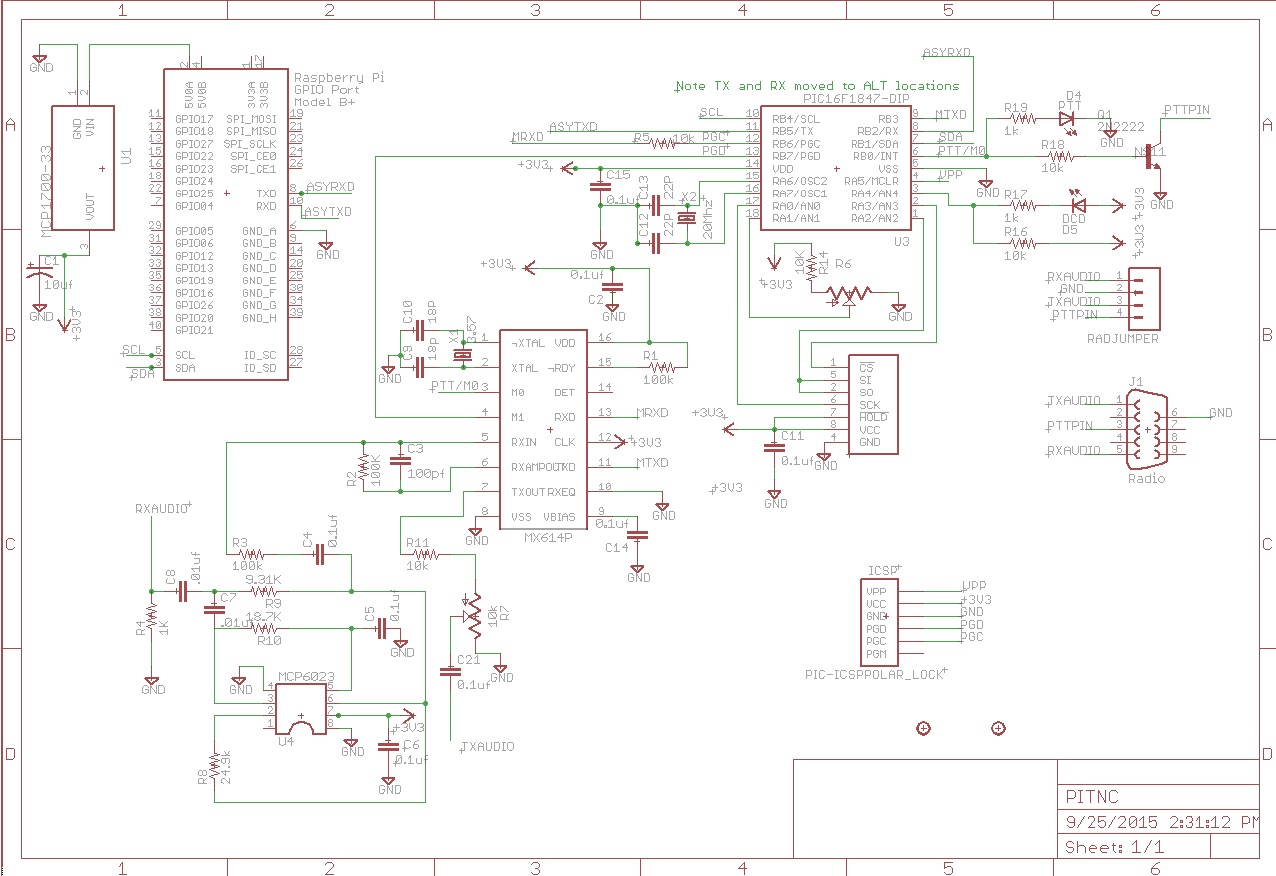
TNC-Pi Layout jpg
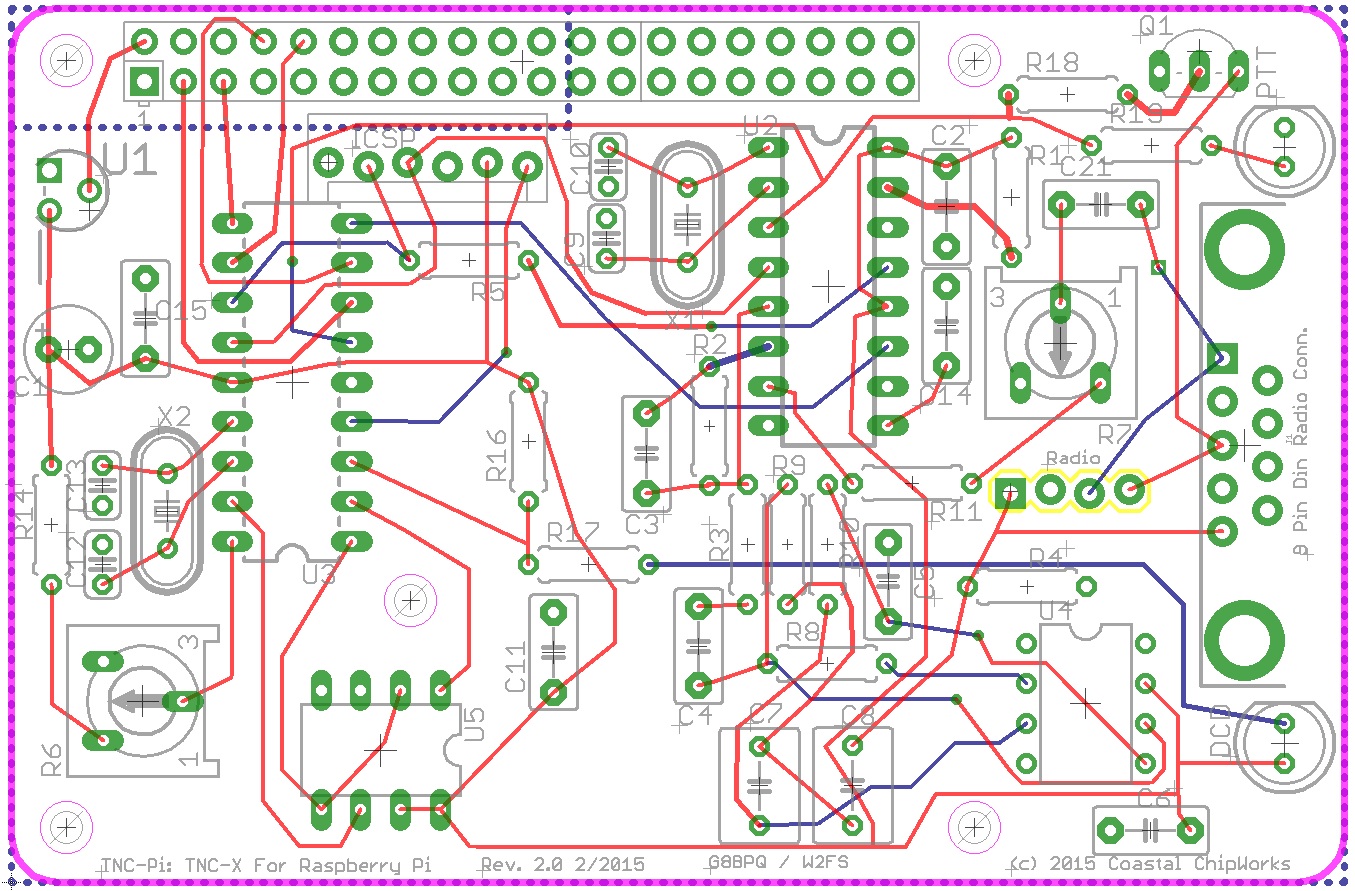
FTDI 3.3V IO 5V Vcc Cable pdf