Thinking In C++
Volume 2: Practical Programming
Bruce Eckel, President, MindView, Inc.
Chuck Allison, Utah Valley State College
Book Home Page
Annotated Solution Guide
Report Errors Here
“I’d
like to congratulate the both of you for a very impressive work! Not only did I
find your book to be an enjoyable and rewarding read … I was astounded by the
accuracy both in terms of technical correctness and use of the language … I
believe that you have attained a level of craftsmanship that is simply
outstanding.”
Bjorn Karlsson
Editorial Board, C/C++ Users Journal
“This book is a tremendous
achievement. You owe it to yourself to have a copy on your shelf.”
Al Stevens
Contributing Editor, Doctor Dobbs Journal
“Eckel’s book is the only one
to so clearly explain how to rethink program construction for object
orientation. That the book is also an excellent tutorial on the ins and outs of
C++ is an added bonus.”
Andrew Binstock
Editor, Unix Review
“Bruce continues to amaze me
with his insight into C++, and Thinking in C++ is his best collection of
ideas yet. If you want clear answers to difficult questions about C++, buy this
outstanding book.”
Gary Entsminger
Author, The Tao of Objects
“Thinking in C++ patiently
and methodically explores the issues of when and how to use inlines,
references, operator overloading, inheritance and dynamic objects, as well as
advanced topics such as the proper use of templates, exceptions and multiple
inheritance. The entire effort is woven in a fabric that includes Eckel’s own
philosophy of object and program design. A must for every C++ developer’s
bookshelf, Thinking in C++ is the one C++ book you must have if you’re
doing serious development with C++.”
Richard Hale Shaw
Contributing Editor, PC Magazine


CIP DATA AVAILABLE
Vice President and Editorial Director,
ECS: Marcia J. Horton
Publisher: Alan R. Apt
Associate Editor: Toni Dianne Holm
Editorial Assistant: Patrick Lindner
Vice President and Director of Production
and Manufacturing, ESM: David W. Riccardi
Executive Managing Editor: Vince O’Brien
Managing Editor: Camille Trentacoste
Production Editor: Irwin Zucker
Director of Creative Services: Paul
Belfanti
Creative Director: Carole Anson
Cover and Interior Designer: Daniel
Will-Harris
Cover Illustrations: Tina Jensen
Manufacturing Manager: Trudy Pisciotti
Manufacturing Buyer: Lisa McDowell
Marketing Manager: Pamela Shaffer
 ©2004 MindView, Inc.
Published by Pearson Prentice Hall
Pearson Education, Inc.
Upper Saddle River, NJ 07458
All rights reserved. No part of this book may be
reproduced in any form or by any means, without permission in writing from the
publisher.
Pearson Prentice Hall® is a trademark of Pearson
Education, Inc.
The authors and publisher of this book have used their
best efforts in preparing this book. These efforts include the development,
research, and testing of the theories and programs to determine their
effectiveness. The authors and publisher make no warranty of any kind,
expressed or implied, with regard to these programs or the documentation
contained in this book. The authors and publisher shall not be liable in any
event for incidental or consequential damages in connection with, or arising
out of, the furnishing, performance, or use of these programs.
Printed in the United States of America
10
9 8 7 6 5 4 3 2 1
ISBN
0-13-035313-2
Pearson Education Ltd., London
Pearson Education Australia Pty. Ltd., Sydney
Pearson Education Singapore, Pte. Ltd.
Pearson Education North Asia Ltd., Hong
Kong
Pearson Education Canada, Inc., Toronto
Pearson Educación de Mexico, S.A. de C.V.
Pearson Education-Japan, Tokyo
Pearson Education Malaysia, Pte. Ltd.
Pearson Education, Inc., Upper Saddle
River, New Jersey
Dedication
To all those who have
worked tirelessly
to develop the C++ language
In Volume 1 of this book, you learned the fundamentals of C and
C++. In this volume, we look at more advanced features, with an eye towards
developing techniques and ideas that produce robust C++ programs.
We assume you are familiar with the material presented in
Volume 1.
Our goals in this book are to:
1. Present the material a simple step at a time, so the reader can
easily digest each concept before moving on.
2. Teach “practical programming” techniques that you can use on a
day-to-day basis.
3. Give you what we think is important for you to understand about
the language, rather than everything we know. We believe there is an
“information importance hierarchy,” and there are some facts that 95% of
programmers will never need to know, but that would just confuse people and add
to their perception of the complexity of the language. To take an example from
C, if you memorize the operator precedence table (we never did) you can write
clever code. But if you must think about it, it will confuse the
reader/maintainer of that code. So forget about precedence and use parentheses
when things aren’t clear. This same attitude will be taken with some
information in the C++ language, which is more important for compiler writers
than for programmers.
4. Keep each section focused enough so the lecture time—and the time
between exercise periods—is small. Not only does this keep the audience’ minds
more active and involved during a hands-on seminar, but it gives the reader a
greater sense of accomplishment.
5. We have endeavored not to use any particular vendor’s version of
C++. We have tested the code on all the implementations we could (described
later in this introduction), and when one implementation absolutely refused to
work because it doesn’t conform to the C++ Standard, we’ve flagged that fact in
the example (you’ll see the flags in the source code) to exclude it from the
build process.
6. Automate the compiling and testing of the code in the book. We
have discovered that code that isn’t compiled and tested is probably broken, so
in this volume we’ve instrumented the examples with test code. In addition, the
code that you can download from http://www.MindView.net has been extracted
directly from the text of the book using programs that automatically create
makefiles to compile and run the tests. This way we know that the code in the
book is correct.
Here is a brief description of the chapters contained in
this book:
Part 1: Building Stable Systems
1. Exception handling. Error handling has always been
a problem in programming. Even if you dutifully return error information or set
a flag, the function caller may simply ignore it. Exception handling is a
primary feature in C++ that solves this problem by allowing you to “throw” an
object out of your function when a critical error happens. You throw different
types of objects for different errors, and the function caller “catches” these
objects in separate error handling routines. If you throw an exception, it
cannot be ignored, so you can guarantee that something will happen in
response to your error. The decision to use exceptions affects code design in positive,
fundamental ways.
2. Defensive Programming. Many software problems can
be prevented. To program defensively is to craft code in such a way that bugs are
found and fixed early before they can damage in the field. Using assertions is
the single most important way to validate your code during development, while
at the same time leaving an executable documentation trail in your code that
reveals your thoughts while you wrote the code in the first place. Rigorously
test your code before you let out of your hands. An automated unit testing framework
is an indispensable tool for successful, everyday software development.
Part 2: The Standard C++ Library
3. Strings in Depth. The most common programming
activity is text processing. The C++ string class relieves the programmer from
memory management issues, while at the same time delivering a powerhouse of
text processing capability. C++ also supports the use of wide characters and
locales for internationalized applications.
4. Iostreams. One of the original C++ libraries—the
one that provides the essential I/O facility—is called iostreams. Iostreams is
intended to replace C’s stdio.h with an I/O library that is easier to
use, more flexible, and extensible—you can adapt it to work with your new
classes. This chapter teaches you how to make the best use of the existing
iostream library for standard I/O, file I/O, and in-memory formatting.
5. Templates in Depth. The distinguishing feature of
“modern C++” is the broad power of templates. Templates do more than just create
generic containers. They support development of robust, generic,
high-performance libraries. There is a lot to know about templates—they
constitute, as it were, a sub-language within the C++ language, and give the
programmer an impressive degree of control over the compilation process. It is
not an overstatement to say that templates have revolutionized C++ programming.
6. Generic Algorithms. Algorithms are at the
core of computing, and C++, through its template facility, supports an
impressive entourage of powerful, efficient, and easy-to-use generic
algorithms. The standard algorithms are also customizable through function
objects. This chapter looks at every algorithm in the library. (Chapters 6 and
7 cover that portion of the Standard C++ library commonly known as the Standard
Template Library, or STL.)
7. Generic Containers & Iterators. C++
supports all the common data structures in a type-safe manner. You never need
to worry about what such a container holds. The homogeneity of its objects is
guaranteed. Separating the traversing of a container from the container itself,
another accomplishment of templates, is made possible through iterators. This
ingenious arrangement allows a flexible application of algorithms to containers
using the simplest of designs.
Part 3: Special Topics
8. Runtime type identification. Runtime type
identification (RTTI) finds the exact type of an object when you only have a
pointer or reference to the base type. Normally, you’ll want to intentionally
ignore the exact type of an object and let the virtual function mechanism
implement the correct behavior for that type. But occasionally (like when
writing software tools such as debuggers) it is helpful to know the exact type
of an object—with this information, you can often perform a special-case
operation more efficiently. This chapter explains what RTTI is for and how to
use it.
9. Multiple inheritance. This sounds simple at first:
A new class is inherited from more than one existing class. However, you can
end up with ambiguities and multiple copies of base-class objects. That problem
is solved with virtual base classes, but the bigger issue remains: When do you
use it? Multiple inheritance is only essential when you need to manipulate an
object through more than one common base class. This chapter explains the
syntax for multiple inheritance and shows alternative approaches—in particular,
how templates solve one typical problem. Using multiple inheritance to repair a
“damaged” class interface is demonstrated as a valuable use of this feature.
10. Design Patterns. The most revolutionary advance
in programming since objects is the introduction of design patterns. A
design pattern is a language-independent codification of a solution to a common
programming problem, expressed in such a way that it can apply to many
contexts. Patterns such as Singleton, Factory Method, and Visitor now find
their way into daily discussions around the keyboard. This chapter shows how to
implement and use some of the more useful design patterns in C++.
11. Concurrent Programming. People have come to
expect responsive user interfaces that (seem to) process multiple tasks
simultaneously. Modern operating systems allow processes to have multiple
threads that share the process address space. Multithreaded programming
requires a different mindset, however, and comes with its own set of difficulties.
This chapter uses a freely available library (the ZThread library by Eric
Crahen of IBM) to show how to effectively manage multithreaded applications in
C++.
We have discovered that simple exercises are exceptionally
useful during a seminar to complete a student’s understanding. You’ll find a
set at the end of each chapter.
These are fairly simple, so they can be finished in a
reasonable amount of time in a classroom situation while the instructor
observes, making sure all the students are absorbing the material. Some
exercises are a bit more challenging to keep advanced students entertained.
They’re all designed to be solved in a short time and are only there to test
and polish your knowledge rather than present major challenges (presumably,
you’ll find those on your own—or more likely they’ll find you).
Solutions to exercises can be found in the electronic
document The C++ Annotated Solution Guide, Volume 2, available for a nominal
fee from http://www.MindView.net.
The source code for this book is copyrighted freeware,
distributed via the web site http://www.MindView.net. The copyright prevents
you from republishing the code in print media without permission.
In the starting directory where you unpack the code you will
find the following copyright notice:
//:! :CopyRight.txt
(c) 1995-2004 MindView, Inc. All rights reserved.
Source code file from the book
"Thinking in C++, 2nd Edition, Volume 2."
The following permissions are granted respecting the
computer source code, which is contained in this file:
Permission is granted to classroom educators to use
this
file as part of instructional materials prepared for
classes personally taught or supervised by the educator
who
uses this permission, provided that (a) the book
"Thinking
in C++" is cited as the origin on each page or
slide that
contains any part of this file, and (b) that you may
not
remove the above copyright legend nor this notice. This
permission extends to handouts, slides and other
presentation materials.
For purposes that do not include the publication or
presentation of educational or instructional materials,
permission also is granted to computer program
designers
and programmers, and to their employers and customers,
(a)
to use and modify this file for the purpose of creating
executable computer software, and (b) to distribute
resulting computer programs in binary form only,
provided
that (c) you may not remove the above copyright legend
nor
this notice from retained source code copies of this
file,
and (d) each copy distributed in binary form has
embedded
within it the above copyright notice.
Apart from the permissions granted above, the sole
authorized distribution point for additional copies of
this
file is http://www.MindView.net (and official mirror
sites)
where it is available, subject to the permissions and
restrictions set forth herein.
The following are clarifications of the limited
permissions
granted above:
1. You may not publish or distribute originals or
modified versions of the source code to the software
other
than in classroom situations described above.
2. You may not use the software file or portions
thereof in printed media without the express permission
of
the copyright owner.
The copyright owner and author or authors make no
representation about the suitability of this software
for
any purpose. It is provided "as is," and all
express,
implied, and statutory warranties and conditions of any
kind including any warranties and conditions of
merchantability, satisfactory quality, security,
fitness
for a particular purpose and non-infringement, are
disclaimed. The entire risk as to the quality and
performance of the software is with you.
In no event will the authors or the publisher be liable
for
any lost revenue, savings, or data, or for direct,
indirect, special, consequential, incidental, exemplary
or
punitive damages, however caused and regardless of any
related theory of liability, arising out of this
license
and/or the use of or inability to use this software,
even
if the vendors and/or the publisher have been advised
of
the possibility of such damages. Should the software
prove
defective, you assume the cost of all necessary
servicing,
repair, or correction.
If you think you have a correction for an error in the
software, please submit the correction to
www.MindView.net.
(Please use the same process for non-code errors found
in
the book.)
If you have a need for permissions not granted above,
please inquire of MindView, Inc., at www.MindView.net
or
send a request by email to Bruce@EckelObjects.com.
///:~
You may use the code in your projects and in the classroom
as long as the copyright notice is retained.
Your compiler may not support all the features discussed in
this book, especially if you don’t have the newest version of your compiler.
Implementing a language like C++ is a Herculean task, and you can expect that
the features will appear in pieces rather than all at once. But if you attempt
one of the examples in the book and get a lot of errors from the compiler, it’s
not necessarily a bug in the code or the compiler—it may simply not be
implemented in your particular compiler yet.
We used a number of compilers to test the code in this book,
in an attempt to ensure that our code conforms to the C++ Standard and will
work with as many compilers as possible. Unfortunately, not all compilers
conform to the C++ Standard, and so we have a way of excluding certain files
from building with those compilers. These exclusions are reflected in the
makefiles automatically created for the package of code for this book that you
can download from www.MindView.net. You can see the exclusion tags embedded in
the comments at the beginning of each listing, so you will know whether to
expect a particular compiler to work on that code (in a few cases, the compiler
will actually compile the code but the execution behavior is wrong, and we
exclude those as well).
Here are the tags and the compilers that they exclude from
the build:
· {-dmc} Walter Bright’s Digital Mars compiler for Windows,
freely downloadable at www.DigitalMars.com. This compiler is very conformant
and so you will see almost none of these tags throughout the book.
· {-g++} The free Gnu C++ 3.3.1, which comes pre-installed
in most Linux packages and Macintosh OSX. It is also part of Cygwin for Windows
(see below). It is available for most other platforms from gcc.gnu.org.
· {-msc} Microsoft Version 7 with Visual C++ .NET (only
comes with Visual Studio .NET; not freely downloadable).
· {-bor} Borland C++ Version 6 (not the free download; this
one is more up to date).
· {-edg} Edison Design Group (EDG) C++. This is the
benchmark compiler for standards conformance. This tag occurs only because of
library issues, and because we were using a complimentary copy of the EDG front
end with a complimentary library implementation from Dinkumware, Ltd. No
compile errors occurred because of the compiler alone.
· {-mwcc} Metrowerks Code Warrior for Macintosh OS X. Note
that OS X comes with Gnu C++ pre-installed, as well.
If you download and unpack the code package for this book
from www.MindView.net, you’ll find the makefiles to build the code for the
above compilers. We used the freely-available GNU-make, which comes with
Linux, Cygwin (a free Unix shell that runs on top of Windows; see
www.Cygwin.com), or can be installed on your platform—see
www.gnu.org/software/make. (Other makes may or may not work with these
files, but are not supported.) Once you install make, if you type make
at the command line you’ll get instructions on how to build the book’s code for
the above compilers.
Note that the placement of these tags on the files in this
book indicates the state of the particular version of the compiler at the time
we tried it. It’s possible and likely that the compiler vendor has improved the
compiler since the publication of this book. It’s also possible that while
building the book with so many compilers, we may have misconfigured a
particular compiler that would otherwise have compiled the code correctly. Thus,
you should try the code yourself on your compiler, and also check the code
downloaded from www.MindView.net to see what is current.
Throughout this book, when referring to conformance to the
ANSI/ISO C standard, we will be referring to the 1989 standard, and will
generally just say ‘C.’ Only if it is necessary to distinguish between
Standard 1989 C and older, pre-Standard versions of C will we make the
distinction. We do not reference C99 in this book.
The ANSI/ISO C++ Committee long ago finished working on the first C++ Standard, commonly known as C++98. We will use the term Standard
C++ to refer to this standardized language. If we simply refer to C++,
assume we mean “Standard C++.” The C++ Standards Committee continues to address
issues important to the C++ community that will become C++0x, a future C++
Standard not likely to be available for many years.
Seminars, CD–ROMs &
consulting
Bruce Eckel’s company, MindView, Inc., provides public
hands-on training seminars based on the material in this book, and also for
advanced topics. Selected material from each chapter represents a lesson, which
is followed by a monitored exercise period so each student receives personal
attention. We also provide on-site training, consulting, mentoring, and design
& code walkthroughs. Information and sign-up forms for upcoming seminars
and other contact information is found at http://www.MindView.net.
No matter how many tricks writers use to detect errors, some
always creep in and these often leap off the page for a fresh reader. If you
discover anything you believe to be an error, please use the feedback system
built into the electronic version of this book, which you will find at http://www.MindView.net.
Your help is appreciated.
The cover artwork was painted by Larry O’Brien’s wife, Tina
Jensen (yes, the Larry O’Brien who was the editor of Software Development
Magazine for so many years). Not only are the pictures beautiful, they are also
excellent suggestions of polymorphism. The idea for using these images came
from Daniel Will-Harris, the cover designer (www.Will-Harris.com), working with
Bruce.
Volume 2 of this book languished in a half-completed state
for a long time while Bruce got distracted with other things, notably Java,
Design Patterns and especially Python (see www.Python.org). If Chuck hadn’t
been willing (foolishly, he has sometimes thought) to finish the other half and
bring things up-to-date, this book almost certainly wouldn’t have happened.
There aren’t that many people whom Bruce would have felt comfortable entrusting
this book to. Chuck’s penchant for precision, correctness and clear explanation
is what has made this book as good as it is.
Jamie King acted as an intern under Chuck’s direction during
the completion of this book. He was an essential part of making sure the book
got finished, not only by providing feedback for Chuck, but especially because
of his relentless questioning and picking of every single possible nit that he
didn’t completely understand. If your questions are answered by this book, it’s
probably because Jamie asked them first. Jamie also enhanced a number of the
sample programs and created many of the exercises at the end of each chapter.
Scott Baker, another of Chuck’s interns funded by MindView, Inc., helped with
the exercises for Chapter 3.
Eric Crahen of IBM was instrumental in the completion of
Chapter 11 (Concurrency). When we were looking for a threads package, we sought
out one that was intuitive and easy to use, while being sufficiently robust to
do the job. With Eric we got that and then some—he was extremely cooperative
and has used our feedback to enhance his library, while we have benefited from
his insights as well.
We are grateful to Pete Becker for being our technical
editor. Few people are as articulate and discriminating as Pete, not to mention
as expert in C++ and software development in general. We also thank Bjorn
Karlsson for his gracious and timely technical assistance as he reviewed the
entire manuscript with short notice.
Walter Bright made Herculean efforts to make sure that his
Digital Mars C++ compiler would compile the examples in this book. He makes the
compiler available for free downloads at http://www.DigitalMars.com. Thanks, Walter!
The ideas and understanding in this book have come from many
other sources, as well: friends like Andrea Provaglio, Dan Saks, Scott Meyers,
Charles Petzold, and Michael Wilk; pioneers of the language like Bjarne
Stroustrup, Andrew Koenig, and Rob Murray; members of the C++ Standards
Committee like Nathan Myers (who was particularly helpful and generous with his
insights), Herb Sutter, PJ Plauger, Kevlin Henney, David Abrahams, Tom Plum,
Reg Charney, Tom Penello, Sam Druker, Uwe Steinmueller, John Spicer, Steve
Adamczyk, and Daveed Vandevoorde; people who have spoken in the C++ track at
the Software Development Conference (which Bruce created and developed, and
Chuck spoke in); Colleagues of Chuck like Michael Seaver, Huston Franklin,
David Wagstaff, and often students in seminars, who ask the questions we need
to hear to make the material clearer.
The book design, typeface selection, cover design, and cover
photo were created by Bruce’s friend Daniel Will-Harris, noted author and
designer, who used to play with rub-on letters in junior high school while he
awaited the invention of computers and desktop publishing. However, we produced
the camera-ready pages ourselves, so the typesetting errors are ours. Microsoft®
Word XP was used to write the book and to create camera-ready pages. The body
typeface is Verdana and the headlines are in Verdana. The code type face is
Courier New.
We also wish to thank the
generous professionals at the Edison Design Group and Dinkumware, Ltd., for
giving us complimentary copies of their compiler and library (respectively).
Without their expert assistance, graciously given, some of the examples in this
book could not have been tested. We also wish to thank Howard Hinnant and the
folks at Metrowerks for a copy of their compiler, and Sandy Smith and the folks
at SlickEdit for keeping Chuck supplied with a world-class editing environment
for so many years. Greg Comeau also provided a copy of his successful EDG-based
compiler, Comeau C++.
A special thanks to all
our teachers, and all our students (who are our teachers as well).
Evan Cofsky
(Evan@TheUnixMan.com) provided all sorts of assistance on the server as well as
development of programs in his now-favorite language, Python. Sharlynn Cobaugh
and Paula Steuer were instrumental assistants, preventing Bruce from being
washed away in a flood of projects.
Bruce’s sweetie Dawn McGee provided much-appreciated
inspiration and enthusiasm during this project. The supporting cast of friends
includes, but is not limited to: Mark Western, Gen Kiyooka, Kraig Brockschmidt,
Zack Urlocker, Andrew Binstock, Neil Rubenking, Steve Sinofsky, JD Hildebrandt,
Brian McElhinney, Brinkley Barr, Bill Gates at Midnight Engineering Magazine,
Larry Constantine & Lucy Lockwood, Tom Keffer, Greg Perry, Dan Putterman,
Christi Westphal, Gene Wang, Dave Mayer, David Intersimone, Claire Sawyers, The
Italians (Andrea Provaglio, Laura Fallai, Marco Cantu, Corrado, Ilsa and
Christina Giustozzi), Chris & Laura Strand, The Almquists, Brad Jerbic,
John Kruth & Marilyn Cvitanic, Holly Payne (yes, the famous novelist!),
Mark Mabry, The Robbins Families, The Moelter Families (& the McMillans),
The Wilks, Dave Stoner, Laurie Adams, The Cranstons, Larry Fogg, Mike &
Karen Sequeira, Gary Entsminger & Allison Brody, Chester Andersen, Joe
Lordi, Dave & Brenda Bartlett, The Rentschlers, The Sudeks, Lynn &
Todd, and their families. And of course, Mom & Dad, Sandy, James &
Natalie, Kim& Jared, Isaac, and Abbi.
Software engineers spend about as much time validating code as
they do creating it. Quality is or should be the goal of every programmer, and
one can go a long way towards that goal by eliminating problems before they happen.
In addition, software systems should be robust enough to behave reasonably in
the presence of unforeseen environmental problems.
Exceptions were introduced into C++ to support sophisticated
error handling without cluttering code with an inordinate amount of
error-handling logic. Chapter 1 shows how proper use of exceptions can make for
well-behaved software, and also introduces the design principles that underlie
exception-safe code. In Chapter 2 we cover unit testing and debugging
techniques intended to maximize code quality long before it’s released. The use
of assertions to express and enforce program invariants is a sure sign of an
experienced software engineer. We also introduce a simple framework to support
unit testing.
Improving error recovery is one of the most powerful ways you can increase the robustness of your code.
Unfortunately, it’s almost accepted practice to ignore error
conditions, as if we’re in a state of denial about errors. One reason, no
doubt, is the tediousness and code bloat of checking for many errors. For
example, printf( ) returns the number of characters that were
successfully printed, but virtually no one checks this value. The proliferation
of code alone would be disgusting, not to mention the difficulty it would add
in reading the code.
The problem with C’s approach to error handling could be
thought of as coupling—the user of a function must tie the error-handling code
so closely to that function that it becomes too ungainly and awkward to use.
One of the major features in C++ is exception handling,
which is a better way of thinking about and handling errors. With exception handling:
1. Error-handling code is not nearly so tedious to write, and it
doesn’t become mixed up with your “normal” code. You write the code you want
to happen; later in a separate section you write the code to cope with the
problems. If you make multiple calls to a function, you handle the errors from
that function once, in one place.
2. Errors cannot be ignored. If a function needs to send an error
message to the caller of that function, it “throws” an object representing that
error out of the function. If the caller doesn’t “catch” the error and handle
it, it goes to the next enclosing dynamic scope, and so on until the error is
either caught or the program terminates because there was no handler to catch
that type of exception.
This chapter examines C’s approach to error handling (such as it is), discusses why it did not work well for C, and explains why it won’t work at all
for C++. This chapter also covers try, throw, and catch,
the C++ keywords that support exception handling.
In most of the examples in these volumes, we use assert( )
as it was intended: for debugging during development with code that can be
disabled with #define NDEBUG for the shipping product. Runtime
error checking uses the require.h functions (assure( ) and require( ))
developed in Chapter 9 in Volume 1 and repeated here in Appendix B. These
functions are a convenient way to say, “There’s a problem here you’ll probably
want to handle with some more sophisticated code, but you don’t need to be
distracted by it in this example.” The require.h functions might be
enough for small programs, but for complicated products you’ll want to write
more sophisticated error-handling code.
Error handling is quite straightforward when you know
exactly what to do, because you have all the necessary information in that
context. You can just handle the error at that point.
The problem occurs when you don’t have enough
information in that context, and you need to pass the error information into a
different context where that information does exist. In C, you can handle this
situation using three approaches:
1. Return error information from the function or, if the return
value cannot be used this way, set a global error condition flag. (Standard C
provides errno and perror( ) to support this.) As mentioned
earlier, the programmer is likely to ignore the error information because
tedious and obfuscating error checking must occur with each function call. In
addition, returning from a function that hits an exceptional condition might
not make sense.
2. Use the little-known Standard C library signal-handling system,
implemented with the signal( ) function (to determine what happens
when the event occurs) and raise( ) (to generate an event). Again,
this approach involves high coupling because it requires the user of any
library that generates signals to understand and install the appropriate
signal-handling mechanism. In large projects the signal numbers from different
libraries might clash.
3. Use the nonlocal goto functions in the Standard C library:
setjmp( ) and longjmp( ). With setjmp( )
you save a known good state in the program, and if you get into trouble, longjmp( )
will restore that state. Again, there is high coupling between the place where
the state is stored and the place where the error occurs.
When considering error-handling schemes with C++, there’s an
additional critical problem: The C techniques of signals and setjmp( )/longjmp( )
do not call destructors, so objects aren’t properly cleaned up. (In fact, if longjmp( )
jumps past the end of a scope where destructors should be called, the behavior
of the program is undefined.) This makes it virtually impossible to effectively
recover from an exceptional condition because you’ll always leave objects
behind that haven’t been cleaned up and that can no longer be accessed. The
following example demonstrates this with setjmp/longjmp:
//: C01:Nonlocal.cpp
// setjmp() & longjmp().
#include <iostream>
#include <csetjmp>
using namespace std;
class Rainbow {
public:
Rainbow() { cout << "Rainbow()"
<< endl; }
~Rainbow() { cout << "~Rainbow()"
<< endl; }
};
jmp_buf kansas;
void oz() {
Rainbow rb;
for(int i = 0; i < 3; i++)
cout << "there's no place like
home" << endl;
longjmp(kansas, 47);
}
int main() {
if(setjmp(kansas) == 0) {
cout << "tornado, witch,
munchkins..." << endl;
oz();
} else {
cout << "Auntie Em! "
<< "I had the strangest
dream..."
<< endl;
}
} ///:~
The setjmp( ) function is odd because if you
call it directly, it stores all the relevant information about the current
processor state (such as the contents of the instruction pointer and runtime
stack pointer) in the jmp_buf and returns zero. In this case it behaves
like an ordinary function. However, if you call longjmp( ) using
the same jmp_buf, it’s as if you’re returning from setjmp( )
again—you pop right out the back end of the setjmp( ). This time,
the value returned is the second argument to longjmp( ), so you can
detect that you’re actually coming back from a longjmp( ). You can
imagine that with many different jmp_bufs, you could pop around to many
different places in the program. The difference between a local goto
(with a label) and this nonlocal goto is that you can return to any
pre-determined location higher up in the runtime stack with setjmp( )/longjmp( )
(wherever you’ve placed a call to setjmp( )).
The problem in C++ is that longjmp( ) doesn’t
respect objects; in particular it doesn’t call destructors when it jumps out of
a scope. Destructor
calls are essential, so this approach won’t work with C++. In fact, the C++
Standard states that branching into a scope with goto (effectively
bypassing constructor calls), or branching out of a scope with longjmp( )
where an object on the stack has a destructor, constitutes undefined behavior.
If you encounter an exceptional situation in your code—that
is, if you don’t have enough information in the current context to decide what
to do—you can send information about the error into a larger context by
creating an object that contains that information and “throwing” it out of your
current context. This is called throwing an exception. Here’s what it
looks like:
//: C01:MyError.cpp {RunByHand}
class MyError {
const char* const data;
public:
MyError(const char* const msg = 0) : data(msg) {}
};
void f() {
// Here we "throw" an exception object:
throw MyError("something bad happened");
}
int main() {
// As you’ll see shortly, we’ll want a "try
block" here:
f();
} ///:~
MyError is an ordinary class, which in this case
takes a char* as a constructor argument. You can use any type when you
throw (including built-in types), but usually you’ll create special classes for
throwing exceptions.
The keyword throw causes a number of relatively
magical things to happen. First, it creates a copy of the object you’re
throwing and, in effect, “returns” it from the function containing the throw
expression, even though that object type isn’t normally what the function is
designed to return. A naive way to think about exception handling is as an
alternate return mechanism (although you’ll find you can get into trouble if
you take that analogy too far). You can also exit from ordinary scopes by
throwing an exception. In any case, a value is returned, and the function or
scope exits.
Any similarity to a return statement ends there
because where you return is some place completely different from where a
normal function call returns. (You end up in an appropriate part of the
code—called an exception handler—that might be far removed from where the
exception was thrown.) In addition, any local objects created by the time the
exception occurs are destroyed. This automatic cleanup of local objects is
often called “stack unwinding.”
In addition, you can throw as many different types of
objects as you want. Typically, you’ll throw a different type for each category
of error. The idea is to store the information in the object and in the name
of its class so that someone in a calling context can figure out what to do
with your exception.
As mentioned earlier, one of the advantages of C++ exception
handling is that you can concentrate on the problem you’re trying to solve in
one place, and then deal with the errors from that code in another place.
If you’re inside a function and you throw an exception (or a
called function throws an exception), the function exits because of the thrown
exception. If you don’t want a throw to leave a function, you can set up
a special block within the function where you try to solve your actual
programming problem (and potentially generate exceptions). This block is called
the try block because you try your various function calls there.
The try block is an ordinary scope, preceded by the keyword try:
try {
// Code that may generate exceptions
}
If you check for errors by carefully examining the return
codes from the functions you use, you need to surround every function call with
setup and test code, even if you call the same function several times. With
exception handling, you put everything in a try block and handle
exceptions after the try block. Thus, your code is a lot easier to write
and to read because the goal of the code is not confused with the error handling.
Of course, the thrown exception must end up some place. This
place is the exception handler, and you need one exception handler for every exception type you want to catch. However, polymorphism also works for
exceptions, so one exception handler can work with an exception type and
classes derived from that type.
Exception handlers immediately follow the try block
and are denoted by the keyword catch:
try {
// Code that may generate exceptions
} catch(type1 id1) {
// Handle exceptions of type1
} catch(type2 id2) {
// Handle exceptions of type2
} catch(type3 id3)
// Etc...
} catch(typeN idN)
// Handle exceptions of typeN
}
// Normal execution resumes here...
The syntax of a catch clause resembles functions that
take a single argument. The identifier (id1, id2, and so on) can
be used inside the handler, just like a function argument, although you can
omit the identifier if it’s not needed in the handler. The exception type
usually gives you enough information to deal with it.
The handlers must appear directly after the try
block. If an exception is thrown, the exception-handling mechanism goes hunting
for the first handler with an argument that matches the type of the exception.
It then enters that catch clause, and the exception is considered
handled. (The search for handlers stops once the catch clause is found.)
Only the matching catch clause executes; control then resumes after the
last handler associated with that try block.
Notice that, within the try block, a number of
different function calls might generate the same type of exception, but you
need only one handler.
To illustrate try and catch, the following
variation of Nonlocal.cpp replaces the call to setjmp( )
with a try block and replaces the call to longjmp( ) with a throw
statement:
//: C01:Nonlocal2.cpp
// Illustrates exceptions.
#include <iostream>
using namespace std;
class Rainbow {
public:
Rainbow() { cout << "Rainbow()"
<< endl; }
~Rainbow() { cout << "~Rainbow()"
<< endl; }
};
void oz() {
Rainbow rb;
for(int i = 0; i < 3; i++)
cout << "there's no place like
home" << endl;
throw 47;
}
int main() {
try {
cout << "tornado, witch, munchkins..."
<< endl;
oz();
} catch(int) {
cout << "Auntie Em! I had the strangest
dream..."
<< endl;
}
} ///:~
When the throw statement in oz( )
executes, program control backtracks until it finds the catch clause
that takes an int parameter. Execution resumes with the body of that catch
clause. The most important difference between this program and Nonlocal.cpp
is that the destructor for the object rb is called when the throw
statement causes execution to leave the function oz( ).
There are two basic models in exception-handling theory: termination and resumption. In termination (which is what C++
supports), you assume the error is so critical that there’s no way to
automatically resume execution at the point where the exception occurred. In
other words, whoever threw the exception decided there was no way to salvage
the situation, and they don’t want to come back.
The alternative error-handling model is called resumption,
first introduced with the PL/I language in the 1960s. Using
resumption semantics means that the exception handler is expected to do
something to rectify the situation, and then the faulting code is automatically
retried, presuming success the second time. If you want resumption in C++, you
must explicitly transfer execution back to the code where the error occurred,
usually by repeating the function call that sent you there in the first place.
It is not unusual to place your try block inside a while loop
that keeps reentering the try block until the result is satisfactory.
Historically, programmers using operating systems that
supported resumptive exception handling eventually ended up using
termination-like code and skipping resumption. Although resumption sounds
attractive at first, it seems it isn’t quite so useful in practice. One reason
may be the distance that can occur between the exception and its handler. It is
one thing to terminate to a handler that’s far away, but to jump to that
handler and then back again may be too conceptually difficult for large systems
where the exception is generated from many points.
When an exception is thrown, the exception-handling system
looks through the “nearest” handlers in the order they appear in the source
code. When it finds a match, the exception is considered handled and no further
searching occurs.
Matching an exception doesn’t require a perfect correlation
between the exception and its handler. An object or reference to a
derived-class object will match a handler for the base class. (However, if the
handler is for an object rather than a reference, the exception object is
“sliced”—truncated to the base type—as it is passed to the handler. This does no damage, but loses all the derived-type information.) For this reason, as
well as to avoid making yet another copy of the exception object, it is always better to catch an exception by reference instead of by value. If
a pointer is thrown, the usual standard pointer conversions are used to match
the exception. However, no automatic type conversions are used to convert from one exception type to another in the process of matching. For example:
//: C01:Autoexcp.cpp
// No matching conversions.
#include <iostream>
using namespace std;
class Except1 {};
class Except2 {
public:
Except2(const Except1&) {}
};
void f() { throw Except1(); }
int main() {
try { f();
} catch(Except2&) {
cout << "inside catch(Except2)"
<< endl;
} catch(Except1&) {
cout << "inside catch(Except1)"
<< endl;
}
} ///:~
Even though you might think the first handler could be matched
by converting an Except1 object into an Except2 using the converting
constructor, the system will not perform such a conversion during exception
handling, and you’ll end up at the Except1 handler.
The following example shows how a base-class handler can
catch a derived-class exception:
//: C01:Basexcpt.cpp
// Exception hierarchies.
#include <iostream>
using namespace std;
class X {
public:
class Trouble {};
class Small : public Trouble {};
class Big : public Trouble {};
void f() { throw Big(); }
};
int main() {
X x;
try {
x.f();
} catch(X::Trouble&) {
cout << "caught Trouble" <<
endl;
// Hidden by previous handler:
} catch(X::Small&) {
cout << "caught Small Trouble"
<< endl;
} catch(X::Big&) {
cout << "caught Big Trouble"
<< endl;
}
} ///:~
Here, the exception-handling mechanism will always match a Trouble
object, or anything that is a Trouble (through public
inheritance), to
the first handler. That means the second and third handlers are never called
because the first one captures them all. It makes more sense to catch the
derived types first and put the base type at the end to catch anything less
specific.
Notice that these examples catch exceptions by reference,
although for these classes it isn’t important because there are no additional
members in the derived classes, and there are no argument identifiers in the
handlers anyway. You’ll usually want to use reference arguments rather than
value arguments in your handlers to avoid slicing off information.
Sometimes you want to create a handler that catches any
type of exception. You do this using the ellipsis in the argument list:
catch(...) {
cout << "an exception was thrown"
<< endl;
}
Because an ellipsis catches any exception, you’ll want to
put it at the end of your list of handlers to avoid pre-empting any that
follow it.
The ellipsis gives you no possibility to have an argument, so
you can’t know anything about the exception or its type. It’s a “catchall.”
Such a catch clause is often used to clean up some resources and then
rethrow the exception.
You usually want to rethrow an exception when you have some
resource that needs to be released, such as a network connection or heap memory
that needs to be deallocated. (See the section “Resource Management” later in
this chapter for more detail). If an exception occurs, you don’t necessarily
care what error caused the exception—you just want to close the connection you
opened previously. After that, you’ll want to let some other context closer to
the user (that is, higher up in the call chain) handle the exception. In this
case the ellipsis specification is just what you want. You want to catch any
exception, clean up your resource, and then rethrow the exception for handling
elsewhere. You rethrow an exception by using throw with no argument
inside a handler:
catch(...) {
cout << "an exception was
thrown" << endl;
// Deallocate your resource here,
and then rethrow
throw;
}
Any further catch clauses for the same try
block are still ignored—the throw causes the exception to go to the
exception handlers in the next-higher context. In addition, everything about
the exception object is preserved, so the handler at the higher context that
catches the specific exception type can extract any information the object may
contain.
As we explained in the beginning of this chapter, exception
handling is considered better than the traditional return-an-error-code
technique because exceptions can’t be ignored, and because the error handling
logic is separated from the problem at hand. If none of the exception handlers following a particular try block matches an exception, that exception
moves to the next-higher context, that is, the function or try block
surrounding the try block that did not catch the exception. (The
location of this try block is not always obvious at first glance, since
it’s higher up in the call chain.) This process continues until, at some level,
a handler matches the exception. At that point, the exception is considered “caught,”
and no further searching occurs.
The terminate( ) function
If no handler at any level catches the exception, the
special library function terminate( ) (declared in the <exception>
header) is automatically called. By default, terminate( ) calls the
Standard C library function abort( ) , which abruptly exits the
program. On Unix systems, abort( ) also causes a core dump. When abort( )
is called, no calls to normal program termination functions occur, which means
that destructors for global and static objects do not execute. The terminate( )
function also executes if a destructor for a local object throws an exception while
the stack is unwinding (interrupting the exception that was in progress) or if
a global or static object’s constructor or destructor throws an exception. (In
general, do not allow a destructor to throw an exception.)
The set_terminate( ) function
You can install your own terminate( ) function
using the standard set_terminate( ) function, which returns a
pointer to the terminate( ) function you are replacing (which will
be the default library version the first time you call it), so you can restore
it later if you want. Your custom terminate( ) must take no
arguments and have a void return value. In addition, any terminate( )
handler you install must not return or throw an exception, but instead must
execute some sort of program-termination logic. If terminate( ) is
called, the problem is unrecoverable.
The following example shows the use of set_terminate( ).
Here, the return value is saved and restored so that the terminate( )
function can be used to help isolate the section of code where the uncaught
exception occurs:
//: C01:Terminator.cpp
// Use of set_terminate(). Also shows uncaught
exceptions.
#include <exception>
#include <iostream>
using namespace std;
void terminator() {
cout << "I'll be back!" <<
endl;
exit(0);
}
void (*old_terminate)() = set_terminate(terminator);
class Botch {
public:
class Fruit {};
void f() {
cout << "Botch::f()" << endl;
throw Fruit();
}
~Botch() { throw 'c'; }
};
int main() {
try {
Botch b;
b.f();
} catch(...) {
cout << "inside catch(...)"
<< endl;
}
} ///:~
The definition of old_terminate looks a bit confusing
at first: it not only creates a pointer to a function, but it initializes that
pointer to the return value of set_terminate( ). Even though you
might be familiar with seeing a semicolon right after a pointer-to-function
declaration, here it’s just another kind of variable and can be initialized
when it is defined.
The class Botch not only throws an exception inside f( ),
but also in its destructor. This causes a call to terminate( ), as
you can see in main( ). Even though the exception handler says catch(...),
which would seem to catch everything and leave no cause for terminate( )
to be called, terminate( ) is called anyway. In the process of
cleaning up the objects on the stack to handle one exception, the Botch
destructor is called, and that generates a second exception, forcing a call to terminate( ).
Thus, a destructor that throws an exception or causes one to be thrown is
usually a sign of poor design or sloppy coding.
Part of the magic of exception handling is that you can pop from normal program flow into the appropriate exception handler. Doing so
wouldn’t be useful, however, if things weren’t cleaned up properly as the
exception was thrown. C++ exception handling guarantees that as you leave a
scope, all objects in that scope whose constructors have been completed
will have their destructors called.
Here’s an example that demonstrates that constructors that aren’t completed don’t have the associated destructors called. It also shows
what happens when an exception is thrown in the middle of the creation of an
array of objects:
//: C01:Cleanup.cpp
// Exceptions clean up complete objects only.
#include <iostream>
using namespace std;
class Trace {
static int counter;
int objid;
public:
Trace() {
objid = counter++;
cout << "constructing Trace #"
<< objid << endl;
if(objid == 3) throw 3;
}
~Trace() {
cout << "destructing Trace #"
<< objid << endl;
}
};
int Trace::counter = 0;
int main() {
try {
Trace n1;
// Throws exception:
Trace array[5];
Trace n2; // Won't get here.
} catch(int i) {
cout << "caught " << i
<< endl;
}
} ///:~
The class Trace keeps track of objects so that you
can trace program progress. It keeps a count of the number of objects created
with a static data member counter and tracks the number of the
particular object with objid.
The main program creates a single object, n1 (objid
0), and then attempts to create an array of five Trace objects, but an
exception is thrown before the fourth object (#3) is fully created. The object n2
is never created. You can see the results in the output of the program:
constructing Trace #0
constructing Trace #1
constructing Trace #2
constructing Trace #3
destructing Trace #2
destructing Trace #1
destructing Trace #0
caught 3
Three array elements are successfully created, but in the
middle of the constructor for the fourth element, an exception is thrown.
Because the fourth construction in main( ) (for array[2])
never completes, only the destructors for objects array[1] and array[0]
are called. Finally, object n1 is destroyed, but not object n2,
because it was never created.
When writing code with exceptions, it’s particularly
important that you always ask, “If an exception occurs, will my resources be
properly cleaned up?” Most of the time you’re fairly safe, but in constructors
there’s a particular problem: if an exception is thrown before a constructor is
completed, the associated destructor will not be called for that object. Thus,
you must be especially diligent while writing your constructor.
The difficulty is in allocating resources in constructors.
If an exception occurs in the constructor, the destructor doesn’t get a chance
to deallocate the resource. This problem occurs most often with “naked”
pointers. For example:
//: C01:Rawp.cpp
// Naked pointers.
#include <iostream>
#include <cstddef>
using namespace std;
class Cat {
public:
Cat() { cout << "Cat()" <<
endl; }
~Cat() { cout << "~Cat()" <<
endl; }
};
class Dog {
public:
void* operator new(size_t sz) {
cout << "allocating a Dog" <<
endl;
throw 47;
}
void operator delete(void* p) {
cout << "deallocating a Dog"
<< endl;
::operator delete(p);
}
};
class UseResources {
Cat* bp;
Dog* op;
public:
UseResources(int count = 1) {
cout << "UseResources()" <<
endl;
bp = new Cat[count];
op = new Dog;
}
~UseResources() {
cout << "~UseResources()" <<
endl;
delete [] bp; // Array delete
delete op;
}
};
int main() {
try {
UseResources ur(3);
} catch(int) {
cout << "inside handler" <<
endl;
}
} ///:~
The output is
UseResources()
Cat()
Cat()
Cat()
allocating a Dog
inside handler
The UseResources constructor is entered, and the Cat
constructor is successfully completed for the three array objects. However,
inside Dog::operator new( ), an exception is thrown (to simulate an
out-of-memory error). Suddenly, you end up inside the handler, without
the UseResources destructor being called. This is correct because the UseResources
constructor was unable to finish, but it also means the Cat objects that
were successfully created on the heap were never destroyed.
To prevent such resource leaks, you must guard against these
“raw” resource allocations in one of two ways:
· You can catch exceptions inside the constructor and then release
the resource.
· You can place the allocations inside an object’s constructor, and
you can place the deallocations inside an object’s destructor.
Using the latter approach, each allocation becomes atomic, by virtue of being part of the lifetime of a local object, and if it fails, the
other resource allocation objects are properly cleaned up during stack
unwinding. This technique is called Resource Acquisition Is Initialization (RAII for short) because it equates resource control with object lifetime.
Using templates is an excellent way to modify the previous example to achieve
this:
//: C01:Wrapped.cpp
// Safe, atomic pointers.
#include <iostream>
#include <cstddef>
using namespace std;
// Simplified. Yours may have other arguments.
template<class T, int sz = 1> class PWrap {
T* ptr;
public:
class RangeError {}; // Exception class
PWrap() {
ptr = new T[sz];
cout << "PWrap constructor"
<< endl;
}
~PWrap() {
delete[] ptr;
cout << "PWrap destructor" <<
endl;
}
T& operator[](int i) throw(RangeError) {
if(i >= 0 && i < sz) return ptr[i];
throw RangeError();
}
};
class Cat {
public:
Cat() { cout << "Cat()" <<
endl; }
~Cat() { cout << "~Cat()" <<
endl; }
void g() {}
};
class Dog {
public:
void* operator new[](size_t) {
cout << "Allocating a Dog" <<
endl;
throw 47;
}
void operator delete[](void* p) {
cout << "Deallocating a Dog"
<< endl;
::operator delete[](p);
}
};
class UseResources {
PWrap<Cat, 3> cats;
PWrap<Dog> dog;
public:
UseResources() { cout <<
"UseResources()" << endl; }
~UseResources() { cout <<
"~UseResources()" << endl; }
void f() { cats[1].g(); }
};
int main() {
try {
UseResources ur;
} catch(int) {
cout << "inside handler" <<
endl;
} catch(...) {
cout << "inside catch(...)"
<< endl;
}
} ///:~
The difference is the use of the template to wrap the
pointers and make them into objects. The constructors for these objects are
called before the body of the UseResources constructor, and any
of these constructors that complete before an exception is thrown will have
their associated destructors called during stack unwinding.
The PWrap template shows a more typical use of
exceptions than you’ve seen so far: A nested class called RangeError is
created to use in operator[ ] if its argument is out of range.
Because operator[ ] returns a reference, it cannot return zero. (There are no null references.) This is a true exceptional condition—you don’t know
what to do in the current context and you can’t return an improbable value. In
this example, RangeError is
simple and assumes all the necessary information is in the class name, but you
might also want to add a member that contains the value of the index, if that
is useful.
Now the output is
Cat()
Cat()
Cat()
PWrap constructor
allocating a Dog
~Cat()
~Cat()
~Cat()
PWrap destructor
inside handler
Again, the storage allocation for Dog throws an
exception, but this time the array of Cat objects is properly cleaned
up, so there is no memory leak.
Since dynamic memory is the most frequent resource used in a
typical C++ program, the standard provides an RAII wrapper for pointers to heap
memory that automatically frees the memory. The auto_ptr class template, defined in the <memory> header, has a constructor that takes a
pointer to its generic type (whatever you use in your code). The auto_ptr
class template also overloads the pointer operators * and ->
to forward these operations to the original pointer the auto_ptr object
is holding. So you can use the auto_ptr object as if it were a raw pointer.
Here’s how it works:
//: C01:Auto_ptr.cpp
// Illustrates the RAII nature of auto_ptr.
#include <memory>
#include <iostream>
#include <cstddef>
using namespace std;
class TraceHeap {
int i;
public:
static void* operator new(size_t siz) {
void* p = ::operator new(siz);
cout << "Allocating TraceHeap object on
the heap "
<< "at address " << p
<< endl;
return p;
}
static void operator delete(void* p) {
cout << "Deleting TraceHeap object at
address "
<< p << endl;
::operator delete(p);
}
TraceHeap(int i) : i(i) {}
int getVal() const { return i; }
};
int main() {
auto_ptr<TraceHeap> pMyObject(new
TraceHeap(5));
cout << pMyObject->getVal() << endl;
// Prints 5
} ///:~
The TraceHeap class overloads the operator new
and operator delete so you can see exactly what’s happening. Notice
that, like any other class template, you specify the type you’re going to use
in a template parameter. You don’t say TraceHeap*, however—auto_ptr
already knows that it will be storing a pointer to your type. The second line
of main( ) verifies that auto_ptr’s operator->( )
function applies the indirection to the original, underlying pointer. Most
important, even though we didn’t explicitly delete the original pointer, pMyObject’s
destructor deletes the original pointer during stack unwinding, as the
following output verifies:
Allocating TraceHeap object on the heap at address
8930040
5
Deleting TraceHeap object at
address 8930040
The auto_ptr class template is also handy for pointer
data members. Since class objects contained by value are always destructed, auto_ptr
members always delete the raw pointer they wrap when the containing object is
destructed.
Since constructors can routinely throw exceptions, you might
want to handle exceptions that occur when an object’s member or base subobjects
are initialized. To do this, you can place the initialization of such
subobjects in a function-level try block. In a departure from the usual
syntax, the try block for constructor initializers is the constructor
body, and the associated catch block follows the body of the
constructor, as in the following example:
//: C01:InitExcept.cpp {-bor}
// Handles exceptions from subobjects.
#include <iostream>
using namespace std;
class Base {
int i;
public:
class BaseExcept {};
Base(int i) : i(i) { throw BaseExcept(); }
};
class Derived : public Base {
public:
class DerivedExcept {
const char* msg;
public:
DerivedExcept(const char* msg) : msg(msg) {}
const char* what() const { return msg; }
};
Derived(int j) try : Base(j) {
// Constructor body
cout << "This won't print" <<
endl;
} catch(BaseExcept&) {
throw DerivedExcept("Base subobject
threw");;
}
};
int main() {
try {
Derived d(3);
} catch(Derived::DerivedExcept& d) {
cout << d.what() << endl; //
"Base subobject threw"
}
} ///:~
Notice that the initializer list in the constructor for Derived
goes after the try keyword but before the constructor body. If an
exception does occur, the contained object is not constructed, so it makes no
sense to return to the code that created it. For this reason, the only sensible
thing to do is to throw an exception in the function-level catch clause.
Although it is not terribly useful, C++ also allows
function-level try blocks for any function, as the following
example illustrates:
//: C01:FunctionTryBlock.cpp {-bor}
// Function-level try blocks.
// {RunByHand} (Don’t run automatically by the
makefile)
#include <iostream>
using namespace std;
int main() try {
throw "main";
} catch(const char* msg) {
cout << msg << endl;
return 1;
} ///:~
In this case, the catch block can return in the same
manner that the function body normally returns. Using this type of
function-level try block isn’t much different from inserting a try-catch
around the code inside of the function body.
The exceptions used with the Standard C++ library are also available for your use. Generally it’s easier and faster to start with a
standard exception class than to try to define your own. If the standard class
doesn’t do exactly what you need, you can derive from it.
All standard exception classes derive ultimately from the class exception, defined in the header <exception>. The two main
derived classes are logic_error and runtime_error, which are found in <stdexcept> (which itself includes <exception>). The class logic_error represents errors in programming logic, such as passing an
invalid argument. Runtime errors are those that occur as the result of
unforeseen forces such as hardware failure or memory exhaustion. Both runtime_error
and logic_error provide a constructor that takes a std::string
argument so that you can store a message in the exception object and extract it
later with exception::what( ) , as the following program illustrates:
//: C01:StdExcept.cpp
// Derives an exception class from std::runtime_error.
#include <stdexcept>
#include <iostream>
using namespace std;
class MyError : public runtime_error {
public:
MyError(const string& msg = "") :
runtime_error(msg) {}
};
int main() {
try {
throw MyError("my message");
} catch(MyError& x) {
cout << x.what() << endl;
}
} ///:~
Although the runtime_error constructor inserts the
message into its std::exception subobject, std::exception does
not provide a constructor that takes a std::string argument. You’ll usually
want to derive your exception classes from either runtime_error or logic_error
(or one of their derivatives), and not from std::exception.
The following tables describe the standard exception
classes:
|
exception
|
The base class for all the exceptions thrown by the C++
Standard library. You can ask what( ) and retrieve the optional
string with which the exception was initialized.
|
|
logic_error
|
Derived from exception. Reports program logic
errors, which could presumably be detected by inspection.
|
|
runtime_error
|
Derived from exception. Reports runtime
errors, which can presumably be detected only when the program executes.
|
The iostream exception class ios::failure is also
derived from exception, but it has no further subclasses.
You can use the classes in both of the following tables as
they are, or you can use them as base classes from which to derive your own
more specific types of exceptions.
|
Exception classes derived from logic_error
|
|
domain_error
|
Reports violations of a precondition.
|
|
invalid_argument
|
Indicates an invalid argument to the function from which
it is thrown.
|
|
length_error
|
Indicates an attempt to
produce an object whose length is greater than or equal to npos (the
largest representable value of context’s size type, usually std::size_t).
|
|
out_of_range
|
Reports an out-of-range argument.
|
|
bad_cast
|
Thrown for executing an invalid dynamic_cast
expression in runtime type identification (see Chapter 8).
|
|
bad_typeid
|
Reports a null pointer p
in an expression typeid(*p). (Again, a runtime type identification
feature in Chapter 8).
|
|
Exception classes derived from runtime_error
|
|
range_error
|
Reports violation of a postcondition.
|
|
overflow_error
|
Reports an arithmetic overflow.
|
|
bad_alloc
|
Reports a failure to allocate storage.
|
You’re not required to inform the people using your function
what exceptions you might throw. However, failure to do so can be considered
uncivilized because it means that users cannot be sure what code to write to
catch all potential exceptions. If they have your source code, they can hunt
through and look for throw statements, but often a library doesn’t come
with sources. Good documentation can help alleviate this problem, but how many
software projects are well documented? C++ provides syntax to tell the user the
exceptions that are thrown by this function, so the user can handle them. This
is the optional exception specification, which adorns a function’s
declaration, appearing after the argument list.
The exception specification reuses the keyword throw,
followed by a parenthesized list of all the types of potential exceptions that
the function can throw. Your function declaration might look like this:
void f() throw(toobig, toosmall, divzero);
As far as exceptions are concerned, the traditional function
declaration
means that any type of exception can be thrown from
the function. If you say
no exceptions whatsoever will be thrown from the
function (so you’d better be sure that no functions farther down in the call
chain let any exceptions propagate up!).
For good coding policy, good documentation, and ease-of-use
for the function caller, consider using exception specifications when you write
functions that throw exceptions. (Variations on this guideline are discussed
later in this chapter.)
The unexpected( ) function
If your exception specification claims you’re going to throw a certain set of exceptions and then you throw something that isn’t in that set,
what’s the penalty? The special function unexpected( ) is called
when you throw something other than what appears in the exception
specification. Should this unfortunate situation occur, the default unexpected( )
calls the terminate( ) function described earlier in this
chapter.
The set_unexpected( ) function
Like terminate( ), the unexpected( ) mechanism installs your own function to respond to unexpected exceptions. You do so
with a function called set_unexpected( ), which, like set_terminate( ),
takes the address of a function with no arguments and void return value.
Also, because it returns the previous value of the unexpected( )
pointer, you can save it and restore it later. To use set_unexpected( ),
include the header file <exception>. Here’s an example that shows a
simple use of the features discussed so far in this section:
//: C01:Unexpected.cpp
// Exception specifications & unexpected(),
//{-msc} (Doesn’t terminate properly)
#include <exception>
#include <iostream>
using namespace std;
class Up {};
class Fit {};
void g();
void f(int i) throw(Up, Fit) {
switch(i) {
case 1: throw Up();
case 2: throw Fit();
}
g();
}
// void g() {} // Version 1
void g() { throw 47; } // Version 2
void my_unexpected() {
cout << "unexpected exception thrown"
<< endl;
exit(0);
}
int main() {
set_unexpected(my_unexpected); // (Ignores return
value)
for(int i = 1; i <=3; i++)
try {
f(i);
} catch(Up) {
cout << "Up caught" <<
endl;
} catch(Fit) {
cout << "Fit caught" <<
endl;
}
} ///:~
The classes Up and Fit are created solely to
throw as exceptions. Often exception classes will be small, but they can
certainly hold additional information so that the handlers can query for it.
The f( ) function promises in its exception specification
to throw only exceptions of type Up and Fit, and from looking at
the function definition, this seems plausible. Version one of g( ),
called by f( ), doesn’t throw any exceptions, so this is true. But
if someone changes g( ) so that it throws a different type of
exception (like the second version in this example, which throws an int),
the exception specification for f( ) is violated.
The my_unexpected( ) function has no arguments
or return value, following the proper form for a custom unexpected( )
function. It simply displays a message so that you can see that it was called,
and then exits the program (exit(0) is used here so that the book’s make
process is not aborted). Your new unexpected( ) function should not
have a return statement.
In main( ), the try block is within a for
loop, so all the possibilities are exercised. In this way, you can achieve
something like resumption. Nest the try block inside a for, while,
do, or if and cause any exceptions to attempt to repair the
problem; then attempt the try block again.
Only the Up and Fit exceptions are caught
because those are the only exceptions that the programmer of f( )
said would be thrown. Version two of g( ) causes my_unexpected( )
to be called because f( ) then throws an int.
In the call to set_unexpected( ), the return
value is ignored, but it can also be saved in a pointer to function and be
restored later, as we did in the set_terminate( ) example earlier
in this chapter.
A typical unexpected handler logs the error and
terminates the program by calling exit( ). It can, however, throw
another exception (or rethrow the same exception) or call abort( ).
If it throws an exception of a type allowed by the function whose specification
was originally violated, the search resumes at the call of the function
with this exception specification. (This behavior is unique to unexpected( ).)
If the exception thrown from your unexpected handler
is not allowed by the original function’s specification, one of the following
occurs:
1. If
std::bad_exception (defined in <exception>) was in the function’s exception specification, the exception thrown from the unexpected
handler is replaced with a std::bad_exception object, and the search resumes
from the function as before.
2. If
the original function’s specification did not include std::bad_exception,
terminate( ) is called.
The following program illustrates this behavior:
//: C01:BadException.cpp {-bor}
#include <exception> // For std::bad_exception
#include <iostream>
#include <cstdio>
using namespace std;
// Exception classes:
class A {};
class B {};
// terminate() handler
void my_thandler() {
cout << "terminate called" << endl;
exit(0);
}
// unexpected() handlers
void my_uhandler1() { throw A(); }
void my_uhandler2() { throw; }
// If we embed this throw statement in f or g,
// the compiler detects the violation and reports
// an error, so we put it in its own function.
void t() { throw B(); }
void f() throw(A) { t(); }
void g() throw(A, bad_exception) { t(); }
int main() {
set_terminate(my_thandler);
set_unexpected(my_uhandler1);
try {
f();
} catch(A&) {
cout << "caught an A from f"
<< endl;
}
set_unexpected(my_uhandler2);
try {
g();
} catch(bad_exception&) {
cout << "caught a bad_exception from
g" << endl;
}
try {
f();
} catch(...) {
cout << "This will never print"
<< endl;
}
} ///:~
The my_uhandler1( ) handler throws an acceptable
exception (A), so execution resumes at the first catch, which succeeds.
The my_uhandler2( ) handler does not throw a valid exception (B),
but since g specifies bad_exception, the B exception is
replaced by a bad_exception object, and the second catch also succeeds.
Since f does not include bad_exception in its specification, my_thandler( )
is called as a terminate handler. Here’s the output:
caught an A from f
caught a bad_exception from g
terminate called
You may feel that the existing exception specification rules
aren’t very safe, and that
should mean that no exceptions are thrown from this
function. If the programmer wants to throw any type of exception, you might
think he or she should have to say
void f() throw(...); // Not in C++
This would surely be an improvement because function
declarations would be more explicit. Unfortunately, you can’t always know by
looking at the code in a function whether an exception will be thrown—it could
happen because of a memory allocation, for example. Worse, existing functions
written before exception handling was introduced into the language may find
themselves inadvertently throwing exceptions because of the functions they call
(which might be linked into new, exception-throwing versions). Hence, the
uninformative situation whereby
means, “Maybe I’ll throw an exception, maybe I won’t.” This
ambiguity is necessary to avoid hindering code evolution. If you want to
specify that f throws no exceptions, use the empty list, as in:
Each public function in a class essentially forms a contract with the user; if you pass it certain arguments, it will perform
certain operations and/or return a result. The same contract must hold true in
derived classes; otherwise the expected “is-a” relationship between derived and
base classes is violated. Since exception specifications are logically part of
a function’s declaration, they too must remain consistent across an inheritance
hierarchy. For example, if a member function in a base class says it will only
throw an exception of type A, an override of that function in a derived
class must not add any other exception types to the specification list because
that would break any programs that adhere to the base class interface. You can,
however, specify fewer exceptions or none at all, since that
doesn’t require the user to do anything differently. You can also specify
anything that “is-a” A in place of A in the derived function’s
specification. Here’s an example.
//: C01:Covariance.cpp {-xo}
// Should cause compile error. {-mwcc}{-msc}
#include <iostream>
using namespace std;
class Base {
public:
class BaseException {};
class DerivedException : public BaseException {};
virtual void f() throw(DerivedException) {
throw DerivedException();
}
virtual void g() throw(BaseException) {
throw BaseException();
}
};
class Derived : public Base {
public:
void f() throw(BaseException) {
throw BaseException();
}
virtual void g() throw(DerivedException) {
throw DerivedException();
}
}; ///:~
A compiler should flag the override of Derived::f( )
with an error (or at least a warning) since it changes its exception
specification in a way that violates the specification of Base::f( ).
The specification for Derived::g( ) is acceptable because DerivedException
“is-a” BaseException (not the other way around). You can think of Base/Derived
and BaseException/DerivedException as parallel class hierarchies; when
you are in Derived, you can replace references to BaseException
in exception specifications and return values with DerivedException.
This behavior is called covariance (since both sets of classes vary down their respective hierarchies together). (Reminder from Volume 1: parameter types are not
covariant—you are not allowed to change the signature of an overridden virtual
function.)
If you peruse the function declarations throughout the Standard C++ library, you’ll find that not a single exception specification occurs
anywhere! Although this might seem strange, there is a good reason for this
seeming incongruity: the library consists mainly of templates, and you never
know what a generic type or function might do. For example, suppose you are
developing a generic stack template and attempt to affix an exception
specification to your pop function, like this:
T pop() throw(logic_error);
Since the only error you anticipate is a stack underflow,
you might think it’s safe to specify a logic_error or some other
appropriate exception type. But type T’s copy constructor could throw an
exception. Then unexpected( ) would be called, and your program
would terminate. You can’t make unsupportable guarantees. If you don’t know
what exceptions might occur, don’t use exception specifications. That’s why
template classes, which constitute the majority of the Standard C++ library, do
not use exception specifications—they specify the exceptions they know about in
documentation and leave the rest to you. Exception specifications are
mainly for non-template classes.
In Chapter 7 we’ll take an in-depth look at the containers
in the Standard C++ library, including the stack container. One thing
you’ll notice is that the declaration of the pop( ) member function
looks like this:
You might think it strange that pop( ) doesn’t
return a value. Instead, it just removes the element at the top of the stack.
To retrieve the top value, call top( ) before you call pop( ).
There is an important reason for this behavior, and it has to do with exception
safety, a crucial consideration in library design. There are different
levels of exception safety, but most importantly, and just as the name implies,
exception safety is about correct semantics in the face of exceptions.
Suppose you are implementing a stack with a dynamic array
(we’ll call it data and the counter integer count), and you try
to write pop( ) so that it returns a value. The code for such a pop( )
might look something like this:
template<class T> T stack<T>::pop() {
if(count == 0)
throw logic_error("stack underflow");
else
return data[--count];
}
What happens if the copy constructor that is called for the
return value in the last line throws an exception when the value is returned?
The popped element is not returned because of the exception, and yet count
has already been decremented, so the top element you wanted is lost forever!
The problem is that this function attempts to do two things at once: (1) return
a value, and (2) change the state of the stack. It is better to separate these
two actions into two separate member functions, which is exactly what the
standard stack class does. (In other words, follow the design practice
of cohesion—every function should do one thing well.) Exception-safe
code leaves objects in a consistent state and does not leak resources.
You also need to be careful writing custom assignment
operators. In Chapter 12 of Volume 1, you saw that operator= should
adhere to the following pattern:
1. Make
sure you’re not assigning to self. If you are, go to step 6. (This is strictly
an optimization.)
2. Allocate
new memory required by pointer data members.
3. Copy
data from the old memory to the new.
4. Delete
the old memory.
5. Update
the object’s state by assigning the new heap pointers to the pointer data
members.
6. Return
*this.
It’s important to not change the state of your object until
all the new pieces have been safely allocated and initialized. A good technique
is to move steps 2 and 3 into a separate function, often called clone( ).
The following example does this for a class that has two pointer members, theString
and theInts:
//: C01:SafeAssign.cpp
// An Exception-safe operator=.
#include <iostream>
#include <new> // For std::bad_alloc
#include <cstring>
#include <cstddef>
using namespace std;
// A class that has two pointer members using the heap
class HasPointers {
// A Handle class to hold the data
struct MyData {
const char* theString;
const int* theInts;
size_t numInts;
MyData(const char* pString, const int* pInts,
size_t nInts)
: theString(pString), theInts(pInts),
numInts(nInts) {}
} *theData; // The handle
// Clone and cleanup functions:
static MyData* clone(const char* otherString,
const int* otherInts, size_t nInts) {
char* newChars = new char[strlen(otherString)+1];
int* newInts;
try {
newInts = new int[nInts];
} catch(bad_alloc&) {
delete [] newChars;
throw;
}
try {
// This example uses built-in types, so it won't
// throw, but for class types it could throw, so
we
// use a try block for illustration. (This is the
// point of the example!)
strcpy(newChars, otherString);
for(size_t i = 0; i < nInts; ++i)
newInts[i] = otherInts[i];
} catch(...) {
delete [] newInts;
delete [] newChars;
throw;
}
return new MyData(newChars, newInts, nInts);
}
static MyData* clone(const MyData* otherData) {
return clone(otherData->theString, otherData->theInts,
otherData->numInts);
}
static void cleanup(const MyData* theData) {
delete [] theData->theString;
delete [] theData->theInts;
delete theData;
}
public:
HasPointers(const char* someString, const int*
someInts,
size_t numInts) {
theData = clone(someString, someInts, numInts);
}
HasPointers(const HasPointers& source) {
theData = clone(source.theData);
}
HasPointers& operator=(const HasPointers&
rhs) {
if(this != &rhs) {
MyData* newData = clone(rhs.theData->theString,
rhs.theData->theInts,
rhs.theData->numInts);
cleanup(theData);
theData = newData;
}
return *this;
}
~HasPointers() { cleanup(theData); }
friend ostream&
operator<<(ostream& os, const HasPointers&
obj) {
os << obj.theData->theString <<
": ";
for(size_t i = 0; i < obj.theData->numInts;
++i)
os << obj.theData->theInts[i] << '
';
return os;
}
};
int main() {
int someNums[] = { 1, 2, 3, 4 };
size_t someCount = sizeof someNums / sizeof
someNums[0];
int someMoreNums[] = { 5, 6, 7 };
size_t someMoreCount =
sizeof someMoreNums / sizeof someMoreNums[0];
HasPointers h1("Hello", someNums,
someCount);
HasPointers h2("Goodbye", someMoreNums,
someMoreCount);
cout << h1 << endl; // Hello: 1 2 3 4
h1 = h2;
cout << h1 << endl; // Goodbye: 5 6 7
} ///:~
For convenience, HasPointers uses the MyData
class as a handle to the two pointers. Whenever it’s time to allocate more
memory, whether during construction or assignment, the first clone
function is ultimately called to do the job. If memory fails for the first call
to the new operator, a bad_alloc exception is thrown
automatically. If it happens on the second allocation (for theInts), we must
clean up the memory for theString—hence the first try block that
catches a bad_alloc exception. The second try block isn’t crucial
here because we’re just copying ints and pointers (so no exceptions will
occur), but whenever you copy objects, their assignment operators can possibly
cause an exception, so everything needs to be cleaned up. In both exception
handlers, notice that we rethrow the exception. That’s because we’re just managing resources here; the user still needs to know that something
went wrong, so we let the exception propagate up the dynamic chain. Software
libraries that don’t silently swallow exceptions are called exception
neutral. Always strive to write libraries that are both exception safe and
exception neutral.
If you inspect the previous code closely, you’ll notice that
none of the delete operations will throw an exception. This code depends
on that fact. Recall that when you call delete on an object, the
object’s destructor is called. It turns out to be practically impossible to
design exception-safe code without assuming that destructors don’t throw
exceptions. Don’t let destructors throw exceptions. (We’re going to remind you
about this once more before this chapter is done).
For most programmers, especially C programmers, exceptions
are not available in their existing language and require some adjustment. Here
are guidelines for programming with exceptions.
Exceptions aren’t the answer to all problems; overuse can
cause trouble. The following sections point out situations where exceptions are
not warranted. The best advice for deciding when to use exceptions is to
throw exceptions only when a function fails to meet its specification.
Not for asynchronous events
The Standard C signal( ) system and any similar system handle asynchronous events: events that
happen outside the flow of a program, and thus events the program cannot
anticipate. You cannot use C++ exceptions to handle asynchronous events because
the exception and its handler are on the same call stack. That is, exceptions
rely on the dynamic chain of function calls on the program’s runtime stack (they
have “dynamic scope”), whereas asynchronous events must be handled by
completely separate code that is not part of the normal program flow
(typically, interrupt service routines or event loops). Don’t throw exceptions
from interrupt handlers.
This is not to say that asynchronous events cannot be associated
with exceptions. But the interrupt handler should do its job as quickly as
possible and then return. The typical way to handle this situation is to set a
flag in the interrupt handler, and check it synchronously in the mainline code.
Not for benign error conditions
If you have enough information to handle an error, it’s not
an exception. Take care of it in the current context rather than throwing an
exception to a larger context.
Also, C++ exceptions are not thrown for machine-level events
such as divide-by-zero. It’s
assumed that some other mechanism, such as the operating system or hardware,
deals with these events. In this way, C++ exceptions can be reasonably
efficient, and their use is isolated to program-level exceptional conditions.
Not for flow–of–control
An exception looks somewhat like an alternate return
mechanism and somewhat like a switch statement, so you might be tempted
to use an exception instead of these ordinary language mechanisms. This is a
bad idea, partly because the exception-handling system is significantly less
efficient than normal program execution. Exceptions are a rare event, so the
normal program shouldn’t pay for them. Also, exceptions from anything other
than error conditions are quite confusing to the user of your class or
function.
You’re not forced to use exceptions
Some programs are quite simple (small utilities, for
example). You might only need to take input and perform some processing. In
these programs, you might attempt to allocate memory and fail, try to open a
file and fail, and so on. It is acceptable in these programs to display a
message and exit the program, allowing the system to clean up the mess, rather
than to work hard to catch all exceptions and recover all the resources
yourself. Basically, if you don’t need exceptions, you’re not forced to use
them.
New exceptions, old code
Another situation that arises is the modification of an
existing program that doesn’t use exceptions. You might introduce a library
that does use exceptions and wonder if you need to modify all your code
throughout the program. Assuming you have an acceptable error-handling scheme
already in place, the most straightforward thing to do is surround the largest
block that uses the new library (this might be all the code in main( ))
with a try block, followed by a catch(...) and basic error
message). You can refine this to whatever degree necessary by adding more
specific handlers, but, in any case, the code you must add can be minimal. It’s
even better to isolate your exception-generating code in a try block and
write handlers to convert the exceptions into your existing error-handling
scheme.
It’s truly important to think about exceptions when you’re
creating a library for someone else to use, especially if you can’t know how
they need to respond to critical error conditions (recall the earlier
discussions on exception safety and why there are no exception specifications
in the Standard C++ Library).
Do use exceptions to do the following:
· Fix the problem and retry the function that caused the exception.
· Patch things up and continue without retrying the function.
· Do whatever you can in the current context and rethrow the same
exception to a higher context.
· Do whatever you can in the current context and throw a different
exception to a higher context.
· Terminate the program.
· Wrap functions (especially C library functions) that use ordinary
error schemes so they produce exceptions instead.
· Simplify. If your error handling scheme makes things more
complicated, it is painful and annoying to use. Exceptions can be used to make
error handling simpler and more effective.
· Make your library and program safer. This is a short-term
investment (for debugging) and a long-term investment (for application
robustness).
When to use exception specifications
The exception specification is like a function prototype: it
tells the user to write exception-handling code and what exceptions to handle.
It tells the compiler the exceptions that might come out of this function so
that it can detect violations at runtime.
You can’t always look at the code and anticipate which
exceptions will arise from a particular function. Sometimes, the functions it
calls produce an unexpected exception, and sometimes an old function that
didn’t throw an exception is replaced with a new one that does, and you get a
call to unexpected( ). Any time you use exception specifications or
call functions that do, consider creating your own unexpected( )
function that logs a message and then either throws an exception or aborts the
program.
As we explained earlier, you should avoid using exception
specifications in template classes, since you can’t anticipate what types of
exceptions the template parameter classes might throw.
Start with standard exceptions
Check out the Standard C++ library exceptions before
creating your own. If a standard exception does what you need, chances are it’s
a lot easier for your user to understand and handle.
If the exception type you want isn’t part of the standard
library, try to inherit one from an existing standard exception. It’s nice if
your users can always write their code to expect the what( ) function
defined in the exception( ) class interface.
Nest your own exceptions
If you create exceptions for your particular class, it’s a
good idea to nest the exception classes either inside your class or inside a
namespace containing your class, to provide a clear message to the reader that
this exception is only for your class. In addition, it prevents pollution of
the global namespace.
You can nest your exceptions even if you’re deriving them
from C++ Standard exceptions.
Use exception hierarchies
Using exception hierarchies is a valuable way to classify the types of critical errors that might be encountered with your class or library. This
gives helpful information to users, assists them in organizing their code, and
gives them the option of ignoring all the specific types of exceptions and just
catching the base-class type. Also, any exceptions added later by inheriting
from the same base class will not force all existing code to be rewritten—the
base-class handler will catch the new exception.
The Standard C++ exceptions are a good example of an
exception hierarchy. Build your exceptions on top of it if you can.
Multiple inheritance (MI)
As you’ll read in Chapter 9, the only essential place
for MI is if you need to upcast an object pointer to two different base
classes—that is, if you need polymorphic behavior with both of those base
classes. It turns out that exception hierarchies are useful places for multiple
inheritance because a base-class handler from any of the roots of the multiply
inherited exception class can handle the exception.
Catch by reference, not by value
As you saw in the section “Exception matching,” you should
catch exceptions by reference for two reasons:
· To avoid making a needless copy of the exception object when it
is passed to the handler.
· To avoid object slicing when catching a derived exception as a
base class object.
Although you can also throw and catch pointers, by doing so you introduce more coupling—the thrower and the catcher must agree on
how the exception object is allocated and cleaned up. This is a problem because
the exception itself might have occurred from heap exhaustion. If you throw exception
objects, the exception-handling system takes care of all storage.
Throw exceptions in constructors
Because a constructor has no return value, you’ve previously had two ways to report an error during construction:
· Set a nonlocal flag and hope the user checks it.
· Return an incompletely created object and hope the user checks
it.
This problem is serious because C programmers expect that
object creation is always successful, which is not unreasonable in C because
the types are so primitive. But continuing execution after construction fails in a C++ program is a guaranteed disaster, so constructors are one of the most
important places to throw exceptions—now you have a safe, effective way to
handle constructor errors. However, you must also pay attention to pointers
inside objects and the way cleanup occurs when an exception is thrown inside a
constructor.
Don’t cause exceptions in destructors
Because destructors are called in the process of throwing other exceptions, you’ll never want to throw an exception in a destructor
or cause another exception to be thrown by some action you perform in the
destructor. If this happens, a new exception can be thrown before the
catch-clause for an existing exception is reached, which will cause a call to terminate( ).
If you call any functions inside a destructor that can throw
exceptions, those calls should be within a try block in the destructor,
and the destructor must handle all exceptions itself. None must escape from the
destructor.
Avoid naked pointers
See Wrapped.cpp earlier in this chapter. A naked
pointer usually means vulnerability in the constructor if resources are
allocated for that pointer. A pointer doesn’t have a destructor, so those
resources aren’t released if an exception is thrown in the constructor. Use auto_ptr
or other smart pointer types for
pointers that reference heap memory.
When an exception is thrown, there’s considerable runtime
overhead (but it’s good overhead, since objects are cleaned up
automatically!). For this reason, you never want to use exceptions as part of
your normal flow-of-control, no matter how tempting and clever it may seem.
Exceptions should occur only rarely, so the overhead is piled on the exception
and not on the normally executing code. One of the important design goals for
exception handling was that it could be implemented with no impact on execution
speed when it wasn’t used; that is, as long as you don’t throw an
exception, your code runs as fast as it would without exception handling.
Whether this is true depends on the particular compiler implementation you’re
using. (See the description of the “zero-cost model” later in this section.)
You can think of a throw expression as a call to a
special system function that takes the exception object as an argument and backtracks
up the chain of execution. For this to work, extra information needs to be put
on the stack by the compiler, to aid in stack unwinding. To understand this,
you need to know about the runtime stack.
Whenever a function is called, information about that
function is pushed onto the runtime stack in an activation record instance (ARI), also called a stack frame. A typical stack frame contains
the address of the calling function (so execution can return to it), a pointer
to the ARI of the function’s static parent (the scope that lexically contains
the called function, so variables global to the function can be accessed), and
a pointer to the function that called it (its dynamic parent). The path
that logically results from repetitively following the dynamic parent links is
the dynamic chain, or call chain, that we’ve mentioned previously
in this chapter. This is how execution can backtrack when an exception is
thrown, and it is the mechanism that makes it possible for components developed
without knowledge of one another to communicate errors at runtime.
To enable stack unwinding for exception handling, extra
exception-related information about each function needs to be available for
each stack frame. This information describes which destructors need to be
called (so that local objects can be cleaned up), indicates whether the current
function has a try block, and lists which exceptions the associated
catch clauses can handle. There is space penalty for this extra information, so
programs that support exception handling can be somewhat larger than those that
don’t. Even the
compile-time size of programs using exception handling is greater, since the
logic of how to generate the expanded stack frames during runtime must be
generated by the compiler.
To illustrate this, we compiled the following program both
with and without exception-handling support in Borland C++ Builder and
Microsoft Visual C++:
//: C01:HasDestructor.cpp {O}
class HasDestructor {
public:
~HasDestructor() {}
};
void g(); // For all we know, g may throw.
void f() {
HasDestructor h;
g();
} ///:~
If exception handling is enabled, the compiler must keep
information about ~HasDestructor( ) available at runtime in the ARI
for f( ) (so it can destroy h properly should g( )
throw an exception). The following table summarizes the result of the
compilations in terms of the size of the compiled (.obj) files (in bytes).
|
Compiler\Mode
|
With Exception Support
|
Without Exception
Support
|
|
Borland
|
616
|
234
|
|
Microsoft
|
1162
|
680
|
Don’t take the percentage
differences between the two modes too seriously. Remember that exceptions
(should) typically constitute a small part of a program, so the space overhead
tends to be much smaller (usually between 5 and 15 percent).
This extra housekeeping slows down execution, but a clever
compiler implementation avoids this. Since information about exception-handling
code and the offsets of local objects can be computed once at compile time,
such information can be kept in a single place associated with each function,
but not in each ARI. You essentially remove exception overhead from each ARI
and thus avoid the extra time to push them onto the stack. This approach is
called the zero-cost model of exception handling, and the optimized storage mentioned earlier is known as the shadow
stack.
Error recovery is a fundamental concern for every program
you write. It’s especially important in C++ when creating program components
for others to use. To create a robust system, each component must be robust.
The goals for exception handling in C++ are to simplify the
creation of large, reliable programs using less code than currently possible,
with more confidence that your application doesn’t have an unhandled error.
This is accomplished with little or no performance penalty and with low impact
on existing code.
Basic exceptions are not terribly difficult to learn; begin
using them in your programs as soon as you can. Exceptions are one of those
features that provide immediate and significant benefits to your project.
Solutions
to selected exercises can be found in the electronic document The Thinking
in C++ Volume 2 Annotated Solution Guide, available for a small fee from www.MindView.net.
1. Write three functions: one
that returns an error value to indicate an error condition, one that sets errno,
and one that uses signal( ). Write code that calls these functions
and responds to the errors. Now write a fourth function that throws an
exception. Call this function and catch the exception. Describe the differences
between these four approaches, and why exception handling is an improvement.
2. Create a class with member functions that throw exceptions.
Within this class, make a nested class to use as an exception object. It takes
a single const char* as its argument; this represents a description
string. Create a member function that throws this exception. (State this in the
function’s exception specification.) Write a try block that calls this
function and a catch clause that handles the exception by displaying its
description string.
3. Rewrite the Stash class from Chapter 13 of Volume 1 so
that it throws out_of_range exceptions for operator[ ].
4. Write a generic main( ) that takes all exceptions and
reports them as errors.
5. Create a class with its own operator new. This operator
should allocate ten objects, and on the eleventh object “run out of memory” and
throw an exception. Also add a static member function that reclaims this
memory. Now create a main( ) with a try block and a catch
clause that calls the memory-restoration routine. Put these inside a while
loop, to demonstrate recovering from an exception and continuing execution.
6. Create a destructor that throws an exception, and write code to
prove to yourself that this is a bad idea by showing that if a new exception is
thrown before the handler for the existing one is reached, terminate( )
is called.
7. Prove to yourself that all exception objects (the ones that are
thrown) are properly destroyed.
8. Prove to yourself that if you create an exception object on the
heap and throw the pointer to that object, it will not be cleaned up.
9. Write a function with an exception specification that can throw
four exception types: a char, an int, a bool, and your own
exception class. Catch each in main( ) and verify the catch. Derive
your exception class from a standard exception. Write the function in such a
way that the system recovers and tries to execute it again.
10. Modify your solution to the previous exercise to throw a double
from the function, violating the exception specification. Catch the violation
with your own unexpected handler that displays a message and exits the program
gracefully (meaning abort( ) is not called).
11. Write a Garage class that has a Car that is having
troubles with its Motor. Use a function-level try block in the Garage
class constructor to catch an exception (thrown from the Motor class)
when its Car object is initialized. Throw a different exception from the
body of the Garage constructor’s handler and catch it in main( ).
Writing “perfect software” may be an elusive goal for
developers, but a few defensive techniques, routinely applied, can go a long
way toward improving the quality of your code.
Although the complexity of typical production software
guarantees that testers will always have a job, we hope you still yearn to
produce defect-free software. Object-oriented design techniques do much to
corral the difficulty of large projects, but eventually you must write loops
and functions. These details of “programming in the small” become the building
blocks of the larger components needed for your designs. If your loops are off
by one or your functions calculate the correct values only “most” of the time,
you’re in trouble no matter how fancy your overall methodology. In this chapter, you’ll see practices that help create robust code regardless of the size of your
project.
Your code is, among other things, an expression of your attempt
to solve a problem. It should be clear to the reader (including yourself)
exactly what you were thinking when you designed that loop. At certain points
in your program, you should be able to make bold statements that some condition
or other holds. (If you can’t, you really haven’t yet solved the problem.) Such
statements are called invariants, since they should invariably be true
at the point where they appear in the code; if not, either your design is faulty,
or your code does not accurately reflect your design.
Consider a program that plays the guessing game of Hi-Lo. One
person thinks of a number between 1 and 100, and the other person guesses the
number. (We’ll let the computer do the guessing.) The person who holds the
number tells the guesser whether their guess is high, low or correct. The best
strategy for the guesser is a binary search, which chooses the midpoint
of the range of numbers where the sought-after number resides. The high-low
response tells the guesser which half of the list holds the number, and the
process repeats, halving the size of the active search range on each iteration.
So how do you write a loop to drive the repetition properly? It’s not
sufficient to just say
bool guessed = false;
while(!guessed) {
...
}
because a malicious user might respond deceitfully, and you
could spend all day guessing. What assumption, however simple, are you making
each time you guess? In other words, what condition should hold by design
on each loop iteration?
The simple assumption is that the secret number is within
the current active range of unguessed numbers: [1, 100]. Suppose we label the
endpoints of the range with the variables low and high.
Each time you pass through the loop you need to make sure that if the number
was in the range [low, high] at the beginning of the loop, you
calculate the new range so that it still contains the number at the end of the
current loop iteration.
The goal is to express the loop invariant in code so that a
violation can be detected at runtime. Unfortunately, since the computer doesn’t
know the secret number, you can’t express this condition directly in code, but
you can at least make a comment to that effect:
while(!guessed) {
// INVARIANT: the number is in the range [low, high]
...
}
What happens when the user says that a guess is too high or
too low when it isn’t? The deception will exclude the secret number from the
new subrange. Because one lie always leads to another, eventually your range
will diminish to nothing (since you shrink it by half each time and the secret
number isn’t in there). We can express this condition in the following program:
//: C02:HiLo.cpp {RunByHand}
// Plays the game of Hi-Lo to illustrate a loop
invariant.
#include <cstdlib>
#include <iostream>
#include <string>
using namespace std;
int main() {
cout << "Think of a number between 1 and
100" << endl
<< "I will make a
guess; "
<< "tell me if I'm
(H)igh or (L)ow" << endl;
int low = 1, high = 100;
bool guessed = false;
while(!guessed) {
// Invariant: the number is in the range [low,
high]
if(low > high) { // Invariant violation
cout << "You cheated! I quit"
<< endl;
return EXIT_FAILURE;
}
int guess = (low + high) / 2;
cout << "My guess is " <<
guess << ". ";
cout << "(H)igh, (L)ow, or (E)qual?
";
string response;
cin >> response;
switch(toupper(response[0])) {
case 'H':
high = guess - 1;
break;
case 'L':
low = guess + 1;
break;
case 'E':
guessed = true;
break;
default:
cout << "Invalid response"
<< endl;
continue;
}
}
cout << "I got it!" << endl;
return EXIT_SUCCESS;
} ///:~
The violation of the invariant is detected with the
condition if(low > high), because if the user always tells the truth,
we will always find the secret number before we run out of guesses.
We also use a standard C technique for reporting program
status to the calling context by returning different values from main( ).
It is portable to use the statement return 0; to indicate success, but
there is no portable value to indicate failure. For this reason we use the
macro declared for this purpose in <cstdlib>: EXIT_FAILURE.
For consistency, whenever we use EXIT_FAILURE we also use EXIT_SUCCESS,
even though the latter is always defined as zero.
The condition in the Hi-Lo program depends on user input, so
you can’t prevent a violation of the invariant. However, invariants usually depend
only on the code you write, so they will always hold if you’ve implemented your
design correctly. In this case, it is clearer to make an assertion, which is a positive statement that reveals your design decisions.
Suppose you are implementing a vector of integers: an
expandable array that grows on demand. The function that adds an element to the
vector must first verify that there is an open slot in the underlying array
that holds the elements; otherwise, it needs to request more heap space and
copy the existing elements to the new space before adding the new element (and
deleting the old array). Such a function might look like the following:
void MyVector::push_back(int x) {
if(nextSlot == capacity)
grow();
assert(nextSlot < capacity);
data[nextSlot++] = x;
}
In this example, data is a dynamic array of ints
with capacity slots and nextSlot slots in use. The purpose of grow( )
is to expand the size of data so that the new value of capacity
is strictly greater than nextSlot. Proper behavior of MyVector
depends on this design decision, and it will never fail if the rest of the
supporting code is correct. We assert the condition with the assert( )
macro, which is defined in the header <cassert>.
The Standard C library assert( ) macro is brief,
to the point, and portable. If the condition in its parameter evaluates to
non-zero, execution continues uninterrupted; if it doesn’t, a message
containing the text of the offending expression along with its source file name
and line number is printed to the standard error channel and the program
aborts. Is that too drastic? In practice, it is much more drastic to let
execution continue when a basic design assumption has failed. Your program
needs to be fixed.
If all goes well, you will thoroughly test your code with
all assertions intact by the time the final product is deployed. (We’ll say
more about testing later.) Depending on the nature of your application, the
machine cycles needed to test all assertions at runtime might be too much of a
performance hit in the field. If that’s the case, you can remove all the
assertion code automatically by defining the macro NDEBUG and rebuilding
the application.
To see how this works, note that a typical implementation of
assert( ) looks something like this:
#ifdef NDEBUG
#define assert(cond) ((void)0)
#else
void assertImpl(const char*, const char*, long);
#define assert(cond) \
((cond) ? (void)0 : assertImpl(???))
#endif
When the macro NDEBUG is defined, the code decays to
the expression (void) 0, so all that’s left in the compilation stream is
an essentially empty statement as a result of the semicolon you appended to
each assert( ) invocation. If NDEBUG is not defined, assert(cond)
expands to a conditional statement that, when cond is zero, calls a
compiler-dependent function (which we named assertImpl( )) with a
string argument representing the text of cond, along with the file name
and line number where the assertion appeared. (We used “???” as a place holder
in the example, but the string mentioned is actually computed there, along with
the file name and the line number where the macro occurs in that file. How
these values are obtained is immaterial to our discussion.) If you want to turn
assertions on and off at different points in your program, you must not only #define
or #undef NDEBUG, but you must also re-include <cassert>.
Macros are evaluated as the preprocessor encounters them and thus use whatever NDEBUG
state applies at the point of inclusion. The most common way to define NDEBUG
once for an entire program is as a compiler option, whether through project
settings in your visual environment or via the command line, as in:
Most compilers use the –D flag to define macro names.
(Substitute the name of your compiler’s executable for mycc above.) The
advantage of this approach is that you can leave your assertions in the source
code as an invaluable bit of documentation, and yet there is no runtime
penalty. Because the code in an assertion disappears when NDEBUG is
defined, it is important that you never do work in an assertion. Only
test conditions that do not change the state of your program.
Whether using NDEBUG for released code is a good idea
remains a subject of debate. Tony Hoare, one of the most influential computer
scientists of all time, has
suggested that turning off runtime checks such as assertions is similar to a
sailing enthusiast who wears a life jacket while training on land and then
discards it when he goes to sea. If
an assertion fails in production, you have a problem much worse than
degradation in performance, so choose wisely.
Not all conditions should be enforced by assertions. User
errors and runtime resource failures should be signaled by throwing exceptions,
as we explained in detail in Chapter 1. It is tempting to use assertions for
most error conditions while roughing out code, with the intent to replace many
of them later with robust exception handling. Like any other temptation, use
caution, since you might forget to make all the necessary changes later.
Remember: assertions are intended to verify design decisions that will only
fail because of faulty programmer logic. The ideal is to solve all assertion
violations during development. Don’t use assertions for conditions that aren’t
totally in your control (for example, conditions that depend on user input). In
particular, you wouldn’t want to use assertions to validate function arguments;
throw a logic_error instead.
The use of assertions as a tool to ensure program
correctness was formalized by Bertrand Meyer in his Design by Contract methodology. Every
function has an implicit contract with clients that, given certain preconditions, guarantees certain postconditions. In other words, the preconditions
are the requirements for using the function, such as supplying arguments within
certain ranges, and the postconditions are the results delivered by the
function, either by return value or by side-effect.
When client programs fail to give you valid input, you must
tell them they have broken the contract. This is not the best time to abort the
program (although you’re justified in doing so since the contract was
violated), but an exception is certainly appropriate. This is why the Standard
C++ library throws exceptions derived from logic_error, such as out_of_range. If there are
functions that only you call, however, such as private functions in a class of
your own design, the assert( ) macro is appropriate, since you have
total control over the situation and you certainly want to debug your code
before shipping.
A postcondition failure indicates a program error, and it is
appropriate to use assertions for any invariant at any time, including the
postcondition test at the end of a function. This applies in particular to
class member functions that maintain the state of an object. In the MyVector
example earlier, for instance, a reasonable invariant for all public member
functions would be:
assert(0 <= nextSlot && nextSlot <=
capacity);
or, if nextSlot is an unsigned integer, simply
assert(nextSlot <= capacity);
Such an invariant is called a class invariant and can reasonably be enforced by an assertion. Subclasses play the role of subcontractor
to their base classes because they must maintain the original contract between the
base class and its clients. For this reason, the preconditions in derived
classes must impose no extra requirements beyond those in the base contract,
and the postconditions must deliver at least as much.
Validating results returned to the client, however, is
nothing more or less than testing, so using post-condition assertions in
this case would be duplicating work. Yes, it’s good documentation, but more
than one developer has been fooled into improperly using post-condition
assertions as a substitute for unit testing.
Writing software is all about meeting requirements. Creating these
requirements is difficult, and they can change from day to day; you might
discover at a weekly project meeting that what you just spent the week doing is
not exactly what the users really want.
People cannot articulate software requirements without
sampling an evolving, working system. It’s much better to specify a little,
design a little, code a little, and test a little. Then, after evaluating the
outcome, do it all over again. The ability to develop in such an iterative
fashion is one of the great advances of the object-oriented approach, but it
requires nimble programmers who can craft resilient code. Change is hard.
Another impetus for change comes from you, the programmer.
The craftsperson in you wants to continually improve the design of your code.
What maintenance programmer hasn’t cursed the aging, flagship company product
as a convoluted, unmodifiable patchwork of spaghetti? Management’s reluctance
to let you tamper with a functioning system robs code of the resilience it
needs to endure. “If it’s not broken, don’t fix it” eventually gives way to, “We
can’t fix it—rewrite it.” Change is necessary.
Fortunately, our industry is growing accustomed to the
discipline of refactoring, the art of internally restructuring code to
improve its design, without changing its behavior. Such
improvements include extracting a new function from another, or inversely,
combining member functions; replacing a member function with an object;
parameterizing a member function or class; and replacing conditionals with
polymorphism. Refactoring helps code evolve.
Whether the force for change comes from users or
programmers, changes today may break what worked yesterday. We need a way to
build code that withstands change and improves over time.
Extreme Programming (XP) is only one of
many practices that support a quick-on-your-feet motif. In this section we
explore what we think is the key to making flexible, incremental development
succeed: an easy-to-use automated unit test framework. (Note that testers,
software professionals who test others’ code for a living, are still indispensable.
Here, we are merely describing a way to help developers write better code.)
Developers write unit tests to gain the confidence to
say the two most important things that any developer can say:
1. I understand the requirements.
2. My code meets those requirements (to the best of my knowledge).
There is no better way to ensure that you know what the code
you’re about to write should do than to write the unit tests first. This simple
exercise helps focus the mind on the task ahead and will likely lead to working
code faster than just jumping into coding. Or, to express it in XP terms:
Testing + programming is faster
than just programming.
Writing tests first also guards you against boundary
conditions that might break your code, so your code is more robust.
When your code passes all your tests, you know that if the
system isn’t working, your code is probably not the problem. The statement “All
my tests pass” is a powerful argument.
So what does a unit test look like? Too often developers
just use some well-behaved input to produce some expected output, which they
inspect visually. Two dangers exist in this approach. First, programs don’t
always receive only well-behaved input. We all know that we should test the
boundaries of program input, but it’s hard to think about this when you’re
trying to just get things working. If you write the test for a function first
before you start coding, you can wear your “tester hat” and ask yourself, “What
could possibly make this break?” Code a test that will prove the function you’ll
write isn’t broken, and then put on your developer hat and make it happen. You’ll
write better code than if you hadn’t written the test first.
The second danger is that inspecting output visually is
tedious and error prone. Most any such thing a human can do a computer can do,
but without human error. It’s better to formulate tests as collections of Boolean expressions and have a test program report any failures.
For example, suppose you need to build a Date class
that has the following properties:
· A date can be initialized with a string (YYYYMMDD), three
integers (Y, M, D), or nothing (giving today’s date).
· A date object can yield its year, month, and day or a string of
the form “YYYYMMDD”.
· All relational comparisons are available, as well as computing
the duration between two dates (in years, months, and days).
· Dates to be compared need to be able to span an arbitrary number
of centuries (for example, 1600–2200).
Your class can store three integers representing the year,
month, and day. (Just be sure the year is at least 16 bits in size to satisfy
the last bulleted item.) The interface for your Date class might look
like this:
//: C02:Date1.h
// A first pass at Date.h.
#ifndef DATE1_H
#define DATE1_H
#include <string>
class Date {
public:
// A struct to hold elapsed time:
struct Duration {
int years;
int months;
int days;
Duration(int y, int m, int d)
: years(y), months(m), days(d) {}
};
Date();
Date(int year, int month, int day);
Date(const std::string&);
int getYear() const;
int getMonth() const;
int getDay() const;
std::string toString() const;
friend bool operator<(const
Date&, const Date&);
friend bool operator>(const
Date&, const Date&);
friend bool operator<=(const
Date&, const Date&);
friend bool operator>=(const
Date&, const Date&);
friend bool operator==(const
Date&, const Date&);
friend bool operator!=(const
Date&, const Date&);
friend Duration duration(const Date&, const
Date&);
};
#endif // DATE1_H ///:~
Before you implement this class, you can solidify your grasp
of the requirements by writing the beginnings of a test program. You might come
up with something like the following:
//: C02:SimpleDateTest.cpp
//{L} Date
#include <iostream>
#include "Date.h" // From Appendix B
using namespace std;
// Test machinery
int nPass = 0, nFail = 0;
void test(bool t) { if(t) nPass++; else nFail++; }
int main() {
Date mybday(1951, 10, 1);
test(mybday.getYear() == 1951);
test(mybday.getMonth() == 10);
test(mybday.getDay() == 1);
cout << "Passed: " << nPass
<< ", Failed: "
<< nFail << endl;
}
/* Expected output:
Passed: 3, Failed: 0
*/ ///:~
In this trivial case, the function test( )
maintains the global variables nPass and nFail. The only visual
inspection you do is to read the final score. If a test failed, a more
sophisticated test( ) displays an appropriate message. The
framework described later in this chapter has such a test function, among other
things.
You can now implement enough of the Date class to get
these tests to pass, and then you can proceed iteratively until all the
requirements are met. By writing tests first, you are more likely to think of
corner cases that might break your upcoming implementation, and you’re more
likely to write the code correctly the first time. Such an exercise might
produce the following version of a test for the Date class:
//: C02:SimpleDateTest2.cpp
//{L} Date
#include <iostream>
#include "Date.h"
using namespace std;
// Test machinery
int nPass = 0, nFail = 0;
void test(bool t) { if(t) ++nPass; else ++nFail; }
int main() {
Date mybday(1951, 10, 1);
Date today;
Date
myevebday("19510930");
// Test the operators
test(mybday < today);
test(mybday <= today);
test(mybday != today);
test(mybday == mybday);
test(mybday >= mybday);
test(mybday <= mybday);
test(myevebday < mybday);
test(mybday > myevebday);
test(mybday >= myevebday);
test(mybday != myevebday);
// Test the functions
test(mybday.getYear() == 1951);
test(mybday.getMonth() == 10);
test(mybday.getDay() == 1);
test(myevebday.getYear() == 1951);
test(myevebday.getMonth() == 9);
test(myevebday.getDay() == 30);
test(mybday.toString() == "19511001");
test(myevebday.toString() == "19510930");
// Test duration
Date d2(2003, 7, 4);
Date::Duration dur = duration(mybday, d2);
test(dur.years == 51);
test(dur.months == 9);
test(dur.days == 3);
// Report results:
cout << "Passed: " << nPass
<< ", Failed: "
<< nFail << endl;
} ///:~
This test can be more fully developed. For example, we haven’t
tested that long durations are handled correctly. We’ll stop here, but you get
the idea. The full implementation for the Date class is available in the
files Date.h and Date.cpp in the appendix.
Some automated C++ unit test tools are available on the
World Wide Web for download, such as CppUnit. Our
purpose here is not only to present a test mechanism that is easy to use, but
also easy to understand internally and even modify if necessary. So, in the
spirit of “Do The Simplest Thing That Could Possibly Work,” we
have developed the TestSuite Framework, a namespace named TestSuite
that contains two key classes: Test and Suite.
The Test class is an abstract base class from which you
derive a test object. It keeps track of the number of passes and failures and
displays the text of any test condition that fails. You simply to override the run( )
member function, which should in turn call the test_( ) macro for
each Boolean test condition you define.
To define a test for the Date class using the
framework, you can inherit from Test as shown in the following program:
//: C02:DateTest.h
#ifndef DATETEST_H
#define DATETEST_H
#include "Date.h"
#include "../TestSuite/Test.h"
class DateTest : public TestSuite::Test {
Date mybday;
Date today;
Date myevebday;
public:
DateTest(): mybday(1951, 10, 1),
myevebday("19510930") {}
void run() {
testOps();
testFunctions();
testDuration();
}
void testOps() {
test_(mybday < today);
test_(mybday <= today);
test_(mybday != today);
test_(mybday == mybday);
test_(mybday >= mybday);
test_(mybday <= mybday);
test_(myevebday < mybday);
test_(mybday > myevebday);
test_(mybday >= myevebday);
test_(mybday != myevebday);
}
void testFunctions() {
test_(mybday.getYear() == 1951);
test_(mybday.getMonth() == 10);
test_(mybday.getDay() == 1);
test_(myevebday.getYear() == 1951);
test_(myevebday.getMonth() == 9);
test_(myevebday.getDay() == 30);
test_(mybday.toString() == "19511001");
test_(myevebday.toString() ==
"19510930");
}
void testDuration() {
Date d2(2003, 7, 4);
Date::Duration dur = duration(mybday, d2);
test_(dur.years == 51);
test_(dur.months == 9);
test_(dur.days == 3);
}
};
#endif // DATETEST_H ///:~
Running the test is a simple matter of instantiating a DateTest
object and calling its run( ) member function:
//: C02:DateTest.cpp
// Automated testing (with a framework).
//{L} Date ../TestSuite/Test
#include <iostream>
#include "DateTest.h"
using namespace std;
int main() {
DateTest test;
test.run();
return test.report();
}
/* Output:
Test "DateTest":
Passed: 21, Failed: 0
*/ ///:~
The Test::report( ) function displays the
previous output and returns the number of failures, so it is suitable to use as
a return value from main( ).
The Test class uses RTTI to
get the name of your class (for example, DateTest) for the report. There
is also a setStream( ) member function if you want the test results
sent to a file instead of to the standard output (the default). You’ll see the Test
class implementation later in this chapter.
The test_( ) macro can extract the text of the
Boolean condition that fails, along with its file name and line number. To see what
happens when a failure occurs, you can introduce an intentional error in the
code, for example by reversing the condition in the first call to test_( )
in DateTest::testOps( ) in the previous example code. The output
indicates exactly what test was in error and where it happened:
DateTest failure: (mybday > today) , DateTest.h
(line 31)
Test "DateTest":
Passed: 20 Failed: 1
In addition to test_( ), the framework includes
the functions succeed_( ) and fail_( ), for cases where
a Boolean test won’t do. These functions apply when the class you’re testing
might throw exceptions. During testing, create an input set that will cause the
exception to occur. If it doesn’t, it’s an error and you call fail_( )
explicitly to display a message and update the failure count. If it does throw
the exception as expected, you call succeed_( ) to update the
success count.
To illustrate, suppose we modify the specification of the
two non-default Date constructors to throw a DateError exception
(a type nested inside Date and derived from std::logic_error) if
the input parameters do not represent a valid date:
Date(const string& s) throw(DateError);
Date(int year, int month, int day) throw(DateError);
The DateTest::run( ) member function can now
call the following function to test the exception handling:
void testExceptions() {
try {
Date d(0,0,0); // Invalid
fail_("Invalid date undetected in Date int
ctor");
} catch(Date::DateError&) {
succeed_();
}
try {
Date d(""); // Invalid
fail_("Invalid date undetected in Date
string ctor");
} catch(Date::DateError&) {
succeed_();
}
}
In both cases, if an exception is not thrown, it is an
error. Notice that you must manually pass a message to fail_( ),
since no Boolean expression is being evaluated.
Real projects usually contain many classes, so you need a
way to group tests so that you can just push a single button to test the entire
project. The Suite
class collects tests into a functional unit. You add Test objects to a Suite
with the addTest( ) member function, or you can include an entire
existing suite with addSuite( ). To illustrate, the following
example collects the programs in Chapter 3 that use the Test class into
a single suite. Note that this file will appear in the Chapter 3 subdirectory:
//: C03:StringSuite.cpp
//{L} ../TestSuite/Test
../TestSuite/Suite
//{L} TrimTest
// Illustrates a test suite
for code from Chapter 3
#include <iostream>
#include
"../TestSuite/Suite.h"
#include
"StringStorage.h"
#include "Sieve.h"
#include "Find.h"
#include "Rparse.h"
#include
"TrimTest.h"
#include "CompStr.h"
using namespace std;
using namespace TestSuite;
int main() {
Suite suite("String
Tests");
suite.addTest(new
StringStorageTest);
suite.addTest(new
SieveTest);
suite.addTest(new
FindTest);
suite.addTest(new
RparseTest);
suite.addTest(new TrimTest);
suite.addTest(new
CompStrTest);
suite.run();
long nFail =
suite.report();
suite.free();
return nFail;
}
/* Output:
s1 = 62345
s2 = 12345
Suite "String Tests"
====================
Test
"StringStorageTest":
Passed: 2 Failed: 0
Test "SieveTest":
Passed: 50 Failed: 0
Test "FindTest":
Passed: 9 Failed: 0
Test "RparseTest":
Passed: 8 Failed: 0
Test "TrimTest":
Passed: 11 Failed: 0
Test "CompStrTest":
Passed: 8 Failed: 0
*/ ///:~
Five of the above tests are completely contained in header
files. TrimTest is not, because it contains static data that must be defined
in an implementation file. The two first two output lines are trace lines from
the StringStorage test. You must give the suite a name as a constructor
argument. The Suite::run( ) member function calls Test::run( )
for each of its contained tests. Much the same thing happens for Suite::report( ),
except that you can send the individual test reports to a different destination
stream than that of the suite report. If the test passed to addSuite( )
already has a stream pointer assigned, it keeps it. Otherwise, it gets its
stream from the Suite object. (As with Test, there is an optional
second argument to the suite constructor that defaults to std::cout.)
The destructor for Suite does not automatically delete the contained Test
pointers because they don’t need to reside on the heap; that’s the job of Suite::free( ).
The test framework code is in a subdirectory called TestSuite
in the code distribution available at www.MindView.net. To use it, include the
search path for the TestSuite subdirectory in your header, link the
object files, and include the TestSuite subdirectory in the library
search path. Here is the header for Test.h:
//: TestSuite:Test.h
#ifndef TEST_H
#define TEST_H
#include <string>
#include <iostream>
#include <cassert>
using std::string;
using std::ostream;
using std::cout;
// fail_() has an underscore to prevent collision with
// ios::fail(). For consistency, test_() and succeed_()
// also have underscores.
#define test_(cond) \
do_test(cond, #cond, __FILE__, __LINE__)
#define fail_(str) \
do_fail(str, __FILE__, __LINE__)
namespace TestSuite {
class Test {
ostream* osptr;
long nPass;
long nFail;
// Disallowed:
Test(const Test&);
Test& operator=(const Test&);
protected:
void do_test(bool cond, const string& lbl,
const char* fname, long lineno);
void do_fail(const string& lbl,
const char* fname, long lineno);
public:
Test(ostream* osptr = &cout) {
this->osptr = osptr;
nPass = nFail = 0;
}
virtual ~Test() {}
virtual void run() = 0;
long getNumPassed() const { return nPass; }
long getNumFailed() const { return nFail; }
const ostream* getStream() const { return osptr; }
void setStream(ostream* osptr) { this->osptr =
osptr; }
void succeed_() { ++nPass; }
long report() const;
virtual void reset() { nPass = nFail = 0; }
};
} // namespace TestSuite
#endif // TEST_H ///:~
There are three virtual functions in the Test class:
· A virtual destructor
· The function reset( )
· The pure virtual function run( )
As explained in Volume 1, it is an error to delete a derived
heap object through a base pointer unless the base class has a virtual
destructor. Any class intended to be a base class (usually evidenced by the
presence of at least one other virtual function) should have a virtual
destructor. The default implementation of the Test::reset( ) resets
the success and failure counters to zero. You might want to override this function
to reset the state of the data in your derived test object; just be sure to
call Test::reset( ) explicitly in your override so that the
counters are reset. The Test::run( ) member function is pure
virtual since you are required to override it in your derived class.
The test_( ) and fail_( ) macros can
include file name and line number information available from the preprocessor.
We originally omitted the trailing underscores in the names, but the fail( )
macro then collided with ios::fail( ), causing compiler errors.
Here is the implementation of the remainder of the Test
functions:
//: TestSuite:Test.cpp {O}
#include "Test.h"
#include <iostream>
#include <typeinfo>
using namespace std;
using namespace TestSuite;
void Test::do_test(bool cond, const std::string&
lbl,
const char* fname, long lineno) {
if(!cond)
do_fail(lbl, fname, lineno);
else
succeed_();
}
void Test::do_fail(const std::string& lbl,
const char* fname, long lineno) {
++nFail;
if(osptr) {
*osptr << typeid(*this).name()
<< "failure: (" << lbl
<< ") , " << fname
<< " (line " << lineno
<< ")" << endl;
}
}
long Test::report() const {
if(osptr) {
*osptr << "Test \"" <<
typeid(*this).name()
<< "\":\n\tPassed: "
<< nPass
<< "\tFailed: " <<
nFail
<< endl;
}
return nFail;
} ///:~
The Test class keeps track of the number of successes
and failures as well as the stream where you want Test::report( )
to display the results. The test_( ) and fail_( )
macros extract the current file name and line number information from the
preprocessor and pass the file name to do_test( ) and the line
number to do_fail( ), which do the actual work of displaying a
message and updating the appropriate counter. We can’t think of a good reason
to allow copy and assignment of test objects, so we have disallowed these
operations by making their prototypes private and omitting their respective
function bodies.
Here is the header file for Suite:
//: TestSuite:Suite.h
#ifndef SUITE_H
#define SUITE_H
#include <vector>
#include <stdexcept>
#include "../TestSuite/Test.h"
using std::vector;
using std::logic_error;
namespace TestSuite {
class TestSuiteError : public logic_error {
public:
TestSuiteError(const string& s = "")
: logic_error(s) {}
};
class Suite {
string name;
ostream* osptr;
vector<Test*> tests;
void reset();
// Disallowed ops:
Suite(const Suite&);
Suite& operator=(const Suite&);
public:
Suite(const string& name, ostream* osptr =
&cout)
: name(name) { this->osptr = osptr; }
string getName() const { return name; }
long getNumPassed() const;
long getNumFailed() const;
const ostream* getStream() const { return osptr; }
void setStream(ostream* osptr) { this->osptr =
osptr; }
void addTest(Test* t) throw(TestSuiteError);
void addSuite(const Suite&);
void run(); // Calls Test::run() repeatedly
long report() const;
void free(); // Deletes tests
};
} // namespace TestSuite
#endif // SUITE_H ///:~
The Suite class holds pointers to its Test
objects in a vector. Notice the exception specification on the addTest( )
member function. When you add a test to a suite, Suite::addTest( )
verifies that the pointer you pass is not null; if it is null, it throws a TestSuiteError
exception. Since this makes it impossible to add a null pointer to a suite, addSuite( )
asserts this condition on each of its tests, as do the other functions that
traverse the vector of tests (see the following implementation). Copy
and assignment are disallowed as they are in the Test class.
//: TestSuite:Suite.cpp {O}
#include "Suite.h"
#include <iostream>
#include <cassert>
#include <cstddef>
using namespace std;
using namespace TestSuite;
void Suite::addTest(Test* t) throw(TestSuiteError) {
// Verify test is valid and has a stream:
if(t == 0)
throw TestSuiteError("Null test in
Suite::addTest");
else if(osptr && !t->getStream())
t->setStream(osptr);
tests.push_back(t);
t->reset();
}
void Suite::addSuite(const Suite& s) {
for(size_t i = 0; i <
s.tests.size(); ++i) {
assert(tests[i]);
addTest(s.tests[i]);
}
}
void Suite::free() {
for(size_t i = 0; i < tests.size(); ++i) {
delete tests[i];
tests[i] = 0;
}
}
void Suite::run() {
reset();
for(size_t i = 0; i < tests.size(); ++i) {
assert(tests[i]);
tests[i]->run();
}
}
long Suite::report() const {
if(osptr) {
long totFail = 0;
*osptr << "Suite \"" <<
name
<< "\"\n=======";
size_t i;
for(i = 0; i < name.size(); ++i)
*osptr << '=';
*osptr << "="
<< endl;
for(i = 0; i <
tests.size(); ++i) {
assert(tests[i]);
totFail += tests[i]->report();
}
*osptr << "=======";
for(i = 0; i < name.size(); ++i)
*osptr << '=';
*osptr << "="
<< endl;
return totFail;
}
else
return getNumFailed();
}
long Suite::getNumPassed() const {
long totPass = 0;
for(size_t i = 0; i < tests.size(); ++i) {
assert(tests[i]);
totPass += tests[i]->getNumPassed();
}
return totPass;
}
long Suite::getNumFailed() const {
long totFail = 0;
for(size_t i = 0; i < tests.size(); ++i) {
assert(tests[i]);
totFail += tests[i]->getNumFailed();
}
return totFail;
}
void Suite::reset() {
for(size_t i = 0; i < tests.size(); ++i) {
assert(tests[i]);
tests[i]->reset();
}
} ///:~
We will be using the TestSuite framework wherever it
applies throughout the rest of this book.
The best debugging habit is to use assertions as explained
in the beginning of this chapter; by doing so you’ll help find logic errors
before they cause real trouble. This section contains some other tips and
techniques that might help during debugging.
Sometimes it’s useful to print the code of each statement as
it is executed, either to cout or to a trace file. Here’s a preprocessor
macro to accomplish this:
#define TRACE(ARG) cout << #ARG << endl; ARG
Now you can go through and surround the statements you trace
with this macro. However, this can introduce problems. For example, if you take
the statement:
for(int i = 0; i < 100; i++)
cout << i << endl;
and put both lines inside TRACE( ) macros, you
get this:
TRACE(for(int i = 0; i < 100; i++))
TRACE( cout << i << endl;)
which expands to this:
cout << "for(int i = 0; i < 100;
i++)" << endl;
for(int i = 0; i < 100; i++)
cout << "cout << i <<
endl;" << endl;
cout << i << endl;
which isn’t exactly what you want. Thus, you must use this
technique carefully.
The following is a variation on the TRACE( )
macro:
#define D(a) cout << #a "=[" << a <<
"]" << endl;
If you want to display an expression, you simply put it
inside a call to D( ). The expression is displayed, followed by its
value (assuming there’s an overloaded operator << for the result
type). For example, you can say D(a + b). You can use this macro any
time you want to check an intermediate value.
These two macros represent the two most fundamental things
you do with a debugger: trace through the code execution and display values. A
good debugger is an excellent productivity tool, but sometimes debuggers are
not available, or it’s not convenient to use them. These techniques always
work, regardless of the situation.
DISCLAIMER: This section and the next contain code which is
officially unsanctioned by the C++ Standard. In particular, we redefine cout
and new via macros, which can cause surprising results if you’re not
careful. Our examples work on all the compilers we use, however, and provide
useful information. This is the only place in this book where we will depart
from the sanctity of standard-compliant coding practice. Use at your own risk!
Note that in order for this to work, a using-declaration must be used, so that cout
isn’t prefixed by its namespace, i.e. std::cout will not work.
The following code easily creates a trace file and sends all
the output that would normally go to cout into that file. All you must
do is #define TRACEON and include the header file (of course, it’s
fairly easy just to write the two key lines right into your file):
//: C03:Trace.h
// Creating a trace file.
#ifndef TRACE_H
#define TRACE_H
#include <fstream>
#ifdef TRACEON
std::ofstream TRACEFILE__("TRACE.OUT");
#define cout TRACEFILE__
#endif
#endif // TRACE_H ///:~
Here’s a simple test of the previous file:
//: C03:Tracetst.cpp {-bor}
#include <iostream>
#include <fstream>
#include "../require.h"
using namespace std;
#define TRACEON
#include "Trace.h"
int main() {
ifstream
f("Tracetst.cpp");
assure(f, "Tracetst.cpp");
cout << f.rdbuf(); // Dumps file contents to
file
} ///:~
Because cout has been textually turned into something
else by Trace.h, all the cout statements in your program now send
information to the trace file. This is a convenient way of capturing your
output into a file, in case your operating system doesn’t make output
redirection easy.
The following straightforward debugging techniques are
explained in Volume 1:
1. For
array bounds checking, use the Array template in C16:Array3.cpp
of Volume 1 for all arrays. You can turn off the checking and increase
efficiency when you’re ready to ship. (Although this doesn’t deal with the case
of taking a pointer to an array.)
2. Check
for non-virtual destructors in base classes.
Tracking new/delete and malloc/free
Common problems with memory allocation include mistakenly
calling delete for memory that’s not on the free store, deleting the
free store more than once, and, most often, forgetting to delete a pointer.
This section discusses a system that can help you track down these kinds of
problems.
As an additional disclaimer beyond that of the
preceding section: because of the way we overload new, the following
technique may not work on all platforms, and will only work for programs that
do not call the function operator new( ) explicitly. We have been quite careful in this book to only present code that fully conforms to the C++
Standard, but in this one instance we’re making an exception for the following
reasons:
1. Even though it’s technically illegal, it works on many compilers.
2. We illustrate some useful thinking along the way.
To use the memory checking system, you simply include the
header file MemCheck.h, link the MemCheck.obj file into your
application to intercept all the calls to new and delete, and
call the macro MEM_ON( ) (explained later in this section) to
initiate memory tracing. A trace of all allocations and deallocations is
printed to the standard output (via stdout). When you use this system,
all calls to new store information about the file and line where they were called. This is accomplished by using the placement syntax for operator
new. Although you
typically use the placement syntax when you need to place objects at a specific
point in memory, it can also create an operator new( ) with any
number of arguments. This is used in the following example to store the results
of the __FILE__ and __LINE__ macros whenever new is
called:
//: C02:MemCheck.h
#ifndef MEMCHECK_H
#define MEMCHECK_H
#include <cstddef> // For size_t
// Usurp the new operator (both scalar and array
versions)
void* operator new(std::size_t, const char*, long);
void* operator new[](std::size_t, const char*, long);
#define new new (__FILE__, __LINE__)
extern bool traceFlag;
#define TRACE_ON() traceFlag = true
#define TRACE_OFF() traceFlag = false
extern bool activeFlag;
#define MEM_ON() activeFlag = true
#define MEM_OFF() activeFlag = false
#endif // MEMCHECK_H ///:~
It is important to include this file in any source file in
which you want to track free store activity, but include it last (after
your other #include directives). Most headers in the standard library
are templates, and since most compilers use the inclusion model of
template compilation (meaning all source code is in the headers), the macro
that replaces new in MemCheck.h would usurp all instances of the new
operator in the library source code (and would likely result in compile
errors). Besides, you are only interested in tracking your own memory errors,
not the library’s.
In the following file, which contains the memory tracking
implementation, everything is done with C standard I/O rather than with C++
iostreams. It shouldn’t make a difference, since we’re not interfering with
iostreams’ use of the free store, but when we tried it, some compilers
complained. All compilers were happy with the <cstdio> version.
//: C02:MemCheck.cpp {O}
#include <cstdio>
#include <cstdlib>
#include <cassert>
#include <cstddef>
using namespace std;
#undef new
// Global flags set by macros in MemCheck.h
bool traceFlag = true;
bool activeFlag = false;
namespace {
// Memory map entry type
struct Info {
void* ptr;
const char* file;
long line;
};
// Memory map data
const size_t MAXPTRS = 10000u;
Info memMap[MAXPTRS];
size_t nptrs = 0;
// Searches the map for an address
int findPtr(void* p) {
for(size_t i = 0; i < nptrs; ++i)
if(memMap[i].ptr == p)
return i;
return -1;
}
void delPtr(void* p) {
int pos = findPtr(p);
assert(pos >= 0);
// Remove pointer from map
for(size_t i = pos; i < nptrs-1; ++i)
memMap[i] = memMap[i+1];
--nptrs;
}
// Dummy type for static destructor
struct Sentinel {
~Sentinel() {
if(nptrs > 0) {
printf("Leaked memory at:\n");
for(size_t i = 0; i < nptrs; ++i)
printf("\t%p (file: %s, line %ld)\n",
memMap[i].ptr, memMap[i].file,
memMap[i].line);
}
else
printf("No user memory leaks!\n");
}
};
// Static dummy object
Sentinel s;
} // End anonymous namespace
// Overload scalar new
void*
operator new(size_t siz, const char* file, long line) {
void* p = malloc(siz);
if(activeFlag) {
if(nptrs == MAXPTRS) {
printf("memory map too small (increase
MAXPTRS)\n");
exit(1);
}
memMap[nptrs].ptr = p;
memMap[nptrs].file = file;
memMap[nptrs].line = line;
++nptrs;
}
if(traceFlag) {
printf("Allocated %u bytes at address %p
", siz, p);
printf("(file: %s, line: %ld)\n", file,
line);
}
return p;
}
// Overload array new
void*
operator new[](size_t siz, const
char* file, long line) {
return operator new(siz, file, line);
}
// Override scalar delete
void operator delete(void* p) {
if(findPtr(p) >= 0) {
free(p);
assert(nptrs > 0);
delPtr(p);
if(traceFlag)
printf("Deleted memory at address
%p\n", p);
}
else if(!p && activeFlag)
printf("Attempt to delete unknown pointer:
%p\n", p);
}
// Override array delete
void operator delete[](void* p) {
operator delete(p);
} ///:~
The Boolean flags traceFlag and activeFlag are
global, so they can be modified in your code by the macros TRACE_ON( ),
TRACE_OFF( ), MEM_ON( ), and MEM_OFF( ). In
general, enclose all the code in your main( ) within a MEM_ON( )-MEM_OFF( )
pair so that memory is always tracked. Tracing, which echoes the activity of
the replacement functions for operator new( ) and operator
delete( ), is on by default, but you can turn it off with TRACE_OFF( ).
In any case, the final results are always printed (see the test runs later in this
chapter).
The MemCheck facility tracks memory by keeping all
addresses allocated by operator new( ) in an array of Info
structures, which also holds the file name and line number where the call to new
occurred. To prevent collision with any names you have placed in the global
namespace, as much information as possible is kept inside the anonymous
namespace. The Sentinel class exists solely to call a static object
destructor as the program shuts down. This destructor inspects memMap to
see if any pointers are waiting to be deleted (indicating a memory leak).
Our operator new( ) uses malloc( )
to get memory, and then adds the pointer and its associated file information to
memMap. The operator delete( ) function undoes all that work
by calling free( ) and decrementing nptrs, but first it
checks to see if the pointer in question is in the map in the first place. If
it isn’t, either you’re trying to delete an address that isn’t on the free
store, or you’re trying to delete one that’s already been deleted and removed
from the map. The activeFlag variable is important here because we don’t
want to process any deallocations from any system shutdown activity. By calling
MEM_OFF( ) at the end of your code, activeFlag will be set
to false, and such subsequent calls to delete will be ignored. (That’s
bad in a real program, but our purpose here is to find your leaks; we’re
not debugging the library.) For simplicity, we forward all work for array new
and delete to their scalar counterparts.
The following is a simple test using the MemCheck
facility:
//: C02:MemTest.cpp
//{L} MemCheck
// Test of MemCheck system.
#include <iostream>
#include <vector>
#include <cstring>
#include "MemCheck.h" // Must appear last!
using namespace std;
class Foo {
char* s;
public:
Foo(const char*s ) {
this->s = new char[strlen(s) + 1];
strcpy(this->s, s);
}
~Foo() { delete [] s; }
};
int main() {
MEM_ON();
cout << "hello" << endl;
int* p = new int;
delete p;
int* q = new int[3];
delete [] q;
int* r;
delete r;
vector<int> v;
v.push_back(1);
Foo s("goodbye");
MEM_OFF();
} ///:~
This example verifies that you can use MemCheck in
the presence of streams, standard containers, and classes that allocate memory
in constructors. The pointers p and q are allocated and
deallocated without any problem, but r is not a valid heap pointer, so
the output indicates the error as an attempt to delete an unknown pointer:
hello
Allocated 4 bytes at address 0xa010778 (file:
memtest.cpp, line: 25)
Deleted memory at address 0xa010778
Allocated 12 bytes at address 0xa010778 (file:
memtest.cpp, line: 27)
Deleted memory at address 0xa010778
Attempt to delete unknown pointer: 0x1
Allocated 8 bytes at address 0xa0108c0 (file:
memtest.cpp, line: 14)
Deleted memory at address 0xa0108c0
No user memory leaks!
Because of the call to MEM_OFF( ), no subsequent
calls to operator delete( ) by vector or ostream are
processed. You still might get some calls to delete from reallocations
performed by the containers.
If you call TRACE_OFF( ) at the beginning of the
program, the output is
hello
Attempt to delete unknown pointer: 0x1
No user memory leaks!
Much of the headache of software engineering can be avoided
by being deliberate about what you’re doing. You’ve probably been using mental
assertions as you’ve crafted your loops and functions, even if you haven’t
routinely used the assert( ) macro. If you’ll use assert( ),
you’ll find logic errors sooner and end up with more readable code as well.
Remember to only use assertions for invariants, though, and not for runtime
error handling.
Nothing will give you more peace of mind than thoroughly
tested code. If it’s been a hassle for you in the past, use an automated
framework, such as the one we’ve presented here, to integrate routine testing
into your daily work. You (and your users!) will be glad you did.
Solutions
to selected exercises can be found in the electronic document The Thinking
in C++ Volume 2 Annotated Solution Guide, available for a small fee from www.MindView.net.
1. Write a test program using the TestSuite Framework for the
standard vector class that thoroughly tests the following member
functions with a vector of integers: push_back( ) (appends
an element to the end of the vector), front( ) (returns the
first element in the vector), back( ) (returns the last
element in the vector), pop_back( ) (removes the last
element without returning it), at( ) (returns the element in a
specified index position), and size( ) (returns the number of
elements). Be sure to verify that vector::at( ) throws a std::out_of_range
exception if the supplied index is out of range.
2. Suppose you are asked to develop a class named Rational
that supports rational numbers (fractions). The fraction in a Rational
object should always be stored in lowest terms, and a denominator of zero is an
error. Here is a sample interface for such a Rational class:
//: C02:Rational.h {-xo}
#ifndef RATIONAL_H
#define RATIONAL_H
#include <iosfwd>
class Rational {
public:
Rational(int numerator = 0, int denominator = 1);
Rational operator-() const;
friend Rational operator+(const Rational&,
const Rational&);
friend Rational operator-(const Rational&,
const Rational&);
friend Rational operator*(const Rational&,
const Rational&);
friend Rational operator/(const Rational&,
const Rational&);
friend std::ostream&
operator<<(std::ostream&, const
Rational&);
friend std::istream&
operator>>(std::istream&, Rational&);
Rational& operator+=(const Rational&);
Rational& operator-=(const Rational&);
Rational& operator*=(const Rational&);
Rational& operator/=(const Rational&);
friend bool operator<(const Rational&,
const Rational&);
friend bool operator>(const Rational&,
const Rational&);
friend bool operator<=(const Rational&,
const Rational&);
friend bool operator>=(const Rational&,
const Rational&);
friend bool operator==(const Rational&,
const Rational&);
friend bool operator!=(const Rational&,
const Rational&);
};
#endif // RATIONAL_H ///:~
Write a complete
specification for this class, including preconditions, postconditions, and
exception specifications.
3. Write a test using the TestSuite framework that thoroughly
tests all the specifications from the previous exercise, including testing
exceptions.
4. Implement the Rational class so that all the tests from
the previous exercise pass. Use assertions only for invariants.
5. The file BuggedSearch.cpp below contains a binary search
function that searches the range [beg, end) for what. There are
some bugs in the algorithm. Use the trace techniques from this chapter to debug
the search function.
//: C02:BuggedSearch.cpp {-xo}
//{L} ../TestSuite/Test
#include <cstdlib>
#include <ctime>
#include <cassert>
#include <fstream>
#include "../TestSuite/Test.h"
using namespace std;
// This function is only one with bugs
int* binarySearch(int* beg, int* end, int what) {
while(end - beg != 1) {
if(*beg == what) return beg;
int mid = (end - beg) / 2;
if(what <= beg[mid]) end = beg + mid;
else beg = beg + mid;
}
return 0;
}
class BinarySearchTest : public TestSuite::Test {
enum { SZ = 10 };
int* data;
int max; // Track largest number
int current; // Current non-contained number
// Used in notContained()
// Find the next number not contained in the array
int notContained() {
while(data[current] + 1 == data[current + 1])
++current;
if(current >= SZ) return max + 1;
int retValue = data[current++] + 1;
return retValue;
}
void setData() {
data = new int[SZ];
assert(!max);
// Input values with increments of one. Leave
// out some values on both odd and even indexes.
for(int i = 0; i < SZ;
rand() % 2 == 0 ? max += 1 : max += 2)
data[i++] = max;
}
void testInBound() {
// Test locations both odd and even
// not contained and contained
for(int i = SZ; --i >=0;)
test_(binarySearch(data, data + SZ, data[i]));
for(int i = notContained(); i < max;
i = notContained())
test_(!binarySearch(data, data + SZ, i));
}
void testOutBounds() {
// Test lower values
for(int i = data[0]; --i > data[0] - 100;)
test_(!binarySearch(data, data + SZ, i));
// Test higher values
for(int i = data[SZ - 1];
++i < data[SZ -1] + 100;)
test_(!binarySearch(data, data + SZ, i));
}
public:
BinarySearchTest() { max = current = 0; }
void run() {
setData();
testInBound();
testOutBounds();
delete [] data;
}
};
int main() {
srand(time(0));
BinarySearchTest t;
t.run();
return t.report();
} ///:~
Standard C++ not only incorporates all the Standard C libraries
(with small additions and changes to support type safety), it also adds
libraries of its own. These libraries are far more powerful than those in
Standard C; the leverage you get from them is analogous to the leverage you get
from changing from C to C++.
This section of the book gives you an in-depth introduction
to key portions of the Standard C++ library.
The most complete and also the most obscure reference to the
full libraries is the Standard itself. Bjarne Stroustrup’s The C++
Programming Language, Third Edition (Addison Wesley, 2000) remains a
reliable reference for both the language and the library. The most celebrated
library-only reference is The C++ Standard Library: A Tutorial and Reference,
by Nicolai Josuttis (Addison Wesley, 1999). The goal of the chapters in this
part of the book is to provide you with an encyclopedia of descriptions and
examples so that you’ll have a good starting point for solving any problem that
requires the use of the Standard libraries. However, some techniques and topics
are rarely used and are not covered here. If you can’t find it in these
chapters, reach for the other two books; this book is not intended to replace
those books but rather to complement them. In particular, we hope that after
going through the material in the following chapters you’ll have a much easier
time understanding those books.
You will notice that these chapters do not contain
exhaustive documentation describing every function and class in the Standard
C++ library. We’ve left the full descriptions to others; in particular to P.J. Plauger’s Dinkumware C/C++ Library Reference at http://www.dinkumware.com.
This is an excellent online source of standard library documentation in HTML format that you can keep resident on your computer and view with a
Web browser whenever you need to look something up. You can view this online or
purchase it for local viewing. It contains complete reference pages for the
both the C and C++ libraries (so it’s good to use for all your Standard C/C++
programming questions). Electronic documentation is effective not only because
you can always have it with you, but also because you can do an electronic
search.
When you’re actively programming, these resources should
satisfy your reference needs (and you can use them to look up anything in this
chapter that isn’t clear to you). Appendix A lists additional references.
The first chapter in this section introduces the Standard
C++ string class, which is a powerful tool that simplifies most of the
text-processing chores you might have. Chances are, anything you’ve done to
character strings with lines of code in C can be done with a member function
call in the string class.
Chapter 4 covers the iostreams library, which
contains classes for processing input and output with files, string targets,
and the system console.
Although Chapter 5, “Templates in Depth,” is not explicitly
a library chapter, it is necessary preparation for the two chapters that
follow. In Chapter 6 we examine the generic algorithms offered by the Standard
C++ library. Because they are implemented with templates, these algorithms can
be applied to any sequence of objects. Chapter 7 covers the standard
containers and their associated iterators. We cover algorithms first because
they can be fully explored by using only arrays and the vector container
(which we have been using since early in Volume 1). It is also natural to use
the standard algorithms in connection with containers, so it’s good to be
familiar with the algorithms before studying the containers.
String processing with character arrays is one of the biggest
time–wasters in C. Character arrays require the programmer to keep track of the
difference between static quoted strings and arrays created on the stack and
the heap, and the fact that sometimes you’re passing around a char* and
sometimes you must copy the whole array.
Especially because string manipulation is so common,
character arrays are a great source of misunderstandings and bugs. Despite
this, creating string classes remained a common exercise for beginning C++ programmers
for many years. The Standard C++ library string class solves the problem of character array manipulation once and for all, keeping track of memory even during
assignments and copy-constructions. You simply don’t need to think about it.
This chapter examines
the Standard C++ string class, beginning with a look at what constitutes
a C++ string and how the C++ version differs from a traditional C character
array. You’ll learn about operations and manipulations using string
objects, and you’ll see how C++ strings accommodate variation in
character sets and string data conversion.
Handling text is one of the oldest programming applications,
so it’s not surprising that the C++ string draws heavily on the ideas and
terminology that have long been used in C and other languages. As you begin to
acquaint yourself with C++ strings, this fact should be reassuring. No
matter which programming idiom you choose, there are three common things you
want to do with a string:
· Create or modify the sequence of characters stored in the string.
· Detect the presence or absence of elements within the string.
· Translate between various schemes for representing string
characters.
You’ll see how each of these jobs is accomplished using C++ string
objects.
In C, a string is simply an array of characters that always
includes a binary zero (often called the null terminator) as its final
array element. There are significant differences between C++ strings and
their C progenitors. First, and most important, C++ strings hide the
physical representation of the sequence of characters they contain. You don’t need
to be concerned about array dimensions or null terminators. A string
also contains certain “housekeeping” information about the size and storage
location of its data. Specifically, a C++ string object knows its
starting location in memory, its content, its length in characters, and the
length in characters to which it can grow before the string object must
resize its internal data buffer. C++ strings thus greatly reduce the likelihood
of making three of the most common and destructive C programming errors:
overwriting array bounds, trying to access arrays through uninitialized or
incorrectly valued pointers, and leaving pointers “dangling” after an array
ceases to occupy the storage that was once allocated to it.
The exact implementation of memory layout for the string
class is not defined by the C++ Standard. This architecture is intended to be
flexible enough to allow differing implementations by compiler vendors, yet
guarantee predictable behavior for users. In particular, the exact conditions
under which storage is allocated to hold data for a string object are not
defined. String allocation rules were formulated to allow but not require a
reference-counted implementation, but whether or not the implementation uses reference counting, the semantics must be the same. To put this a bit differently,
in C, every char array occupies a unique physical region of memory. In
C++, individual string objects may or may not occupy unique physical
regions of memory, but if reference counting avoids storing duplicate copies of
data, the individual objects must look and act as though they exclusively own unique
regions of storage. For example:
//: C03:StringStorage.h
#ifndef STRINGSTORAGE_H
#define STRINGSTORAGE_H
#include <iostream>
#include <string>
#include "../TestSuite/Test.h"
using std::cout;
using std::endl;
using std::string;
class StringStorageTest : public TestSuite::Test {
public:
void run() {
string s1("12345");
// This may copy the first to the second or
// use reference counting to simulate a copy:
string s2 = s1;
test_(s1 == s2);
// Either way, this statement must ONLY modify s1:
s1[0] = '6';
cout << "s1 = " << s1
<< endl; // 62345
cout << "s2 = " << s2
<< endl; // 12345
test_(s1 != s2);
}
};
#endif //
STRINGSTORAGE_H ///:~
//: C03:StringStorage.cpp
//{L} ../TestSuite/Test
#include "StringStorage.h"
int main() {
StringStorageTest t;
t.run();
return t.report();
} ///:~
We say that an implementation that only makes unique copies
when a string is modified uses a copy-on-write strategy. This approach
saves time and space when strings are used only as value parameters or in other
read-only situations.
Whether a library implementation uses reference counting or
not should be transparent to users of the string class. Unfortunately,
this is not always the case. In multithreaded programs, it is practically
impossible to use a reference-counting implementation safely.
Creating and initializing strings is a straightforward
proposition and fairly flexible. In the SmallString.cpp example below,
the first string, imBlank, is declared but contains no initial
value. Unlike a C char array, which would contain a random and
meaningless bit pattern until initialization, imBlank does contain
meaningful information. This string object is initialized to hold “no
characters” and can properly report its zero length and absence of data
elements using class member functions.
The next string, heyMom, is initialized by the
literal argument “Where are my socks?” This form of initialization uses a
quoted character array as a parameter to the string constructor. By
contrast, standardReply is simply initialized with an assignment. The
last string of the group, useThisOneAgain, is initialized using an
existing C++ string object. Put another way, this example illustrates
that string objects let you do the following:
· Create an empty string and defer initializing it with
character data.
· Initialize a string by passing a literal, quoted character
array as an argument to the constructor.
· Initialize a string using the equal sign (=).
· Use one string to initialize another.
//: C03:SmallString.cpp
#include <string>
using namespace std;
int main() {
string imBlank;
string heyMom("Where are my socks?");
string standardReply = "Beamed into deep "
"space on wide angle dispersion?";
string useThisOneAgain(standardReply);
} ///:~
These are the simplest forms of string
initialization, but variations offer more flexibility and control. You can do
the following:
· Use a portion of either a C char array or a C++ string.
· Combine different sources of initialization data using operator+.
· Use the string object’s substr( ) member function to create a substring.
Here’s a program that illustrates
these features:
//: C03:SmallString2.cpp
#include <string>
#include <iostream>
using namespace std;
int main() {
string s1("What is the sound of one clam
napping?");
string s2("Anything worth doing is worth
overdoing.");
string s3("I saw Elvis in a UFO");
// Copy the first 8 chars:
string s4(s1, 0, 8);
cout << s4 << endl;
// Copy 6 chars from the middle of the source:
string s5(s2, 15, 6);
cout << s5 << endl;
// Copy from middle to end:
string s6(s3, 6, 15);
cout << s6 << endl;
// Copy many different things:
string quoteMe = s4 + "that" +
// substr() copies 10 chars at element 20
s1.substr(20, 10) + s5 +
// substr() copies up to either 100 char
// or eos starting at element 5
"with" + s3.substr(5, 100) +
// OK to copy a single char this way
s1.substr(37, 1);
cout << quoteMe << endl;
} ///:~
The string member function substr( )
takes a starting position as its first argument and the number of characters to
select as the second argument. Both arguments have default values. If you say substr( )
with an empty argument list, you produce a copy of the entire string, so
this is a convenient way to duplicate a string.
Here’s the output from the program:
What is
doing
Elvis in a UFO
What is that one clam doing
with Elvis in a UFO?
Notice the final line of the example. C++ allows string
initialization techniques to be mixed in a single statement, a flexible and
convenient feature. Also notice that the last initializer copies just one
character from the source string.
Another slightly more subtle initialization technique
involves the use of the string iterators string::begin( )
and string::end( ). This technique treats a string like a container
object (which you’ve seen primarily in the form of vector so far—you’ll
see many more containers in Chapter 7), which uses iterators to indicate
the start and end of a sequence of characters. In this way you can hand a string
constructor two iterators, and it copies from one to the other into the new string:
//: C03:StringIterators.cpp
#include <string>
#include <iostream>
#include <cassert>
using namespace std;
int main() {
string source("xxx");
string s(source.begin(), source.end());
assert(s == source);
} ///:~
The iterators are not restricted to begin( ) and
end( ); you can increment, decrement, and add integer offsets to
them, allowing you to extract a subset of characters from the source string.
C++ strings may not be initialized with single
characters or with ASCII or other integer values. You can initialize a string
with a number of copies of a single character, however:
//: C03:UhOh.cpp
#include <string>
#include <cassert>
using namespace std;
int main() {
// Error: no single char inits
//! string nothingDoing1('a');
// Error: no integer inits
//! string nothingDoing2(0x37);
// The following is legal:
string okay(5, 'a');
assert(okay == string("aaaaa"));
} ///:~
The first argument indicates the number of copies of the
second argument to place in the string. The second argument can only be a
single char, not a char array.
If you’ve programmed in C, you are accustomed to the family
of functions that write, search, modify, and copy char arrays. There are
two unfortunate aspects of the Standard C library functions for handling char
arrays. First, there are two loosely organized families of them: the “plain”
group, and the ones that require you to supply a count of the number of
characters to be considered in the operation at hand. The roster of functions
in the C char array library shocks the unsuspecting user with a long
list of cryptic, mostly unpronounceable names. Although the type and number of
arguments to the functions are somewhat consistent, to use them properly you
must be attentive to details of function naming and parameter passing.
The second inherent trap of the standard C char array
tools is that they all rely explicitly on the assumption that the character
array includes a null terminator. If by oversight or error the null is omitted
or overwritten, there’s little to keep the C char array functions from
manipulating the memory beyond the limits of the allocated space, sometimes
with disastrous results.
C++ provides a vast improvement in the convenience and
safety of string objects. For purposes of actual string handling
operations, there are about the same number of distinct member function names
in the string class as there are functions in the C library, but because
of overloading the functionality is much greater. Coupled with sensible naming
practices and the judicious use of default arguments, these features combine to
make the string class much easier to use than the C library char
array functions.
One of the most valuable and convenient aspects of C++ strings
is that they grow as needed, without intervention on the part of the
programmer. Not only does this make string-handling code inherently more
trustworthy, it also almost entirely eliminates a tedious “housekeeping”
chore—keeping track of the bounds of the storage where your strings live. For
example, if you create a string object and initialize it with a string of 50
copies of ‘X’, and later store in it 50 copies of “Zowie”, the object itself
will reallocate sufficient storage to accommodate the growth of the data.
Perhaps nowhere is this property more appreciated than when the strings
manipulated in your code change size and you don’t know how big the change is. The
string member functions append( ) and insert( )
transparently reallocate storage when a string grows:
//: C03:StrSize.cpp
#include <string>
#include <iostream>
using namespace std;
int main() {
string bigNews("I saw Elvis in a UFO. ");
cout << bigNews << endl;
// How much data have we actually got?
cout << "Size = " <<
bigNews.size() << endl;
// How much can we store without reallocating?
cout << "Capacity = " <<
bigNews.capacity() << endl;
// Insert this string in bigNews immediately
// before bigNews[1]:
bigNews.insert(1, " thought I");
cout << bigNews << endl;
cout << "Size = " <<
bigNews.size() << endl;
cout << "Capacity = " <<
bigNews.capacity() << endl;
// Make sure that there will be this much space
bigNews.reserve(500);
// Add this to the end of the string:
bigNews.append("I've been working too
hard.");
cout << bigNews << endl;
cout << "Size = " <<
bigNews.size() << endl;
cout << "Capacity = " <<
bigNews.capacity() << endl;
} ///:~
Here is the output from one particular compiler:
I saw Elvis in a UFO.
Size = 22
Capacity = 31
I thought I saw Elvis in a UFO.
Size = 32
Capacity = 47
I thought I saw Elvis in a UFO. I've been
working too hard.
Size = 59
Capacity = 511
This example demonstrates that even though you can safely
relinquish much of the responsibility for allocating and managing the memory
your strings occupy, C++ strings provide you with several tools
to monitor and manage their size. Notice the ease with which we changed the
size of the storage allocated to the string. The size( ) function returns the number of characters currently stored in the string and is identical to the length( ) member function. The capacity( ) function returns
the size of the current underlying allocation, meaning the number of characters
the string can hold without requesting more storage. The reserve( )
function is an optimization mechanism that indicates your intention to specify
a certain amount of storage for future use; capacity( ) always
returns a value at least as large as the most recent call to reserve( ).
A resize( ) function appends spaces if the new size is greater than
the current string size or truncates the string otherwise. (An overload of resize( )
can specify a different character to append.)
The exact fashion that the string member functions
allocate space for your data depends on the implementation of the library. When
we tested one implementation with the previous example, it appeared that
reallocations occurred on even word (that is, full-integer) boundaries, with
one byte held back. The architects of the string class have endeavored
to make it possible to mix the use of C char arrays and C++ string
objects, so it is likely that figures reported by StrSize.cpp for capacity
reflect that, in this particular implementation, a byte is set aside to easily
accommodate the insertion of a null terminator.
The insert( ) function is particularly
nice because it absolves you from making sure the insertion of characters in a
string won’t overrun the storage space or overwrite the characters immediately
following the insertion point. Space grows, and existing characters politely
move over to accommodate the new elements. Sometimes this might not be what you
want. If you want the size of the string to remain unchanged, use the replace( ) function to overwrite characters. There are a number of
overloaded versions of replace( ), but the simplest one takes three
arguments: an integer indicating where to start in the string, an integer
indicating how many characters to eliminate from the original string, and the
replacement string (which can be a different number of characters than the
eliminated quantity). Here’s a simple example:
//: C03:StringReplace.cpp
// Simple find-and-replace in strings.
#include <cassert>
#include <string>
using namespace std;
int main() {
string s("A piece of text");
string tag("$tag$");
s.insert(8, tag + ' ');
assert(s == "A piece $tag$
of text");
int start = s.find(tag);
assert(start == 8);
assert(tag.size() == 5);
s.replace(start, tag.size(), "hello
there");
assert(s == "A piece hello there of text");
} ///:~
The tag is first inserted into s (notice that
the insert happens before the value indicating the insert point and that
an extra space was added after tag), and then it is found and replaced.
You should check to see if you’ve found anything before you
perform a replace( ). The previous example replaces with a char*,
but there’s an overloaded version that replaces with a string. Here’s
a more complete demonstration replace( ):
//: C03:Replace.cpp
#include <cassert>
#include <cstddef> // For size_t
#include <string>
using namespace std;
void replaceChars(string& modifyMe,
const string& findMe, const string& newChars)
{
// Look in modifyMe for the "find string"
// starting at position 0:
size_t i = modifyMe.find(findMe, 0);
// Did we find the string to replace?
if(i != string::npos)
// Replace the find string with newChars:
modifyMe.replace(i, findMe.size(), newChars);
}
int main() {
string bigNews = "I thought I saw Elvis in a
UFO. "
"I have been working too
hard.";
string replacement("wig");
string findMe("UFO");
// Find "UFO" in bigNews and overwrite it:
replaceChars(bigNews, findMe, replacement);
assert(bigNews == "I thought I saw Elvis in a
"
"wig. I have been working too
hard.");
} ///:~
If replace doesn’t find the search string, it returns
string::npos. The npos data member is a static constant member of
the string class that represents a nonexistent character position.
Unlike insert( ), replace( ) won’t
grow the string’s storage space if you copy new characters into the
middle of an existing series of array elements. However, it will grow the storage space if needed, for example, when you make a “replacement” that would
expand the original string beyond the end of the current allocation. Here’s an
example:
//: C03:ReplaceAndGrow.cpp
#include <cassert>
#include <string>
using namespace std;
int main() {
string bigNews("I have been working the
grave.");
string replacement("yard shift.");
// The first argument says "replace chars
// beyond the end of the existing string":
bigNews.replace(bigNews.size() - 1,
replacement.size(), replacement);
assert(bigNews == "I have been working the
"
"graveyard shift.");
} ///:~
The call to replace( ) begins “replacing” beyond
the end of the existing array, which is equivalent to an append operation.
Notice that in this example replace( ) expands the array
accordingly.
You may have been hunting through this chapter trying to do
something relatively simple such as replace all the instances of one character
with a different character. Upon finding the previous material on replacing,
you thought you found the answer, but then you started seeing groups of
characters and counts and other things that looked a bit too complex. Doesn’t string
have a way to just replace one character with another everywhere?
You can easily write such a function using the find( )
and replace( ) member functions as follows:
//: C03:ReplaceAll.h
#ifndef REPLACEALL_H
#define REPLACEALL_H
#include <string>
std::string& replaceAll(std::string& context,
const std::string& from, const std::string&
to);
#endif // REPLACEALL_H ///:~
//: C03:ReplaceAll.cpp {O}
#include <cstddef>
#include "ReplaceAll.h"
using namespace std;
string& replaceAll(string& context, const
string& from,
const string& to) {
size_t lookHere = 0;
size_t foundHere;
while((foundHere = context.find(from, lookHere))
!= string::npos) {
context.replace(foundHere, from.size(), to);
lookHere = foundHere + to.size();
}
return context;
} ///:~
The version of find( ) used here takes as a
second argument the position to start looking in and returns string::npos
if it doesn’t find it. It is important to advance the position held in the
variable lookHere past the replacement string, in case from is a
substring of to. The following program tests the replaceAll
function:
//: C03:ReplaceAllTest.cpp
//{L} ReplaceAll
#include <cassert>
#include <iostream>
#include <string>
#include "ReplaceAll.h"
using namespace std;
int main() {
string text = "a man, a plan, a canal, Panama";
replaceAll(text, "an", "XXX");
assert(text == "a mXXX, a plXXX, a cXXXal, PXXXama");
} ///:~
As you can see, the string class by itself doesn’t
solve all possible problems. Many solutions have been left to the algorithms in
the Standard library because
the string class can look just like an STL sequence (by virtue of the
iterators discussed earlier). All the generic algorithms work on a “range” of
elements within a container. Usually that range is just “from the beginning of
the container to the end.” A string object looks like a container of
characters: to get the beginning of the range you use string::begin( ),
and to get the end of the range you use string::end( ). The
following example shows the use of the replace( ) algorithm to
replace all the instances of the single character ‘X’ with ‘Y’:
//: C03:StringCharReplace.cpp
#include <algorithm>
#include <cassert>
#include <string>
using namespace std;
int main() {
string s("aaaXaaaXXaaXXXaXXXXaaa");
replace(s.begin(), s.end(), 'X', 'Y');
assert(s == "aaaYaaaYYaaYYYaYYYYaaa");
} ///:~
Notice that this replace( ) is not called
as a member function of string. Also, unlike the string::replace( )
functions that only perform one replacement, the replace( )
algorithm replaces all instances of one character with another.
The replace( ) algorithm only works with single
objects (in this case, char objects) and will not replace quoted char
arrays or string objects. Since a string behaves like an STL
sequence, a number of other algorithms can be applied to it, which might solve
other problems that are not directly addressed by the string member
functions.
One of the most delightful discoveries awaiting a C
programmer learning about C++ string handling is how simply strings
can be combined and appended using operator+ and operator+=. These
operators make combining strings syntactically similar to adding numeric
data:
//: C03:AddStrings.cpp
#include <string>
#include <cassert>
using namespace std;
int main() {
string s1("This ");
string s2("That ");
string s3("The other ");
// operator+ concatenates strings
s1 = s1 + s2;
assert(s1 == "This That ");
// Another way to concatenates strings
s1 += s3;
assert(s1 == "This That The other ");
// You can index the string on the right
s1 += s3 + s3[4] + "ooh lala";
assert(s1 == "This That The other The other oooh
lala");
} ///:~
Using the operator+ and operator+= operators
is a flexible and convenient way to combine string data. On
the right side of the statement, you can use almost any type that evaluates to
a group of one or more characters.
The find family of string member functions
locates a character or group of characters within a given string. Here are the
members of the find family and their general usage :
|
string find member function
|
What/how it finds
|
|
find( )
|
Searches a string for a specified character or group of
characters and returns the starting position of the first occurrence found or
npos if no match is found.
|
|
find_first_of( )
|
Searches a target string and returns the position of the
first match of any character in a specified group. If no match is
found, it returns npos.
|
|
find_last_of( )
|
Searches a target string and returns the position of the
last match of any character in a specified group. If no match is
found, it returns npos.
|
|
find_first_not_of( )
|
Searches a target string and returns the position of the
first element that doesn’t match any character in a specified
group. If no such element is found, it returns npos.
|
|
find_last_not_of( )
|
Searches a target string and returns the position of the
element with the largest subscript that doesn’t match any
character in a specified group. If no such element is found, it returns npos.
|
|
rfind( )
|
Searches a string from end to beginning for a specified
character or group of characters and returns the starting position of the
match if one is found. If no match is found, it returns npos.
|
The simplest use of find( )
searches for one or more characters in a string. This overloaded
version of find( ) takes a parameter that specifies the
character(s) for which to search and optionally a parameter that tells it where
in the string to begin searching for the occurrence of a substring. (The default
position at which to begin searching is 0.) By setting the call to find inside
a loop, you can easily move through a string, repeating a search to find all
the occurrences of a given character or group of characters within the string.
The following program uses the method of The Sieve of
Eratosthenes to find prime numbers less than 50. This method starts with
the number 2, marks all subsequent multiples of 2 as not prime, and repeats the
process for the next prime candidate. The SieveTest constructor
initializes sieveChars by setting the initial size of the character
array and writing the value ‘P’ to each of its members.
//: C03:Sieve.h
#ifndef SIEVE_H
#define SIEVE_H
#include <cmath>
#include <cstddef>
#include <string>
#include "../TestSuite/Test.h"
using std::size_t;
using std::sqrt;
using std::string;
class SieveTest : public TestSuite::Test {
string sieveChars;
public:
// Create a 50 char string and set each
// element to 'P' for Prime:
SieveTest() : sieveChars(50, 'P') {}
void run() {
findPrimes();
testPrimes();
}
bool isPrime(int p) {
if(p == 0 || p == 1) return false;
int root = int(sqrt(double(p)));
for(int i = 2; i <= root; ++i)
if(p % i == 0) return false;
return true;
}
void findPrimes() {
// By definition neither 0 nor 1 is prime.
// Change these elements to "N" for Not
Prime:
sieveChars.replace(0, 2, "NN");
// Walk through the array:
size_t sieveSize = sieveChars.size();
int root = int(sqrt(double(sieveSize)));
for(int i = 2; i <= root; ++i)
// Find all the multiples:
for(size_t factor = 2; factor * i < sieveSize;
++factor)
sieveChars[factor * i] = 'N';
}
void testPrimes() {
size_t i = sieveChars.find('P');
while(i != string::npos) {
test_(isPrime(i++));
i = sieveChars.find('P', i);
}
i = sieveChars.find_first_not_of('P');
while(i != string::npos) {
test_(!isPrime(i++));
i = sieveChars.find_first_not_of('P', i);
}
}
};
#endif // SIEVE_H ///:~
//: C03:Sieve.cpp
//{L} ../TestSuite/Test
#include "Sieve.h"
int main() {
SieveTest t;
t.run();
return t.report();
} ///:~
The find( ) function can walk forward through a string,
detecting multiple occurrences of a character or a group of characters, and find_first_not_of( )
finds other characters or substrings.
There are no functions in the string class to change
the case of a string, but you can easily create these functions using the
Standard C library functions toupper( ) and tolower( ),
which change the case of one character at a time. The following example
illustrates a case-insensitive search:
//: C03:Find.h
#ifndef FIND_H
#define FIND_H
#include <cctype>
#include <cstddef>
#include <string>
#include "../TestSuite/Test.h"
using std::size_t;
using std::string;
using std::tolower;
using std::toupper;
// Make an uppercase copy of s
inline string upperCase(const string& s) {
string upper(s);
for(size_t i = 0; i < s.length(); ++i)
upper[i] = toupper(upper[i]);
return upper;
}
// Make a lowercase copy of s
inline string lowerCase(const string& s) {
string lower(s);
for(size_t i = 0; i < s.length(); ++i)
lower[i] = tolower(lower[i]);
return lower;
}
class FindTest : public TestSuite::Test {
string chooseOne;
public:
FindTest() : chooseOne("Eenie, Meenie, Miney,
Mo") {}
void testUpper() {
string upper = upperCase(chooseOne);
const string LOWER =
"abcdefghijklmnopqrstuvwxyz";
test_(upper.find_first_of(LOWER) == string::npos);
}
void testLower() {
string lower = lowerCase(chooseOne);
const string UPPER =
"ABCDEFGHIJKLMNOPQRSTUVWXYZ";
test_(lower.find_first_of(UPPER) == string::npos);
}
void testSearch() {
// Case sensitive search
size_t i = chooseOne.find("een");
test_(i == 8);
// Search lowercase:
string test = lowerCase(chooseOne);
i = test.find("een");
test_(i == 0);
i = test.find("een", ++i);
test_(i == 8);
i = test.find("een", ++i);
test_(i == string::npos);
// Search uppercase:
test = upperCase(chooseOne);
i = test.find("EEN");
test_(i == 0);
i = test.find("EEN", ++i);
test_(i == 8);
i = test.find("EEN", ++i);
test_(i == string::npos);
}
void run() {
testUpper();
testLower();
testSearch();
}
};
#endif // FIND_H ///:~
//: C03:Find.cpp
//{L} ../TestSuite/Test
#include "Find.h"
#include "../TestSuite/Test.h"
int main() {
FindTest t;
t.run();
return t.report();
} ///:~
Both the upperCase( ) and lowerCase( )
functions follow the same form: they make a copy of the argument string
and change the case. The Find.cpp program isn’t the best solution to the
case-sensitivity problem, so we’ll revisit it when we examine string
comparisons.
If you need to search through a string from end to
beginning (to find the data in “last in / first out” order), you can use the
string member function rfind( ):
//: C03:Rparse.h
#ifndef RPARSE_H
#define RPARSE_H
#include <cstddef>
#include <string>
#include <vector>
#include "../TestSuite/Test.h"
using std::size_t;
using std::string;
using std::vector;
class RparseTest : public TestSuite::Test {
// To store the words:
vector<string> strings;
public:
void parseForData() {
// The ';' characters will be delimiters
string
s("now.;sense;make;to;going;is;This");
// The last element of the string:
int last = s.size();
// The beginning of the current word:
size_t current = s.rfind(';');
// Walk backward through the string:
while(current != string::npos) {
// Push each word into the vector.
// Current is incremented before copying
// to avoid copying the delimiter:
++current;
strings.push_back(s.substr(current, last - current));
// Back over the delimiter we just found,
// and set last to the end of the next word:
current -= 2;
last = current + 1;
// Find the next delimiter:
current = s.rfind(';', current);
}
// Pick up the first word -- it's not
// preceded by a delimiter:
strings.push_back(s.substr(0, last));
}
void testData() {
// Test them in the new order:
test_(strings[0] == "This");
test_(strings[1] == "is");
test_(strings[2] == "going");
test_(strings[3] == "to");
test_(strings[4] == "make");
test_(strings[5] == "sense");
test_(strings[6] == "now.");
string sentence;
for(size_t i = 0; i < strings.size() - 1; i++)
sentence += strings[i] += " ";
// Manually put last word in to avoid an extra
space:
sentence += strings[strings.size() - 1];
test_(sentence == "This is going to make sense
now.");
}
void run() {
parseForData();
testData();
}
};
#endif // RPARSE_H ///:~
//: C03:Rparse.cpp
//{L} ../TestSuite/Test
#include "Rparse.h"
int main() {
RparseTest t;
t.run();
return t.report();
} ///:~
The string member function rfind( ) backs
through the string looking for tokens and reports the array index of matching
characters or string::npos if it is unsuccessful.
The find_first_of( ) and find_last_of( )
member functions can be conveniently put to work to create a little utility
that will strip whitespace characters from both ends of a string. Notice that
it doesn’t touch the original string, but instead returns a new string:
//: C03:Trim.h
// General tool to strip spaces from both ends.
#ifndef TRIM_H
#define TRIM_H
#include <string>
#include <cstddef>
inline std::string trim(const std::string& s) {
if(s.length() == 0)
return s;
std::size_t beg = s.find_first_not_of("
\a\b\f\n\r\t\v");
std::size_t end = s.find_last_not_of("
\a\b\f\n\r\t\v");
if(beg == std::string::npos) // No non-spaces
return "";
return std::string(s, beg, end - beg + 1);
}
#endif // TRIM_H ///:~
The first test checks for an empty string; in that
case, no tests are made, and a copy is returned. Notice that once the end
points are found, the string constructor builds a new string from
the old one, giving the starting count and the length.
Testing such a general-purpose tool needs to be thorough:
//: C03:TrimTest.h
#ifndef TRIMTEST_H
#define TRIMTEST_H
#include "Trim.h"
#include "../TestSuite/Test.h"
class TrimTest : public TestSuite::Test {
enum {NTESTS = 11};
static std::string s[NTESTS];
public:
void testTrim() {
test_(trim(s[0]) == "abcdefghijklmnop");
test_(trim(s[1]) == "abcdefghijklmnop");
test_(trim(s[2]) == "abcdefghijklmnop");
test_(trim(s[3]) == "a");
test_(trim(s[4]) == "ab");
test_(trim(s[5]) == "abc");
test_(trim(s[6]) == "a b c");
test_(trim(s[7]) == "a b c");
test_(trim(s[8]) == "a \t b \t c");
test_(trim(s[9]) == "");
test_(trim(s[10]) == "");
}
void run() {
testTrim();
}
};
#endif // TRIMTEST_H ///:~
//: C03:TrimTest.cpp {O}
#include "TrimTest.h"
// Initialize static data
std::string TrimTest::s[TrimTest::NTESTS] = {
" \t abcdefghijklmnop \t ",
"abcdefghijklmnop \t ",
" \t abcdefghijklmnop",
"a", "ab", "abc",
"a b c",
" \t a b c \t ", " \t a \t b \t c \t
",
"\t \n \r \v \f",
"" // Must also test the empty string
}; ///:~
//: C03:TrimTestMain.cpp
//{L} ../TestSuite/Test TrimTest
#include "TrimTest.h"
int main() {
TrimTest t;
t.run();
return t.report();
} ///:~
In the array of strings, you can see that the
character arrays are automatically converted to string objects. This
array provides cases to check the removal of spaces and tabs from both ends, as
well as ensuring that spaces and tabs are not removed from the middle of a string.
Removing characters is easy and efficient with the erase( ) member function, which takes two arguments: where to start
removing characters (which defaults to 0), and how many to remove (which
defaults to string::npos). If you specify more characters than remain in
the string, the remaining characters are all erased anyway (so calling erase( )
without any arguments removes all characters from a string). Sometimes it’s
useful to take an HTML file and strip its tags and special characters so that
you have something approximating the text that would be displayed in the Web
browser, only as a plain text file. The following example uses erase( )
to do the job:
//: C03:HTMLStripper.cpp {RunByHand}
//{L} ReplaceAll
// Filter to remove html tags and markers.
#include <cassert>
#include <cmath>
#include <cstddef>
#include <fstream>
#include <iostream>
#include <string>
#include "ReplaceAll.h"
#include "../require.h"
using namespace std;
string& stripHTMLTags(string& s) {
static bool inTag = false;
bool done = false;
while(!done) {
if(inTag) {
// The previous line started an HTML tag
// but didn't finish. Must search for '>'.
size_t rightPos = s.find('>');
if(rightPos != string::npos) {
inTag = false;
s.erase(0, rightPos + 1);
}
else {
done = true;
s.erase();
}
}
else {
// Look for start of tag:
size_t leftPos = s.find('<');
if(leftPos != string::npos) {
// See if tag close is in this line:
size_t rightPos = s.find('>');
if(rightPos == string::npos) {
inTag = done = true;
s.erase(leftPos);
}
else
s.erase(leftPos, rightPos - leftPos + 1);
}
else
done = true;
}
}
// Remove all special HTML characters
replaceAll(s, "<",
"<");
replaceAll(s, ">",
">");
replaceAll(s, "&",
"&");
replaceAll(s, " ", " ");
// Etc...
return s;
}
int main(int argc, char* argv[]) {
requireArgs(argc, 1,
"usage: HTMLStripper InputFile");
ifstream in(argv[1]);
assure(in, argv[1]);
string s;
while(getline(in, s))
if(!stripHTMLTags(s).empty())
cout << s << endl;
} ///:~
This example will even strip HTML tags that span multiple
lines. This is
accomplished with the static flag, inTag, which is true whenever
the start of a tag is found, but the accompanying tag end is not found in the
same line. All forms of erase( ) appear in the stripHTMLFlags( )
function. The
version of getline( ) we use here is a (global) function declared
in the <string> header and is handy because it stores an
arbitrarily long line in its string argument. You don’t need to worry
about the dimension of a character array as you do with istream::getline( ).
Notice that this program uses the replaceAll( ) function from
earlier in this chapter. In the next chapter, we’ll use string streams to
create a more elegant solution.
Comparing strings is inherently different from comparing
numbers. Numbers have constant, universally meaningful values. To evaluate the
relationship between the magnitudes of two strings, you must make a lexical
comparison. Lexical comparison means that when you test a character to see
if it is “greater than” or “less than” another character, you are actually
comparing the numeric representation of those characters as specified in the
collating sequence of the character set being used. Most often this will be the
ASCII collating sequence, which assigns the printable characters for the
English language numbers in the range 32 through 127 decimal. In the ASCII
collating sequence, the first “character” in the list is the space, followed by
several common punctuation marks, and then uppercase and lowercase letters.
With respect to the alphabet, this means that the letters nearer the front have
lower ASCII values than those nearer the end. With these details in mind, it
becomes easier to remember that when a lexical comparison that reports s1
is “greater than” s2, it simply means that when the two were compared,
the first differing character in s1 came later in the alphabet than the
character in that same position in s2.
C++ provides several ways to compare strings, and each has
advantages. The simplest to use are the nonmember, overloaded operator
functions: operator ==, operator != operator >, operator
<, operator >=, and operator <=.
//: C03:CompStr.h
#ifndef COMPSTR_H
#define COMPSTR_H
#include <string>
#include "../TestSuite/Test.h"
using std::string;
class CompStrTest : public TestSuite::Test {
public:
void run() {
// Strings to compare
string s1("This");
string s2("That");
test_(s1 == s1);
test_(s1 != s2);
test_(s1 > s2);
test_(s1 >= s2);
test_(s1 >= s1);
test_(s2 < s1);
test_(s2 <= s1);
test_(s1 <= s1);
}
};
#endif // COMPSTR_H ///:~
//: C03:CompStr.cpp
//{L} ../TestSuite/Test
#include "CompStr.h"
int main() {
CompStrTest t;
t.run();
return t.report();
} ///:~
The overloaded comparison operators are useful for comparing
both full strings and individual string character elements.
Notice in the following example the flexibility of argument
types on both the left and right side of the comparison operators. For
efficiency, the string class provides overloaded operators for the
direct comparison of string objects, quoted literals, and pointers to C-style
strings without having to create temporary string objects.
//: C03:Equivalence.cpp
#include <iostream>
#include <string>
using namespace std;
int main() {
string s2("That"), s1("This");
// The lvalue is a quoted literal
// and the rvalue is a string:
if("That" == s2)
cout << "A match" << endl;
// The left operand is a string and the right is
// a pointer to a C-style null terminated string:
if(s1 != s2.c_str())
cout << "No match" << endl;
} ///:~
The c_str( ) function returns a const char*
that points to a C-style, null-terminated string equivalent to the contents of
the string object. This comes in handy when you want to pass a string to
a standard C function, such as atoi( ) or any of the functions
defined in the <cstring> header. It is an error to use the value
returned by c_str( ) as non-const argument to any function.
You won’t find the logical not (!) or the logical
comparison operators (&& and ||) among operators for a
string. (Neither will you find overloaded versions of the bitwise C operators &,
|, ^, or ~.) The overloaded nonmember comparison operators
for the string class are limited to the subset that has clear, unambiguous
application to single characters or groups of characters.
The compare( ) member function offers you a
great deal more sophisticated and precise comparison than the nonmember
operator set. It provides overloaded versions to compare:
· Two complete strings.
· Part of either string to a complete string.
· Subsets of two strings.
The following example compares complete strings:
//: C03:Compare.cpp
// Demonstrates compare() and swap().
#include <cassert>
#include <string>
using namespace std;
int main() {
string first("This");
string second("That");
assert(first.compare(first) == 0);
assert(second.compare(second) == 0);
// Which is lexically greater?
assert(first.compare(second) > 0);
assert(second.compare(first) < 0);
first.swap(second);
assert(first.compare(second) < 0);
assert(second.compare(first) > 0);
} ///:~
The swap( ) function in this example does what
its name implies: it exchanges the contents of its object and argument. To
compare a subset of the characters in one or both strings, you add arguments
that define where to start the comparison and how many characters to consider.
For example, we can use the following overloaded version of compare( ):
s1.compare(s1StartPos, s1NumberChars, s2, s2StartPos,
s2NumberChars);
Here’s an example:
//: C03:Compare2.cpp
// Illustrate overloaded compare().
#include <cassert>
#include <string>
using namespace std;
int main() {
string first("This is a day that will live in
infamy");
string second("I don't believe that this is what
"
"I signed up for");
// Compare "his is" in both strings:
assert(first.compare(1, 7, second, 22, 7) == 0);
// Compare "his is a" to "his is w":
assert(first.compare(1, 9, second, 22, 9) < 0);
} ///:~
In the examples so far, we have used C-style array indexing
syntax to refer to an individual character in a string. C++ strings provide an
alternative to the s[n] notation: the at( ) member. These two indexing mechanisms produce the same result in C++ if all goes well:
//: C03:StringIndexing.cpp
#include <cassert>
#include <string>
using namespace std;
int main() {
string s("1234");
assert(s[1] == '2');
assert(s.at(1) == '2');
} ///:~
There is one important difference, however, between [ ]
and at( ). When you try to reference an array element that is out
of bounds, at( ) will do you the kindness of throwing an exception,
while ordinary [ ] subscripting syntax will leave you to your own
devices:
//: C03:BadStringIndexing.cpp
#include <exception>
#include <iostream>
#include <string>
using namespace std;
int main() {
string s("1234");
// at() saves you by throwing an exception:
try {
s.at(5);
} catch(exception& e) {
cerr << e.what() << endl;
}
} ///:~
Responsible programmers will not use errant indexes, but
should you want to benefits of automatic index checking, using at( ) in
place of [ ] will give you a chance to gracefully recover from
references to array elements that don’t exist. Execution of this program on one
of our test compilers gave the following output:
The at( ) member throws an object of class out_of_range,
which derives (ultimately) from std::exception. By catching this object
in an exception handler, you can take appropriate remedial actions such as
recalculating the offending subscript or growing the array. Using string::operator[ ]( )
gives no such protection and is as dangerous as char array processing in
C.
The program Find.cpp earlier in this chapter leads us
to ask the obvious question: Why isn’t case-insensitive comparison part of the
standard string class? The answer provides interesting background on the
true nature of C++ string objects.
Consider what it means for a character to have “case.”
Written Hebrew, Farsi, and Kanji don’t use the concept of upper- and lowercase,
so for those languages this idea has no meaning. It would seem that if there
were a way to designate some languages as “all uppercase” or “all lowercase,”
we could design a generalized solution. However, some languages that employ the
concept of “case” also change the meaning of particular characters with
diacritical marks, for example: the cedilla in Spanish, the circumflex in
French, and the umlaut in German. For this reason, any case-sensitive collating
scheme that attempts to be comprehensive will be nightmarishly complex to use.
Although we usually treat the C++ string as a class,
this is really not the case. The string type is a specialization of a
more general constituent, the basic_string< >
template. Observe how string is declared in the Standard C++ header file:
typedef basic_string<char> string;
To understand the nature of the string class, look at the basic_string< >
template:
template<class charT, class traits =
char_traits<charT>,
class allocator =
allocator<charT> > class basic_string;
In Chapter 5, we examine templates in great detail (much
more than in Chapter 16 of Volume 1). For now, just notice that the string
type is created when the basic_string template is instantiated with char.
Inside the basic_string< > template declaration, the
line:
class traits = char_traits<charT>,
tells us that the behavior of the class made from the basic_string< >
template is specified by a class based on the template char_traits< >.
Thus, the basic_string< > template produces
string-oriented classes that manipulate types other than char (wide
characters, for example). To do this, the char_traits< > template
controls the content and collating behaviors of a variety of character sets
using the character comparison functions eq( ) (equal), ne( )
(not equal), and lt( ) (less than). The basic_string< >
string comparison functions rely on these.
This is why the string class doesn’t include
case-insensitive member functions: that’s not in its job description. To change
the way the string class treats character comparison, you must supply a
different char_traits< > template because that defines
the behavior of the individual character comparison member functions.
You can use this information to make a new type of string
class that ignores case. First, we’ll define a new case-insensitive char_traits< >
template that inherits from the existing template. Next, we’ll override only
the members we need to change to make character-by-character comparison case
insensitive. (In addition to the three lexical character comparison members
mentioned earlier, we’ll also supply a new implementation for the char_traits
functions find( ) and compare( )) . Finally, we’ll typedef
a new class based on basic_string, but using the case-insensitive ichar_traits
template for its second argument:
//: C03:ichar_traits.h
// Creating your own character traits.
#ifndef ICHAR_TRAITS_H
#define ICHAR_TRAITS_H
#include <cassert>
#include <cctype>
#include <cmath>
#include <cstddef>
#include <ostream>
#include <string>
using std::allocator;
using std::basic_string;
using std::char_traits;
using std::ostream;
using std::size_t;
using std::string;
using std::toupper;
using std::tolower;
struct ichar_traits : char_traits<char> {
// We'll only change character-by-
// character comparison functions
static bool eq(char c1st, char c2nd) {
return toupper(c1st) == toupper(c2nd);
}
static bool ne(char c1st, char c2nd) {
return !eq(c1st, c2nd);
}
static bool lt(char c1st, char c2nd) {
return toupper(c1st) < toupper(c2nd);
}
static int
compare(const char* str1, const char* str2, size_t n)
{
for(size_t i = 0; i < n; ++i) {
if(str1 == 0)
return -1;
else if(str2 == 0)
return 1;
else if(tolower(*str1) < tolower(*str2))
return -1;
else if(tolower(*str1) > tolower(*str2))
return 1;
assert(tolower(*str1) == tolower(*str2));
++str1; ++str2; // Compare the other chars
}
return 0;
}
static const char*
find(const char* s1, size_t n, char c) {
while(n-- > 0)
if(toupper(*s1) == toupper(c))
return s1;
else
++s1;
return 0;
}
};
typedef basic_string<char, ichar_traits> istring;
inline ostream& operator<<(ostream& os,
const istring& s) {
return os << string(s.c_str(), s.length());
}
#endif // ICHAR_TRAITS_H ///:~
We provide a typedef named istring so that our
class will act like an ordinary string in every way, except that it will
make all comparisons without respect to case. For convenience, we’ve also
provided an overloaded operator<<( ) so that you can print istrings.
Here’s an example:
//: C03:ICompare.cpp
#include <cassert>
#include <iostream>
#include "ichar_traits.h"
using namespace std;
int main() {
// The same letters except for case:
istring first = "tHis";
istring second = "ThIS";
cout << first << endl;
cout << second << endl;
assert(first.compare(second) == 0);
assert(first.find('h') == 1);
assert(first.find('I') == 2);
assert(first.find('x') == string::npos);
} ///:~
This is just a toy example. To make istring fully
equivalent to string, we’d have to create the other functions necessary
to support the new istring type.
The <string> header provides a wide string
class via the following typedef:
typedef basic_string<wchar_t> wstring;
Wide string support also reveals itself in wide streams
(wostream in place of ostream, also defined in <iostream>)
and in the header <cwctype>, a wide-character version of <cctype>.
This along with the wchar_t specialization of char_traits in the
standard library allows us to do a wide-character version of ichar_traits:
//: C03:iwchar_traits.h {-g++}
// Creating your own wide-character traits.
#ifndef IWCHAR_TRAITS_H
#define IWCHAR_TRAITS_H
#include <cassert>
#include <cmath>
#include <cstddef>
#include <cwctype>
#include <ostream>
#include <string>
using std::allocator;
using std::basic_string;
using std::char_traits;
using std::size_t;
using std::towlower;
using std::towupper;
using std::wostream;
using std::wstring;
struct iwchar_traits : char_traits<wchar_t> {
// We'll only change character-by-
// character comparison functions
static bool eq(wchar_t c1st, wchar_t c2nd) {
return towupper(c1st) == towupper(c2nd);
}
static bool ne(wchar_t c1st, wchar_t c2nd) {
return towupper(c1st) != towupper(c2nd);
}
static bool lt(wchar_t c1st, wchar_t c2nd) {
return towupper(c1st) < towupper(c2nd);
}
static int compare(
const wchar_t* str1, const wchar_t* str2, size_t n)
{
for(size_t i = 0; i < n; i++) {
if(str1 == 0)
return -1;
else if(str2 == 0)
return 1;
else if(towlower(*str1) < towlower(*str2))
return -1;
else if(towlower(*str1) > towlower(*str2))
return 1;
assert(towlower(*str1) == towlower(*str2));
++str1; ++str2; // Compare the other wchar_ts
}
return 0;
}
static const wchar_t*
find(const wchar_t* s1, size_t n, wchar_t c) {
while(n-- > 0)
if(towupper(*s1) == towupper(c))
return s1;
else
++s1;
return 0;
}
};
typedef basic_string<wchar_t, iwchar_traits>
iwstring;
inline wostream& operator<<(wostream& os,
const iwstring& s) {
return os << wstring(s.c_str(), s.length());
}
#endif // IWCHAR_TRAITS_H ///:~
As you can see, this is mostly an exercise in placing a ‘w’
in the appropriate place in the source code. The test program looks like this:
//: C03:IWCompare.cpp {-g++}
#include <cassert>
#include <iostream>
#include "iwchar_traits.h"
using namespace std;
int main() {
// The same letters except for case:
iwstring wfirst = L"tHis";
iwstring wsecond = L"ThIS";
wcout << wfirst << endl;
wcout << wsecond << endl;
assert(wfirst.compare(wsecond) == 0);
assert(wfirst.find('h') == 1);
assert(wfirst.find('I') == 2);
assert(wfirst.find('x') == wstring::npos);
} ///:~
Unfortunately, some compilers still do not provide robust
support for wide characters.
If you’ve looked at the sample code
in this book closely, you’ve noticed that certain tokens in the comments
surround the code. These are used by a Python program that Bruce wrote to
extract the code into files and set up makefiles for building the code. For
example, a double-slash followed by a colon at the beginning of a line denotes
the first line of a source file. The rest of the line contains information
describing the file’s name and location and whether it should be only compiled
rather than fully built into an executable file. For example, the first line in
the previous program above contains the string C03:IWCompare.cpp,
indicating that the file IWCompare.cpp should be extracted into the
directory C03.
The last line of a source file contains a triple-slash
followed by a colon and a tilde. If the first line has an exclamation point
immediately after the colon, the first and last lines of the source code are
not to be output to the file (this is for data-only files). (If you’re
wondering why we’re avoiding showing you these tokens, it’s because we don’t
want to break the code extractor when applied to the text of the book!)
Bruce’s Python program does a lot more than just extract
code. If the token “{O}” follows the file name, its makefile entry will
only be set up to compile the file and not to link it into an executable. (The
Test Framework in Chapter 2 is built this way.) To link such a file with
another source example, the target executable’s source file will contain an “{L}”
directive, as in:
This section will present a program to just extract all the
code so that you can compile and inspect it manually. You can use this program
to extract all the code in this book by saving the document file as a text file (let’s call it
TICV2.txt) and by executing something like the following on a shell command
line:
C:> extractCode TICV2.txt /TheCode
This command reads the text file TICV2.txt and writes
all the source code files in subdirectories under the top-level directory /TheCode.
The directory tree will look like the following:
TheCode/
C0B/
C01/
C02/
C03/
C04/
C05/
C06/
C07/
C08/
C09/
C10/
C11/
TestSuite/
The source files containing the examples from each chapter
will be in the corresponding directory.
Here’s the program:
//: C03:ExtractCode.cpp {-edg} {RunByHand}
// Extracts code from text.
#include <cassert>
#include <cstddef>
#include <cstdio>
#include <cstdlib>
#include <fstream>
#include <iostream>
#include <string>
using namespace std;
// Legacy non-standard C header for mkdir()
#if defined(__GNUC__) || defined(__MWERKS__)
#include <sys/stat.h>
#elif defined(__BORLANDC__) || defined(_MSC_VER) \
|| defined(__DMC__)
#include <direct.h>
#else
#error Compiler not supported
#endif
// Check to see if directory exists
// by attempting to open a new file
// for output within it.
bool exists(string fname) {
size_t len = fname.length();
if(fname[len-1] != '/' && fname[len-1] !=
'\\')
fname.append("/");
fname.append("000.tmp");
ofstream outf(fname.c_str());
bool existFlag = outf;
if(outf) {
outf.close();
remove(fname.c_str());
}
return existFlag;
}
int main(int argc, char* argv[]) {
// See if input file name provided
if(argc == 1) {
cerr << "usage: extractCode file
[dir]" << endl;
exit(EXIT_FAILURE);
}
// See if input file exists
ifstream inf(argv[1]);
if(!inf) {
cerr << "error opening file: "
<< argv[1] << endl;
exit(EXIT_FAILURE);
}
// Check for optional output directory
string root("./"); // current is default
if(argc == 3) {
// See if output directory exists
root = argv[2];
if(!exists(root)) {
cerr << "no such directory: "
<< root << endl;
exit(EXIT_FAILURE);
}
size_t rootLen = root.length();
if(root[rootLen-1] != '/' &&
root[rootLen-1] != '\\')
root.append("/");
}
// Read input file line by line
// checking for code delimiters
string line;
bool inCode = false;
bool printDelims = true;
ofstream outf;
while(getline(inf, line)) {
size_t findDelim = line.find("//"
"/:~");
if(findDelim != string::npos) {
// Output last line and close file
if(!inCode) {
cerr << "Lines out of order"
<< endl;
exit(EXIT_FAILURE);
}
assert(outf);
if(printDelims)
outf << line << endl;
outf.close();
inCode = false;
printDelims = true;
} else {
findDelim = line.find("//"
":");
if(findDelim == 0) {
// Check for '!' directive
if(line[3] == '!') {
printDelims = false;
++findDelim; // To skip '!' for next search
}
// Extract subdirectory name, if any
size_t startOfSubdir =
line.find_first_not_of(" \t",
findDelim+3);
findDelim = line.find(':', startOfSubdir);
if(findDelim == string::npos) {
cerr << "missing filename
information\n" << endl;
exit(EXIT_FAILURE);
}
string subdir;
if(findDelim > startOfSubdir)
subdir = line.substr(startOfSubdir,
findDelim -
startOfSubdir);
// Extract file name (better be one!)
size_t startOfFile = findDelim + 1;
size_t endOfFile =
line.find_first_of(" \t",
startOfFile);
if(endOfFile == startOfFile) {
cerr << "missing filename"
<< endl;
exit(EXIT_FAILURE);
}
// We have all the pieces; build fullPath name
string fullPath(root);
if(subdir.length() > 0)
fullPath.append(subdir).append("/");
assert(fullPath[fullPath.length()-1] == '/');
if(!exists(fullPath))
#if defined(__GNUC__) || defined(__MWERKS__)
mkdir(fullPath.c_str(), 0); // Create subdir
#else
mkdir(fullPath.c_str()); // Create subdir
#endif
fullPath.append(line.substr(startOfFile,
endOfFile - startOfFile));
outf.open(fullPath.c_str());
if(!outf) {
cerr << "error opening "
<< fullPath
<< " for output"
<< endl;
exit(EXIT_FAILURE);
}
inCode = true;
cout << "Processing " <<
fullPath << endl;
if(printDelims)
outf << line << endl;
}
else if(inCode) {
assert(outf);
outf << line << endl; // Output middle
code line
}
}
}
exit(EXIT_SUCCESS);
} ///:~
First, you’ll notice some conditional compilation directives.
The mkdir( ) function, which creates a directory in the file
system, is defined by the POSIX standard
in the header <sys/stat.h>. Unfortunately, many compilers still
use a different header (<direct.h>). The respective signatures for
mkdir( ) also differ: POSIX specifies two arguments, the older
versions just one. For this reason, there is more conditional compilation later
in the program to choose the right call to mkdir( ). We normally
don’t use conditional compilation in the examples in this book, but this
particular program is too useful not to put a little extra work into, since you
can use it to extract all the code with it.
The exists( ) function in ExtractCode.cpp
tests whether a directory exists by opening a temporary file in it. If the open
fails, the directory doesn’t exist. You remove a file by sending its name as a char*
to std::remove( ).
The main program validates the command-line arguments and
then reads the input file a line at a time, looking for the special source code
delimiters. The Boolean flag inCode indicates that the program is in the
middle of a source file, so lines should be output. The printDelims flag
will be true if the opening token is not followed by an exclamation point;
otherwise the first and last lines are not written. It is important to check
for the closing delimiter first, because the start token is a subset, and
searching for the start token first would return a successful find for both
cases. If we encounter the closing token, we verify that we are in the middle
of processing a source file; otherwise, something is wrong with the way the
delimiters are laid out in the text file. If inCode is true, all is
well, and we (optionally) write the last line and close the file. When the
opening token is found, we parse the directory and file name components and
open the file. The following string-related functions were used in this
example: length( ), append( ), getline( ), find( )
(two versions), find_first_not_of( ), substr( ), find_first_of( ),
c_str( ), and, of course, operator<<( ).
C++ string objects provide developers with a number
of great advantages over their C counterparts. For the most part, the string
class makes referring to strings with character pointers unnecessary. This
eliminates an entire class of software defects that arise from the use of
uninitialized and incorrectly valued pointers.
C++ strings dynamically and transparently grow their
internal data storage space to accommodate increases in the size of the string
data. When the data in a string grows beyond the limits of the memory initially
allocated to it, the string object will make the memory management calls that
take space from and return space to the heap. Consistent allocation schemes
prevent memory leaks and have the potential to be much more efficient than
“roll your own” memory management.
The string class member functions provide a fairly
comprehensive set of tools for creating, modifying, and searching in strings.
String comparisons are always case sensitive, but you can work around this by
copying string data to C-style null-terminated strings and using
case-insensitive string comparison functions, temporarily converting the data
held in string objects to a single case, or by creating a case-insensitive
string class that overrides the character traits used to create the basic_string
object.
Solutions
to selected exercises can be found in the electronic document The Thinking
in C++ Volume 2 Annotated Solution Guide, available for a small fee from www.MindView.net.
1. Write and test a function that reverses the order of the
characters in a string.
2. A palindrome is a word or group of words that read the same
forward and backward. For example “madam” or “wow.” Write a program that takes
a string argument from the command line and, using the function from the
previous exercise, prints whether the string was a palindrome or not.
3. Make your program from Exercise 2 return true even if
symmetric letters differ in case. For example, “Civic” would still return true
although the first letter is capitalized.
4. Change your program from Exercise 3 to ignore punctuation and
spaces as well. For example “Able was I, ere I saw Elba.” would report true.
5. Using the following string declarations and only chars (no
string literals or magic numbers):
string one("I walked down the canyon with the
moving mountain bikers.");
string
two("The bikers passed by me too close for comfort.");
string three("I went hiking instead.");
produce the following sentence:
I
moved down the canyon with the mountain bikers. The mountain bikers passed by
me too close for comfort. So I went hiking instead.
6. Write a program named replace that takes three
command-line arguments representing an input text file, a string to replace
(call it from), and a replacement string (call it to). The
program should write a new file to standard output with all occurrences of from
replaced by to.
7. Repeat the previous exercise but replace all instances of from
regardless of case.
8. Make your program from Exercise 3 take a filename from the command-line,
and then display all words that are palindromes (ignoring case) in the file. Do
not display duplicates (even if their case differs). Do not try to look for
palindromes that are larger than a word (unlike in Exercise 4).
9. Modify HTMLStripper.cpp so that when it encounters a tag,
it displays the tag’s name, then displays the file’s contents between the tag
and the file’s ending tag. Assume no nesting of tags, and that all tags have
ending tags (denoted with </TAGNAME>).
10. Write a program that takes three command-line arguments (a
filename and two strings) and displays to the console all lines in the file
that have both strings in the line, either string, only one string, or neither
string, based on user input at the beginning of the program (the user will
choose which matching mode to use). For all but the “neither string” option,
highlight the input string(s) by placing an asterisk (*) at the beginning and
end of each string’s occurrence when it is displayed.
11. Write a program that takes two command-line arguments (a filename
and a string) and counts the number of times the string occurs in the file,
even as a substring (but ignoring overlaps). For example, an input string of “ba”
would match twice in the word “basketball,” but an input string of “ana” would
match only once in the word “banana.” Display to the console the number of
times the string is matched in the file, as well as the average length of the
words where the string occurred. (If the string occurs more than once in a
word, only count the word once in figuring the average.)
12. Write a program that takes a filename from the command line and
profiles the character usage, including punctuation and spaces (all character
values of 0x21 [33] through 0x7E [126], as well as the space character). That is,
count the number of occurrences of each character in the file, then display the
results sorted either sequentially (space, then !, ", #, etc.) or by
ascending or descending frequency based on user input at the beginning of the
program. For space, display the word “Space” instead of the character ' '. A
sample run might look something like this:
Format sequentially, ascending, or descending
(S/A/D): D
t: 526
r: 490
etc.
13. Using find( ) and rfind( ), write a
program that takes two command-line arguments (a filename and a string) and
displays the first and last words (and their indexes) not matching the string,
as well as the indexes of the first and last instances of the string. Display “Not
Found” if any of the searches fail.
14. Using the find_first_of “family” of functions (but not
exclusively), write a program that will remove all non-alphanumeric characters
except spaces and periods from a file, then capitalize the first letter
following a period.
15. Again using the find_first_of “family” of functions, write
a program that accepts a filename as a command-line argument and then formats
all numbers in the file to currency. Ignore decimal points after the first
until a non-numeric character is found, and round to the nearest hundredth. For
example, the string 12.399abc29.00.6a would be formatted (in the USA) to
$12.40abc$29.01a.
16. Write a program that accepts two command-line arguments (a
filename and a number) and scrambles each word in the file by randomly
switching two of its letters the number of times specified in the second
argument. (That is, if 0 is passed into your program from the command-line, the
words should not be scrambled; if 1 is passed in, one pair of randomly-chosen
letters should be swapped, for an input of 2, two random pairs should be
swapped, etc.).
17. Write a program that accepts a filename from the command line and
displays the number of sentences (defined as the number of periods in the
file), average number of characters per sentence, and the total number of
characters in the file.
18. Prove to yourself that the at( ) member function
really will throw an exception if an attempt is made to go out of bounds, and
that the indexing operator ([ ]) won’t.
You can do much more with the general
I/O problem than just take standard I/O and turn it into a class.
Wouldn’t it be nice if you could make all the usual
“receptacles”—standard I/O, files, and even blocks of memory—look the same so
that you need to remember only one interface? That’s the idea behind iostreams.
They’re much easier, safer, and sometimes even more efficient than the assorted
functions from the Standard C stdio library.
The iostreams classes are usually the first part of the C++
library that new C++ programmers learn to use. This chapter discusses how
iostreams are an improvement over C’s stdio facilities and explores the
behavior of file and string streams in addition to the standard console
streams.
You might wonder what’s wrong with the good old C library.
Why not “wrap” the C library in a class and be done with it? Sometimes this is a
fine solution. For example, suppose you want to make sure that the file
represented by a stdio FILE pointer is always safely opened and
properly closed without having to rely on the user to remember to call the close( )
function. The following program is such an attempt:
//: C04:FileClass.h
// stdio files wrapped.
#ifndef FILECLASS_H
#define FILECLASS_H
#include <cstdio>
#include <stdexcept>
class FileClass {
std::FILE* f;
public:
struct FileClassError : std::runtime_error {
FileClassError(const char* msg)
: std::runtime_error(msg) {}
};
FileClass(const char* fname, const char* mode =
"r");
~FileClass();
std::FILE* fp();
};
#endif // FILECLASS_H ///:~
When you perform file I/O in C, you work with a naked
pointer to a FILE struct, but this class wraps around the pointer and
guarantees it is properly initialized and cleaned up using the constructor and
destructor. The second constructor argument is the file mode, which defaults to
“r” for “read.”
To fetch the value of the pointer to use in the file I/O
functions, you use the fp( ) access function. Here are the member
function definitions:
//: C04:FileClass.cpp {O}
// FileClass Implementation.
#include "FileClass.h"
#include <cstdlib>
#include <cstdio>
using namespace std;
FileClass::FileClass(const char* fname, const char*
mode) {
if((f = fopen(fname, mode)) == 0)
throw FileClassError("Error opening
file");
}
FileClass::~FileClass() { fclose(f); }
FILE* FileClass::fp() { return
f; } ///:~
The constructor calls fopen( ), as you would
normally do, but it also ensures that the result isn’t zero, which indicates a
failure upon opening the file. If the file does not open as expected, an exception
is thrown.
The destructor closes the file, and the access function fp( )
returns f. Here’s a simple example using FileClass:
//: C04:FileClassTest.cpp
//{L} FileClass
#include <cstdlib>
#include <iostream>
#include "FileClass.h"
using namespace std;
int main() {
try {
FileClass f("FileClassTest.cpp");
const int BSIZE = 100;
char buf[BSIZE];
while(fgets(buf, BSIZE, f.fp()))
fputs(buf, stdout);
} catch(FileClass::FileClassError& e) {
cout << e.what() << endl;
return EXIT_FAILURE;
}
return EXIT_SUCCESS;
} // File automatically closed by destructor
///:~
You create the FileClass object and use it in normal
C file I/O function calls by calling fp( ). When you’re done with
it, just forget about it; the file is closed by the destructor at the end of
its scope.
Even though the FILE pointer is private, it isn’t
particularly safe because fp( ) retrieves it. Since the only effect
seems to be guaranteed initialization and cleanup, why not make it public or
use a struct instead? Notice that while you can get a copy of f
using fp( ), you cannot assign to f—that’s completely under
the control of the class. After capturing the pointer returned by fp( ),
the client programmer can still assign to the structure elements or even close
it, so the safety is in guaranteeing a valid FILE pointer rather than
proper contents of the structure.
If you want complete safety, you must prevent the user from
directly accessing the FILE pointer. Some version of all the normal file
I/O functions must show up as class members so that everything you can do with
the C approach is available in the C++ class:
//: C04:Fullwrap.h
// Completely hidden file IO.
#ifndef FULLWRAP_H
#define FULLWRAP_H
#include <cstddef>
#include <cstdio>
#undef getc
#undef putc
#undef ungetc
using std::size_t;
using std::fpos_t;
class File {
std::FILE* f;
std::FILE* F(); // Produces checked pointer to f
public:
File(); // Create object but don't open file
File(const char* path, const char* mode =
"r");
~File();
int open(const char* path, const char* mode =
"r");
int reopen(const char* path, const char* mode);
int getc();
int ungetc(int c);
int putc(int c);
int puts(const char* s);
char* gets(char* s, int n);
int printf(const char* format, ...);
size_t read(void* ptr, size_t size, size_t n);
size_t write(const void* ptr, size_t size, size_t n);
int eof();
int close();
int flush();
int seek(long offset, int whence);
int getpos(fpos_t* pos);
int setpos(const fpos_t* pos);
long tell();
void rewind();
void setbuf(char* buf);
int setvbuf(char* buf, int type, size_t sz);
int error();
void clearErr();
};
#endif // FULLWRAP_H ///:~
This class contains almost all the file I/O functions from <cstdio>.
(vfprintf( ) is missing; it implements the printf( ) member function.)
File has the same constructor as in the previous
example, and it also has a default constructor. The default constructor is
important if you want to create an array of File objects or use a File
object as a member of another class where the initialization doesn’t happen in
the constructor, but some time after the enclosing object is created.
The default constructor sets the private FILE pointer
f to zero. But now, before any reference to f, its value must be
checked to ensure it isn’t zero. This is accomplished with F( ),
which is private because it is intended to be used only by other member
functions. (We don’t want to give the user direct access to the underlying FILE
structure in this class.)
This approach is not a terrible solution by any means. It’s
quite functional, and you could imagine making similar classes for standard
(console) I/O and for in-core formatting (reading/writing a piece of memory
rather than a file or the console).
The stumbling block is the runtime interpreter used for the
variable argument list functions. This is the code that parses your format
string at runtime and grabs and interprets arguments from the variable argument
list. It’s a problem for four reasons.
1. Even if you use only a fraction of the functionality of the
interpreter, the whole thing gets loaded into your executable. So if you say printf("%c",
'x');, you’ll get the whole package, including the parts that print
floating-point numbers and strings. There’s no standard option for reducing the
amount of space used by the program.
2. Because the interpretation happens at runtime, you can’t get rid
of a performance overhead. It’s frustrating because all the information is there
in the format string at compile time, but it’s not evaluated until runtime.
However, if you could parse the arguments in the format string at compile time,
you could make direct function calls that have the potential to be much faster
than a runtime interpreter (although the printf( ) family of
functions is usually quite well optimized).
3. Because the format string is not evaluated until runtime, there
can be no compile-time error checking. You’re probably familiar with this problem if you’ve tried to find bugs that came from using the wrong number or type of
arguments in a printf( ) statement. C++ makes a big deal out of
compile-time error checking to find errors early and make your life easier. It
seems a shame to throw type safety away for an I/O library, especially since
I/O is used a lot.
4. For C++, the most crucial problem is that the printf( )
family of functions is not particularly extensible. They’re really designed to
handle only the basic data types in C (char, int, float, double,
wchar_t, char*, wchar_t*, and void*) and their
variations. You might think that every time you add a new class, you could add
overloaded printf( ) and scanf( ) functions (and their
variants for files and strings), but remember, overloaded functions must have
different types in their argument lists, and the printf( ) family
hides its type information in the format string and in the variable argument
list. For a language such as C++, whose goal is to be able to easily add new
data types, this is an unacceptable restriction.
These issues make it clear that I/O is one of the first
priorities for the Standard C++ class libraries. Because “hello, world” is the
first program just about everyone writes in a new language, and because I/O is
part of virtually every program, the I/O library in C++ must be particularly
easy to use. It also has the much greater challenge that it must accommodate
any new class. Thus, its constraints require that this foundation class library
be a truly inspired design. In addition to gaining a great deal of leverage and
clarity in your dealings with I/O and formatting, you’ll also see in this
chapter how a really powerful C++ library can work.
A stream is an object that transports and formats
characters of a fixed width. You can have an input stream (via descendants of
the istream class), an output stream (with ostream objects), or a stream that does both simultaneously (with objects derived from iostream).
The iostreams library provides different types of such classes: ifstream,
ofstream, and fstream for files, and istringstream, ostringstream, and stringstream for interfacing with the Standard C++ string
class. All these stream classes have nearly identical interfaces, so you can
use streams in a uniform manner, whether you’re working with a file, standard
I/O, a region of memory, or a string object. The single interface you
learn also works for extensions added to support new classes. Some functions
implement your formatting commands, and some functions read and write
characters without formatting.
The stream classes mentioned earlier are actually template
specializations, much
like the standard string class is a specialization of the basic_string
template. The basic classes in the iostreams inheritance hierarchy are shown in
the following figure:
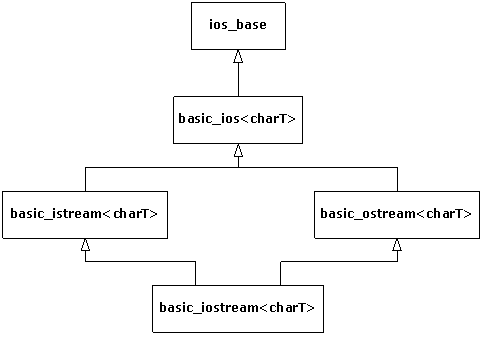
The ios_base class declares everything that is common
to all streams, independent of the type of character the stream handles. These
declarations are mostly constants and functions to manage them, some of which
you’ll see throughout this chapter. The rest of the classes are templates that
have the underlying character type as a parameter. The istream class,
for example, is defined as follows:
typedef basic_istream<char> istream;
All the classes mentioned earlier are defined via similar
type definitions. There are also type definitions for all stream classes using wchar_t
(the wide character type discussed in Chapter 3) instead of char. We’ll
look at these at the end of this chapter. The basic_ios template defines
functions common to both input and output, but that depends on the underlying
character type (we won’t use these much). The template basic_istream defines generic functions for input, and basic_ostream does the same for output. The classes for file and string streams introduced later add functionality for their
specific stream types.
In the iostreams library, two operators are overloaded to
simplify the use of iostreams. The operator << is often referred to as an inserter for iostreams, and the operator >> is often referred to as an extractor.
Extractors parse the information that’s expected by the
destination object according to its type. To see an example of this, you can
use the cin object, which is the iostream equivalent of stdin in
C, that is, redirectable standard input. This object is predefined whenever you
include the <iostream> header.
int i;
cin >> i;
float f;
cin >> f;
char c;
cin >> c;
char buf[100];
cin >> buf;
There’s an overloaded operator >> for every
built-in data type. You can also overload your own, as you’ll see later.
To find out what you have in the various variables, you can
use the cout object (corresponding to standard output; there’s also a cerr object corresponding to standard error) with the inserter <<:
cout << "i = ";
cout << i;
cout << "\n";
cout << "f = ";
cout << f;
cout << "\n";
cout << "c = ";
cout << c;
cout << "\n";
cout << "buf = ";
cout << buf;
cout << "\n";
This is tedious and doesn’t seem like much of an improvement
over printf( ), despite improved type checking. Fortunately, the
overloaded inserters and extractors are designed to be chained into a more complex expression that is much easier to write (and read):
cout << "i = " << i <<
endl;
cout << "f = " << f <<
endl;
cout << "c = " << c <<
endl;
cout << "buf = " << buf << endl;
Defining inserters and extractors for your own classes is
just a matter of overloading the associated operators to do the right things,
namely:
· Make the first parameter a non-const reference to the
stream (istream for input, ostream for output).
· Perform the operation by inserting/extracting data to/from the
stream (by processing the components of the object).
· Return a reference to the stream.
The stream should be non-const because processing
stream data changes the state of the stream. By returning the stream, you allow
for chaining stream operations in a single statement, as shown earlier.
As an example, consider how to output the representation of
a Date object in MM-DD-YYYY format. The following inserter does the job:
ostream& operator<<(ostream& os, const
Date& d) {
char fillc = os.fill('0');
os << setw(2) << d.getMonth() <<
'-'
<< setw(2) << d.getDay() << '-'
<< setw(4) << setfill(fillc) <<
d.getYear();
return os;
}
This function cannot be a member of the Date class
because the left operand of the << operator must be the output
stream. The fill( ) member function of ostream changes the
padding character used when the width of an output field, determined by the manipulator
setw( ), is greater than needed for the data. We use a ‘0’
character so that months preceding October will display a leading zero, such as
“09” for September. The fill( ) function also returns the previous
fill character (which defaults to a single space) so that we can restore it
later with the manipulator setfill( ). We discuss manipulators in
depth later in this chapter.
Extractors require a little more care because things can go
wrong with input data. The way to signal a stream error is to set the stream’s fail
bit, as follows:
istream& operator>>(istream& is,
Date& d) {
is >> d.month;
char dash;
is >> dash;
if(dash != '-')
is.setstate(ios::failbit);
is >> d.day;
is >> dash;
if(dash != '-')
is.setstate(ios::failbit);
is >> d.year;
return is;
}
When an error bit is set in a stream, all further streams
operations are ignored until the stream is restored to a good state (explained
shortly). That’s why the code above continues extracting even if ios::failbit gets set. This implementation is somewhat forgiving in that it allows white space between
the numbers and dashes in a date string (because the >> operator
skips white space by default when reading built-in types). The following are
valid date strings for this extractor:
"08-10-2003"
"8-10-2003"
"08 - 10 - 2003"
but these are not:
"A-10-2003" // No alpha characters allowed
"08%10/2003" // Only
dashes allowed as a delimiter
We’ll discuss stream state in more depth in the section
“Handling stream errors” later in this chapter.
As the Date extractor illustrated, you must be on
guard for erroneous input. If the input produces an unexpected value, the
process is skewed, and it’s difficult to recover. In addition, formatted input
defaults to white space delimiters. Consider what happens when we collect the
code fragments from earlier in this chapter into a single program:
//: C04:Iosexamp.cpp {RunByHand}
// Iostream examples.
#include <iostream>
using namespace std;
int main() {
int i;
cin >> i;
float f;
cin >> f;
char c;
cin >> c;
char buf[100];
cin >> buf;
cout << "i = "
<< i << endl;
cout << "f = " << f <<
endl;
cout << "c = " << c <<
endl;
cout << "buf = " << buf
<< endl;
cout << flush;
cout << hex << "0x" << i
<< endl;
} ///:~
and give it the following input:
We expect the same output as if we gave it
but the output is, somewhat unexpectedly
i = 12
f = 1.4
c = c
buf = this
0xc
Notice that buf got only the first word because the
input routine looked for a space to delimit the input, which it saw after
“this.” In addition, if the continuous input string is longer than the storage
allocated for buf, we overrun the buffer.
In practice, you’ll usually want to get input from
interactive programs a line at a time as a sequence of characters, scan them,
and then perform conversions once they’re safely in a buffer. This way you
don’t need to worry about the input routine choking on unexpected data.
Another consideration is the whole concept of a command-line
interface. This made sense in the past when the console was little more than a
glass typewriter, but the world is rapidly changing to one where the graphical
user interface (GUI) dominates. What is the meaning of console I/O in such a world? It makes much more sense to ignore cin altogether, other
than for simple examples or tests, and take the following approaches:
1. If your program requires input, read that input from a
file—you’ll soon see that it’s remarkably easy to use files with iostreams.
Iostreams for files still works fine with a GUI.
2. Read the input without attempting to convert it, as we just
suggested. When the input is some place where it can’t foul things up during
conversion, you can safely scan it.
3. Output is different. If you’re using a GUI, cout doesn’t
necessarily work, and you must send it to a file (which is identical to sending
it to cout) or use the GUI facilities for data display. Otherwise it
often makes sense to send it to cout. In both cases, the output
formatting functions of iostreams are highly useful.
Another common
practice saves compile time on large projects. Consider, for example, how you
would declare the Date stream operators introduced earlier in the
chapter in a header file. You only need to include the prototypes for the
functions, so it’s not really necessary to include the entire <iostream>
header in Date.h. The standard practice is to only declare classes,
something like this:
This is an age-old
technique for separating interface from implementation and is often called a forward
declaration (and ostream at this point would be considered an incomplete
type, since the class definition has not yet been seen by the compiler).
This will not work
as is, however, for two reasons:
1. The
stream classes are defined in the std namespace.
2. They
are templates.
The proper
declaration would be:
namespace std {
template<class charT, class traits =
char_traits<charT> >
class basic_ostream;
typedef basic_ostream<char> ostream;
}
(As you can see, like the string
class, the streams classes use the character traits classes mentioned in
Chapter 3). Since it would be terribly tedious to type all that for every
stream class you want to reference, the standard provides a header that does it
for you: <iosfwd>. The Date header would then look
something like this:
// Date.h
#include <iosfwd>
class Date {
friend std::ostream&
operator<<(std::ostream&,
const Date&);
friend std::istream&
operator>>(std::istream&, Date&);
// Etc.
To grab input a line at a time, you have three choices:
· The member function get( )
· The member function getline( )
· The global function getline( ) defined in the <string>
header
The first two functions take three arguments:
1. A pointer to a character buffer in which to store the result.
2. The size of that buffer (so it’s not overrun).
3. The terminating character, to know when to stop reading input.
The terminating character has a default value of '\n',
which is what you’ll usually use. Both functions store a zero in the result
buffer when they encounter the terminating character in the input.
So what’s the difference? Subtle, but important: get( )
stops when it sees the delimiter in the input stream, but it doesn’t
extract it from the input stream. Thus, if you did another get( )
using the same delimiter, it would immediately return with no fetched input.
(Presumably, you either use a different delimiter in the next get( )
statement or a different input function.) The getline( ) function,
on the other hand, extracts the delimiter from the input stream, but still
doesn’t store it in the result buffer.
The getline( ) function defined in <string>
is convenient. It is not a member function, but rather a stand-alone function
declared in the namespace std. It takes only two non-default arguments,
the input stream and the string object to populate. Like its namesake,
it reads characters until it encounters the first occurrence of the delimiter ('\n'
by default) and consumes and discards the delimiter. The advantage of this
function is that it reads into a string object, so you don’t need to
worry about buffer size.
Generally, when you’re processing a text file that you read
a line at a time, you’ll want to use one of the getline( )
functions.
Overloaded versions of get( )
The get( ) function also comes in three other
overloaded versions: one with no arguments that returns the next character
using an int return value; one that stuffs a character into its char
argument using a reference; and one that stores directly into the underlying
buffer structure of another iostream object. The latter is explored later in
the chapter.
Reading raw bytes
If you know exactly what you’re dealing with and want to
move the bytes directly into a variable, an array, or a structure in memory,
you can use the unformatted I/O function read( ). The first argument for this function is a pointer to the destination memory, and the second is the number of bytes
to read. This is especially useful if you’ve previously stored the information
to a file, for example, in binary form using the complementary write( )
member function for an output stream (using the same compiler, of course).
You’ll see examples of all these functions later.
The Date extractor shown earlier sets a stream’s fail
bit under certain conditions. How does the user know when such a failure
occurs? You can detect stream errors by either calling certain stream member
functions to see if an error state has occurred, or if you don’t care what the
particular error was, you can just evaluate the stream in a Boolean context.
Both techniques derive from the state of a stream’s error bits.
Stream state
The ios_base class, from which ios derives, defines four
flags that you can use to test the state of a stream:
|
Flag
|
Meaning
|
|
badbit
|
Some fatal (perhaps physical) error occurred. The stream
should be considered unusable.
|
|
eofbit
|
End-of-input has occurred (either by encountering the
physical end of a file stream or by the user terminating a console stream,
such as with Ctrl-Z or Ctrl‑D).
|
|
failbit
|
An I/O operation failed, most likely because of invalid
data (e.g., letters were found when trying to read a number). The stream is
still usable. The failbit flag is also set when end-of-input occurs.
|
|
goodbit
|
All is well; no errors. End-of-input has not yet occurred.
|
You can test whether any of these conditions have occurred
by calling corresponding member functions that return a Boolean value
indicating whether any of these have been set. The good( ) stream
member function returns true if none of the other three bits are set. The eof( )
function returns true if eofbit is set, which happens with an attempt to
read from a stream that has no more data (usually a file). Because end-of-input
happens in C++ when trying to read past the end of the physical medium, failbit
is also set to indicate that the “expected” data was not successfully read. The
fail( ) function returns true if either failbit or badbit
is set, and bad( ) returns true only if the badbit is set.
Once any of the error bits in a stream’s state are set, they
remain set, which is not always what you want. When reading a file, you might
want to reposition to an earlier place in the file before end-of-file occurred.
Just moving the file pointer doesn’t automatically reset eofbit or failbit;
you must do it yourself with the clear( ) function, like this:
myStream.clear(); // Clears all error bits
After calling clear( ), good( ) will
return true if called immediately. As you saw in the Date
extractor earlier, the setstate( ) function sets the bits you pass
it. It turns out that setstate( ) doesn’t affect any other bits—if
they’re already set, they stay set. If you want to set certain bits but at the
same time reset all the rest, you can call an overloaded version of clear( ),
passing it a bitwise expression representing the bits you want to set, as in:
myStream.clear(ios::failbit | ios::eofbit);
Most of the time you won’t be interested in checking the
stream state bits individually. Usually you just want to know if everything is
okay. This is the case when you read a file from beginning to end; you just
want to know when the input data is exhausted. You can use a conversion function
defined for void* that is automatically called when a stream occurs in a
Boolean expression. Reading a stream until end-of-input using this idiom looks
like the following:
int i;
while(myStream >> i)
cout << i <<
endl;
Remember that operator>>( ) returns its
stream argument, so the while statement above tests the stream as a
Boolean expression. This particular example assumes that the input stream myStream
contains integers separated by white space. The function ios_base::operator
void*( ) simply calls good( ) on its stream and returns
the result. Because
most stream operations return their stream, using this idiom is convenient.
Streams and exceptions
Iostreams existed as part of C++ long before there were
exceptions, so checking stream state manually was just the way things were done.
For backward compatibility, this is still the status quo, but modern iostreams
can throw exceptions instead. The exceptions( ) stream member
function takes a parameter representing the state bits for which you want
exceptions to be thrown. Whenever the stream encounters such a state, it throws
an exception of type std::ios_base::failure, which inherits from std::exception.
Although you can trigger a failure exception for any of the
four stream states, it’s not necessarily a good idea to enable exceptions for
all of them. As Chapter 1 explains, use exceptions for truly exceptional
conditions, but end-of-file is not only not exceptional—it’s expected!
For that reason, you might want to enable exceptions only for the errors
represented by badbit, which you would do like this:
myStream.exceptions(ios::badbit);
You enable exceptions on a stream-by-stream basis, since exceptions( )
is a member function for streams. The exceptions( ) function
returns a bitmask (of
type iostate, which is some compiler-dependent type convertible to int)
indicating which stream states will cause exceptions. If those states have
already been set, an exception is thrown immediately. Of course, if you use
exceptions in connection with streams, you had better be ready to catch them,
which means that you need to wrap all stream processing with a try block
that has an ios::failure handler. Many programmers find this tedious and
just check states manually where they expect errors to occur (since, for
example, they don’t expect bad( ) to return true most of the
time anyway). This is another reason that having streams throw exceptions is
optional and not the default. In any case, you can choose how you want to
handle stream errors. For the same reasons that we recommend using exceptions
for error handling in other contexts, we do so here.
Manipulating files with iostreams is much easier and safer
than using stdio in C. All you do to open a file is create an object—the
constructor does the work. You don’t need to explicitly close a file (although
you can, using the close( ) member function) because the destructor will close it when the object goes out of scope. To create a file that defaults to input,
make an ifstream object. To create one that defaults to output, make an ofstream
object. An fstream object can do both input and output.
The file stream classes fit into the iostreams classes as
shown in the following figure:
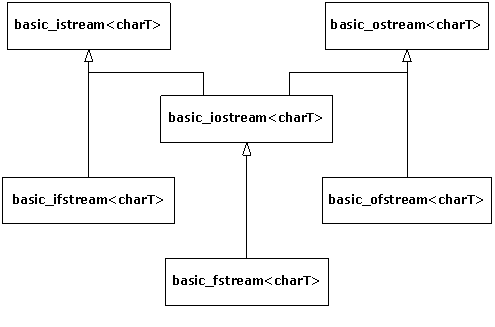
As before, the classes you actually use are template
specializations defined by type definitions. For example, ifstream,
which processes files of char, is defined as
typedef basic_ifstream<char> ifstream;
Here’s an example that shows many of the features discussed
so far. Notice the inclusion of <fstream> to declare the file I/O classes. Although on many platforms this will also include <iostream>
automatically, compilers are not required to do so. If you want portable code,
always include both headers.
//: C04:Strfile.cpp
// Stream I/O with files;
// The difference between get() & getline().
#include <fstream>
#include <iostream>
#include "../require.h"
using namespace std;
int main() {
const int SZ = 100; // Buffer size;
char buf[SZ];
{
ifstream in("Strfile.cpp"); // Read
assure(in, "Strfile.cpp"); // Verify open
ofstream out("Strfile.out"); // Write
assure(out, "Strfile.out");
int i = 1; // Line counter
// A less-convenient approach for line input:
while(in.get(buf, SZ)) { // Leaves \n in input
in.get(); // Throw away next character (\n)
cout << buf << endl; // Must add \n
// File output just like standard I/O:
out << i++ << ": " <<
buf << endl;
}
} // Destructors close in & out
ifstream in("Strfile.out");
assure(in, "Strfile.out");
// More convenient line input:
while(in.getline(buf, SZ)) { // Removes \n
char* cp = buf;
while(*cp != ':')
++cp;
cp += 2; // Past ": "
cout << cp << endl; // Must still add
\n
}
} ///:~
The creation of both the ifstream and ofstream
are followed by an assure( ) to guarantee the file was successfully
opened. Here again the object, used in a situation where the compiler expects a
Boolean result, produces a value that indicates success or failure.
The first while loop demonstrates the use of two
forms of the get( ) function. The first gets characters into a
buffer and puts a zero terminator in the buffer when either SZ-1
characters have been read or the third argument (defaulted to '\n') is
encountered. The get( ) function leaves the terminator character in
the input stream, so this terminator must be thrown away via in.get( )
using the form of get( ) with no argument, which fetches a single
byte and returns it as an int. You can also use the ignore( )
member function, which has two default arguments. The first argument is the
number of characters to throw away and defaults to one. The second argument is
the character at which the ignore( ) function quits (after
extracting it) and defaults to EOF.
Next, you see two output statements that look similar: one
to cout and one to the file out. Notice the convenience here—you don’t
need to worry about the object type because the formatting statements work the
same with all ostream objects. The first one echoes the line to standard
output, and the second writes the line out to the new file and includes a line
number.
To demonstrate getline( ), open the file we just
created and strip off the line numbers. To ensure the file is properly closed
before opening it to read, you have two choices. You can surround the first
part of the program with braces to force the out object out of scope,
thus calling the destructor and closing the file, which is done here. You can
also call close( ) for both files; if you do this, you can even
reuse the in object by calling the open( ) member function.
The second while loop shows how getline( )
removes the terminator character (its third argument, which defaults to '\n')
from the input stream when it’s encountered. Although getline( ),
like get( ), puts a zero in the buffer, it still doesn’t insert the
terminating character.
This example, as well as most of the examples in this
chapter, assumes that each call to any overload of getline( ) will
encounter a newline character. If this is not the case, the eofbit state of the
stream will be set and the call to getline( ) will return false,
causing the program to lose the last line of input.
You can control the way a file is opened by overriding the
constructor’s default arguments. The following table shows the flags that
control the mode of the file:
|
Flag
|
Function
|
|
ios::in
|
Opens an input file. Use this as an open mode for an ofstream
to prevent truncating an existing file.
|
|
ios::out
|
Opens an output file. When used for an ofstream
without ios::app, ios::ate or ios::in, ios::trunc
is implied.
|
|
ios::app
|
Opens an output file for appending only.
|
|
ios::ate
|
Opens an existing file (either input or output) and seeks
to the end.
|
|
ios::trunc
|
Truncates the old file if it already exists.
|
|
ios::binary
|
Opens a file in binary mode. The default is text
mode.
|
You can combine these flags using a bitwise or
operation.
The binary flag, while portable, only has an effect on some
non-UNIX systems, such as operating systems derived from MS-DOS, that have special
conventions for storing end-of-line delimiters. For example, on MS-DOS systems
in text mode (which is the default), every time you output a newline character ('\n'), the file system actually outputs two characters, a
carriage-return/linefeed pair (CRLF), which is the pair of ASCII characters 0x0D
and 0x0A. Conversely, when you read such a file back into memory in text
mode, each occurrence of this pair of bytes causes a '\n' to be sent to
the program in its place. If you want to bypass this special processing, you
open files in binary mode. Binary mode has nothing whatsoever to do with
whether you can write raw bytes to a file—you always can (by
calling write( )) . You should, however, open a file in binary mode
when you’ll be using read( ) or write( ), because these
functions take a byte count parameter. Having the extra '\r' characters
will throw your byte count off in those instances. You should also open a file
in binary mode if you’re going to use the stream-positioning commands discussed
later in this chapter.
You can open a file for both input and output by declaring
an fstream object. When declaring an fstream object, you must use
enough of the open mode flags mentioned earlier to let the file system know
whether you want to input, output, or both. To switch from output to input, you
need to either flush the stream or change the file position. To change from
input to output, change the file position. To create a file via an fstream
object, use the ios::trunc open mode flag in the constructor call to do
both input and output.
Good design practice dictates that, whenever you create a new class, you should endeavor to hide the details of the underlying
implementation as much as possible from the user of the class. You show them
only what they need to know and make the rest private to avoid
confusion. When using inserters and extractors, you normally don’t know or care
where the bytes are being produced or consumed, whether you’re dealing with
standard I/O, files, memory, or some newly created class or device.
A time comes, however, when it is important to communicate
with the part of the iostream that produces and consumes bytes. To provide this
part with a common interface and still hide its underlying implementation, the
standard library abstracts it into its own class, called streambuf. Each iostream object contains a pointer to some kind of streambuf. (The type
depends on whether it deals with standard I/O, files, memory, and so on.) You
can access the streambuf directly; for example, you can move raw bytes
into and out of the streambuf without formatting them through the
enclosing iostream. This is accomplished by calling member functions for the streambuf
object.
Currently, the most important thing for you to know is that
every iostream object contains a pointer to a streambuf object, and the streambuf
object has some member functions you can call if necessary. For file and string
streams, there are specialized types of stream buffers, as the following figure
illustrates:
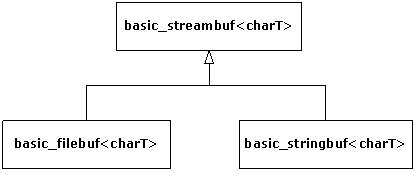
To allow you to access the streambuf, every iostream
object has a member function called rdbuf( ) that returns the pointer to the object’s streambuf. This way you can call any member function for
the underlying streambuf. However, one of the most interesting things
you can do with the streambuf pointer is to connect it to another
iostream object using the << operator. This drains all the
characters from your object into the one on the left side of the <<.
If you want to move all the characters from one iostream to another, you don’t need
to go through the tedium (and potential coding errors) of reading them one
character or one line at a time. This is a much more elegant approach.
Here’s a simple program that opens a file and sends the
contents to standard output (similar to the previous example):
//: C04:Stype.cpp
// Type a file to standard output.
#include <fstream>
#include <iostream>
#include "../require.h"
using namespace std;
int main() {
ifstream in("Stype.cpp");
assure(in, "Stype.cpp");
cout << in.rdbuf(); // Outputs entire file
} ///:~
An ifstream is created using the source code file for
this program as an argument. The assure( ) function reports a
failure if the file cannot be opened. All the work really happens in the
statement
which sends the entire contents of the file to cout.
This is not only more succinct to code, it is often more efficient than moving
the bytes one at a time.
A form of get( ) writes directly into the streambuf
of another object. The first argument is a reference to the destination streambuf,
and the second is the terminating character (‘\n’ by default), which
stops the get( ) function. So there is yet another way to print a
file to standard output:
//: C04:Sbufget.cpp
// Copies a file to standard output.
#include <fstream>
#include <iostream>
#include "../require.h"
using namespace std;
int main() {
ifstream in("Sbufget.cpp");
assure(in);
streambuf& sb = *cout.rdbuf();
while(!in.get(sb).eof()) {
if(in.fail()) // Found blank line
in.clear();
cout << char(in.get()); // Process '\n'
}
} ///:~
The rdbuf( ) function returns a pointer, so it
must be dereferenced to satisfy the function’s need to see an object. Stream
buffers are not meant to be copied (they have no copy constructor), so we define
sb as a reference to cout’s stream buffer. We need the
calls to fail( ) and clear( ) in case the input file has a blank line (this one does). When this particular overloaded version of get( )
sees two newlines in a row (evidence of a blank line), it sets the input
stream’s fail bit, so we must call clear( ) to reset it so that the
stream can continue to be read. The second call to get( ) extracts
and echoes each newline delimiter. (Remember, the get( ) function
doesn’t extract its delimiter like getline( ) does.)
You probably won’t need to use a technique like this often,
but it’s nice to know it exists.
Each type of iostream has a concept of where its “next”
character will come from (if it’s an istream) or go (if it’s an ostream).
In some situations, you might want to move this stream position. You can do so
using two models: one uses an absolute location in the stream called the streampos; the second works like the Standard C library functions fseek( ) for a file and moves a given number of bytes from the beginning, end, or current
position in the file.
The streampos approach requires that you first call a
“tell” function: tellp( ) for an ostream or tellg( ) for an istream. (The “p” refers to the “put pointer,” and the “g” refers to the “get pointer.”) This function returns a streampos you can
later use in calls to seekp( ) for an ostream or seekg( ) for an istream when you want to return to that position in the stream.
The second approach is a relative seek and uses overloaded
versions of seekp( ) and seekg( ). The first argument
is the number of characters to move: it can be positive or negative. The second
argument is the seek direction:
|
ios::beg
|
From beginning of stream
|
|
ios::cur
|
Current position in stream
|
|
ios::end
|
From end of stream
|
Here’s an example that shows the movement through a file,
but remember, you’re not limited to seeking within files as you are with C’s stdio.
With C++, you can seek in any type of iostream (although the standard stream
objects, such as cin and cout, explicitly disallow it):
//: C04:Seeking.cpp
// Seeking in iostreams.
#include <cassert>
#include <cstddef>
#include <cstring>
#include <fstream>
#include "../require.h"
using namespace std;
int main() {
const int STR_NUM = 5, STR_LEN = 30;
char origData[STR_NUM][STR_LEN] = {
"Hickory dickory dus. .
.",
"Are you tired of C++?",
"Well, if you have,",
"That's just too bad,",
"There's plenty more for us!"
};
char readData[STR_NUM][STR_LEN] = {{ 0
}};
ofstream
out("Poem.bin", ios::out | ios::binary);
assure(out, "Poem.bin");
for(int i = 0; i < STR_NUM; i++)
out.write(origData[i], STR_LEN);
out.close();
ifstream in("Poem.bin", ios::in |
ios::binary);
assure(in, "Poem.bin");
in.read(readData[0], STR_LEN);
assert(strcmp(readData[0], "Hickory dickory dus.
. .")
== 0);
// Seek -STR_LEN bytes from the end of file
in.seekg(-STR_LEN, ios::end);
in.read(readData[1], STR_LEN);
assert(strcmp(readData[1], "There's plenty more
for us!")
== 0);
// Absolute seek (like using operator[] with a file)
in.seekg(3 * STR_LEN);
in.read(readData[2], STR_LEN);
assert(strcmp(readData[2], "That's just too
bad,") == 0);
// Seek backwards from current position
in.seekg(-STR_LEN * 2, ios::cur);
in.read(readData[3], STR_LEN);
assert(strcmp(readData[3], "Well, if you
have,") == 0);
// Seek from the begining of the file
in.seekg(1 * STR_LEN, ios::beg);
in.read(readData[4], STR_LEN);
assert(strcmp(readData[4], "Are you tired of
C++?")
== 0);
} ///:~
This program writes a poem to a file using a binary output
stream. Since we reopen it as an ifstream, we use seekg( )
to position the “get pointer.” As you can see, you can seek from the beginning
or end of the file or from the current file position. Obviously, you must
provide a positive number to move from the beginning of the file and a negative
number to move back from the end.
Now that you know about the streambuf and how to
seek, you can understand an alternative method (besides using an fstream
object) for creating a stream object that will both read and write a file. The
following code first creates an ifstream with flags that say it’s both
an input and an output file. You can’t write to an ifstream, so you need
to create an ostream with the underlying stream buffer:
ifstream in("filename", ios::in | ios::out);
ostream out(in.rdbuf());
You might wonder what happens when you write to one of these
objects. Here’s an example:
//: C04:Iofile.cpp
// Reading & writing one file.
#include <fstream>
#include <iostream>
#include "../require.h"
using namespace std;
int main() {
ifstream in("Iofile.cpp");
assure(in, "Iofile.cpp");
ofstream out("Iofile.out");
assure(out, "Iofile.out");
out << in.rdbuf(); // Copy file
in.close();
out.close();
// Open for reading and writing:
ifstream in2("Iofile.out", ios::in |
ios::out);
assure(in2, "Iofile.out");
ostream out2(in2.rdbuf());
cout << in2.rdbuf(); // Print whole file
out2 << "Where does this end up?";
out2.seekp(0, ios::beg);
out2 << "And what about this?";
in2.seekg(0, ios::beg);
cout << in2.rdbuf();
} ///:~
The first five lines copy the source code for this program
into a file called iofile.out and then close the files. This gives us a
safe text file to play with. Then the aforementioned technique is used to
create two objects that read and write to the same file. In cout <<
in2.rdbuf( ), you can see the “get” pointer is initialized to the
beginning of the file. The “put” pointer, however, is set to the end of the
file because “Where does this end up?” appears appended to the file. However,
if the put pointer is moved to the beginning with a seekp( ), all
the inserted text overwrites the existing text. Both writes are seen
when the get pointer is moved back to the beginning with a seekg( ),
and the file is displayed. The file is automatically saved and closed when out2
goes out of scope and its destructor is called.
A string stream works directly with memory instead of a file
or standard output. It uses the same reading and formatting functions that you
use with cin and cout to manipulate bytes in memory. On old
computers, the memory was referred to as core, so this type of
functionality is often called in-core formatting.
The class names for string streams echo those for file
streams. If you want to create a string stream to extract characters from, you
create an istringstream. If you want to put characters into a string
stream, you create an ostringstream. All declarations for string streams
are in the standard header <sstream>. As usual, there are class templates that fit into the iostreams hierarchy, as shown in the following figure:
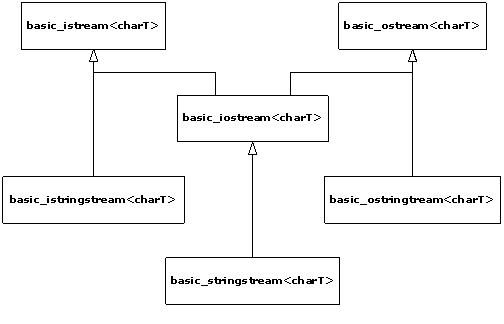
To read from a string using stream operations, you create an
istringstream object initialized with the string. The following program
shows how to use an istringstream object:
//: C04:Istring.cpp
// Input string streams.
#include <cassert>
#include <cmath> // For fabs()
#include <iostream>
#include <limits> // For epsilon()
#include <sstream>
#include <string>
using namespace std;
int main() {
istringstream s("47 1.414 This is a test");
int i;
double f;
s >> i >> f; // Whitespace-delimited
input
assert(i == 47);
double relerr = (fabs(f) - 1.414) / 1.414;
assert(relerr <=
numeric_limits<double>::epsilon());
string buf2;
s >> buf2;
assert(buf2 == "This");
cout << s.rdbuf(); // " is a test"
} ///:~
You can see that this is a more flexible and general
approach to transforming character strings to typed values than the standard C library functions such as atof( ) or atoi( ), even though the latter may be more efficient for single conversions.
In the expression s >> i >> f, the first
number is extracted into i, and the second into f. This isn’t
“the first whitespace-delimited set of characters” because it depends on the
data type it’s being extracted into. For example, if the string were instead, “1.414
47 This is a test,” then i would get the value 1 because the input
routine would stop at the decimal point. Then f would get 0.414.
This could be useful if you want to break a floating-point number into a whole
number and a fraction part. Otherwise it would seem to be an error. The second assert( )
calculates the relative error between what we read and what we expected; it’s
always better to do this than to compare floating-point numbers for equality.
The constant returned by epsilon( ), defined in <limits>, represents the machine epsilon for double-precision numbers, which is the
best tolerance you can expect comparisons of doubles to satisfy.
As you may already have guessed, buf2 doesn’t get the
rest of the string, just the next white-space-delimited word. In general, it’s
best to use the extractor in iostreams when you know the exact sequence of data
in the input stream and you’re converting to some type other than a character
string. However, if you want to extract the rest of the string all at once and
send it to another iostream, you can use rdbuf( ) as shown.
To test the Date extractor at the beginning of this
chapter, we used an input string stream with the following test program:
//: C04:DateIOTest.cpp
//{L} ../C02/Date
#include <iostream>
#include <sstream>
#include "../C02/Date.h"
using namespace std;
void testDate(const string& s) {
istringstream os(s);
Date d;
os >> d;
if(os)
cout << d << endl;
else
cout << "input error with \""
<< s << "\"" << endl;
}
int main() {
testDate("08-10-2003");
testDate("8-10-2003");
testDate("08 - 10 - 2003");
testDate("A-10-2003");
testDate("08%10/2003");
} ///:~
Each string literal in main( ) is passed by
reference to testDate( ), which in turn wraps it in an istringstream
so we can test the stream extractor we wrote for Date objects.
The function testDate( ) also begins to test the inserter, operator<<( ).
To create an output string stream, you just create an ostringstream
object, which manages a dynamically sized character buffer to hold whatever you
insert. To get the formatted result as a string object, you call the str( ) member function. Here’s an example:
//: C04:Ostring.cpp {RunByHand}
// Illustrates ostringstream.
#include <iostream>
#include <sstream>
#include <string>
using namespace std;
int main() {
cout << "type an int, a float and a
string: ";
int i;
float f;
cin >> i >> f;
cin >> ws; // Throw away
white space
string stuff;
getline(cin, stuff); // Get rest of the line
ostringstream os;
os << "integer = "
<< i << endl;
os << "float = " <<
f << endl;
os << "string = "
<< stuff << endl;
string result = os.str();
cout << result << endl;
} ///:~
This is similar to the Istring.cpp example earlier
that fetched an int and a float. A sample execution follows (the
keyboard input is in bold type).
type an int, a float and a string: 10 20.5 the end
integer = 10
float = 20.5
string = the end
You can see that, like the other output streams, you can use
the ordinary formatting tools, such as the << operator and endl,
to send bytes to the ostringstream. The str( ) function
returns a new string object every time you call it so the underlying stringbuf object owned by the string stream is left undisturbed.
In the previous chapter, we presented a program, HTMLStripper.cpp,
that removed all HTML tags and special codes from a text file. As promised,
here is a more elegant version using string streams.
//: C04:HTMLStripper2.cpp {RunByHand}
//{L} ../C03/ReplaceAll
// Filter to remove html tags and markers.
#include <cstddef>
#include <cstdlib>
#include <fstream>
#include <iostream>
#include <sstream>
#include <stdexcept>
#include <string>
#include "../C03/ReplaceAll.h"
#include "../require.h"
using namespace std;
string& stripHTMLTags(string& s)
throw(runtime_error) {
size_t leftPos;
while((leftPos = s.find('<')) != string::npos) {
size_t rightPos = s.find('>', leftPos+1);
if(rightPos == string::npos) {
ostringstream msg;
msg << "Incomplete HTML tag starting
in position "
<< leftPos;
throw runtime_error(msg.str());
}
s.erase(leftPos, rightPos - leftPos + 1);
}
// Remove all special HTML characters
replaceAll(s, "<",
"<");
replaceAll(s, ">",
">");
replaceAll(s, "&",
"&");
replaceAll(s, " ", " ");
// Etc...
return s;
}
int main(int argc, char* argv[]) {
requireArgs(argc, 1,
"usage: HTMLStripper2 InputFile");
ifstream in(argv[1]);
assure(in, argv[1]);
// Read entire file into string; then strip
ostringstream ss;
ss << in.rdbuf();
try {
string s = ss.str();
cout << stripHTMLTags(s) << endl;
return EXIT_SUCCESS;
} catch(runtime_error& x) {
cout << x.what() << endl;
return EXIT_FAILURE;
}
} ///:~
In this program we read the entire file into a string by
inserting a rdbuf( ) call to the file stream into an ostringstream.
Now it’s an easy matter to search for HTML delimiter pairs and erase them
without having to worry about crossing line boundaries like we had to with the
previous version in Chapter 3.
The following example shows how to use a bidirectional (that
is, read/write) string stream:
//: C04:StringSeeking.cpp {-bor}{-dmc}
// Reads and writes a string stream.
#include <cassert>
#include <sstream>
#include <string>
using namespace std;
int main() {
string text = "We will hook no fish";
stringstream ss(text);
ss.seekp(0, ios::end);
ss << " before its time.";
assert(ss.str() ==
"We will hook no fish before its time.");
// Change "hook" to "ship"
ss.seekg(8, ios::beg);
string word;
ss >> word;
assert(word == "hook");
ss.seekp(8, ios::beg);
ss << "ship";
// Change "fish" to "code"
ss.seekg(16, ios::beg);
ss >> word;
assert(word == "fish");
ss.seekp(16, ios::beg);
ss << "code";
assert(ss.str() ==
"We will ship no code before its time.");
ss.str("A horse of a different color.");
assert(ss.str() == "A horse of a different
color.");
} ///:~
As
always, to move the put pointer, you call seekp( ), and to
reposition the get pointer, you call seekg( ). Even though we
didn’t show it with this example, string streams are a little more forgiving
than file streams in that you can switch from reading to writing or vice-versa
at any time. You don’t need to reposition the get or put pointers or flush the
stream. This program also illustrates the overload of str( ) that
replaces the stream’s underlying stringbuf with a new string.
The goal of the iostreams design is to allow you to easily
move and/or format characters. It certainly wouldn’t be useful if you couldn’t
do most of the formatting provided by C’s printf( ) family of
functions. In this section, you’ll learn all the output formatting functions
that are available for iostreams, so you can format your bytes the way you want
them.
The formatting functions in iostreams can be somewhat
confusing at first because there’s often more than one way to control the
formatting: through both member functions and manipulators. To further confuse
things, a generic member function sets state flags to control formatting, such
as left or right justification, to use uppercase letters for hex notation, to
always use a decimal point for floating-point values, and so on. On the other
hand, separate member functions set and read values for the fill character, the
field width, and the precision.
In an attempt to clarify all this, we’ll first examine the
internal formatting data of an iostream, along with the member functions that
can modify that data. (Everything can be controlled through the member
functions, if desired.) We’ll cover the manipulators separately.
The class ios contains data members to store all the
formatting information pertaining to a stream. Some of this data has a range of
values and is stored in variables: the floating-point precision, the output
field width, and the character used to pad the output (normally a space). The
rest of the formatting is determined by flags, which are usually combined to
save space and are referred to collectively as the format flags. You can
find out the value of the format flags with the ios::flags( ) member function, which takes no arguments and returns an object of type fmtflags (usually a synonym for long) that contains the current format flags. All the
rest of the functions make changes to the format flags and return the previous
value of the format flags.
fmtflags ios::flags(fmtflags newflags);
fmtflags ios::setf(fmtflags ored_flag);
fmtflags ios::unsetf(fmtflags
clear_flag);
fmtflags ios::setf(fmtflags bits, fmtflags field);
The first function forces all the flags to change,
which is sometimes what you want. More often, you change one flag at a time
using the remaining three functions.
The use of setf( ) can seem somewhat confusing.
To know which overloaded version to use, you must know what type of flag you’re
changing. There are two types of flags: those that are simply on or off, and
those that work in a group with other flags. The on/off flags are the simplest
to understand because you turn them on with setf(fmtflags) and off with unsetf(fmtflags).
These flags are shown in the following table:
|
on/off flag
|
Effect
|
|
ios::skipws
|
Skip white space. (For input; this is the default.)
|
|
ios::showbase
|
Indicate the numeric base (as set, for example, by dec, oct, or hex) when printing an integral value. Input streams
also recognize the base prefix when showbase is on.
|
|
ios::showpoint
|
Show decimal point and trailing zeros for floating-point
values.
|
|
ios::uppercase
|
Display uppercase A-F for hexadecimal values and E
for scientific values.
|
|
ios::showpos
|
Show plus sign (+) for positive values.
|
|
ios::unitbuf
|
“Unit buffering.” The stream is flushed after each
insertion.
|
For example, to show the plus sign for cout, you say cout.setf(ios::showpos). To stop showing the plus sign, you say cout.unsetf(ios::showpos).
The unitbuf flag controls unit buffering, which means that each insertion is flushed to its output stream immediately. This
is handy for error tracing, so that in case of a program crash, your data is
still written to the log file. The following program illustrates unit
buffering:
//: C04:Unitbuf.cpp {RunByHand}
#include <cstdlib> // For abort()
#include <fstream>
using namespace std;
int main() {
ofstream out("log.txt");
out.setf(ios::unitbuf);
out << "one" << endl;
out << "two" << endl;
abort();
} ///:~
It is necessary to turn on unit buffering before any
insertions are made to the stream. When we commented out the call to setf( ),
one particular compiler had written only the letter ‘o’ to the file log.txt.
With unit buffering, no data was lost.
The standard error output stream cerr has unit
buffering turned on by default. There is a cost for unit buffering, so if an
output stream is heavily used, don’t enable unit buffering unless efficiency is
not a consideration.
The second type of formatting flags work in a group. Only
one of these flags can be set at a time, like the buttons on old car radios—you
push one in, the rest pop out. Unfortunately this doesn’t happen automatically,
and you must pay attention to what flags you’re setting so that you don’t
accidentally call the wrong setf( ) function. For example, there’s
a flag for each of the number bases: hexadecimal, decimal, and octal.
Collectively, these flags are referred to as the ios::basefield. If the ios::dec flag is set and you call setf(ios::hex), you’ll set
the ios::hex flag, but you won’t clear the ios::dec bit,
resulting in undefined behavior. Instead, call the second form of setf( )
like this: setf(ios::hex, ios::basefield). This function first clears
all the bits in the ios::basefield and then sets ios::hex.
Thus, this form of setf( ) ensures that the other flags in the
group “pop out” whenever you set one. The ios::hex manipulator does all
this for you, automatically, so you don’t need to concern yourself with the
internal details of the implementation of this class or to even care
that it’s a set of binary flags. Later you’ll see that there are manipulators
to provide equivalent functionality in all the places you would use setf( ).
Here are the flag groups and their effects:
|
ios::basefield
|
Effect
|
|
ios::dec
|
Format integral values in base 10 (decimal) (the default
radix—no prefix is visible).
|
|
ios::hex
|
Format integral values in base 16 (hexadecimal).
|
|
ios::oct
|
Format integral values in base 8 (octal).
|
|
ios::floatfield
|
Effect
|
|
ios::scientific
|
Display floating-point numbers in scientific format.
Precision field indicates number of digits after the decimal point.
|
|
ios::fixed
|
Display floating-point numbers in fixed format. Precision
field indicates number of digits after the decimal point.
|
|
“automatic” (Neither bit is set.)
|
Precision field indicates the total number of significant
digits.
|
|
ios::adjustfield
|
Effect
|
|
ios::left
|
Left-align values; pad on the right with the fill character.
|
|
ios::right
|
Right-align values. Pad on the left with the fill character.
This is the default alignment.
|
|
ios::internal
|
Add fill characters after any leading sign or base indicator,
but before the value. (In other words, the sign, if printed, is
left-justified while the number is right-justified.)
|
The internal variables that control the width of the output
field, the fill character used to pad an output field, and the precision for
printing floating-point numbers are read and written by member functions of the
same name.
|
Function
|
Effect
|
|
int ios::width( )
|
Returns the current width. Default is 0. Used for both insertion
and extraction.
|
|
int ios::width(int n)
|
Sets the width, returns the previous width.
|
|
int ios::fill( )
|
Returns the current fill character. Default is space.
|
|
int ios::fill(int n)
|
Sets the fill character, returns the previous fill character.
|
|
int ios::precision( )
|
Returns current floating-point precision. Default is 6.
|
|
int ios::precision(int n)
|
Sets floating-point precision, returns previous precision. See
ios::floatfield table for the meaning of “precision.”
|
The fill and precision
values are fairly straightforward, but width requires some explanation.
When the width is zero, inserting a value produces the minimum number of
characters necessary to represent that value. A positive width means that
inserting a value will produce at least as many characters as the width; if the
value has fewer than width characters, the fill character pad the field.
However, the value will never be truncated, so if you try to print 123 with a
width of two, you’ll still get 123. The field width specifies a minimum
number of characters; there’s no way to specify a maximum number.
The width is also distinctly different because it’s reset to
zero by each inserter or extractor that could be influenced by its value. It’s
really not a state variable, but rather an implicit argument to the inserters
and extractors. If you want a constant width, call width( ) after
each insertion or extraction.
To make sure you know how to call all the functions
previously discussed, here’s an example that calls them all:
//: C04:Format.cpp
// Formatting Functions.
#include <fstream>
#include <iostream>
#include "../require.h"
using namespace std;
#define D(A) T << #A << endl; A
int main() {
ofstream T("format.out");
assure(T);
D(int i = 47;)
D(float f = 2300114.414159;)
const char* s = "Is there any more?";
D(T.setf(ios::unitbuf);)
D(T.setf(ios::showbase);)
D(T.setf(ios::uppercase | ios::showpos);)
D(T << i << endl;) // Default is dec
D(T.setf(ios::hex, ios::basefield);)
D(T << i << endl;)
D(T.setf(ios::oct, ios::basefield);)
D(T << i << endl;)
D(T.unsetf(ios::showbase);)
D(T.setf(ios::dec, ios::basefield);)
D(T.setf(ios::left, ios::adjustfield);)
D(T.fill('0');)
D(T << "fill char: " <<
T.fill() << endl;)
D(T.width(10);)
T << i << endl;
D(T.setf(ios::right,
ios::adjustfield);)
D(T.width(10);)
T << i << endl;
D(T.setf(ios::internal,
ios::adjustfield);)
D(T.width(10);)
T << i << endl;
D(T << i << endl;)
// Without width(10)
D(T.unsetf(ios::showpos);)
D(T.setf(ios::showpoint);)
D(T << "prec = " <<
T.precision() << endl;)
D(T.setf(ios::scientific, ios::floatfield);)
D(T << endl << f << endl;)
D(T.unsetf(ios::uppercase);)
D(T << endl << f << endl;)
D(T.setf(ios::fixed, ios::floatfield);)
D(T << f << endl;)
D(T.precision(20);)
D(T << "prec = " <<
T.precision() << endl;)
D(T << endl << f << endl;)
D(T.setf(ios::scientific, ios::floatfield);)
D(T << endl << f << endl;)
D(T.setf(ios::fixed, ios::floatfield);)
D(T << f << endl;)
D(T.width(10);)
T << s << endl;
D(T.width(40);)
T << s << endl;
D(T.setf(ios::left, ios::adjustfield);)
D(T.width(40);)
T << s << endl;
} ///:~
This example uses a trick to create a trace file so that you
can monitor what’s happening. The macro D(a) uses the preprocessor
“stringizing” to turn a into a string to display. Then it reiterates a
so the statement is executed. The macro sends all the information to a file
called T, which is the trace file. The output is
int i = 47;
float f = 2300114.414159;
T.setf(ios::unitbuf);
T.setf(ios::showbase);
T.setf(ios::uppercase | ios::showpos);
T << i << endl;
+47
T.setf(ios::hex, ios::basefield);
T << i << endl;
0X2F
T.setf(ios::oct, ios::basefield);
T << i << endl;
057
T.unsetf(ios::showbase);
T.setf(ios::dec, ios::basefield);
T.setf(ios::left, ios::adjustfield);
T.fill('0');
T << "fill char: " << T.fill()
<< endl;
fill char: 0
T.width(10);
+470000000
T.setf(ios::right, ios::adjustfield);
T.width(10);
0000000+47
T.setf(ios::internal, ios::adjustfield);
T.width(10);
+000000047
T << i << endl;
+47
T.unsetf(ios::showpos);
T.setf(ios::showpoint);
T << "prec = " << T.precision()
<< endl;
prec = 6
T.setf(ios::scientific, ios::floatfield);
T << endl << f << endl;
2.300114E+06
T.unsetf(ios::uppercase);
T << endl << f << endl;
2.300114e+06
T.setf(ios::fixed, ios::floatfield);
T << f << endl;
2300114.500000
T.precision(20);
T << "prec = " << T.precision()
<< endl;
prec = 20
T << endl << f << endl;
2300114.50000000000000000000
T.setf(ios::scientific, ios::floatfield);
T << endl << f << endl;
2.30011450000000000000e+06
T.setf(ios::fixed, ios::floatfield);
T << f << endl;
2300114.50000000000000000000
T.width(10);
Is there any more?
T.width(40);
0000000000000000000000Is there any more?
T.setf(ios::left, ios::adjustfield);
T.width(40);
Is there any
more?0000000000000000000000
Studying this output should clarify your understanding of
the iostream formatting member functions.
As you can see from the previous program, calling the member
functions for stream formatting operations can get a bit tedious. To make
things easier to read and write, a set of manipulators is supplied to
duplicate the actions provided by the member functions. Manipulators are a
convenience because you can insert them for their effect within a containing
expression; you don’t need to create a separate function-call statement.
Manipulators change the state of the stream instead of (or
in addition to) processing data. When you insert endl in an output expression, for example, it not only inserts a newline character, but it also flushes
the stream (that is, puts out all pending characters that have been stored in
the internal stream buffer but not yet output). You can also just flush a stream like this:
which causes a call to the flush( ) member function, as in:
as a side effect (nothing is inserted into the stream).
Additional basic manipulators will change the number base to oct (octal), dec (decimal) or hex (hexadecimal):
cout << hex << "0x" << i << endl;
In this case, numeric output will continue in hexadecimal
mode until you change it by inserting either dec or oct in the
output stream.
There’s also a manipulator for extraction that “eats” white
space:
Manipulators with no arguments are provided in <iostream>.
These include dec, oct, and hex, which perform the same
action as, respectively, setf(ios::dec, ios::basefield), setf(ios::oct,
ios::basefield), and setf(ios::hex, ios::basefield), albeit more
succinctly. The <iostream> header also includes ws, endl, and flush and the additional set shown here:
|
Manipulator
|
Effect
|
|
showbase
noshowbase
|
Indicate the numeric base (dec, oct, or hex)
when printing an integral value.
|
|
showpos
noshowpos
|
Show plus sign (+) for positive values.
|
|
uppercase
nouppercase
|
Display uppercase A-F for hexadecimal values, and display E
for scientific values.
|
|
showpoint
noshowpoint
|
Show decimal point and trailing zeros for floating-point
values.
|
|
skipws
noskipws
|
Skip white space on input.
|
|
left
right
internal
|
Left-align, pad on right.
Right-align, pad on left.
Fill between leading sign or base indicator and value.
|
|
scientific
fixed
|
Indicates the display preference for floating-point output (scientific
notation vs. fixed-point decimal).
|
There are six standard manipulators, such as setw( ),
that take arguments. These are defined in the header file <iomanip>, and are summarized in the following table:
|
Manipulator
|
effect
|
|
setiosflags(fmtflags n)
|
Equivalent to a call to setf(n). The setting remains in
effect until the next change, such as ios::setf( ).
|
|
resetiosflags(fmtflags n)
|
Clears only the format flags specified by n. The
setting remains in effect until the next change, such as ios::unsetf( ).
|
|
setbase(base n)
|
Changes base to n, where n is 10, 8, or 16.
(Anything else results in 0.) If n is zero, output is base 10, but
input uses the C conventions: 10 is 10, 010 is 8, and 0xf is 15. You might as
well use dec, oct, and hex for output.
|
|
setfill(char n)
|
Changes the fill character to n, such as ios::fill( ).
|
|
setprecision(int n)
|
Changes the precision to n, such as ios::precision( ).
|
|
setw(int n)
|
Changes the field width to n, such as ios::width( ).
|
If you’re doing a lot of
formatting, you can see how using manipulators instead of calling stream member
functions can clean up your code. As an example, here’s the program from the
previous section rewritten to use the manipulators. (The D( ) macro
is removed to make it easier to read.)
//: C04:Manips.cpp
// Format.cpp using manipulators.
#include <fstream>
#include <iomanip>
#include <iostream>
using namespace std;
int main() {
ofstream trc("trace.out");
int i = 47;
float f = 2300114.414159;
char* s = "Is there any more?";
trc << setiosflags(ios::unitbuf
| ios::showbase | ios::uppercase
| ios::showpos);
trc << i << endl;
trc << hex << i <<
endl
<< oct << i <<
endl;
trc.setf(ios::left, ios::adjustfield);
trc << resetiosflags(ios::showbase)
<< dec << setfill('0');
trc << "fill char: " <<
trc.fill() << endl;
trc << setw(10) << i << endl;
trc.setf(ios::right, ios::adjustfield);
trc << setw(10) << i << endl;
trc.setf(ios::internal, ios::adjustfield);
trc << setw(10) << i << endl;
trc << i << endl; // Without setw(10)
trc << resetiosflags(ios::showpos)
<< setiosflags(ios::showpoint)
<< "prec = " <<
trc.precision() << endl;
trc.setf(ios::scientific, ios::floatfield);
trc << f << resetiosflags(ios::uppercase)
<< endl;
trc.setf(ios::fixed, ios::floatfield);
trc << f << endl;
trc << f << endl;
trc << setprecision(20);
trc << "prec = " <<
trc.precision() << endl;
trc << f << endl;
trc.setf(ios::scientific, ios::floatfield);
trc << f << endl;
trc.setf(ios::fixed, ios::floatfield);
trc << f << endl;
trc << f << endl;
trc << setw(10) << s << endl;
trc << setw(40) << s << endl;
trc.setf(ios::left, ios::adjustfield);
trc << setw(40) << s << endl;
} ///:~
You can see that a lot of the multiple statements have been
condensed into a single chained insertion. Notice the call to setiosflags( )
in which the bitwise-OR of the flags is passed. This could also have been done
with setf( ) and unsetf( ) as in the previous example.
When using setw( ) with an output stream, the
output expression is formatted into a temporary string that is padded with the
current fill character if needed, as determined by comparing the length of the
formatted result to the argument of setw( ). In other words, setw( )
affects the result string of a formatted output operation. Likewise,
using setw( ) with input streams only is meaningful when reading strings,
as the following example makes clear:
//: C04:InputWidth.cpp
// Shows limitations of setw with input.
#include <cassert>
#include <cmath>
#include <iomanip>
#include <limits>
#include <sstream>
#include <string>
using namespace std;
int main() {
istringstream is("one 2.34 five");
string temp;
is >> setw(2) >> temp;
assert(temp == "on");
is >> setw(2) >> temp;
assert(temp == "e");
double x;
is >> setw(2) >> x;
double relerr = fabs(x - 2.34) / x;
assert(relerr <=
numeric_limits<double>::epsilon());
} ///:~
If you attempt to read a string, setw( )
will control the number of characters extracted quite nicely… up to a point.
The first extraction gets two characters, but the second only gets one, even
though we asked for two. That is because operator>>( ) uses
white space as a delimiter (unless you turn off the skipws flag). When
trying to read a number, however, such as x, you cannot use setw( )
to limit the characters read. With input streams, use only setw( )
for extracting strings.
Sometimes you’d like to create your own manipulators, and it
turns out to be remarkably simple. A zero-argument manipulator such as endl is
simply a function that takes as its argument an ostream reference and
returns an ostream reference. The declaration for endl is
Now, when you say:
the endl produces the address of that
function. So the compiler asks, “Is there a function that can be applied here
that takes the address of a function as its argument?” Predefined functions in <iostream>
do this; they’re called applicators (because they apply a
function to a stream). The applicator calls its function argument, passing it
the ostream object as its argument. You don’t need to know how
applicators work to create your own manipulator; you only need to know that
they exist. Here’s the (simplified) code for an ostream applicator:
ostream& ostream::operator<<(ostream&
(*pf)(ostream&)) {
return pf(*this);
}
The actual definition is a little more complicated since it
involves templates, but this code illustrates the technique. When a function
such as *pf (that takes a stream parameter and returns a stream
reference) is inserted into a stream, this applicator function is called, which
in turn executes the function to which pf points. Applicators for ios_base,
basic_ios, basic_ostream, and basic_istream are predefined
in the Standard C++ library.
To illustrate the process, here’s a trivial example that
creates a manipulator called nl that is equivalent to just inserting a
newline into a stream (i.e., no flushing of the stream occurs, as with endl):
//: C04:nl.cpp
// Creating a manipulator.
#include <iostream>
using namespace std;
ostream& nl(ostream& os) {
return os << '\n';
}
int main() {
cout << "newlines" << nl
<< "between" << nl
<< "each" << nl <<
"word" << nl;
} ///:~
When you insert nl into an output stream, such as cout,
the following sequence of calls ensues:
cout.operator<<(nl) è nl(cout)
The expression
inside nl( ) calls ostream::operator(char),
which returns the stream, which is what is ultimately returned from nl( ).
As you’ve seen, zero-argument manipulators are easy to
create. But what if you want to create a manipulator that takes arguments? If
you inspect the <iomanip> header, you’ll see a type called smanip, which is what the manipulators with arguments return. You might be tempted to
somehow use that type to define your own manipulators, but don’t do it. The smanip
type is implementation-dependent and thus not portable. Fortunately, you can
define such manipulators in a straightforward way without any special
machinery, based on a technique introduced by Jerry Schwarz, called an effector. An effector is
a simple class whose constructor formats a string representing the desired
operation, along with an overloaded operator<< to insert that
string into a stream. Here’s an example with two effectors. The first outputs a
truncated character string, and the second prints a number in binary.
//: C04:Effector.cpp
// Jerry Schwarz's "effectors."
#include <cassert>
#include <limits> // For max()
#include <sstream>
#include <string>
using namespace std;
// Put out a prefix of a string:
class Fixw {
string str;
public:
Fixw(const string& s, int width) : str(s, 0,
width) {}
friend ostream& operator<<(ostream& os,
const Fixw& fw) {
return os << fw.str;
}
};
// Print a number in binary:
typedef unsigned long ulong;
class Bin {
ulong n;
public:
Bin(ulong nn) { n = nn; }
friend ostream& operator<<(ostream& os,
const Bin& b) {
const ulong ULMAX =
numeric_limits<ulong>::max();
ulong bit = ~(ULMAX >> 1); // Top bit set
while(bit) {
os << (b.n & bit ? '1' : '0');
bit >>= 1;
}
return os;
}
};
int main() {
string words = "Things that make us happy, make
us wise";
for(int i = words.size(); --i >= 0;) {
ostringstream s;
s << Fixw(words, i);
assert(s.str() == words.substr(0, i));
}
ostringstream xs, ys;
xs << Bin(0xCAFEBABEUL);
assert(xs.str() ==
"1100""1010""1111""1110""1011""1010""1011""1110");
ys << Bin(0x76543210UL);
assert(ys.str() ==
"0111""0110""0101""0100""0011""0010""0001""0000");
} ///:~
The constructor for Fixw creates a shortened copy of
its char* argument, and the destructor releases the memory created for
this copy. The overloaded operator<< takes the contents of its
second argument, the Fixw object, inserts it into the first argument,
the ostream, and then returns the ostream so that it can be used
in a chained expression. When you use Fixw in an expression like this:
cout << Fixw(string, i) << endl;
a temporary object is created by the call to the Fixw
constructor, and that temporary object is passed to operator<<.
The effect is that of a manipulator with arguments. The temporary Fixw
object persists until the end of the statement.
The Bin effector relies on the fact that shifting an
unsigned number to the right shifts zeros into the high bits. We use numeric_limits<unsigned long>::max( ) (the largest unsigned long
value, from the standard header <limits>) to produce a value with the high bit set, and this value is moved across the number in question (by shifting it to
the right), masking each bit in turn. We’ve juxtaposed string literals in the
code for readability; the separate strings are concatenated into a single
string by the compiler.
Historically, the problem with this technique was that once
you created a class called Fixw for char* or Bin for unsigned
long, no one else could create a different Fixw or Bin class
for their type. However, with namespaces, this problem is eliminated. Effectors
and manipulators aren’t equivalent, although they can often be used to solve
the same problem. If you find that an effector isn’t enough, you will need to
conquer the complexity of manipulators.
In this section you’ll see examples that use what you’ve
learned in this chapter. Although many tools exist to manipulate bytes (stream
editors such as sed and awk from UNIX are perhaps the most well
known, but a text editor also fits this category), they generally have some
limitations. Both sed and awk can be slow and can only handle
lines in a forward sequence, and text editors usually require human
interaction, or at least learning a proprietary macro language. The programs
you write with iostreams have none of these limitations: they’re fast,
portable, and flexible.
Generally, when you create a class, you think in library
terms: you make a header file Name.h for the class declaration, and then
create a file called Name.cpp where the member functions are implemented. These files have certain
requirements: a particular coding standard (the program shown here uses the
coding format for this book), and preprocessor statements surrounding the code in
the header file to prevent multiple declarations of classes. (Multiple
declarations confuse the compiler—it doesn’t know which one you want to use.
They could be different, so it throws up its hands and gives an error message.)
This example creates a new header/implementation pair of
files or modifies an existing pair. If the files already exist, it checks and
potentially modifies the files, but if they don’t exist, it creates them using
the proper format.
//: C04:Cppcheck.cpp
// Configures .h & .cpp files to conform to style
// standard. Tests existing files for conformance.
#include <fstream>
#include <sstream>
#include <string>
#include <cstddef>
#include "../require.h"
using namespace std;
bool startsWith(const string& base, const
string& key) {
return base.compare(0, key.size(), key) == 0;
}
void cppCheck(string fileName) {
enum bufs { BASE, HEADER, IMPLEMENT, HLINE1, GUARD1,
GUARD2, GUARD3, CPPLINE1, INCLUDE, BUFNUM };
string part[BUFNUM];
part[BASE] = fileName;
// Find any '.' in the string:
size_t loc = part[BASE].find('.');
if(loc != string::npos)
part[BASE].erase(loc); // Strip extension
// Force to upper case:
for(size_t i = 0; i < part[BASE].size(); i++)
part[BASE][i] = toupper(part[BASE][i]);
// Create file names and internal lines:
part[HEADER] = part[BASE] + ".h";
part[IMPLEMENT] = part[BASE] + ".cpp";
part[HLINE1] = "//" ": " +
part[HEADER];
part[GUARD1] = "#ifndef " + part[BASE] +
"_H";
part[GUARD2] = "#define " + part[BASE] +
"_H";
part[GUARD3] = "#endif // " + part[BASE]
+"_H";
part[CPPLINE1] = string("//") + ":
" + part[IMPLEMENT];
part[INCLUDE] = "#include \"" +
part[HEADER] + "\"";
// First, try to open existing files:
ifstream existh(part[HEADER].c_str()),
existcpp(part[IMPLEMENT].c_str());
if(!existh) { // Doesn't exist; create it
ofstream newheader(part[HEADER].c_str());
assure(newheader, part[HEADER].c_str());
newheader << part[HLINE1] << endl
<< part[GUARD1] << endl
<< part[GUARD2] << endl
<< endl
<< part[GUARD3] << endl;
} else { // Already exists; verify it
stringstream hfile; // Write & read
ostringstream newheader; // Write
hfile << existh.rdbuf();
// Check that first three lines conform:
bool changed = false;
string s;
hfile.seekg(0);
getline(hfile, s);
bool lineUsed = false;
// The call to good() is for Microsoft (later too):
for(int line = HLINE1; hfile.good() && line
<= GUARD2;
++line) {
if(startsWith(s, part[line])) {
newheader << s << endl;
lineUsed = true;
if(getline(hfile, s))
lineUsed = false;
} else {
newheader << part[line] << endl;
changed = true;
lineUsed = false;
}
}
// Copy rest of file
if(!lineUsed)
newheader << s << endl;
newheader << hfile.rdbuf();
// Check for GUARD3
string head = hfile.str();
if(head.find(part[GUARD3]) == string::npos) {
newheader << part[GUARD3] << endl;
changed = true;
}
// If there were changes, overwrite file:
if(changed) {
existh.close();
ofstream newH(part[HEADER].c_str());
assure(newH, part[HEADER].c_str());
newH << "//@//\n" // Change
marker
<< newheader.str();
}
}
if(!existcpp) { // Create cpp file
ofstream newcpp(part[IMPLEMENT].c_str());
assure(newcpp, part[IMPLEMENT].c_str());
newcpp << part[CPPLINE1] << endl
<< part[INCLUDE] << endl;
} else { // Already exists; verify it
stringstream cppfile;
ostringstream newcpp;
cppfile << existcpp.rdbuf();
// Check that first two lines conform:
bool changed = false;
string s;
cppfile.seekg(0);
getline(cppfile, s);
bool lineUsed = false;
for(int line = CPPLINE1;
cppfile.good() && line <= INCLUDE;
++line) {
if(startsWith(s, part[line])) {
newcpp << s << endl;
lineUsed = true;
if(getline(cppfile, s))
lineUsed = false;
} else {
newcpp << part[line] << endl;
changed = true;
lineUsed = false;
}
}
// Copy rest of file
if(!lineUsed)
newcpp << s << endl;
newcpp << cppfile.rdbuf();
// If there were changes, overwrite file:
if(changed) {
existcpp.close();
ofstream newCPP(part[IMPLEMENT].c_str());
assure(newCPP, part[IMPLEMENT].c_str());
newCPP << "//@//\n" // Change
marker
<< newcpp.str();
}
}
}
int main(int argc, char* argv[]) {
if(argc > 1)
cppCheck(argv[1]);
else
cppCheck("cppCheckTest.h");
} ///:~
First notice the useful function startsWith( ),
which does just what its name says—it returns true if the first string
argument starts with the second argument. This is used when looking for the
expected comments and include-related statements. Having the array of strings, part,
allows for easy looping through the series of expected statements in source
code. If the source file doesn’t exist, we merely write the statements to a new
file of the given name. If the file does exist, we search a line at a time,
verifying that the expected lines occur. If they are not present, they are
inserted. Special care must be taken to make sure we don’t drop existing lines
(see where we use the Boolean variable lineUsed). Notice that we use a stringstream
for an existing file, so we can first write the contents of the file to it and
then read from and search it.
The names in the enumeration are BASE, the
capitalized base file name without extension; HEADER, the header file
name; IMPLEMENT, the implementation file (cpp) name; HLINE1,
the skeleton first line of the header file; GUARD1, GUARD2, and GUARD3,
the “guard” lines in the header file (to prevent multiple inclusion); CPPLINE1,
the skeleton first line of the cpp file; and INCLUDE, the line in
the cpp file that includes the header file.
If you run this program without any arguments, the following
two files are created:
// CPPCHECKTEST.h
#ifndef CPPCHECKTEST_H
#define CPPCHECKTEST_H
#endif // CPPCHECKTEST_H
// CPPCHECKTEST.cpp
#include
"CPPCHECKTEST.h"
(We removed the colon after the double-slash in the first
comment lines so as not to confuse the book’s code extractor. It will appear in
the actual output produced by cppCheck.)
You can experiment by removing selected lines from these
files and re-running the program. Each time you will see that the correct lines
are added back in. When a file is modified, the string “//@//” is placed
as the first line of the file to bring the change to your attention. You will
need to remove this line before you process the file again (otherwise cppcheck
will assume the initial comment line is missing).
All the code in this book is designed to compile as shown
without errors. Lines of code that should generate a compile-time error may be
commented out with the special comment sequence “//!”. The following program
will remove these special comments and append a numbered comment to the line.
When you run your compiler, it should generate error messages, and you will see
all the numbers appear when you compile all the files. This program also
appends the modified line to a special file so that you can easily locate any
lines that don’t generate errors.
//: C04:Showerr.cpp {RunByHand}
// Un-comment error generators.
#include <cstddef>
#include <cstdlib>
#include <cstdio>
#include <fstream>
#include <iostream>
#include <sstream>
#include <string>
#include "../require.h"
using namespace std;
const string USAGE =
"usage: showerr filename chapnum\n"
"where filename is a C++ source file\n"
"and chapnum is the chapter name it's
in.\n"
"Finds lines commented with //! and
removes\n"
"the comment, appending //(#) where # is
unique\n"
"across all files, so you can determine\n"
"if your compiler finds the error.\n"
"showerr /r\n"
"resets the unique counter.";
class Showerr {
const int CHAP;
const string MARKER, FNAME;
// File containing error number counter:
const string ERRNUM;
// File containing error lines:
const string ERRFILE;
stringstream edited; // Edited file
int counter;
public:
Showerr(const string& f, const string& en,
const string& ef, int c)
: CHAP(c), MARKER("//!"), FNAME(f),
ERRNUM(en),
ERRFILE(ef), counter(0) {}
void replaceErrors() {
ifstream infile(FNAME.c_str());
assure(infile, FNAME.c_str());
ifstream count(ERRNUM.c_str());
if(count) count >> counter;
int linecount = 1;
string buf;
ofstream errlines(ERRFILE.c_str(), ios::app);
assure(errlines, ERRFILE.c_str());
while(getline(infile, buf)) {
// Find marker at start of line:
size_t pos = buf.find(MARKER);
if(pos != string::npos) {
// Erase marker:
buf.erase(pos, MARKER.size() + 1);
// Append counter & error info:
ostringstream out;
out << buf << " // ("
<< ++counter << ") "
<< "Chapter " << CHAP
<< " File: " << FNAME
<< " Line " <<
linecount << endl;
edited << out.str();
errlines << out.str(); // Append error
file
}
else
edited << buf << "\n"; //
Just copy
++linecount;
}
}
void saveFiles() {
ofstream outfile(FNAME.c_str()); // Overwrites
assure(outfile, FNAME.c_str());
outfile << edited.rdbuf();
ofstream count(ERRNUM.c_str()); // Overwrites
assure(count, ERRNUM.c_str());
count << counter; // Save new counter
}
};
int main(int argc, char* argv[]) {
const string ERRCOUNT("../errnum.txt"),
ERRFILE("../errlines.txt");
requireMinArgs(argc, 1, USAGE.c_str());
if(argv[1][0] == '/' || argv[1][0] == '-') {
// Allow for other switches:
switch(argv[1][1]) {
case 'r': case 'R':
cout << "reset counter"
<< endl;
remove(ERRCOUNT.c_str()); // Delete files
remove(ERRFILE.c_str());
return EXIT_SUCCESS;
default:
cerr << USAGE << endl;
return EXIT_FAILURE;
}
}
if(argc == 3) {
Showerr s(argv[1], ERRCOUNT, ERRFILE, atoi(argv[2]));
s.replaceErrors();
s.saveFiles();
}
} ///:~
You can replace the marker with one of your choice.
Each file is read a line at a time, and each line is
searched for the marker appearing at the head of the line; the line is modified
and put into the error line list and into the string stream, edited.
When the whole file is processed, it is closed (by reaching the end of a
scope), it is reopened as an output file, and edited is poured into the
file. Also notice the counter is saved in an external file. The next time this
program is invoked, it continues to increment the counter.
This example shows an approach you might take to log data to
disk and later retrieve it for processing. It is meant to produce a temperature-depth
profile of the ocean at various points. The DataPoint class holds the
data:
//: C04:DataLogger.h
// Datalogger record layout.
#ifndef DATALOG_H
#define DATALOG_H
#include <ctime>
#include <iosfwd>
#include <string>
using std::ostream;
struct Coord {
int deg, min, sec;
Coord(int d = 0, int m = 0, int s = 0)
: deg(d), min(m), sec(s) {}
std::string toString() const;
};
ostream& operator<<(ostream&, const
Coord&);
class DataPoint {
std::time_t timestamp; // Time & day
Coord latitude, longitude;
double depth, temperature;
public:
DataPoint(std::time_t ts, const Coord& lat,
const Coord& lon, double dep, double
temp)
: timestamp(ts), latitude(lat), longitude(lon),
depth(dep), temperature(temp) {}
DataPoint() : timestamp(0), depth(0), temperature(0)
{}
friend ostream& operator<<(ostream&,
const DataPoint&);
};
#endif // DATALOG_H ///:~
A DataPoint consists of a time stamp, which is stored
as a time_t value as defined in <ctime>, longitude and latitude coordinates, and values for depth and temperature. We use inserters for easy formatting.
Here’s the implementation file:
//: C04:DataLogger.cpp {O}
// Datapoint implementations.
#include "DataLogger.h"
#include <iomanip>
#include <iostream>
#include <sstream>
#include <string>
using namespace std;
ostream& operator<<(ostream& os, const
Coord& c) {
return os << c.deg << '*'
<< c.min << '\''
<< c.sec
<< '"';
}
string Coord::toString() const {
ostringstream os;
os << *this;
return os.str();
}
ostream& operator<<(ostream& os, const
DataPoint& d) {
os.setf(ios::fixed, ios::floatfield);
char fillc = os.fill('0'); // Pad on left with '0'
tm* tdata =
localtime(&d.timestamp);
os <<
setw(2) << tdata->tm_mon + 1 << '\\'
<< setw(2) <<
tdata->tm_mday << '\\'
<< setw(2) <<
tdata->tm_year+1900 << ' '
<< setw(2) << tdata->tm_hour
<< ':'
<< setw(2) <<
tdata->tm_min << ':'
<< setw(2) <<
tdata->tm_sec;
os.fill(' '); // Pad on left with ' '
streamsize prec = os.precision(4);
os << " Lat:" << setw(9)
<< d.latitude.toString()
<< ", Long:" << setw(9)
<< d.longitude.toString()
<< ", depth:" << setw(9)
<< d.depth
<< ", temp:" << setw(9)
<< d.temperature;
os.fill(fillc);
os.precision(prec);
return os;
} ///:~
The Coord::toString( ) function is necessary
because the DataPoint inserter calls setw( ) before it prints the latitude and longitude. If we used the stream inserter for Coord instead, the width
would only apply to the first insertion (that is, to Coord::deg), since
width changes are always reset immediately. The call to setf( ) causes the floating-point output to be fixed-precision, and precision( ) sets the number of decimal places to four. Notice how we restore the fill
character and precision to whatever they were before the inserter was called.
To get the values from the time encoding stored in DataPoint::timestamp,
we call the function std::localtime( ), which returns a static pointer to a tm object. The tm struct has the following layout:
struct tm {
int tm_sec; // 0-59 seconds
int tm_min; // 0-59 minutes
int tm_hour; // 0-23 hours
int tm_mday; // Day of month
int tm_mon; // 0-11 months
int tm_year; // Years since 1900
int tm_wday; // Sunday == 0, etc.
int tm_yday; // 0-365 day of year
int tm_isdst; // Daylight savings?
};
Generating test data
Here’s a program that creates a file of test data in binary
form (using write( )) and a second file in ASCII form using the DataPoint inserter. You can also print it out to the screen, but it’s easier
to inspect in file form.
//: C04:Datagen.cpp
// Test data generator.
//{L} DataLogger
#include <cstdlib>
#include <ctime>
#include <cstring>
#include <fstream>
#include "DataLogger.h"
#include "../require.h"
using namespace std;
int main() {
time_t timer;
srand(time(&timer)); // Seed the random number
generator
ofstream data("data.txt");
assure(data, "data.txt");
ofstream bindata("data.bin", ios::binary);
assure(bindata, "data.bin");
for(int i = 0; i < 100; i++, timer += 55) {
// Zero to 199 meters:
double newdepth = rand() % 200;
double fraction = rand() % 100 + 1;
newdepth += 1.0 / fraction;
double newtemp = 150 + rand() % 200; // Kelvin
fraction = rand() % 100 + 1;
newtemp += 1.0 / fraction;
const DataPoint d(timer, Coord(45,20,31),
Coord(22,34,18), newdepth,
newtemp);
data << d << endl;
bindata.write(reinterpret_cast<const
char*>(&d),
sizeof(d));
}
} ///:~
The file data.txt is created in the ordinary way as
an ASCII file, but data.bin has the flag ios::binary to tell the constructor to set it up as a binary file. To illustrate the formatting used for the text
file, here is the first line of data.txt (the line wraps because it’s
longer than this page will allow):
07\28\2003 12:54:40 Lat:45*20'31", Long:22*34'18", depth:
16.0164, temp: 242.0122
The Standard C library function time( ) updates the time_t value its argument points to with an encoding of the
current time, which on most platforms is the number of seconds elapsed since 00:
00: 00 GMT, January 1 1970 (the dawning of the age of Aquarius?). The current
time is also a convenient way to seed the random number generator with the
Standard C library function srand( ), as is done here.
After this, the timer is incremented by 55 seconds to
give an interesting interval between readings in this simulation.
The latitude and longitude used are fixed values to indicate
a set of readings at a single location. Both the depth and the temperature are
generated with the Standard C library rand( ) function, which
returns a pseudorandom number between zero and a platform-dependent constant, RAND_MAX, defined in <cstdlib> (usually the value of the platform’s largest
unsigned integer). To put this in a desired range, use the remainder operator %
and the upper end of the range. These numbers are integral; to add a fractional
part, a second call to rand( ) is made, and the value is inverted
after adding one (to prevent divide-by-zero errors).
In effect, the data.bin file is being used as a
container for the data in the program, even though the container exists on disk
and not in RAM. write( ) sends the data out to the disk in binary
form. The first argument is the starting address of the source block—notice it
must be cast to a char* because that’s what write( ) expects
for narrow streams. The second argument is the number of characters to write,
which in this case is the size of the DataPoint object (again, because
we’re using narrow streams). Because no pointers are contained in DataPoint,
there is no problem in writing the object to disk. If the object is more
sophisticated, you must implement a scheme for serialization, which
writes the data referred to by pointers and defines new pointers when read back
in later. (We don’t talk about serialization in this volume—most vendor class libraries
have some sort of serialization structure built into them.)
Verifying and viewing the data
To check the validity of the data stored in binary format,
you can read it into memory with the read( ) member function for
input streams, and compare it to the text file created earlier by Datagen.cpp.
The following example just writes the formatted results to cout, but you
can redirect this to a file and then use a file comparison utility to verify
that it is identical to the original:
//: C04:Datascan.cpp
//{L} DataLogger
#include <fstream>
#include <iostream>
#include "DataLogger.h"
#include "../require.h"
using namespace std;
int main() {
ifstream bindata("data.bin", ios::binary);
assure(bindata, "data.bin");
DataPoint d;
while(bindata.read(reinterpret_cast<char*>(&d),
sizeof d))
cout << d << endl;
} ///:~
The software industry is now a healthy, worldwide economic
market, with demand for applications that can run in various languages and
cultures. As early as the late 1980s, the C Standards Committee added support
for non-U.S. formatting conventions with their locale mechanism. A
locale is a set of preferences for displaying certain entities such as dates
and monetary quantities. In the 1990s, the C Standards Committee approved an
addendum to Standard C that specified functions to handle wide characters (denoted by the type wchar_t), which allow support for character sets
other than ASCII and its commonly used Western European extensions. Although
the size of a wide character is not specified, some platforms implement them as
32-bit quantities, so they can hold the encodings specified by the Unicode Consortium, as well as mappings to multi-byte characters sets defined by Asian
standards bodies. C++ has integrated support for both wide characters and
locales into the iostreams library.
A wide stream is a stream class that handles wide
characters. All the examples so far (except for the last traits example in
Chapter 3) have used narrow streams that hold instances of char.
Since stream operations are essentially the same no matter the underlying
character type, they are encapsulated generically as templates. So all input
streams, for example, are connected to the basic_istream class template:
template<class charT, class traits =
char_traits<charT> >
class basic_istream {...};
In fact, all input stream types are specializations of this
template, according to the following type definitions:
typedef basic_istream<char> istream;
typedef basic_istream<wchar_t> wistream;
typedef basic_ifstream<char> ifstream;
typedef basic_ifstream<wchar_t> wifstream;
typedef basic_istringstream<char> istringstream;
typedef
basic_istringstream<wchar_t> wistringstream;
All other stream types are defined in similar fashion.
In a perfect world, this is all you’d need to create streams
of different character types. But things aren’t that simple. The reason is that
the character-processing functions provided for char and wchar_t
don’t have the same names. To compare two narrow strings, for example, you use
the strcmp( ) function. For wide characters, that function is named
wcscmp( ). (Remember these originated in C, which does not have function overloading, hence unique names are required.) For this reason, a generic
stream can’t just call strcmp( ) in response to a comparison operator. There needs to be a way for the correct low-level functions to be called automatically.
The solution is to factor out the differences into a new
abstraction. The operations you can perform on characters have been abstracted
into the char_traits template, which has predefined specializations for char
and wchar_t, as we discussed at the end of the previous chapter. To
compare two strings, then, basic_string just calls traits::compare( ) (remember that traits is the second template parameter), which in
turn calls either strcmp( ) or wcscmp( ), depending on
which specialization is being used (transparent to basic_string).
You only need to be concerned about char_traits if
you access the low-level character processing functions; most of the time you
don’t care. Consider, however, making your inserters and extractors more robust
by defining them as templates, just in case someone wants to use them on a wide
stream.
To illustrate, recall again the Date class inserter
from the beginning of this chapter. We originally declared it as:
ostream& operator<<(ostream&, const Date&);
This accommodates only narrow streams. To make it generic,
we simply make it a template based on basic_ostream:
template<class charT, class traits>
std::basic_ostream<charT, traits>&
operator<<(std::basic_ostream<charT,
traits>& os,
const Date& d) {
charT fillc = os.fill(os.widen('0'));
charT dash = os.widen('-');
os << setw(2) << d.month << dash
<< setw(2) << d.day << dash
<< setw(4) << d.year;
os.fill(fillc);
return os;
}
Notice that we also have to replace char with the
template parameter charT in the declaration of fillc, since it
could be either char or wchar_t, depending on the template
instantiation being used.
Since you don’t know when you’re writing the template which
type of stream you have, you need a way to automatically convert character
literals to the correct size for the stream. This is the job of the widen( ) member function. The expression widen('-'), for example, converts its
argument to L’-’ (the literal syntax equivalent to the conversion wchar_t(‘-’))
if the stream is a wide stream and leaves it alone otherwise. There is also a narrow( ) function that converts to a char if needed.
We can use widen( ) to write a generic version
of the nl manipulator we presented earlier in the chapter.
template<class charT, class traits>
basic_ostream<charT,traits>&
nl(basic_ostream<charT,traits>& os) {
return os << charT(os.widen('\n'));
}
Perhaps the most notable difference in typical numeric
computer output from country to country is the punctuator used to separate the
integer and fractional parts of a real number. In the United States, a period
denotes a decimal point, but in much of the world, a comma is expected instead.
It would be quite inconvenient to do all your own formatting for
locale-dependent displays. Once again, creating an abstraction that handles
these differences solves the problem.
That abstraction is the locale. All streams have an
associated locale object that they use for guidance on how to display certain
quantities for different cultural environments. A locale manages the categories
of culture-dependent display rules, which are defined as follows:
|
Category
|
Effect
|
|
collate
|
Allows comparing strings according to different, supported
collating sequences.
|
|
ctype
|
Abstracts the character classification and conversion
facilities found in <cctype>.
|
|
monetary
|
Supports different displays of monetary quantities.
|
|
numeric
|
Supports different display formats of real numbers,
including radix (decimal point) and grouping (thousands) separators.
|
|
time
|
Supports various international formats for display of date
and time.
|
|
messages
|
Scaffolding to implement context-dependent message
catalogs (such as for error messages in different languages).
|
The following program illustrates basic locale behavior:
//: C04:Locale.cpp {-g++}{-bor}{-edg} {RunByHand}
// Illustrates effects of locales.
#include <iostream>
#include <locale>
using namespace std;
int main() {
locale def;
cout << def.name() << endl;
locale current = cout.getloc();
cout << current.name() << endl;
float val = 1234.56;
cout << val << endl;
// Change to French/France
cout.imbue(locale("french"));
current = cout.getloc();
cout << current.name() << endl;
cout << val << endl;
cout << "Enter the literal 7890,12:
";
cin.imbue(cout.getloc());
cin >> val;
cout << val << endl;
cout.imbue(def);
cout << val << endl;
} ///:~
Here’s the output:
C
C
1234.56
French_France.1252
1234,56
Enter the literal 7890,12: 7890,12
7890,12
7890.12
The default locale is the “C” locale, which is what C and
C++ programmers have been used to all these years (basically, English language
and American culture). All streams are initially “imbued” with the “C” locale.
The imbue( ) member function changes the locale that a stream uses.
Notice that the full ISO name for the “French” locale is displayed (that is,
French used in France vs. French used in another country). This example shows
that this locale uses a comma for a radix point in numeric display. We have to
change cin to the same locale if we want to do input according to the
rules of this locale.
Each locale category is divided into number of facets, which are classes encapsulating the functionality that pertains to
that category. For example, the time category has the facets time_put and time_get, which contain functions for doing time and date input
and output respectively. The monetary category has facets money_get, money_put, and moneypunct. (The latter facet determines the currency symbol.) The following program illustrates the moneypunct facet.
(The time facet requires a sophisticated use of iterators which is
beyond the scope of this chapter.)
//: C04:Facets.cpp {-bor}{-g++}{-mwcc}{-edg}
#include <iostream>
#include <locale>
#include <string>
using namespace std;
int main() {
// Change to French/France
locale loc("french");
cout.imbue(loc);
string currency =
use_facet<moneypunct<char>
>(loc).curr_symbol();
char point =
use_facet<moneypunct<char>
>(loc).decimal_point();
cout << "I made " << currency
<< 12.34 << " today!"
<< endl;
} ///:~
The output shows the French
currency symbol and decimal separator:
You can also define your own facets to construct customized
locales. Be aware that
the overhead for locales is considerable. In fact, some library vendors provide
different “flavors” of the Standard C++ library to accommodate environments
that have limited space.
This chapter has given you a fairly thorough introduction to
the iostream class library. What you’ve seen here is likely to be all you need
to create programs using iostreams. However, be aware that some additional
features in iostreams are not used often, but you can discover them by looking
at the iostream header files and by reading your compiler’s documentation on
iostreams or the references mentioned in this chapter and in the appendices.
Solutions
to selected exercises can be found in the electronic document The Thinking
in C++ Volume 2 Annotated Solution Guide, available for a small fee from www.MindView.net.
1. Open a file by creating an ifstream object. Make an ostringstream
object and read the entire contents into the ostringstream using the rdbuf( )
member function. Extract a string copy of the underlying buffer and
capitalize every character in the file using the Standard C toupper( )
macro defined in <cctype>. Write the result out to a new file.
2. Create a program that opens a file (the first argument on the
command line) and searches it for any one of a set of words (the remaining
arguments on the command line). Read the input a line at a time, and write out
the lines (with line numbers) that match to the new file.
3. Write a program that adds a copyright notice to the beginning of
all source-code files indicated by the program’s command-line arguments.
4. Use your favorite text-searching program (grep, for
example) to output the names (only) of all the files that contain a particular
pattern. Redirect the output into a file. Write a program that uses the
contents of that file to generate a batch file that invokes your editor on each
of the files found by the search program.
5. We know that setw( ) allows for a minimum of
characters read in, but what if you wanted to read a maximum? Write an effector
that allows the user to specify a maximum number of characters to extract. Have
your effector also work for output, in such a way that output fields are
truncated, if necessary, to stay within width limits.
6. Demonstrate to yourself that if the fail or bad bit is set, and
you subsequently turn on stream exceptions, that the stream will immediately
throw an exception.
7. String streams accommodate easy conversions, but they come with a
price. Write a program that races atoi( ) against the stringstream
conversion system to see the effect of the overhead involved with stringstream.
8. Make a Person struct with fields such as name, age,
address, etc. Make the string fields fixed-size arrays. The social security
number will be the key for each record. Implement the following Database
class:
class DataBase {
public:
// Find where a record is on disk
size_t query(size_t ssn);
// Return the person at rn (record number)
Person retrieve(size_t rn);
// Record a record on disk
void add(const Person& p);
};
Write some Person records to disk (do not keep them all in memory).
When the user requests a record, read it off the disk and return it. The I/O operations
in the DataBase class use read( ) and write( )
to process all Person records.
9. Write an operator<< inserter for the Person
struct that can be used to display records in a format for easy reading. Demonstrate
it by writing data out to a file.
10. Suppose the database for your Person structs was lost but
that you have the file you wrote from the previous exercise. Recreate your
database using this file. Be sure to use error checking.
11. Write size_t(-1) (the largest unsigned int on your
platform) to a text file 1,000,000 times. Repeat, but write to a binary file.
Compare the size of the two files, and see how much room is saved using the
binary format. (You may first want to calculate how much will be saved on your
platform.)
12. Discover the maximum number of digits of precision your
implementation of iostreams will print by repeatedly increasing the value of
the argument to precision( ) when printing a transcendental number
such as sqrt(2.0).
13. Write a program that reads real numbers from a file and prints
their sum, average, minimum, and maximum.
14. Determine the output of the following program before it is
executed:
//: C04:Exercise14.cpp
#include <fstream>
#include <iostream>
#include <sstream>
#include "../require.h"
using namespace std;
#define d(a) cout << #a " ==\t"
<< a << endl;
void tellPointers(fstream& s) {
d(s.tellp());
d(s.tellg());
cout << endl;
}
void tellPointers(stringstream& s) {
d(s.tellp());
d(s.tellg());
cout << endl;
}
int main() {
fstream in("Exercise14.cpp");
assure(in, "Exercise14.cpp");
in.seekg(10);
tellPointers(in);
in.seekp(20);
tellPointers(in);
stringstream memStream("Here is a
sentence.");
memStream.seekg(10);
tellPointers(memStream);
memStream.seekp(5);
tellPointers(memStream);
} ///:~
15. Suppose you are given line-oriented data in a file formatted as
follows:
//: C04:Exercise15.txt
Australia
5E56,7667230284,Langler,Tyson,31.2147,0.00042117361
2B97,7586701,Oneill,Zeke,553.429,0.0074673053156065
4D75,7907252710,Nickerson,Kelly,761.612,0.010276276
9F2,6882945012,Hartenbach,Neil,47.9637,0.0006471644
Austria
480F,7187262472,Oneill,Dee,264.012,0.00356226040013
1B65,4754732628,Haney,Kim,7.33843,0.000099015948475
DA1,1954960784,Pascente,Lester,56.5452,0.0007629529
3F18,1839715659,Elsea,Chelsy,801.901,0.010819887645
Belgium
BDF,5993489554,Oneill,Meredith,283.404,0.0038239127
5AC6,6612945602,Parisienne,Biff,557.74,0.0075254727
6AD,6477082,Pennington,Lizanne,31.0807,0.0004193544
4D0E,7861652688,Sisca,Francis,704.751,0.00950906238
Bahamas
37D8,6837424208,Parisienne,Samson,396.104,0.0053445
5E98,6384069,Willis,Pam,90.4257,0.00122009564059246
1462,1288616408,Stover,Hazal,583.939,0.007878970561
5FF3,8028775718,Stromstedt,Bunk,39.8712,0.000537974
1095,3737212,Stover,Denny,3.05387,0.000041205248883
7428,2019381883,Parisienne,Shane,363.272,0.00490155
///:~
The heading of each section is a region, and every line under that heading
is a seller in that region. Each comma-separated field represents the data
about each seller. The first field in a line is the SELLER_ID which
unfortunately was written out in hexadecimal format. The second is the
PHONE_NUMBER (notice that some are missing area codes). LAST_NAME and
FIRST_NAME then follow. TOTAL_SALES is the second to the last column. The last
column is the decimal amount of the total sales that the seller represents for
the company. You are to format the data on the terminal window so that an
executive can easily interpret the trends. Sample output is given below.
Australia
---------------------------------
*Last Name* *First
Name* *ID* *Phone* *Sales* *Percent*
Langler
Tyson 24150 766-723-0284 31.24 4.21E-02
Oneill
Zeke 11159 XXX-758-6701 553.43 7.47E-01
(etc.)
The C++ template facility goes far
beyond simple “containers of T.” Although the original motivation was to
enable type–safe, generic containers, in modern C++, templates are also used to
generate custom code and to optimize program execution through compile–time
programming constructs.
In this chapter we offer a practical look at the power (and
pitfalls) of programming with templates in modern C++. For a more complete
analysis of template-related language issues and pitfalls, we recommend the
superb book by Daveed Vandevoorde and Nico Josuttis.
As illustrated in Volume 1, templates come in two flavors:
function templates and class templates. Both are wholly characterized by their
parameters. Each template parameter can represent one of the following:
1. Types
(either built-in or user-defined).
2. Compile-time
constant values (for example, integers, and pointers and references to static
entities; often referred to as non-type parameters).
3. Other
templates.
The examples in Volume 1 all fall into the first category
and are the most common. The canonical example for simple container-like
templates nowadays seems to be a Stack class. Being a container, a Stack
object is not concerned with the type of object it stores; the logic of holding
objects is independent of the type of objects being held. For this reason you
can use a type parameter to represent the contained type:
template<class T> class Stack {
T* data;
size_t count;
public:
void push(const T& t);
// Etc.
};
The actual type to be used for a particular Stack
instance is determined by the argument for the parameter T:
Stack<int> myStack; // A Stack of ints
The compiler then provides an int-version of Stack
by substituting int for T and generating the corresponding code.
The name of the class instance generated from the template in this case is Stack<int>.
A non-type template parameter must be an integral value that
is known at compile time. You can make a fixed-size Stack, for instance,
by specifying a non-type parameter to be used as the dimension for the
underlying array, as follows.
template<class T, size_t N> class Stack {
T data[N]; // Fixed capacity is N
size_t count;
public:
void push(const T& t);
// Etc.
};
You must provide a compile-time constant value for the
parameter N when you request an instance of this template, such as
Stack<int, 100> myFixedStack;
Because the value of N is known at compile time, the
underlying array (data) can be placed on the runtime stack instead of on the free store. This can improve runtime performance by avoiding the overhead
associated with dynamic memory allocation. Following the pattern mentioned
earlier, the name of the class above is Stack<int, 100>. This
means that each distinct value of N results in a unique class type. For
example, Stack<int, 99> is a distinct class from Stack<int, 100>.
The bitset class template, discussed in detail in Chapter
7, is the only class in the Standard C++ library that uses a non-type template
parameter (which specifies the number of bits the bitset object can hold).
The following random number generator example uses a bitset to track
numbers so all the numbers in its range are returned in random order without
repetition before starting over. This example also overloads operator( ) to produce a familiar function-call syntax.
//: C05:Urand.h {-bor}
// Unique randomizer.
#ifndef URAND_H
#define URAND_H
#include <bitset>
#include <cstddef>
#include <cstdlib>
#include <ctime>
using std::size_t;
using std::bitset;
template<size_t UpperBound> class Urand {
bitset<UpperBound> used;
public:
Urand() { srand(time(0)); } // Randomize
size_t operator()(); // The "generator"
function
};
template<size_t UpperBound>
inline size_t Urand<UpperBound>::operator()() {
if(used.count() == UpperBound)
used.reset(); // Start over (clear bitset)
size_t newval;
while(used[newval = rand() % UpperBound])
; // Until unique value is found
used[newval] = true;
return newval;
}
#endif // URAND_H ///:~
The numbers generated by Urand are unique because the
bitset used tracks all the possible numbers in the random space
(the upper bound is set with the template argument) and records each used number
by setting the corresponding position bit. When the numbers are all used up, the
bitset is cleared to start over. Here’s a simple driver that illustrates
how to use a Urand object:
//: C05:UrandTest.cpp {-bor}
#include <iostream>
#include "Urand.h"
using namespace std;
int main() {
Urand<10> u;
for(int i = 0; i < 20; ++i)
cout << u() << ' ';
} ///:~
As we explain later in this chapter, non-type template
arguments are also important in the optimization of numeric computations.
You can provide default arguments for template parameters in
class templates, but not function templates. As with default function
arguments, they should only be defined once, the first time a template
declaration or definition is seen by the compiler. Once you introduce a default
argument, all the subsequent template parameters must also have defaults. To
make the fixed-size Stack template shown earlier a little friendlier,
for example, you can add a default argument like this:
template<class T, size_t N = 100> class Stack {
T data[N]; // Fixed capacity is N
size_t count;
public:
void push(const T& t);
// Etc.
};
Now, if you omit the second template argument when declaring
a Stack object, the value for N will default to 100.
You can choose to provide defaults for all arguments, but
you must use an empty set of brackets when declaring an instance so that the
compiler knows that a class template is involved:
template<class T = int, size_t N = 100> // Both
defaulted
class Stack {
T data[N]; // Fixed capacity is N
size_t count;
public:
void push(const T& t);
// Etc.
};
Stack<> myStack; // Same as Stack<int, 100>
Default arguments are used heavily in the Standard C++
library. The vector class template, for instance, is declared as
follows:
template<class T, class Allocator =
allocator<T> >
class vector;
Note the space between the last two right angle bracket
characters. This prevents the compiler from interpreting those two characters (>>)
as the right-shift operator.
This declaration reveals that vector takes two
arguments: the type of the contained objects it holds, and a type that
represents the allocator used by the vector. Whenever you omit the
second argument, the standard allocator template is used, parameterized
by the first template parameter. This declaration also shows that you can use
template parameters in subsequent template parameters, as T is used
here.
Although you cannot use default template arguments in
function templates, you can use template parameters as default arguments to
normal functions. The following function template adds the elements in a
sequence:
//: C05:FuncDef.cpp
#include <iostream>
using namespace std;
template<class T> T sum(T* b, T* e, T init = T())
{
while(b != e)
init += *b++;
return init;
}
int main() {
int a[] = { 1, 2, 3 };
cout << sum(a, a + sizeof a / sizeof a[0])
<< endl; // 6
} ///:~
The third argument to sum( ) is the initial
value for the accumulation of the elements. Since we omitted it, this argument
defaults to T( ), which in the case of int and other
built-in types invokes a pseudo-constructor that performs zero-initialization.
The third type of parameter a template can accept is another
class template. If you are going to use a template type parameter itself as a
template in your code, the compiler needs to know that the parameter is a
template in the first place. The following example illustrates a template
template parameter:
//: C05:TempTemp.cpp
// Illustrates a template template parameter.
#include <cstddef>
#include <iostream>
using namespace std;
template<class T>
class Array { // A simple, expandable sequence
enum { INIT = 10 };
T* data;
size_t capacity;
size_t count;
public:
Array() {
count = 0;
data = new T[capacity = INIT];
}
~Array() { delete [] data; }
void push_back(const T& t) {
if(count == capacity) {
// Grow underlying array
size_t newCap = 2 * capacity;
T* newData = new T[newCap];
for(size_t i = 0; i < count; ++i)
newData[i] = data[i];
delete [] data;
data = newData;
capacity = newCap;
}
data[count++] = t;
}
void pop_back() {
if(count > 0)
--count;
}
T* begin() { return data; }
T* end() { return data + count; }
};
template<class T,
template<class> class Seq>
class Container {
Seq<T> seq;
public:
void append(const T& t) { seq.push_back(t); }
T* begin() { return seq.begin(); }
T* end() { return seq.end(); }
};
int main() {
Container<int, Array> container;
container.append(1);
container.append(2);
int* p = container.begin();
while(p != container.end())
cout << *p++ << endl;
} ///:~
The Array class template is a trivial sequence
container. The Container template takes two parameters: the type that it
holds, and a sequence data structure to do the holding. The following line in
the implementation of the Container class requires that we inform the
compiler that Seq is a template:
If we hadn’t declared Seq to be a template template
parameter, the compiler would complain here that Seq is not a template,
since we’re using it as such. In main( ) a Container is
instantiated to use an Array to hold integers, so Seq stands for Array
in this example.
Note that it is not necessary in this case to name the
parameter for Seq inside Container’s declaration. The line in
question is:
template<class T, template<class> class Seq>
Although we could have written
template<class T, template<class U> class Seq>
the parameter U is not needed anywhere. All that
matters is that Seq is a class template that takes a single type
parameter. This is analogous to omitting the names of function parameters when
they’re not needed, such as when you overload the post-increment operator:
The int here is merely a placeholder and so needs no
name.
The following program uses a fixed-size array, which has an
extra template parameter representing the array length:
//: C05:TempTemp2.cpp
// A multi-variate template template
parameter.
#include <cstddef>
#include <iostream>
using namespace std;
template<class T, size_t N> class Array {
T data[N];
size_t count;
public:
Array() { count = 0; }
void push_back(const T& t) {
if(count < N)
data[count++] = t;
}
void pop_back() {
if(count > 0)
--count;
}
T* begin() { return data; }
T* end() { return data + count; }
};
template<class T,size_t
N,template<class,size_t> class Seq>
class Container {
Seq<T,N> seq;
public:
void append(const T& t) { seq.push_back(t); }
T* begin() { return seq.begin(); }
T* end() { return seq.end(); }
};
int main() {
const size_t N = 10;
Container<int, N, Array> container;
container.append(1);
container.append(2);
int* p = container.begin();
while(p != container.end())
cout << *p++ << endl;
} ///:~
Once again, parameter names are not needed in the
declaration of Seq inside Container’s declaration, but we need
two parameters to declare the data member seq, hence the appearance of
the non-type parameter N at the top level.
Combining default arguments with template template parameters
is slightly more problematic. When the compiler looks at the inner parameters
of a template template parameter, default arguments are not considered, so you
have to repeat the defaults in order to get an exact match. The following
example uses a default argument for the fixed-size Array template and
shows how to accommodate this quirk in the language:
//: C05:TempTemp3.cpp {-bor}{-msc}
// Template template parameters and default arguments.
#include <cstddef>
#include <iostream>
using namespace std;
template<class T, size_t N = 10> // A default
argument
class Array {
T data[N];
size_t count;
public:
Array() { count = 0; }
void push_back(const T& t) {
if(count < N)
data[count++] = t;
}
void pop_back() {
if(count > 0)
--count;
}
T* begin() { return data; }
T* end() { return data + count; }
};
template<class T, template<class, size_t = 10>
class Seq>
class Container {
Seq<T> seq; // Default used
public:
void append(const T& t) { seq.push_back(t); }
T* begin() { return seq.begin(); }
T* end() { return seq.end(); }
};
int main() {
Container<int, Array> container;
container.append(1);
container.append(2);
int* p = container.begin();
while(p != container.end())
cout << *p++ << endl;
} ///:~
The default dimension of 10 is required in the line:
template<class T, template<class, size_t = 10> class Seq>
Both the definition of seq in Container and container
in main( ) use the default. The only way to use something other
than the default value was shown in TempTemp2.cpp. This is the only
exception to the rule stated earlier that default arguments should appear only
once in a compilation unit.
Since the standard sequence containers (vector, list,
and deque, discussed in depth in Chapter 7) have a default allocator
argument, the technique shown above is helpful should you ever want to pass one
of these sequences as a template parameter. The following program passes a vector
and then a list to two instances of Container:
//: C05:TempTemp4.cpp {-bor}{-msc}
// Passes standard sequences as template arguments.
#include <iostream>
#include <list>
#include <memory> // Declares allocator<T>
#include <vector>
using namespace std;
template<class T,
template<class U, class = allocator<U> >
class Seq>
class Container {
Seq<T> seq; // Default of allocator<T>
applied implicitly
public:
void push_back(const T& t) { seq.push_back(t); }
typename Seq<T>::iterator begin() { return
seq.begin(); }
typename Seq<T>::iterator end() { return
seq.end(); }
};
int main() {
// Use a vector
Container<int, vector> vContainer;
vContainer.push_back(1);
vContainer.push_back(2);
for(vector<int>::iterator p = vContainer.begin();
p != vContainer.end();
++p) {
cout << *p <<
endl;
}
// Use a list
Container<int, list> lContainer;
lContainer.push_back(3);
lContainer.push_back(4);
for(list<int>::iterator p2 = lContainer.begin();
p2 != lContainer.end(); ++p2) {
cout << *p2 << endl;
}
} ///:~
Here we name the first parameter of the inner template Seq
(with the name U) because the allocators in the standard sequences must
themselves be parameterized with the same type as the contained objects in the
sequence. Also, since the default allocator parameter is known, we can
omit it in the subsequent references to Seq<T>, as we did in the
previous program. To fully explain this example, however, we have to discuss
the semantics of the typename keyword.
Consider the following:
//: C05:TypenamedID.cpp {-bor}
// Uses 'typename' as a prefix for nested types.
template<class T> class X {
// Without typename, you should get an error:
typename T::id i;
public:
void f() { i.g(); }
};
class Y {
public:
class id {
public:
void g() {}
};
};
int main() {
X<Y> xy;
xy.f();
} ///:~
The template definition assumes that the class T that
you hand it must have a nested identifier of some kind called id. Yet id
could also be a static data member of T, in which case you can perform
operations on id directly, but you can’t “create an object” of “the type
id.” In this example, the identifier id is being treated as if it
were a nested type inside T. In the case of class Y, id is
in fact a nested type, but (without the typename keyword) the compiler
can’t know that when it’s compiling X.
If the compiler has the option of treating an identifier as
a type or as something other than a type when it sees an identifier in a
template, it will assume that the identifier refers to something other than a
type. That is, it will assume that the identifier refers to an object
(including variables of primitive types), an enumeration, or something similar.
However, it will not—cannot—just assume that it is a type.
Because the default behavior of the compiler is to assume that
a name that fits the above two points is not a type, you must use typename
for nested names (except in constructor initializer lists, where it is neither
needed nor allowed). In the above example, when the compiler sees typename
T::id, it knows (because of the typename keyword) that id
refers to a nested type and thus it can create an object of that type.
The short version of the rule is: if a type referred to
inside template code is qualified by a template type parameter, you must use
the typename keyword as a prefix, unless it appears in a base class
specification or initializer list in the same scope (in which case you must
not).
The above explains the use of the typename keyword in
the program TempTemp4.cpp. Without it, the compiler would assume that
the expression Seq<T>::iterator is not a type, but we were using
it to define the return type of the begin( ) and end( )
member functions.
The following example, which defines a function template
that can print any Standard C++ sequence, shows a similar use of typename:
//: C05:PrintSeq.cpp {-msc}{-mwcc}
// A print function for Standard C++ sequences.
#include <iostream>
#include <list>
#include <memory>
#include <vector>
using namespace std;
template<class T, template<class U, class =
allocator<U> >
class Seq>
void printSeq(Seq<T>& seq) {
for(typename Seq<T>::iterator b = seq.begin();
b != seq.end();)
cout << *b++ << endl;
}
int main() {
// Process a vector
vector<int> v;
v.push_back(1);
v.push_back(2);
printSeq(v);
// Process a list
list<int> lst;
lst.push_back(3);
lst.push_back(4);
printSeq(lst);
} ///:~
Once again, without the typename keyword the compiler
will interpret iterator as a static data member of Seq<T>,
which is a syntax error, since a type is required.
Typedefing a typename
It’s important not to assume that the typename
keyword creates a new type name. It doesn’t. Its purpose is to inform the
compiler that the qualified identifier is to be interpreted as a type. A line that
reads:
typename Seq<T>::iterator It;
causes a variable named It to be declared of type Seq<T>::iterator.
If you mean to create a new type name, you should use typedef, as usual,
as in:
typedef typename Seq<It>::iterator It;
Using typename instead of class
Another role of the typename keyword is to provide
you the option of using typename instead of class in the template
argument list of a template definition:
//: C05:UsingTypename.cpp
// Using 'typename' in the template argument list.
template<typename T> class X {};
int main() {
X<int> x;
} ///:~
To some, this produces clearer code.
Just as the typename keyword helps the compiler when
a type identifier is not expected, there is also a potential difficulty with
tokens that are not identifiers, such as the < and >
characters. Sometimes these represent the less-than or greater-than symbols,
and sometimes they delimit template parameter lists. As an example, we’ll once
more use the bitset class:
//: C05:DotTemplate.cpp
// Illustrate the .template construct.
#include <bitset>
#include <cstddef>
#include <iostream>
#include <string>
using namespace std;
template<class charT, size_t N>
basic_string<charT> bitsetToString(const
bitset<N>& bs) {
return bs. template to_string<charT,
char_traits<charT>,
allocator<charT>
>();
}
int main() {
bitset<10> bs;
bs.set(1);
bs.set(5);
cout << bs << endl; // 0000100010
string s = bitsetToString<char>(bs);
cout << s << endl; // 0000100010
} ///:~
The bitset class supports conversion to string object
via its to_string member function. To support multiple string classes, to_string
is itself a template, following the pattern established by the basic_string
template discussed in Chapter 3. The declaration of to_string inside of bitset looks like this:
template<class charT, class traits, class
Allocator>
basic_string<charT, traits, Allocator> to_string() const;
Our bitsetToString( ) function template above
requests different types of string representations of a bitset. To get a
wide string, for instance, you change the call to the following:
wstring s = bitsetToString<wchar_t>(bs);
Note that basic_string uses default template arguments, so we don’t need to repeat the char_traits and allocator arguments in the return value. Unfortunately, bitset::to_string does not use default
arguments. Using bitsetToString<char>( bs) is more convenient
than typing a fully-qualified call to bs.template to_string<char,
char_traits, allocator<char> >( ) every time.
The return statement in bitsetToString( )
contains the template keyword in an odd place—right after the dot
operator applied to the bitset object bs. This is because when
the template is parsed, the < character after the to_string
token would be interpreted as a less-than operation instead of the beginning of
a template argument list. The template keyword used in this context tells
the compiler that what follows is the name of a template, causing the <
character to be interpreted correctly. The same reasoning applies to the ->
and ::operators when applied to templates. As with the typename
keyword, this template disambiguation technique can only be used within
template code.
The bitset::to_string( ) function template is an
example of a member template: a template declared within another class
or class template. This allows many combinations of independent template
arguments to be combined. A useful example is found in the complex class
template in the Standard C++ library. The complex template has a type
parameter meant to represent an underlying floating-point type to hold the real
and imaginary parts of a complex number. The following code snippet from the
standard library shows a member-template constructor in the complex
class template:
template<typename T> class
complex {
public:
template<class X> complex(const complex<X>&);
The standard complex template comes ready-made with
specializations that use float, double, and long double
for the parameter T. The member-template constructor above creates a new
complex number that uses a different floating-point type as its base type, as
seen in the code below:
complex<float> z(1, 2);
complex<double> w(z);
In the declaration of w, the complex template
parameter T is double and X is float. Member
templates make this kind of flexible conversion easy.
Defining a template within a template is a nesting
operation, so the prefixes that introduce the templates must reflect this
nesting if you define the member template outside the outer class definition.
For example, if you implement the complex class template, and if you
define the member-template constructor outside the complex template
class definition, you do it like this:
template<typename T>
template<typename X>
complex<T>::complex(const
complex<X>& c) {/* Body here… */}
Another use of member function templates in the standard
library is in the initialization of containers. Suppose we have a vector
of ints and we want to initialize a new vector of doubles
with it, like this:
int data[5] = { 1, 2, 3, 4, 5 };
vector<int> v1(data, data+5);
vector<double> v2(v1.begin(), v1.end());
As long as the elements in v1 are
assignment-compatible with the elements in v2 (as double and int
are here), all is well. The vector class template has the following
member template constructor:
template<class InputIterator>
vector(InputIterator first, InputIterator last,
const Allocator& = Allocator());
This constructor is used twice in the vector
declarations above. When v1 is initialized from the array of ints,
the type InputIterator is int*. When v2 is initialized
from v1, an instance of the member template constructor is used with InputIterator
representing vector<int>::iterator.
Member templates can also be classes. (They don’t need to be
functions.) The following example shows a member class template inside an outer
class template:
//: C05:MemberClass.cpp
// A member class template.
#include <iostream>
#include <typeinfo>
using namespace std;
template<class T> class Outer {
public:
template<class R> class Inner {
public:
void f();
};
};
template<class T> template<class R>
void Outer<T>::Inner<R>::f() {
cout << "Outer == " <<
typeid(T).name() << endl;
cout << "Inner == " <<
typeid(R).name() << endl;
cout << "Full Inner == " <<
typeid(*this).name() << endl;
}
int main() {
Outer<int>::Inner<bool> inner;
inner.f();
} ///:~
The typeid operator, covered in Chapter 8, takes a
single argument and returns a type_info object whose name( )
function yields a string representing the argument type. For example, typeid(int).name( )
might return the string “int.” (The actual string is
platform-dependent.) The typeid operator can also take an expression and
return a type_info object representing the type of that expression. For
example, with int i, typeid(i).name( ) returns something
like “int,” and typeid(&i).name( ) returns something
like “int *.”
The output of the program above should be something like
this:
Outer == int
Inner == bool
Full Inner == Outer<int>::Inner<bool>
The declaration of the variable inner in the main
program instantiates both Inner<bool> and Outer<int>.
Member template functions cannot be declared virtual. Current compiler technology expects to be able to determine the size of a
class’s virtual function table when the class is parsed. Allowing virtual
member template functions would require knowing all calls to such member
functions everywhere in the program ahead of time. This is not feasible,
especially for multi-file projects.
Just as a class template describes a family of classes, a
function template describes a family of functions. The syntax for creating
either type of template is virtually identical, but they differ somewhat in how
they are used. You must always use angle brackets when instantiating class
templates and you must supply all non-default template arguments. However, with
function templates you can often omit the template arguments, and default
template arguments are not even allowed. Consider a typical
implementation of the min( ) function template declared in the <algorithm>
header, which looks something like this:
template<typename T> const T& min(const
T& a, const T& b) {
return (a < b) ? a : b;
}
You could invoke this template by providing the type of the
arguments in angle brackets, just like you do with class templates, as in:
This syntax tells the compiler that a specialization of the min( )
template is needed with int used in place of the parameter T,
whereupon the compiler generates the corresponding code. Following the pattern
of naming the classes generated from class templates, you can think of the name
of the instantiated function as min<int>( ).
You can always use such explicit function template specification as in the example above, but it is often convenient to leave off the template
arguments and let the compiler deduce them from the function arguments, like
this:
If both i and j are ints, the compiler
knows that you need min<int>( ), which it then instantiates
automatically. The types must be identical because the template was originally
specified with only one template type argument used for both function
parameters. No standard conversions are applied for function arguments whose
type is specified by a template parameter. For example, if you wanted to find
the minimum of an int and a double, the following attempt at a
call to min( ) would fail:
int z = min(x, j); // x is a double
Since x and j are distinct types, no single
parameter matches the template parameter T in the definition of min( ),
so the call does not match the template declaration. You can work around this
difficulty by casting one argument to the other’s type or by reverting to the
fully-specified call syntax, as in:
int z = min<double>(x, j);
This tells the compiler to generate the double
version of min( ), after which j can be promoted to a double
by normal standard conversion rules (because the function min<double>(const
double&, const double&) would then exist).
You might be tempted to require two parameters for min( ),
allowing the types of the arguments to be independent, like this:
template<typename T, typename
U>
const T& min(const T& a,
const U& b) {
return (a < b) ? a : b;
}
This is often a good strategy, but here it is problematic
because min( ) must return a value, and there is no satisfactory
way to determine which type it should be (T or U?).
If the return type of a function template is an independent
template parameter, you must always specify its type explicitly when you call
it, since there is no argument from which to deduce it. Such is the case with
the fromString template below.
//: C05:StringConv.h
// Function templates to convert to and from strings.
#ifndef STRINGCONV_H
#define STRINGCONV_H
#include <string>
#include <sstream>
template<typename T> T fromString(const
std::string& s) {
std::istringstream is(s);
T t;
is >> t;
return t;
}
template<typename T> std::string toString(const
T& t) {
std::ostringstream s;
s << t;
return s.str();
}
#endif // STRINGCONV_H ///:~
These function templates provide conversions to and from std::string
for any types that provide a stream inserter or extractor, respectively. Here’s
a test program that includes the use of the standard library complex
number type:
//: C05:StringConvTest.cpp
#include <complex>
#include <iostream>
#include "StringConv.h"
using namespace std;
int main() {
int i = 1234;
cout << "i == \""
<< toString(i) << "\"" << endl;
float x = 567.89;
cout << "x == \"" <<
toString(x) << "\"" << endl;
complex<float> c(1.0, 2.0);
cout << "c == \"" <<
toString(c) << "\"" << endl;
cout << endl;
i =
fromString<int>(string("1234"));
cout << "i == "
<< i << endl;
x = fromString<float>(string("567.89"));
cout << "x == " << x <<
endl;
c = fromString<complex<float>
>(string("(1.0,2.0)"));
cout << "c == " << c <<
endl;
} ///:~
The output is what you’d expect:
i == "1234"
x == "567.89"
c == "(1,2)"
i == 1234
x == 567.89
c == (1,2)
Notice that in each of the instantiations of fromString( ),
the template parameter is specified in the call. If you have a function
template with template parameters for the parameter types as well as the return
types, it is important to declare the return type parameter first, otherwise
you won’t be able to omit the type parameters for the function parameters. As
an illustration, consider the following well-known function template:
//: C05:ImplicitCast.cpp
template<typename R, typename
P>
R implicit_cast(const P& p) {
return p;
}
int main() {
int i = 1;
float x = implicit_cast<float>(i);
int j = implicit_cast<int>(x);
//! char* p = implicit_cast<char*>(i);
} ///:~
If you interchange R and P in the template
parameter list near the top of the file, it will be impossible to compile this
program because the return type will remain unspecified (the first template
parameter would be the function’s parameter type). The last line (which is
commented out) is illegal because there is no standard conversion from int
to char*. implicit_cast is for revealing conversions in your code
that are allowed naturally.
With a little care you can even deduce array dimensions. This
example has an array-initialization function template (init2) that performs
such a deduction:
//: C05:ArraySize.cpp
#include <cstddef>
using std::size_t;
template<size_t R, size_t C, typename T>
void init1(T a[R][C]) {
for(size_t i = 0; i < R; ++i)
for(size_t j = 0; j < C; ++j)
a[i][j] = T();
}
template<size_t R, size_t C, class T>
void init2(T (&a)[R][C]) { // Reference parameter
for(size_t i = 0; i < R; ++i)
for(size_t j = 0; j < C; ++j)
a[i][j] = T();
}
int main() {
int a[10][20];
init1<10,20>(a); // Must specify
init2(a); // Sizes deduced
} ///:~
Array dimensions are not passed as part of a function
parameter’s type unless that parameter is passed by pointer or reference. The
function template init2 declares a to be a reference to a
two-dimensional array, so its dimensions R and C are deduced by
the template facility, making init2 a handy way to initialize a
two-dimensional array of any size. The template init1 does not pass the
array by reference, so the sizes must be explicitly specified, although the
type parameter can still be deduced.
As with ordinary functions, you can overload function
templates that have the same name. When the compiler processes a function call
in a program, it has to decide which template or ordinary function is the
“best” fit for the call. Along with the min( ) function template
introduced earlier, let’s add some ordinary functions to the mix:
//: C05:MinTest.cpp
#include <cstring>
#include <iostream>
using std::strcmp;
using std::cout;
using std::endl;
template<typename T> const T& min(const
T& a, const T& b) {
return (a < b) ? a : b;
}
const char* min(const char* a, const char* b) {
return (strcmp(a, b) < 0) ? a : b;
}
double min(double x, double y) {
return (x < y) ? x : y;
}
int main() {
const char *s2 = "say \"Ni-!\"",
*s1 = "knights who";
cout << min(1, 2) << endl; // 1: 1
(template)
cout << min(1.0, 2.0) << endl; // 2: 1
(double)
cout << min(1, 2.0) << endl; // 3: 1
(double)
cout << min(s1, s2) << endl; // 4:
knights who (const
//
char*)
cout << min<>(s1, s2) << endl; //
5: say "Ni-!"
// (template)
} ///:~
In addition to the function template, this program defines
two non-template functions: a C-style string version of min( ) and
a double version. If the template doesn’t exist, the call in line 1
above invokes the double version of min( ) because of the
standard conversion from int to double. The template can generate
an int version which is considered a better match, so that’s what
happens. The call in line 2 is an exact match for the double version,
and the call in line 3 also invokes the same function, implicitly converting 1
to 1.0. In line 4 the const char* version of min( ) is
called directly. In line 5 we force the compiler to use the template facility
by appending empty angle brackets to the function name, whereupon it generates
a const char* version from the template and uses it (which is verified
by the wrong answer—it’s just comparing addresses!).
If you’re wondering why we have using declarations in lieu of the using
namespace std directive, it’s because some compilers include headers behind
the scenes that bring in std::min( ), which would conflict with our
declarations of the name min( ).
As stated above, you can overload templates of the same
name, as long as they can be distinguished by the compiler. You could, for
example, declare a min( ) function template that processes three
arguments:
template<typename T>
const T& min(const T& a, const T& b, const T& c);
Versions of this template will be generated only for calls
to min( ) that have three arguments of the same type.
In some situations you need to take the address of a
function. For example, you may have a function that takes an argument of a
pointer to another function. It’s possible that this other function might be
generated from a template function, so you need some way to take that kind of
address:
//: C05:TemplateFunctionAddress.cpp {-mwcc}
// Taking the address of a function generated
// from a template.
template<typename T> void f(T*) {}
void h(void (*pf)(int*)) {}
template<typename T> void g(void (*pf)(T*)) {}
int main() {
h(&f<int>); // Full type specification
h(&f); // Type deduction
g<int>(&f<int>); // Full type
specification
g(&f<int>); // Type deduction
g<int>(&f); // Partial (but sufficient)
specification
} ///:~
This example demonstrates a number of issues. First, even
though you’re using templates, the signatures must match. The function h( )
takes a pointer to a function that takes an int* and returns void,
and that’s what the template f( ) produces. Second, the function
that wants the function pointer as an argument can itself be a template, as in
the case of the template g( ).
In main( ) you can see that type deduction works
here, too. The first call to h( ) explicitly gives the template
argument for f( ), but since h( ) says that it will
only take the address of a function that takes an int*, that part can be
deduced by the compiler. With g( ) the situation is even more
interesting because two templates are involved. The compiler cannot deduce the
type with nothing to go on, but if either f( ) or g( )
is given int, the rest can be deduced.
An obscure issue arises when trying to pass the functions tolower or toupper, declared in <cctype>, as parameters. It is possible to use these, for example, with the transform algorithm (which is covered in detail in the next chapter) to convert a string to lower or upper case. You must be careful because
there are multiple declarations for these functions. A naive approach would be
something like this:
// The variable s is a std::string
transform(s.begin(), s.end(), s.begin(), tolower);
The transform algorithm applies its fourth parameter
(tolower( ) in this case) to each character in the string s
and places the result in s itself, thus overwriting each character in s
with its lower-case equivalent. As it is written, this statement may or may not
work! It fails in the following context:
//: C05:FailedTransform.cpp {-xo}
#include <algorithm>
#include <cctype>
#include <iostream>
#include <string>
using namespace std;
int main() {
string s("LOWER");
transform(s.begin(), s.end(), s.begin(), tolower);
cout << s << endl;
} ///:~
Even if your compiler lets you get away with this, it is
illegal. The reason is that the <iostream> header also makes
available a two-argument version of tolower( ) and toupper( ):
template<class charT> charT toupper(charT c,
const locale&
loc);
template<class charT> charT tolower(charT c,
const locale& loc);
These function templates take a second argument of type locale.
The compiler has no way of knowing whether it should use the one-argument
version of tolower( ) defined in <cctype> or the one
mentioned above. You can solve this problem (almost!) with a cast in the call
to transform, as follows:
transform(s.begin(),s.end(),s.begin()
static_cast<int (*)(int)>(tolower));
(Recall that tolower( ) and toupper( ) work
with int instead of char.) The cast above makes clear that the
single-argument version of tolower( ) is desired. This works with
some compilers, but it is not required to. The reason, albeit obscure, is that
a library implementation is allowed to give “C linkage” (meaning that the
function name does not contain all the auxiliary information that
normal C++ functions do) to functions inherited from the C language. If this is
the case, the cast fails because transform is a C++ function template
and expects its fourth argument to have C++ linkage—and a cast is not allowed
to change the linkage. What a predicament!
The solution is to place tolower( ) calls in an
unambiguous context. For example, you could write a function named strTolower( )
and place it in its own file without including <iostream>, like
this:
//: C05:StrTolower.cpp {O} {-mwcc}
#include <algorithm>
#include <cctype>
#include <string>
using namespace std;
string strTolower(string s) {
transform(s.begin(), s.end(), s.begin(), tolower);
return s;
} ///:~
The header <iostream> is not involved here, and
the compilers we use do not introduce the two-argument version of tolower( )
in this context, so
there’s no problem. You can then use this function normally:
//: C05:Tolower.cpp {-mwcc}
//{L} StrTolower
#include <algorithm>
#include <cctype>
#include <iostream>
#include <string>
using namespace std;
string strTolower(string);
int main() {
string s("LOWER");
cout << strTolower(s) << endl;
} ///:~
Another solution is to write a wrapper function template
that calls the correct version of tolower( ) explicitly:
//: C05:ToLower2.cpp {-mwcc}
#include <algorithm>
#include <cctype>
#include <iostream>
#include <string>
using namespace std;
template<class charT> charT strTolower(charT c) {
return tolower(c); // One-arg version called
}
int main() {
string s("LOWER");
transform(s.begin(),s.end(),s.begin(),&strTolower<char>);
cout << s << endl;
} ///:~
This version has the advantage that it can process both wide
and narrow strings since the underlying character type is a template parameter.
The C++ Standards Committee is working on modifying the language so that the
first example (without the cast) will work, and some day these workarounds can
be ignored.
Suppose you want to take an STL sequence container (which
you’ll learn more about in subsequent chapters; for now we can just use the
familiar vector) and apply a member function to all the objects it contains.
Because a vector can contain any type of object, you need a function
that works with any type of vector:
//: C05:ApplySequence.h
// Apply a function to an STL sequence container.
// const, 0 arguments, any type of return value:
template<class Seq, class T, class R>
void apply(Seq& sq, R (T::*f)() const) {
typename Seq::iterator it = sq.begin();
while(it != sq.end())
((*it++)->*f)();
}
// const, 1 argument, any type of return value:
template<class Seq, class T, class R, class A>
void apply(Seq& sq, R(T::*f)(A) const, A a) {
typename Seq::iterator it = sq.begin();
while(it != sq.end())
((*it++)->*f)(a);
}
// const, 2 arguments, any type of return value:
template<class Seq, class T, class R,
class A1, class A2>
void apply(Seq& sq, R(T::*f)(A1, A2) const,
A1 a1, A2 a2) {
typename Seq::iterator it = sq.begin();
while(it != sq.end())
((*it++)->*f)(a1, a2);
}
// Non-const, 0 arguments, any type of return value:
template<class Seq, class T, class R>
void apply(Seq& sq, R (T::*f)()) {
typename Seq::iterator it = sq.begin();
while(it != sq.end())
((*it++)->*f)();
}
// Non-const, 1 argument, any type of return value:
template<class Seq, class T, class R, class A>
void apply(Seq& sq, R(T::*f)(A), A a) {
typename Seq::iterator it = sq.begin();
while(it != sq.end())
((*it++)->*f)(a);
}
// Non-const, 2 arguments, any type of return value:
template<class Seq, class T, class R,
class A1, class A2>
void apply(Seq& sq, R(T::*f)(A1, A2),
A1 a1, A2 a2) {
typename Seq::iterator it = sq.begin();
while(it != sq.end())
((*it++)->*f)(a1, a2);
}
// Etc., to handle maximum
likely arguments ///:~
The apply( ) function template above takes a
reference to the container class and a pointer-to-member for a member function
of the objects contained in the class. It uses an iterator to move through the
sequence and apply the function to every object. We have overloaded on the const-ness
of the function so you can use it with both const and non-const
functions.
Notice that there are no STL header files (or any header
files, for that matter) included in applySequence.h, so it is not
limited to use with an STL container. However, it does make assumptions
(primarily, the name and behavior of the iterator) that apply to STL
sequences, and it also assumes that the elements of the container be of pointer
type.
You can see there is more than one version of apply( ),
further illustrating overloading of function templates. Although these
templates allow any type of return value (which is ignored, but the type
information is required to match the pointer-to-member), each version takes a
different number of arguments, and because it’s a template, those arguments can
be of any type. The only limitation here is that there’s no “super template” to
create templates for you; you must decide how many arguments will ever be
required and make the appropriate definitions.
To test the various overloaded versions of apply( ),
the class Gromit is
created containing functions with different numbers of arguments, and both const
and non-const member functions:
//: C05:Gromit.h
// The techno-dog. Has member functions
// with various numbers of arguments.
#include <iostream>
class Gromit {
int arf;
int totalBarks;
public:
Gromit(int arf = 1) : arf(arf + 1), totalBarks(0) {}
void speak(int) {
for(int i = 0; i < arf; i++) {
std::cout << "arf! ";
++totalBarks;
}
std::cout << std::endl;
}
char eat(float) const {
std::cout << "chomp!" <<
std::endl;
return 'z';
}
int sleep(char, double) const {
std::cout << "zzz..." <<
std::endl;
return 0;
}
void sit() const {
std::cout << "Sitting..." <<
std::endl;
}
}; ///:~
Now you can use the apply( ) template functions to
apply the Gromit member functions to a vector<Gromit*>,
like this:
//: C05:ApplyGromit.cpp
// Test ApplySequence.h.
#include <cstddef>
#include <iostream>
#include <vector>
#include "ApplySequence.h"
#include "Gromit.h"
#include "../purge.h"
using namespace std;
int main() {
vector<Gromit*> dogs;
for(size_t i = 0; i < 5; i++)
dogs.push_back(new Gromit(i));
apply(dogs, &Gromit::speak, 1);
apply(dogs, &Gromit::eat, 2.0f);
apply(dogs, &Gromit::sleep, 'z', 3.0);
apply(dogs, &Gromit::sit);
purge(dogs);
} ///:~
The purge( ) function is a small utility that
calls delete on every element of sequence. You’ll find it defined in
Chapter 7, and used various places in this book.
Although the definition of apply( ) is somewhat
complex and not something you’d ever expect a novice to understand, its use is
remarkably clean and simple, and a novice could use it knowing only what
it is intended to accomplish, not how. This is the type of division you
should strive for in all your program components. The tough details are all
isolated on the designer’s side of the wall. Users are concerned only with
accomplishing their goals and don’t see, know about, or depend on details of
the underlying implementation. We’ll explore even more flexible ways to apply
functions to sequences in the next chapter.
We mentioned earlier that an ordinary function overload of min( ) is preferable to using the template. If a function already exists
to match a function call, why generate another? In the absence of ordinary
functions, however, it is possible that overloaded function templates can lead
to ambiguities. To minimize the chances of this, an ordering is defined for
function templates, which chooses the most specialized template, if such
exists. A function template is considered more specialized than another if
every possible list of arguments that matches it also matches the other, but
not the other way around. Consider the following function template
declarations, taken from an example in the C++ Standard document:
template<class T> void f(T);
template<class T> void f(T*);
template<class T> void f(const T*);
The first template can be matched with any type. The second
template is more specialized than the first because only pointer types match
it. In other words, you can look upon the set of possible calls that match the
second template as a subset of the first. A similar relationship exists between
the second and third template declarations above: the third can only be called
for pointers to const, but the second accommodates any pointer type. The
following program illustrates these rules:
//: C05:PartialOrder.cpp
// Reveals ordering of function templates.
#include <iostream>
using namespace std;
template<class T> void f(T) {
cout << "T" << endl;
}
template<class T> void f(T*) {
cout << "T*" << endl;
}
template<class T> void f(const T*) {
cout << "const T*" << endl;
}
int main() {
f(0); // T
int i = 0;
f(&i); // T*
const int j = 0;
f(&j); // const T*
} ///:~
The call f(&i) certainly matches the first
template, but since the second is more specialized, it is called. The third
can’t be called here since the pointer is not a pointer to const. The
call f(&j) matches all three templates (for example, T would
be const int in the second template), but again, the third template is
more specialized, so it is used instead.
If there is no “most specialized” template among a set of
overloaded function templates, an ambiguity remains, and the compiler will
report an error. That is why this feature is called a “partial ordering”—it may
not be able to resolve all possibilities. Similar rules exist for class
templates (see the section “Partial specialization” below).
The term specialization has a specific,
template-related meaning in C++. A template definition is, by its very nature,
a generalization, because it describes a family of functions or classes
in general terms. When template arguments are supplied, the result is a
specialization of the template because it determines a unique instance out of
the many possible instances of the family of functions or classes. The min( )
function template seen at the beginning of this chapter is a generalization of
a minimum-finding function because the type of its parameters is not specified.
When you supply the type for the template parameter, whether explicitly or
implicitly via argument deduction, the resultant code generated by the compiler
(for example, min<int>( )) is a specialization of the
template. The code generated is also considered an instantiation of the template, as are all code bodies generated by the template facility.
You can also provide the code yourself for a given template
specialization, should the need arise. Providing your own template
specializations is often needed with class templates, but we will begin with
the min( ) function template to introduce the syntax.
Recall that in MinTest.cpp earlier in this chapter we
introduced the following ordinary function:
const char* min(const char* a, const char* b) {
return (strcmp(a, b) < 0) ? a : b;
}
This was so that a call to min( ) would compare
strings and not addresses. Although it would provide no advantage here, we
could instead define a const char* specialization for min( ),
as in the following program:
//: C05:MinTest2.cpp
#include <cstring>
#include <iostream>
using std::strcmp;
using std::cout;
using std::endl;
template<class T> const T& min(const T&
a, const T& b) {
return (a < b) ? a : b;
}
// An explicit specialization of the min template
template<>
const char* const& min<const char*>(const
char* const& a,
const char*
const& b) {
return (strcmp(a, b) < 0) ? a : b;
}
int main() {
const char *s2 = "say \"Ni-!\"",
*s1 = "knights who";
cout << min(s1, s2) << endl;
cout << min<>(s1, s2) << endl;
} ///:~
The “template<>” prefix tells the compiler that
what follows is a specialization of a template. The type for the specialization
must appear in angle brackets immediately following the function name, as it normally
would in an explicitly specified call. Note that we carefully substitute
const char* for T in the explicit specialization. Whenever the
original template specifies const T, that const modifies the whole
type T. It is the pointer to a const char* that is const. So
we must write const char* const in place of const T in the specialization.
When the compiler sees a call to min( ) with const char*
arguments in the program, it will instantiate our const char* version of
min( ) so it can be called. The two calls to min( ) in
this program call the same specialization of min( ).
Explicit specializations tend to be more useful for class
templates than for function templates. When you provide a full specialization
for a class template, though, you may need to implement all the member
functions. This is because you are providing a separate class, and client code
may expect the complete interface to be implemented.
The standard library has an explicit specialization for vector
when it holds objects of type bool. The purpose for vector<bool>
is to allow library implementations to save space by packing bits into
integers.
As you saw earlier in this chapter, the declaration for the
primary vector class template is:
template<class T, class Allocator =
allocator<T> >
class vector {...};
To specialize for objects of type bool, you could
declare an explicit specialization as follows:
template<> class
vector<bool, allocator<bool> > {...};
Again, this is quickly recognized as a full, explicit
specialization because of the template<> prefix and because all
the primary template’s parameters are satisfied by the argument list appended
to the class name.
It turns out that vector<bool> is a little more
flexible than we have described, as seen in the next section.
Class templates can also be partially specialized, meaning
that at least one of the template parameters is left “open” in some way in the
specialization. vector<bool> specifies the object type (bool),
but leaves the allocator type unspecified. Here is the actual declaration of vector<bool>:
template<class Allocator> class vector<bool,
Allocator>;
You can recognize a partial specialization because non-empty
parameter lists appear in angle brackets both after the template keyword (the
unspecified parameters) and after the class (the specified arguments). Because
of the way vector<bool> is defined, a user can provide a custom
allocator type, even though the contained type of bool is fixed. In
other words, specialization, and partial specialization in particular,
constitute a sort of “overloading” for class templates.
Partial ordering of class templates
The rules that determine which template is selected for instantiation are similar to the partial ordering for function templates—the “most
specialized” template is selected. The string in each f( ) member
function in the illustration below explains the role of each template
definition:
//: C05:PartialOrder2.cpp
// Reveals partial ordering of class templates.
#include <iostream>
using namespace std;
template<class T, class U> class C {
public:
void f() { cout << "Primary Template\n";
}
};
template<class U> class C<int, U> {
public:
void f() { cout << "T == int\n"; }
};
template<class T> class C<T, double> {
public:
void f() { cout << "U == double\n”; }
};
template<class T, class U> class C<T*, U> {
public:
void f() { cout << "T* used\n”; }
};
template<class T, class U> class C<T, U*> {
public:
void f() { cout << "U* used\n”; }
};
template<class T, class U> class C<T*, U*>
{
public:
void f() { cout << "T* and U* used\n”; }
};
template<class T> class C<T, T> {
public:
void f() { cout << "T == U\n”; }
};
int main() {
C<float, int>().f(); // 1: Primary template
C<int, float>().f(); // 2: T == int
C<float, double>().f(); // 3: U == double
C<float, float>().f(); // 4: T == U
C<float*, float>().f(); // 5: T* used [T is
float]
C<float, float*>().f(); // 6: U* used [U is
float]
C<float*, int*>().f(); // 7: T* and U* used
[float,int]
// The following are ambiguous:
// 8: C<int, int>().f();
// 9: C<double, double>().f();
// 10: C<float*, float*>().f();
// 11: C<int, int*>().f();
// 12: C<int*, int*>().f();
} ///:~
As you can see, you can partially specify template
parameters according to whether they are pointer types, or whether they are
equal. When the T* specialization is used, such as is the case in line
5, T itself is not the top-level pointer type that was passed—it is the
type that the pointer refers to (float, in this case). The T*
specification is a pattern to allow matching against pointer types. If you use int**
as the first template argument, T becomes int*. Line 8 is
ambiguous because having the first parameter as an int versus having the
two parameters equal are independent issues—one is not more specialized than
the other. Similar logic applies to lines 9 through 12.
You can easily derive from a class template, and you can
create a new template that instantiates and inherits from an existing template.
If the vector template does most everything you want, for example, but in
a certain application you’d also like a version that can sort itself, you can
easily reuse the vector code. The following example derives from vector<T>
and adds sorting. Note that deriving from vector, which doesn’t have a
virtual destructor, would be dangerous if we needed to perform cleanup in our
destructor.
//: C05:Sortable.h
// Template specialization.
#ifndef SORTABLE_H
#define SORTABLE_H
#include <cstring>
#include <cstddef>
#include <string>
#include <vector>
using std::size_t;
template<class T>
class Sortable : public std::vector<T> {
public:
void sort();
};
template<class T>
void Sortable<T>::sort() { // A simple sort
for(size_t i = this->size(); i > 0; --i)
for(size_t j = 1; j < i; ++j)
if(this->at(j-1) > this->at(j)) {
T t = this->at(j-1);
this->at(j-1) = this->at(j);
this->at(j) = t;
}
}
// Partial specialization for
pointers:
template<class T>
class Sortable<T*> :
public std::vector<T*> {
public:
void sort();
};
template<class T>
void Sortable<T*>::sort() {
for(size_t i = this->size(); i > 0; --i)
for(size_t j = 1; j < i; ++j)
if(*this->at(j-1) > *this->at(j)) {
T* t = this->at(j-1);
this->at(j-1) = this->at(j);
this->at(j) = t;
}
}
// Full specialization for char*
// (Made inline here for
convenience -- normally you would
// place the function body in a separate
file and only
// leave the declaration here).
template<> inline void Sortable<char*>::sort()
{
for(size_t i = this->size(); i > 0; --i)
for(size_t j = 1; j < i; ++j)
if(std::strcmp(this->at(j-1), this->at(j))
> 0) {
char* t = this->at(j-1);
this->at(j-1) = this->at(j);
this->at(j) = t;
}
}
#endif // SORTABLE_H ///:~
The Sortable template imposes a restriction on all
but one of the classes for which it is instantiated: they must contain a >
operator. It works correctly only with non-pointer objects (including objects
of built-in types). The full specialization compares the elements using strcmp( )
to sort vectors of char* according to the null-terminated strings
to which they refer. The use of “this->” above is mandatory and is
explained in the section entitled “Name lookup issues” later in this chapter.
Here’s a driver for Sortable.h that uses the randomizer
introduced earlier in the chapter:
//: C05:Sortable.cpp
//{-bor} (Because of bitset in Urand.h)
// Testing template specialization.
#include <cstddef>
#include <iostream>
#include "Sortable.h"
#include "Urand.h"
using namespace std;
#define asz(a) (sizeof a / sizeof a[0])
char* words[] = { "is", "running",
"big", "dog", "a", };
char* words2[] = { "this", "that",
"theother", };
int main() {
Sortable<int> is;
Urand<47> rnd;
for(size_t i = 0; i < 15; ++i)
is.push_back(rnd());
for(size_t i = 0; i < is.size(); ++i)
cout << is[i] << ' ';
cout << endl;
is.sort();
for(size_t i = 0; i < is.size(); ++i)
cout << is[i] << ' ';
cout << endl;
// Uses the template partial specialization:
Sortable<string*> ss;
for(size_t i = 0; i < asz(words); ++i)
ss.push_back(new string(words[i]));
for(size_t i = 0; i < ss.size(); ++i)
cout << *ss[i] << ' ';
cout << endl;
ss.sort();
for(size_t i = 0; i < ss.size(); ++i) {
cout << *ss[i] << ' ';
delete ss[i];
}
cout << endl;
// Uses the full char* specialization:
Sortable<char*> scp;
for(size_t i = 0; i < asz(words2); ++i)
scp.push_back(words2[i]);
for(size_t i = 0; i < scp.size(); ++i)
cout << scp[i] << ' ';
cout << endl;
scp.sort();
for(size_t i = 0; i < scp.size(); ++i)
cout << scp[i] << ' ';
cout << endl;
} ///:~
Each of the template instantiations above uses a different
version of the template. Sortable<int> uses the primary template. Sortable<string*>
uses the partial specialization for pointers. Last, Sortable<char*>
uses the full specialization for char*. Without this full
specialization, you could be fooled into thinking that things were working
correctly because the words array would still sort out to “a big dog is
running” since the partial specialization would end up comparing the first
character of each array. However, words2 would not sort correctly.
Whenever a class template is instantiated, the code from the
class definition for the particular specialization is generated, along with all
the member functions that are called in the program. Only the member functions
that are called are generated. This is good, as you can see in the following
program:
//: C05:DelayedInstantiation.cpp
// Member functions of class templates are not
// instantiated until they're needed.
class X {
public:
void f() {}
};
class Y {
public:
void g() {}
};
template<typename T> class Z {
T t;
public:
void a() { t.f(); }
void b() { t.g(); }
};
int main() {
Z<X> zx;
zx.a(); // Doesn't create Z<X>::b()
Z<Y> zy;
zy.b(); // Doesn't create Z<Y>::a()
} ///:~
Here, even though the template Z purports to use both
f( ) and g( ) member functions of T, the fact
that the program compiles shows you that it only generates Z<X>::a( )
when it is explicitly called for zx. (If Z<X>::b( )
were also generated at the same time, a compile-time error message would be
generated because it would attempt to call X::g( ), which doesn’t
exist.) Similarly, the call to zy.b( ) doesn’t generate Z<Y>::a( ).
As a result, the Z template can be used with X and Y,
whereas if all the member functions were generated when the class was first instantiated
the use of many templates would become significantly limited.
Suppose you have a templatized Stack container and
you use specializations for int, int*, and char*. Three
versions of Stack code will be generated and linked as part of your
program. One of the reasons for using a template in the first place is so you don’t
need to replicate code by hand; but code still gets replicated—it’s just the
compiler that does it instead of you. You can factor the bulk of the
implementation for storing pointer types into a single class by using a combination
of full and partial specialization. The key is to fully specialize for void*
and then derive all other pointer types from the void* implementation so
the common code can be shared. The program below illustrates this technique:
//: C05:Nobloat.h
// Shares code for storing pointers in a Stack.
#ifndef NOBLOAT_H
#define NOBLOAT_H
#include <cassert>
#include <cstddef>
#include <cstring>
// The primary template
template<class T> class Stack {
T* data;
std::size_t count;
std::size_t capacity;
enum { INIT = 5 };
public:
Stack() {
count = 0;
capacity = INIT;
data = new T[INIT];
}
void push(const T& t) {
if(count == capacity) {
// Grow array store
std::size_t newCapacity = 2 * capacity;
T* newData = new T[newCapacity];
for(size_t i = 0; i < count; ++i)
newData[i] = data[i];
delete [] data;
data = newData;
capacity = newCapacity;
}
assert(count < capacity);
data[count++] = t;
}
void pop() {
assert(count > 0);
--count;
}
T top() const {
assert(count > 0);
return data[count-1];
}
std::size_t size() const { return count; }
};
// Full specialization for void*
template<> class Stack<void *> {
void** data;
std::size_t count;
std::size_t capacity;
enum { INIT = 5 };
public:
Stack() {
count = 0;
capacity = INIT;
data = new void*[INIT];
}
void push(void* const & t) {
if(count == capacity) {
std::size_t newCapacity = 2*capacity;
void** newData = new void*[newCapacity];
std::memcpy(newData, data, count*sizeof(void*));
delete [] data;
data = newData;
capacity = newCapacity;
}
assert(count < capacity);
data[count++] = t;
}
void pop() {
assert(count > 0);
--count;
}
void* top() const {
assert(count > 0);
return data[count-1];
}
std::size_t size() const { return count; }
};
// Partial specialization for
other pointer types
template<class T> class
Stack<T*> : private Stack<void *> {
typedef Stack<void *>
Base;
public:
void push(T* const & t) { Base::push(t); }
void pop() {Base::pop();}
T* top() const { return
static_cast<T*>(Base::top()); }
std::size_t size() { return Base::size(); }
};
#endif // NOBLOAT_H ///:~
This simple stack expands as it fills its capacity. The void*
specialization stands out as a full specialization by virtue of the template<>
prefix (that is, the template parameter list is empty). As mentioned earlier,
it is necessary to implement all member functions in a class template
specialization. The savings occurs with all other pointer types. The partial
specialization for other pointer types derives from Stack<void*>
privately, since we are merely using Stack<void*> for
implementation purposes, and do not wish to expose any of its interface
directly to the user. The member functions for each pointer instantiation are
small forwarding functions to the corresponding functions in Stack<void*>.
Hence, whenever a pointer type other than void* is instantiated, it is a
fraction of the size it would have been had the primary template alone been
used. Here is a driver
program:
//: C05:NobloatTest.cpp
#include <iostream>
#include <string>
#include "Nobloat.h"
using namespace std;
template<class StackType>
void emptyTheStack(StackType& stk) {
while(stk.size() > 0) {
cout << stk.top() << endl;
stk.pop();
}
}
// An overload for emptyTheStack (not a
specialization!)
template<class T>
void emptyTheStack(Stack<T*>& stk) {
while(stk.size() > 0) {
cout << *stk.top() << endl;
stk.pop();
}
}
int main() {
Stack<int> s1;
s1.push(1);
s1.push(2);
emptyTheStack(s1);
Stack<int *> s2;
int i = 3;
int j = 4;
s2.push(&i);
s2.push(&j);
emptyTheStack(s2);
} ///:~
For convenience we include two emptyStack function templates.
Since function templates don’t support partial specialization, we provide
overloaded templates. The second version of emptyStack is more
specialized than the first, so it is chosen whenever pointer types are used. Three
class templates are instantiated in this program: Stack<int>, Stack<void*>,
and Stack<int*>. Stack<void*> is implicitly
instantiated because Stack<int*> derives from it. A program using
instantiations for many pointer types can produce substantial savings in code
size over just using a single Stack template.
When the compiler encounters an identifier it must determine
the type and scope (and in the case of variables, the lifetime) of the entity
the identifier represents. Templates add complexity to the situation. Because the
compiler doesn’t know everything about a template when it first sees the
definition, it can’t tell whether the template is being used properly until it
sees the template instantiation. This predicament leads to a two-phase process
for template compilation.
In the first phase, the compiler parses the template
definition looking for obvious syntax errors and resolving all the names it
can. It can resolve names that do not depend on template parameters using
normal name lookup, and if necessary through argument-dependent lookup (discussed
below). The names it can’t resolve are the so-called dependent names, which depend on template parameters in some way. These can’t be resolved
until the template is instantiated with its actual arguments. So instantiation is
the second phase of template compilation. Here, the compiler determines whether to use an explicit specialization of the template instead of the primary
template.
Before you see an example, you must understand two more
terms. A qualified name is a name with a class-name prefix, a name with
an object name and a dot operator, or a name with a pointer to an object and an
arrow operator. Examples of qualified names are:
MyClass::f();
x.f();
p->f();
We use qualified names many times in this book, and most
recently in connection with the typename keyword. These are called
qualified names because the target names (like f above) are explicitly
associated with a class or namespace, which tells the compiler where to look
for the declarations of those names.
The other term is argument-dependent lookup (ADL), a mechanism
originally designed to simplify non-member function calls (including operators)
declared in namespaces. Consider the following:
#include <iostream>
#include <string>
// ...
std::string s("hello");
std::cout << s << std::endl;
Note that, following the typical practice in header files,
there is no using namespace std directive. Without such a directive, you
must use the “std::” qualifier on the items that are in the std
namespace. We have, however, not qualified everything from std that we
are using. Can you see what is unqualified?
We have not specified which operator functions to use. We
want the following to happen, but we don’t want to have to type it!
std::operator<<(std::operator<<(std::cout,s),std::endl);
To make the original output statement work as desired, ADL
specifies that when an unqualified function call appears and its declaration is
not in (normal) scope, the namespaces of each of its arguments are searched for
a matching function declaration. In the original statement, the first function
call is:
operator<<(std::cout, s);
Since there is no such function in scope in our original
excerpt, the compiler notes that this function’s first argument (std::cout)
is in the namespace std; so it adds that namespace to the list of scopes
to search for a unique function that best matches the signature operator<<(std::ostream&,
std::string). It finds this function declared in the std namespace
via the <string> header.
Namespaces would be very inconvenient without ADL. Note that
ADL generally brings in all declarations of the name in question from
all eligible namespaces—if there is no single best match, an ambiguity will
result.
To turn off ADL, you can enclose the function name in
parentheses:
(f)(x, y); // ADL suppressed
Now consider the following program:
//: C05:Lookup.cpp
// Only produces correct behavior with EDG,
// and Metrowerks using a special option.
#include <iostream>
using std::cout;
using std::endl;
void f(double) { cout << "f(double)"
<< endl; }
template<class T> class X {
public:
void g() { f(1); }
};
void f(int) { cout << "f(int)" <<
endl; }
int main() {
X<int>().g();
} ///:~
The only compiler we have that produces correct behavior
without modification is the Edison Design Group front end, although
some compilers, such as Metrowerks, have an option to enable the correct lookup
behavior. The output should be:
because f is a non-dependent name that can be
resolved early by looking in the context where the template is defined, when
only f(double) is in scope. Unfortunately, there is a lot of existing code
in the industry that depends on the non-standard behavior of binding the call
to f(1) inside g( ) to the latter f(int), so compiler
writers have been reluctant to make the change.
Here is a more detailed example:
//: C05:Lookup2.cpp {-bor}{-g++}{-dmc}
// Microsoft: use option –Za (ANSI mode)
#include <algorithm>
#include <iostream>
#include <typeinfo>
using std::cout;
using std::endl;
void g() { cout << "global g()” <<
endl; }
template<class T> class Y {
public:
void g() {
cout << "Y<" <<
typeid(T).name() << ">::g()” << endl;
}
void h() {
cout << "Y<" <<
typeid(T).name() << ">::h()” << endl;
}
typedef int E;
};
typedef double E;
template<class T> void swap(T& t1, T& t2)
{
cout << "global swap” << endl;
T temp = t1;
t1 = t2;
t2 = temp;
}
template<class T> class X : public Y<T> {
public:
E f() {
g();
this->h();
T t1 = T(), t2 = T(1);
cout << t1 << endl;
swap(t1, t2);
std::swap(t1, t2);
cout << typeid(E).name() << endl;
return E(t2);
}
};
int main() {
X<int> x;
cout << x.f() << endl;
} ///:~
The output from this program should be:
global g()
Y<int>::h()
0
global swap
double
1
Looking at the declarations inside of X::f( ):
· E, the return type of X::f( ), is not a
dependent name, so it is looked up when the template is parsed, and the typedef
naming E as a double is found. This may seem strange, since with
non-template classes the declaration of E in the base class would be
found first, but those are the rules. (The base class, Y, is a dependent
base class, so it can’t be searched at template definition time).
· The call to g( ) is also non-dependent, since there
is no mention of T. If g had parameters that were of class type
of defined in another namespace, ADL would take over, since there is no g
with parameters in scope. As it is, this call matches the global declaration of
g( ).
· The call this->h( ) is a qualified name, and the object that qualifies it (this) refers to the current object, which is of type X,
which in turn depends on the name Y<T> by inheritance. There is no
function h( ) inside of X, so the lookup will search the
scope of X’s base class, Y<T>. Since this is a dependent
name, it is looked up at instantiation time, when Y<T> are
reliably known (including any potential specializations that might have been
written after the definition of X), so it calls Y<int>::h( ).
· The declarations of t1 and t2 are dependent.
· The call to operator<<(cout, t1) is dependent, since
t1 is of type T. This is looked up later when T is int,
and the inserter for int is found in std.
· The unqualified call to swap( ) is dependent because
its arguments are of type T. This ultimately causes a global swap(int&,
int&) to be instantiated.
· The qualified call to std::swap( ) is not
dependent, because std is a fixed namespace. The compiler knows to look in
std for the proper declaration. (The qualifier on the left of the “::”
must mention a template parameter for a qualified name to be considered
dependent.) The std::swap( ) function template later generates std::swap(int&,
int&), at instantiation time. No more dependent names remain in X<T>::f( ).
To clarify and summarize: name lookup is done at the point
of instantiation if the name is dependent, except that for unqualified
dependent names the normal name lookup is also attempted early, at the point of
definition. All non-dependent names in templates are looked up early, at the
time the template definition is parsed. (If necessary, another lookup occurs at
instantiation time, when the type of the actual argument is known.)
If you have studied this example to the point that you
understand it, prepare yourself for yet another surprise in the following
section on friend declarations.
A friend function declaration inside a class allows a
non-member function to access non-public members of that class. If the friend
function name is qualified, it will be found in the namespace or class that
qualifies it. If it is unqualified, however, the compiler must make an
assumption about where the definition of the friend function will be, since all
identifiers must have a unique scope. The expectation is that the function will
be defined in the nearest enclosing namespace (non-class) scope that contains
the class granting friendship. Often this is just the global scope. The
following non-template example clarifies this issue:
//: C05:FriendScope.cpp
#include <iostream>
using namespace std;
class Friendly {
int i;
public:
Friendly(int theInt) { i = theInt; }
friend void f(const Friendly&); // Needs global
def.
void g() { f(*this); }
};
void h() {
f(Friendly(1)); // Uses ADL
}
void f(const Friendly& fo) { // Definition of
friend
cout << fo.i << endl;
}
int main() {
h(); // Prints 1
Friendly(2).g(); // Prints 2
} ///:~
The declaration of f( ) inside the Friendly
class is unqualified, so the compiler will expect to be able to eventually link
that declaration to a definition at file scope (the namespace scope that
contains Friendly in this case). That definition appears after the
definition of the function h( ). The linking of the call to f( )
inside h( ) to the same function is a separate matter, however.
This is resolved by ADL. Since the argument of f( ) inside h( )
is a Friendly object, the Friendly class is searched for a
declaration of f( ), which succeeds. If the call were f(1)
instead (which makes some sense since 1 can be implicitly converted to Friendly(1)),
the call should fail, since there is no hint of where the compiler should look
for the declaration of f( ). The EDG compiler correctly complains
that f is undefined in that case.
Now suppose that Friendly and f are both
templates, as in the following program:
//: C05:FriendScope2.cpp
#include <iostream>
using namespace std;
// Necessary forward declarations:
template<class T> class Friendly;
template<class T> void f(const
Friendly<T>&);
template<class T> class Friendly {
T t;
public:
Friendly(const T& theT) : t(theT) {}
friend void f<>(const Friendly<T>&);
void g() { f(*this); }
};
void h() {
f(Friendly<int>(1));
}
template<class T> void f(const
Friendly<T>& fo) {
cout << fo.t << endl;
}
int main() {
h();
Friendly<int>(2).g();
} ///:~
First notice that angle brackets in the declaration of f
inside Friendly. This is necessary to tell the compiler that f is
a template. Otherwise, the compiler will look for an ordinary function named f
and not find it. We could have inserted the template parameter (<T>)
in the brackets, but it is easily deduced from the declaration.
The forward declaration of the function template f
before the class definition is necessary, even though it wasn’t in the previous
example when f was a not a template; the language specifies that friend
function templates must be previously declared. To properly declare f, Friendly
must also have been declared, since f takes a Friendly argument,
hence the forward declaration of Friendly in the beginning. We could
have placed the full definition of f right after the initial declaration
of Friendly instead of separating its definition and declaration, but we
chose instead to leave it in a form that more closely resembles the previous
example.
One last option remains for using friends inside templates:
fully define them inside the host class template definition itself. Here is how
the previous example would appear with that change:
//: C05:FriendScope3.cpp {-bor}
// Microsoft: use the -Za (ANSI-compliant) option
#include <iostream>
using namespace std;
template<class T> class Friendly {
T t;
public:
Friendly(const T& theT) : t(theT) {}
friend void f(const Friendly<T>& fo) {
cout << fo.t << endl;
}
void g() { f(*this); }
};
void h() {
f(Friendly<int>(1));
}
int main() {
h();
Friendly<int>(2).g();
} ///:~
There is an important difference between this and the
previous example: f is not a template here, but is an ordinary function.
(Remember that angle brackets were necessary before to imply that f( )
was a template.) Every time the Friendly class template is instantiated,
a new, ordinary function overload is created that takes an argument of the
current Friendly specialization. This is what Dan Saks has called
“making new friends.” This
is the most convenient way to define friend functions for templates.
To clarify, suppose you want to add non-member friend
operators to a class template. Here is a class template that simply holds a
generic value:
template<class T> class Box {
T t;
public:
Box(const T& theT) : t(theT) {}
};
Without understanding the previous examples in this section,
novices find themselves frustrated because they can’t get a simple stream
output inserter to work. If you don’t define your operators inside the
definition of Box, you must provide the forward declarations we showed
earlier:
//: C05:Box1.cpp
// Defines template operators.
#include <iostream>
using namespace std;
// Forward declarations
template<class T> class Box;
template<class T>
Box<T> operator+(const Box<T>&, const
Box<T>&);
template<class T>
ostream& operator<<(ostream&, const
Box<T>&);
template<class T> class Box {
T t;
public:
Box(const T& theT) : t(theT) {}
friend Box operator+<>(const Box<T>&,
const Box<T>&);
friend ostream& operator<< <>(ostream&,
const Box<T>&);
};
template<class T>
Box<T> operator+(const Box<T>& b1,
const Box<T>& b2) {
return Box<T>(b1.t + b2.t);
}
template<class T>
ostream& operator<<(ostream& os, const
Box<T>& b) {
return os << '[' << b.t << ']';
}
int main() {
Box<int> b1(1), b2(2);
cout << b1 + b2 << endl; // [3]
// cout << b1 + 2 << endl; // No implicit
conversions!
} ///:~
Here we are defining both an addition operator and an output
stream operator. The main program reveals a disadvantage of this approach: you
can’t depend on implicit conversions (the expression b1 + 2) because
templates do not provide them. Using the in-class, non-template approach is
shorter and more robust:
//: C05:Box2.cpp
// Defines non-template operators.
#include <iostream>
using namespace std;
template<class T> class Box {
T t;
public:
Box(const T& theT) : t(theT) {}
friend Box<T> operator+(const Box<T>&
b1,
const Box<T>& b2) {
return Box<T>(b1.t + b2.t);
}
friend ostream&
operator<<(ostream& os, const
Box<T>& b) {
return os << '[' << b.t << ']';
}
};
int main() {
Box<int> b1(1), b2(2);
cout << b1 + b2 << endl; // [3]
cout << b1 + 2 << endl; // [3]
} ///:~
Because the operators are normal functions (overloaded for
each specialization of Box—just int in this case), implicit
conversions are applied as normal; so the expression b1 + 2 is valid.
Note that there’s one type in particular that cannot be made
a friend of Box, or any other class template for that matter, and that
type is T—or rather, the type that the class template is parameterized
upon. To the best of our knowledge, there are really no good reasons why this
shouldn’t be allowed, but as is, the declaration friend class T is
illegal, and should not compile.
Friend templates
You can be precise as to which specializations of a template
are friends of a class. In the examples in the previous section, only the
specialization of the function template f with the same type that
specialized Friendly was a friend. For example, only the specialization f<int>(const
Friendly<int>&) is a friend of the class Friendly<int>.
This was accomplished by using the template parameter for Friendly to
specialize f in its friend declaration. If we had wanted to, we could
have made a particular, fixed specialization of f a friend to all
instances of Friendly, like this:
// Inside Friendly:
friend void f<>(const Friendly<double>&);
By using double instead of T, the double
specialization of f has access to the non-public members of any Friendly
specialization. The specialization f<double>( ) still isn’t
instantiated unless it is explicitly called.
Likewise, if you declare a non-template function with no
parameters dependent on T, that single function is a friend to all
instances of Friendly:
// Inside Friendly:
friend void g(int); // g(int) befriends all Friendlys
As always, since g(int) is unqualified, it must be
defined at file scope (the namespace scope containing Friendly).
It is also possible to arrange for all specializations of f
to be friends for all specializations of Friendly, with a so-called friend
template, as follows:
template<class T> class Friendly {
template<class U> friend void f<>(const Friendly<U>&);
Since the template argument for the friend declaration is
independent of T, any combination of T and U is allowed,
achieving the friendship objective. Like member templates, friend templates can
appear within non-template classes as well.
Since language is a tool of thought, new language features
tend to spawn new programming techniques. In this section we cover some
commonly used template programming idioms that have emerged in the years since
templates were added to the C++ language.
The traits template technique, pioneered by Nathan Myers, is a means of bundling type-dependent declarations together. In essence, using
traits you can “mix and match” certain types and values with contexts that use
them in a flexible manner, while keeping your code readable and maintainable.
The simplest example of a traits template is the numeric_limits class template defined in <limits>. The primary template is defined as follows:
template<class T> class numeric_limits {
public:
static const bool is_specialized = false;
static T min() throw();
static T max() throw();
static const int digits = 0;
static const int digits10 = 0;
static const bool is_signed = false;
static const bool is_integer = false;
static const bool is_exact = false;
static const int radix = 0;
static T epsilon() throw();
static T round_error() throw();
static const int min_exponent = 0;
static const int min_exponent10 = 0;
static const int max_exponent = 0;
static const int max_exponent10 = 0;
static const bool has_infinity = false;
static const bool has_quiet_NaN = false;
static const bool has_signaling_NaN = false;
static const float_denorm_style has_denorm =
denorm_absent;
static const bool has_denorm_loss = false;
static T infinity() throw();
static T quiet_NaN() throw();
static T signaling_NaN() throw();
static T denorm_min() throw();
static const bool is_iec559 = false;
static const bool is_bounded = false;
static const bool is_modulo = false;
static const bool traps = false;
static const bool tinyness_before = false;
static const float_round_style round_style =
round_toward_zero;
};
The <limits> header defines specializations for
all fundamental, numeric types (when the member is_specialized is set to
true). To obtain the base for the double version of your floating-point
number system, for example, you can use the expression numeric_limits<double>::radix.
To find the smallest integer value available, you can use numeric_limits<int>::min( ).
Not all members of numeric_limits apply to all fundamental types. (For
example, epsilon( ) is only meaningful for floating-point types.)
The values that will always be integral are static data
members of numeric_limits. Those that may not be integral, such as the
minimum value for float, are implemented as static inline member
functions. This is because C++ allows only integral static data member
constants to be initialized inside a class definition.
In Chapter 3 you saw how traits are used to control the
character-processing functionality used by the string classes. The classes std::string
and std::wstring are specializations of the std::basic_string
template, which is defined as follows:
template<class charT,
class traits = char_traits<charT>,
class allocator = allocator<charT> >
class
basic_string;
The template parameter charT represents the
underlying character type, which is usually either char or wchar_t.
The primary char_traits template is typically empty, and specializations
for char and wchar_t are provided by the standard library. Here
is the specification of the specialization char_traits<char>
according to the C++ Standard:
template<> struct char_traits<char> {
typedef char char_type;
typedef int int_type;
typedef streamoff off_type;
typedef streampos pos_type;
typedef mbstate_t state_type;
static void assign(char_type& c1, const
char_type& c2);
static bool eq(const char_type& c1, const
char_type& c2);
static bool lt(const char_type& c1, const
char_type& c2);
static int compare(const char_type* s1,
const char_type* s2, size_t n);
static size_t length(const char_type* s);
static const char_type* find(const char_type* s,
size_t n,
const char_type& a);
static char_type* move(char_type* s1,
const char_type* s2, size_t
n);
static char_type* copy(char_type* s1,
const char_type* s2, size_t
n);
static char_type* assign(char_type* s, size_t n,
char_type a);
static int_type not_eof(const int_type& c);
static char_type to_char_type(const int_type& c);
static int_type to_int_type(const char_type& c);
static bool eq_int_type(const int_type& c1,
const int_type& c2);
static int_type eof();
};
These functions are used by the basic_string class
template for character-based operations common to string processing. When you
declare a string variable, such as:
you are actually declaring s as follows (because of
the default template arguments in the specification of basic_string):
std::basic_string<char,
std::char_traits<char>,
std::allocator<char> > s;
Because the character traits have been separated from the basic_string
class template, you can supply a custom traits class to replace std::char_traits.
The following example illustrates this flexibility:
//: C05:BearCorner.h
#ifndef BEARCORNER_H
#define BEARCORNER_H
#include <iostream>
using std::ostream;
// Item classes (traits of guests):
class Milk {
public:
friend ostream& operator<<(ostream& os,
const Milk&) {
return os << "Milk";
}
};
class CondensedMilk {
public:
friend ostream&
operator<<(ostream& os, const CondensedMilk
&) {
return os << "Condensed Milk";
}
};
class Honey {
public:
friend ostream& operator<<(ostream& os,
const Honey&) {
return os << "Honey";
}
};
class Cookies {
public:
friend ostream& operator<<(ostream& os,
const Cookies&) {
return os << "Cookies";
}
};
// Guest classes:
class Bear {
public:
friend ostream& operator<<(ostream& os,
const Bear&) {
return os << "Theodore";
}
};
class Boy {
public:
friend ostream& operator<<(ostream& os,
const Boy&) {
return os << "Patrick";
}
};
// Primary traits template (empty-could hold common
types)
template<class Guest> class GuestTraits;
// Traits specializations for Guest types
template<> class GuestTraits<Bear> {
public:
typedef CondensedMilk beverage_type;
typedef Honey snack_type;
};
template<> class GuestTraits<Boy> {
public:
typedef Milk beverage_type;
typedef Cookies snack_type;
};
#endif // BEARCORNER_H ///:~
//: C05:BearCorner.cpp
// Illustrates traits classes.
#include <iostream>
#include "BearCorner.h"
using namespace std;
// A custom traits class
class MixedUpTraits {
public:
typedef Milk beverage_type;
typedef Honey snack_type;
};
// The Guest template (uses a traits class)
template<class Guest, class traits =
GuestTraits<Guest> >
class BearCorner {
Guest theGuest;
typedef typename traits::beverage_type beverage_type;
typedef typename traits::snack_type snack_type;
beverage_type bev;
snack_type snack;
public:
BearCorner(const Guest& g) : theGuest(g) {}
void entertain() {
cout << "Entertaining " <<
theGuest
<< " serving " << bev
<< " and " << snack
<< endl;
}
};
int main() {
Boy cr;
BearCorner<Boy> pc1(cr);
pc1.entertain();
Bear pb;
BearCorner<Bear> pc2(pb);
pc2.entertain();
BearCorner<Bear, MixedUpTraits> pc3(pb);
pc3.entertain();
} ///:~
In this program, instances of the guest classes Boy
and Bear are served items appropriate to their tastes. Boys like
milk and cookies, and Bears like condensed milk and honey. This
association of guests to items is done via specializations of a primary (empty)
traits class template. The default arguments to BearCorner ensure that
guests get their proper items, but you can override this by simply providing a
class that meets the requirements of the traits class, as we do with the MixedUpTraits
class above. The output of this program is:
Entertaining Patrick serving Milk and Cookies
Entertaining Theodore serving Condensed Milk and Honey
Entertaining Theodore serving
Milk and Honey
Using traits provides two key advantages: (1) it allows
flexibility and extensibility in pairing objects with associated attributes or
functionality, and (2) it keeps template parameter lists small and readable. If
30 types were associated with a guest, it would be inconvenient to have to
specify all 30 arguments directly in each BearCorner declaration.
Factoring the types into a separate traits class simplifies things
considerably.
The traits technique is also used in implementing streams
and locales, as we showed in Chapter 4. An example of iterator traits is found
in the header file PrintSequence.h in Chapter 6.
If you inspect the char_traits specialization for wchar_t,
you’ll see that it is practically identical to its char counterpart:
template<> struct char_traits<wchar_t> {
typedef wchar_t char_type;
typedef wint_t int_type;
typedef streamoff off_type;
typedef wstreampos pos_type;
typedef mbstate_t state_type;
static void assign(char_type& c1, const
char_type& c2);
static bool eq(const char_type& c1, const
char_type& c2);
static bool lt(const char_type& c1, const
char_type& c2);
static int compare(const char_type* s1,
const char_type* s2, size_t n);
static size_t length(const char_type* s);
static const char_type* find(const char_type* s,
size_t n,
const char_type& a);
static char_type* move(char_type* s1,
const char_type* s2, size_t
n);
static char_type* copy(char_type* s1,
const char_type* s2, size_t
n);
static char_type* assign(char_type* s, size_t n,
char_type a);
static int_type not_eof(const int_type& c);
static char_type to_char_type(const int_type& c);
static int_type to_int_type(const char_type& c);
static bool eq_int_type(const int_type& c1,
const int_type& c2);
static int_type eof();
};
The only real difference between the two versions is the set
of types involved (char and int vs. wchar_t and wint_t).
The functionality provided is the same. This
highlights the fact that traits classes are indeed for traits, and the
things that change between related traits classes are usually types and
constant values, or fixed algorithms that use type-related template parameters.
Traits classes tend to be templates themselves, since the types and constants
they contain are seen as characteristics of the primary template parameter(s) (for
example, char and wchar_t).
It is also useful to be able to associate functionality
with template arguments, so that client programmers can easily customize
behavior when they code. The following version of the BearCorner program,
for instance, supports different types of entertainment:
//: C05:BearCorner2.cpp
// Illustrates policy classes.
#include <iostream>
#include "BearCorner.h"
using namespace std;
// Policy classes (require a static doAction()
function):
class Feed {
public:
static const char* doAction() { return
"Feeding"; }
};
class Stuff {
public:
static const char* doAction() { return
"Stuffing"; }
};
// The Guest template (uses a policy and a traits
class)
template<class Guest, class Action,
class traits = GuestTraits<Guest> >
class BearCorner {
Guest theGuest;
typedef typename traits::beverage_type beverage_type;
typedef typename traits::snack_type snack_type;
beverage_type bev;
snack_type snack;
public:
BearCorner(const Guest& g) : theGuest(g) {}
void entertain() {
cout << Action::doAction() << "
" << theGuest
<< " with " << bev
<< " and " << snack
<< endl;
}
};
int main() {
Boy cr;
BearCorner<Boy, Feed> pc1(cr);
pc1.entertain();
Bear pb;
BearCorner<Bear, Stuff> pc2(pb);
pc2.entertain();
} ///:~
The Action template parameter in the BearCorner
class expects to have a static member function named doAction( ),
which is used in BearCorner<>::entertain( ). Users can choose
Feed or Stuff at will, both of which provide the required
function. Classes that encapsulate functionality in this way are referred to as
policy classes. The entertainment “policies” are provided above through Feed::doAction( )
and Stuff::doAction( ). These policy classes happen to be ordinary
classes, but they can be templates, and can be combined with inheritance to
great advantage. For more in-depth information on policy-based design, see
Andrei Alexandrescu’s book, the
definitive source on the subject.
Any novice C++ programmer can figure out how to modify a class to keep track of the number of objects of that class that currently exist. All
you have to do is to add static members, and modify constructor and destructor
logic, as follows:
//: C05:CountedClass.cpp
// Object counting via static members.
#include <iostream>
using namespace std;
class CountedClass {
static int count;
public:
CountedClass() { ++count; }
CountedClass(const CountedClass&) { ++count; }
~CountedClass() { --count; }
static int getCount() { return count; }
};
int CountedClass::count = 0;
int main() {
CountedClass a;
cout << CountedClass::getCount() <<
endl; // 1
CountedClass b;
cout << CountedClass::getCount() <<
endl; // 2
{ // An arbitrary scope:
CountedClass c(b);
cout << CountedClass::getCount() <<
endl; // 3
a = c;
cout << CountedClass::getCount() <<
endl; // 3
}
cout << CountedClass::getCount() <<
endl; // 2
} ///:~
All constructors of CountedClass increment the static
data member count, and the destructor decrements it. The static member
function getCount( ) yields the current number of objects.
It would be tedious to manually add these members every time
you wanted to add object counting to a class. The usual object-oriented device used
to repeat or share code is inheritance, which is only half a solution in this
case. Observe what happens when we collect the counting logic into a base
class.
//: C05:CountedClass2.cpp
// Erroneous attempt to count objects.
#include <iostream>
using namespace std;
class Counted {
static int count;
public:
Counted() { ++count; }
Counted(const Counted&) { ++count; }
~Counted() { --count; }
static int getCount() { return count; }
};
int Counted::count = 0;
class CountedClass : public Counted {};
class CountedClass2 : public Counted {};
int main() {
CountedClass a;
cout << CountedClass::getCount() <<
endl; // 1
CountedClass b;
cout << CountedClass::getCount() <<
endl; // 2
CountedClass2 c;
cout << CountedClass2::getCount() <<
endl; // 3 (Error)
} ///:~
All classes that derive from Counted share the same,
single static data member, so the number of objects is tracked collectively
across all classes in the Counted hierarchy. What is needed is a way to
automatically generate a different base class for each derived class.
This is accomplished by the curious template construct illustrated below:
//: C05:CountedClass3.cpp
#include <iostream>
using namespace std;
template<class T> class Counted {
static int count;
public:
Counted() { ++count; }
Counted(const Counted<T>&) { ++count; }
~Counted() { --count; }
static int getCount() { return count; }
};
template<class T> int Counted<T>::count =
0;
// Curious class definitions
class CountedClass : public Counted<CountedClass>
{};
class CountedClass2 : public
Counted<CountedClass2> {};
int main() {
CountedClass a;
cout << CountedClass::getCount() <<
endl; // 1
CountedClass b;
cout << CountedClass::getCount() <<
endl; // 2
CountedClass2 c;
cout << CountedClass2::getCount() <<
endl; // 1 (!)
} ///:~
Each derived class derives from a unique base class that is
determined by using itself (the derived class) as a template parameter! This
may seem like a circular definition, and it would be, had any base class
members used the template argument in a computation. Since no data members of Counted
are dependent on T, the size of Counted (which is zero!) is known
when the template is parsed. So it doesn’t matter which argument is used to
instantiate Counted because the size is always the same. Any derivation
from an instance of Counted can be completed when it is parsed, and
there is no recursion. Since each base class is unique, it has its own static
data, thus constituting a handy technique for adding counting to any class
whatsoever. Jim Coplien was the first to mention this interesting derivation
idiom in print, which he cited in an article, entitled “Curiously Recurring
Template Patterns.”
In 1993 compilers were beginning to support simple template
constructs so that users could define generic containers and functions. About
the same time that the STL was being considered for adoption into Standard C++,
clever and surprising examples such as the following were passed around among
members of the C++ Standards Committee:
//: C05:Factorial.cpp
// Compile-time computation using templates.
#include <iostream>
using namespace std;
template<int n> struct Factorial {
enum { val = Factorial<n-1>::val * n };
};
template<> struct Factorial<0> {
enum { val = 1 };
};
int main() {
cout << Factorial<12>::val << endl;
// 479001600
} ///:~
That this program prints the correct value of 12! is
not alarming. What is alarming is that the computation is complete before the
program even runs!
When the compiler attempts to instantiate Factorial<12>,
it finds it must also instantiate Factorial<11>, which requires Factorial<10>,
and so on. Eventually the recursion ends with the specialization Factorial<1>,
and the computation unwinds. Eventually, Factorial<12>::val is
replaced by the integral constant 479001600, and compilation ends. Since all
the computation is done by the compiler, the values involved must be
compile-time constants, hence the use of enum. When the program runs,
the only work left to do is print that constant followed by a newline. To
convince yourself that a specialization of Factorial results in the
correct compile-time value, you could use it as an array dimension, such as:
double nums[Factorial<5>::val];
assert(sizeof
nums == sizeof(double)*120);
So what was meant to be a convenient way to perform type
parameter substitution turned out to be a mechanism to support compile-time
programming. Such a program is called a template metaprogram
(since you’re in effect “programming a program”), and it turns out that you can
do quite a lot with it. In fact, template metaprogramming is Turing complete because it supports selection (if-else) and looping (through recursion). Theoretically,
then, you can perform any computation with it. The
factorial example above shows how to implement repetition: write a recursive
template and provide a stopping criterion via a specialization. The following
example shows how to compute Fibonacci numbers at compile time by the same
technique:
//: C05:Fibonacci.cpp
#include <iostream>
using namespace std;
template<int n> struct Fib {
enum { val = Fib<n-1>::val +
Fib<n-2>::val };
};
template<> struct Fib<1> { enum { val = 1 };
};
template<> struct
Fib<0> { enum { val = 0 }; };
int main() {
cout << Fib<5>::val << endl; // 6
cout << Fib<20>::val << endl; //
6765
} ///:~
Fibonacci numbers are defined mathematically as:

The first two cases lead to the template specializations
above, and the rule in the third line becomes the primary template.
Compile–time looping
To compute any loop in a template metaprogram, it must first
be reformulated recursively. For example, to raise the integer n to the
power p, instead of using a loop such as in the following lines:
int val = 1;
while(p--)
val *=
n;
you cast it as a recursive procedure:
int power(int n, int p) {
return (p == 0) ? 1 : n*power(n, p - 1);
}
This can now be easily rendered as a template metaprogram:
//: C05:Power.cpp
#include <iostream>
using namespace std;
template<int N, int P> struct Power {
enum { val = N * Power<N, P-1>::val };
};
template<int N> struct Power<N, 0> {
enum { val = 1 };
};
int main() {
cout << Power<2, 5>::val << endl;
// 32
} ///:~
We need to use a partial specialization for the stopping
condition, since the value N is still a free template parameter. Note
that this program only works for non-negative powers.
The following metaprogram adapted from Czarnecki and Eisenecker is interesting
in that it uses a template template parameter, and simulates passing a function
as a parameter to another function, which “loops through” the numbers 0..n:
//: C05:Accumulate.cpp
// Passes a "function" as a parameter at
compile time.
#include <iostream>
using namespace std;
// Accumulates the results of F(0)..F(n)
template<int n, template<int> class F> struct
Accumulate {
enum { val = Accumulate<n-1, F>::val +
F<n>::val };
};
// The stopping criterion (returns the value F(0))
template<template<int> class F> struct
Accumulate<0, F> {
enum { val = F<0>::val };
};
// Various "functions":
template<int n> struct
Identity {
enum { val = n };
};
template<int n> struct Square {
enum { val = n*n };
};
template<int n> struct Cube {
enum { val = n*n*n };
};
int main() {
cout << Accumulate<4, Identity>::val
<< endl; // 10
cout << Accumulate<4, Square>::val
<< endl; // 30
cout << Accumulate<4, Cube>::val <<
endl; // 100
} ///:~
The primary Accumulate template attempts to compute
the sum F(n)+F(n‑1)…F(0). The stopping criterion is obtained by a
partial specialization, which “returns” F(0). The parameter F is
itself a template, and acts like a function as in the previous examples in this
section. The templates Identity, Square, and Cube compute
the corresponding functions of their template parameter that their names
suggest. The first instantiation of Accumulate in main( )
computes the sum 4+3+2+1+0, because the Identity function simply
“returns” its template parameter. The second line in main( ) adds
the squares of those numbers (16+9+4+1+0), and the last computes the sum of the
cubes (64+27+8+1+0).
Loop unrolling
Algorithm designers have always endeavored to optimize their
programs. One time-honored optimization, especially for numeric programming, is
loop unrolling, a technique that minimizes loop overhead. The quintessential
loop-unrolling example is matrix multiplication. The following function
multiplies a matrix and a vector. (Assume that the constants ROWS and COLS
have been previously defined.):
void mult(int a[ROWS][COLS], int x[COLS], int y[COLS])
{
for(int i = 0; i < ROWS; ++i) {
y[i] = 0;
for(int j = 0; j < COLS; ++j)
y[i] += a[i][j]*x[j];
}
}
If COLS is an even number, the overhead of
incrementing and comparing the loop control variable j can be cut in
half by “unrolling” the computation into pairs in the inner loop:
void mult(int a[ROWS][COLS], int x[COLS], int y[COLS])
{
for(int i = 0; i < ROWS; ++i) {
y[i] = 0;
for(int j = 0; j < COLS; j += 2)
y[i] += a[i][j]*x[j] + a[i][j+1]*x[j+1];
}
}
In general, if COLS is a factor of k, k
operations can be performed each time the inner loop iterates, greatly reducing
the overhead. The savings is only noticeable on large arrays, but that is
precisely the case with industrial-strength mathematical computations.
Function inlining also constitutes a form of loop unrolling.
Consider the following approach to computing powers of integers:
//: C05:Unroll.cpp
// Unrolls an implicit loop via inlining.
#include <iostream>
using namespace std;
template<int n> inline int power(int m) {
return power<n-1>(m) * m;
}
template<> inline int power<1>(int m) {
return m;
}
template<> inline int power<0>(int m) {
return 1;
}
int main() {
int m = 4;
cout << power<3>(m) << endl;
} ///:~
Conceptually, the compiler must generate three
specializations of power<>, one each for the template parameters
3, 2, and 1. Because the code for each of these functions can be inlined, the
actual code that is inserted into main( ) is the single expression m*m*m.
Thus, a simple template specialization coupled with inlining provides a way to
totally avoid loop control overhead. This
approach to loop unrolling is limited by your compiler’s inlining depth.
Compile–time selection
To simulate conditionals at compile time, you can use the
conditional ternary operator in an enum declaration. The following
program uses this technique to calculate the maximum of two integers at compile
time:
//: C05:Max.cpp
#include <iostream>
using namespace std;
template<int n1, int n2> struct Max {
enum { val = n1 > n2 ? n1 : n2 };
};
int main() {
cout << Max<10, 20>::val << endl;
// 20
} ///:~
If you want to use compile-time conditions to govern custom
code generation, you can use specializations of the values true and false:
//: C05:Conditionals.cpp
// Uses compile-time conditions to choose code.
#include <iostream>
using namespace std;
template<bool cond> struct Select {};
template<> class Select<true> {
static void statement1() {
cout << "This is statement1 executing\n";
}
public:
static void f() { statement1(); }
};
template<> class Select<false> {
static void statement2() {
cout << "This is statement2
executing\n";
}
public:
static void f() { statement2(); }
};
template<bool cond> void execute() {
Select<cond>::f();
}
int main() {
execute<sizeof(int) == 4>();
} ///:~
This program is equivalent to the expression:
if(cond)
statement1();
else
statement2();
except that the condition cond is evaluated at
compile time, and the appropriate versions of execute<>( ) and
Select<> are instantiated by the compiler. The function Select<>::f( )
executes at runtime. A switch statement can be emulated in similar
fashion, but specializing on each case value instead of the values true
and false.
Compile–time assertions
In Chapter 2 we touted the virtues of using assertions as
part of an overall defensive programming strategy. An assertion is basically an
evaluation of a Boolean expression followed by a suitable action: do nothing if
the condition is true, or halt with a diagnostic message otherwise. It’s best to
discover assertion failures as soon as possible. If you can evaluate an
expression at compile time, use a compile-time assertion. The following example
uses a technique that maps a Boolean expression to an array declaration:
//: C05:StaticAssert1.cpp {-xo}
// A simple, compile-time assertion facility
#define STATIC_ASSERT(x) \
do { typedef int a[(x) ? 1 : -1]; } while(0)
int main() {
STATIC_ASSERT(sizeof(int) <= sizeof(long)); //
Passes
STATIC_ASSERT(sizeof(double) <= sizeof(int)); //
Fails
} ///:~
The do loop creates a temporary scope for the
definition of an array, a, whose size is determined by the condition in
question. It is illegal to define an array of size -1, so when the condition is
false the statement should fail.
The previous section showed how to evaluate compile-time Boolean
expressions. The remaining challenge in emulating assertions at compile time is
to print a meaningful error message and halt. All that is required to halt the
compiler is a compile error; the trick is to insert helpful text in the error
message. The following example from Alexandrescu uses template
specialization, a local class, and a little macro magic to do the job:
//: C05:StaticAssert2.cpp {-g++}
#include <iostream>
using namespace std;
// A template and a specialization
template<bool> struct StaticCheck {
StaticCheck(...);
};
template<> struct StaticCheck<false> {};
// The macro (generates a local class)
#define STATIC_CHECK(expr, msg) { \
class Error_##msg {}; \
sizeof((StaticCheck<expr>(Error_##msg()))); \
}
// Detects narrowing conversions
template<class To, class From> To safe_cast(From
from) {
STATIC_CHECK(sizeof(From) <= sizeof(To),
NarrowingConversion);
return reinterpret_cast<To>(from);
}
int main() {
void* p = 0;
int i = safe_cast<int>(p);
cout << "int cast okay” << endl;
//! char c = safe_cast<char>(p);
} ///:~
This example defines a function template, safe_cast<>( ),
that checks to see if the object it is casting from is no larger than the type
of object it casts to. If the size of the target object type is smaller, then
the user will be notified at compile time that a narrowing conversion was
attempted. Notice that the StaticCheck class template has the curious
feature that anything can be converted to an instance of StaticCheck<true>
(because of the ellipsis in its constructor),
and nothing can be converted to a StaticCheck<false>
because no conversions are supplied for that specialization. The idea is to
attempt to create an instance of a new class and attempt to convert it to StaticCheck<true>
at compile time whenever the condition of interest is true, or to a StaticCheck<false>
object when the condition being tested is false. Since the sizeof
operator does its work at compile time, it is used to attempt the conversion.
If the condition is false, the compiler will complain that it doesn’t know how
to convert from the new class type to StaticCheck<false>. (The
extra parentheses inside the sizeof invocation in STATIC_CHECK( )
are to prevent the compiler from thinking that we’re trying to invoke sizeof
on a function, which is illegal.) To get some meaningful information inserted
into the error message, the new class name carries key text in its name.
The best way to understand this technique is to walk through
a specific case. Consider the line in main( ) above which reads:
int i =
safe_cast<int>(p);
The call to safe_cast<int>(p) contains the
following macro expansion replacing its first line of code:
{ \
class Error_NarrowingConversion {}; \
sizeof(StaticCheck<sizeof(void*) <= sizeof(int)>
\
(Error_NarrowingConversion())); \
}
(Recall that the token-pasting preprocessing operator, ##,
concatenates its operand into a single token, so Error_##NarrowingConversion
becomes the token Error_NarrowingConversion after preprocessing). The
class Error_NarrowingConversion is a local class (meaning that it
is declared inside a non-namespace scope) because it is not needed elsewhere in
the program. The application of the sizeof operator here attempts to
determine the size of an instance of StaticCheck<true> (because sizeof(void*)
<= sizeof(int) is true on our platforms), created implicitly from the
temporary object returned by the call Error_NarrowingConversion( ).
The compiler knows the size of the new class Error_NarrowingConversion (it’s
empty), and so the compile-time use of sizeof at the outer level in STATIC_CHECK( )
is valid. Since the conversion from the Error_NarrowingConversion
temporary to StaticCheck<true> succeeds, so does this outer
application of sizeof, and execution continues.
Now consider what would happen if the comment were removed
from the last line of main( ):
char c
= safe_cast<char>(p);
Here the STATIC_CHECK( ) macro inside safe_cast<char>(p)
expands to:
{ \
class Error_NarrowingConversion {}; \
sizeof(StaticCheck<sizeof(void*) <=
sizeof(char)> \
(Error_NarrowingConversion())); \
}
Since the expression sizeof(void*) <= sizeof(char)
is false, a conversion from an Error_NarrowingConversion temporary to StaticCheck<false>
is attempted, as follows:
sizeof(StaticCheck<false>(Error_NarrowingConversion()));
which fails, so the compiler halts with a message something
like the following:
Cannot cast from
'Error_NarrowingConversion' to 'StaticCheck<0>' in function
char safe_cast<char,void *>(void *)
The class name Error_NarrowingConversion is the
meaningful message judiciously arranged by the coder. In general, to perform a
static assertion with this technique, you just invoke the STATIC_CHECK
macro with the compile-time condition to check and with a meaningful name to
describe the error.
Perhaps the most powerful application of templates is a
technique discovered independently in 1994 by Todd Veldhuizen and Daveed
Vandevoorde: expression
templates. Expression templates enable extensive compile-time optimization
of certain computations that result in code that is at least as fast as
hand-optimized Fortran, and yet preserves the natural notation of mathematics
via operator overloading. Although you wouldn’t be likely to use this technique
in everyday programming, it is the basis for a number of sophisticated,
high-performance mathematical libraries written in C++.
To motivate the need for expression templates, consider typical
numerical linear algebra operations, such as adding together two matrices or
vectors, such as in the
following:
In naive implementations, this expression would result in a
number of temporaries—one for A+B, and one for (A+B)+C. When
these variables represent immense matrices or vectors, the coincident drain on
resources is unacceptable. Expression templates allow you to use the same
expression without temporaries.
The following program defines a MyVector class to
simulate mathematical vectors of any size. We use a non-type template argument
for the length of the vector. We also define a MyVectorSum class to act
as a proxy class for a sum of MyVector objects. This allows us to use
lazy evaluation, so the addition of vector components is performed on demand
without the need for temporaries.
//: C05:MyVector.cpp
// Optimizes away temporaries via templates.
#include <cstddef>
#include <cstdlib>
#include <ctime>
#include <iostream>
using namespace std;
// A proxy class for sums of vectors
template<class, size_t> class MyVectorSum;
template<class T, size_t N> class MyVector {
T data[N];
public:
MyVector<T,N>& operator=(const
MyVector<T,N>& right) {
for(size_t i = 0; i < N; ++i)
data[i] = right.data[i];
return *this;
}
MyVector<T,N>& operator=(const
MyVectorSum<T,N>& right);
const T& operator[](size_t i) const { return
data[i]; }
T& operator[](size_t i) { return data[i]; }
};
// Proxy class hold references; uses lazy addition
template<class T, size_t N> class MyVectorSum {
const MyVector<T,N>& left;
const MyVector<T,N>& right;
public:
MyVectorSum(const MyVector<T,N>& lhs,
const MyVector<T,N>& rhs)
: left(lhs), right(rhs) {}
T operator[](size_t i) const {
return left[i] + right[i];
}
};
// Operator to support v3 = v1 + v2
template<class T, size_t N> MyVector<T,N>&
MyVector<T,N>::operator=(const
MyVectorSum<T,N>& right) {
for(size_t i = 0; i < N; ++i)
data[i] = right[i];
return *this;
}
// operator+ just stores references
template<class T, size_t N> inline
MyVectorSum<T,N>
operator+(const MyVector<T,N>& left,
const MyVector<T,N>& right) {
return MyVectorSum<T,N>(left, right);
}
// Convenience functions for the test program below
template<class T, size_t N> void
init(MyVector<T,N>& v) {
for(size_t i = 0; i < N; ++i)
v[i] = rand() % 100;
}
template<class T, size_t N> void
print(MyVector<T,N>& v) {
for(size_t i = 0; i < N; ++i)
cout << v[i] << ' ';
cout << endl;
}
int main() {
srand(time(0));
MyVector<int, 5> v1;
init(v1);
print(v1);
MyVector<int, 5> v2;
init(v2);
print(v2);
MyVector<int, 5> v3;
v3 = v1 + v2;
print(v3);
MyVector<int, 5> v4;
// Not yet supported:
//! v4 = v1 + v2 + v3;
} ///:~
The MyVectorSum class does no computation when it is
created; it merely holds references to the two vectors to be added. Calculations
happen only when you access a component of a vector sum (see its operator[ ]( )).
The overload of the assignment operator for MyVector that takes a MyVectorSum
argument is for an expression such as:
v1 = v2 + v3;
// Add two vectors
When the expression v1+v2 is evaluated, a MyVectorSum
object is returned (or actually, inserted inline, since that operator+( )
is declared inline). This is a small, fixed-size object (it holds only
two references). Then the assignment operator mentioned above is invoked:
v3.operator=<int,5>(MyVectorSum<int,5>(v2,
v3));
This assigns to each element of v3 the sum of the
corresponding elements of v1 and v2, computed in real time. No
temporary MyVector objects are created.
This program does not support an expression that has more
than two operands, however, such as
The reason is that, after the first addition, a second
addition is attempted:
which would require an operator+( ) with a first
argument of MyVectorSum and a second argument of type MyVector.
We could attempt to provide a number of overloads to meet all situations, but
it is better to let templates do the work, as in the following version of the
program:
//: C05:MyVector2.cpp
// Handles sums of any length with expression templates.
#include <cstddef>
#include <cstdlib>
#include <ctime>
#include <iostream>
using namespace std;
// A proxy class for sums of vectors
template<class, size_t, class, class> class
MyVectorSum;
template<class T, size_t N> class MyVector {
T data[N];
public:
MyVector<T,N>& operator=(const
MyVector<T,N>& right) {
for(size_t i = 0; i < N; ++i)
data[i] = right.data[i];
return *this;
}
template<class Left, class
Right> MyVector<T,N>&
operator=(const
MyVectorSum<T,N,Left,Right>& right);
const T& operator[](size_t i) const {
return data[i];
}
T& operator[](size_t i) {
return data[i];
}
};
// Allows mixing MyVector and MyVectorSum
template<class T, size_t N, class Left, class
Right>
class MyVectorSum {
const Left& left;
const Right& right;
public:
MyVectorSum(const Left& lhs, const Right&
rhs)
: left(lhs), right(rhs) {}
T operator[](size_t i) const {
return left[i] + right[i];
}
};
template<class T, size_t N>
template<class Left, class Right>
MyVector<T,N>&
MyVector<T,N>::
operator=(const MyVectorSum<T,N,Left,Right>&
right) {
for(size_t i = 0; i < N; ++i)
data[i] = right[i];
return *this;
}
// operator+ just stores references
template<class T, size_t N>
inline
MyVectorSum<T,N,MyVector<T,N>,MyVector<T,N> >
operator+(const MyVector<T,N>& left,
const MyVector<T,N>& right) {
return
MyVectorSum<T,N,MyVector<T,N>,MyVector<T,N> >
(left,right);
}
template<class T, size_t N, class Left, class
Right>
inline MyVectorSum<T, N,
MyVectorSum<T,N,Left,Right>,
MyVector<T,N> >
operator+(const MyVectorSum<T,N,Left,Right>&
left,
const MyVector<T,N>& right) {
return
MyVectorSum<T,N,MyVectorSum<T,N,Left,Right>,
MyVector<T,N> >
(left, right);
}
// Convenience functions for the test program below
template<class T, size_t N> void
init(MyVector<T,N>& v) {
for(size_t i = 0; i < N; ++i)
v[i] = rand() % 100;
}
template<class T, size_t N> void
print(MyVector<T,N>& v) {
for(size_t i = 0; i < N; ++i)
cout << v[i] << ' ';
cout << endl;
}
int main() {
srand(time(0));
MyVector<int, 5> v1;
init(v1);
print(v1);
MyVector<int, 5> v2;
init(v2);
print(v2);
MyVector<int, 5> v3;
v3 = v1 + v2;
print(v3);
// Now supported:
MyVector<int, 5> v4;
v4 = v1 + v2 + v3;
print(v4);
MyVector<int, 5> v5;
v5 = v1 + v2 + v3 + v4;
print(v5);
} ///:~
The template facility deduces the argument types of a sum
using the template arguments, Left and Right, instead of
committing to those types ahead of time. The MyVectorSum template takes
these extra two parameters so it can represent a sum of any combination of
pairs of MyVector and MyVectorSum.
The assignment operator is now a member function template.
This allows any <T, N> pair to be coupled with any <Left,
Right> pair, so a MyVector object can be assigned from a MyVectorSum
holding references to any possible pair of the types MyVector and MyVectorSum.
As we did before, let’s trace through a sample assignment to
understand exactly what takes place, beginning with the expression
Since the resulting expressions become quite unwieldy, in
the explanation that follows, we will use MVS as shorthand for MyVectorSum,
and will omit the template arguments.
The first operation is v1+v2, which invokes the
inline operator+( ), which in turn inserts MVS(v1, v2) into
the compilation stream. This is then added to v3, which results in a
temporary object according to the expression MVS(MVS(v1, v2), v3). The
final representation of the entire statement is
v4.operator+(MVS(MVS(v1,
v2), v3));
This transformation is all arranged by the compiler and
explains why this technique carries the moniker “expression templates.” The template
MyVectorSum represents an expression (an addition, in this case), and
the nested calls above are reminiscent of the parse tree of the left-associative
expression v1+v2+v3.
An excellent article by Angelika Langer and Klaus Kreft explains how this technique can be extended to more complex computations.
You may have noticed that all our template examples place
fully-defined templates within each compilation unit. (For example, we place
them completely within single-file programs, or in header files for multi-file
programs.) This runs counter to the conventional practice of separating ordinary
function definitions from their declarations by placing the latter in header
files and the function implementations in separate (that is, .cpp)
files.
The reasons for this traditional separation are:
· Non-inline function bodies in header files lead to multiple
function definitions, resulting in linker errors.
· Hiding the implementation from clients helps reduce compile-time
coupling.
· Vendors can distribute pre-compiled code (for a particular
compiler) along with headers so that users cannot see the function
implementations.
· Compile times are shorter since header files are smaller.
Templates, on the other hand, are not code per se, but
instructions for code generation. Only template instantiations are real code.
When a compiler has seen a complete template definition during a compilation
and then encounters a point of instantiation for that template in the same
translation unit, it must deal with the fact that an equivalent point of
instantiation may be present in another translation unit. The most common
approach consists of generating the code for the instantiation in every
translation unit and letting the linker weed out duplicates. That particular
approach also works well with inline functions that cannot be inlined and with
virtual function tables, which is one of the reasons for its popularity. Nonetheless,
several compilers prefer instead to rely on more complex schemes to avoid
generating a particular instantiation more than once. Either way, it is the
responsibility of the C++ translation system to avoid errors due to multiple
equivalent points of instantiation.
A drawback of this approach is that all template source code
is visible to the client, so there is little opportunity for library vendors to
hide their implementation strategies. Another disadvantage of the inclusion
model is that header files are much larger than they would be if function
bodies were compiled separately. This can increase compile times dramatically
over traditional compilation models.
To help reduce the large headers required by the inclusion
model, C++ offers two (non-exclusive) alternative code organization mechanisms:
you can manually instantiate each specialization using explicit instantiation
or you can use exported templates, which support a large degree of
separate compilation.
You can manually direct the compiler to instantiate any
template specializations of your choice. When you use this technique, there
must be one and only one such directive for each such specialization; otherwise
you might get multiple definition errors, just as you would with
ordinary, non-inline functions with identical signatures. To illustrate, we
first (erroneously) separate the declaration of the min( ) template
from earlier in this chapter from its definition, following the normal pattern
for ordinary, non-inline functions. The following example consists of five
files:
· OurMin.h: contains the declaration of the min( )
function template.
· OurMin.cpp: contains the definition of the min( )
function template.
· UseMin1.cpp: attempts to use an int-instantiation
of min( ).
· UseMin2.cpp: attempts to use a double-instantiation
of min( ).
· MinMain.cpp: calls usemin1( ) and usemin2( ).
//: C05:OurMin.h
#ifndef OURMIN_H
#define OURMIN_H
// The declaration of min()
template<typename T> const T& min(const
T&, const T&);
#endif //
OURMIN_H ///:~
// OurMin.cpp
#include "OurMin.h"
// The definition of min()
template<typename T> const T& min(const
T& a, const T& b) {
return (a < b) ? a : b;
}
//: C05:UseMin1.cpp {O}
#include <iostream>
#include "OurMin.h"
void usemin1() {
std::cout << min(1,2) <<
std::endl;
} ///:~
//: C05:UseMin2.cpp {O}
#include <iostream>
#include "OurMin.h"
void usemin2() {
std::cout << min(3.1,4.2)
<< std::endl;
} ///:~
//: C05:MinMain.cpp
//{L} UseMin1 UseMin2 MinInstances
void usemin1();
void usemin2();
int main() {
usemin1();
usemin2();
} ///:~
When we attempt to build this program, the linker reports
unresolved external references for min<int>( ) and min<double>( ).
The reason is that when the compiler encounters the calls to specializations of
min( ) in UseMin1 and UseMin2, only the declaration
of min( ) is visible. Since the definition is not available, the
compiler assumes it will come from some other translation unit, and the needed
specializations are thus not instantiated at that point, leaving the linker to eventually
complain that it cannot find them.
To solve this problem, we will introduce a new file, MinInstances.cpp,
that explicitly instantiates the needed specializations of min( ):
//: C05:MinInstances.cpp {O}
#include "OurMin.cpp"
// Explicit Instantiations for int and double
template const int& min<int>(const int&,
const int&);
template const double& min<double>(const
double&,
const double&);
///:~
To manually instantiate a particular template
specialization, you precede the specialization’s declaration with the template
keyword. Note that we must include OurMin.cpp, not OurMin.h,
here, because the compiler needs the template definition to perform the
instantiation. This is the only place where we have to do this in this program, however, since
it gives us the unique instantiations of min( ) that we need—the declarations
alone suffice for the other files. Since we are including OurMin.cpp
with the macro preprocessor, we add include guards:
//: C05:OurMin.cpp {O}
#ifndef OURMIN_CPP
#define OURMIN_CPP
#include "OurMin.h"
template<typename T> const T& min(const
T& a, const T& b) {
return (a < b) ? a : b;
}
#endif //
OURMIN_CPP ///:~
Now when we compile all the files together into a complete
program, the unique instances of min( ) are found, and the program
executes correctly, giving the output:
You can also manually instantiate classes and static data
members. When explicitly instantiating a class, all member functions for the
requested specialization are instantiated, except any that may have been explicitly
instantiated previously. This is important, as it will render many templates
useless when using this mechanism—specifically, templates that implement
different functionality depending on their parameterization type. Implicit
instantiation has the advantage here: only member functions that get called are
instantiated.
Explicit instantiation is intended for large projects where
a hefty chunk of compilation time can be avoided. Whether you use implicit or
explicit instantiation is independent of which template compilation you use. You
can use manual instantiation with either the inclusion model or the separation
model (discussed in the next section).
The separation model of template compilation separates function template definitions or static data member definitions from their
declarations across translation units, just like you do with ordinary functions
and data, by exporting templates. After reading the preceding two
sections, this must sound strange. Why bother to have the inclusion model in
the first place if you can just adhere to the status quo? The reasons are both
historical and technical.
Historically, the inclusion model was the first to experience
widespread commercial use—all C++ compilers support the inclusion model. Part
of the reason for that was that the separation model was not well specified
until late in the standardization process, but also that the inclusion model is
easier to implement. A lot of working code was in existence long before the
semantics of the separation model were finalized.
The separation model is so difficult to implement that, as
of Summer 2003, only one compiler front end (EDG) supports the separation
model, and at the moment it still requires that template source code be
available at compile time to perform instantiation on demand. Plans are in
place to use some form of intermediate code instead of requiring that the
original source be at hand, at which point you will be able to ship
“pre-compiled” templates without shipping source code. Because of the lookup
complexities explained earlier in this chapter (about dependent names being
looked up in the template definition context), a full template definition still
has to be available in some form when you compile a program that instantiates
it.
The syntax to separate the source code of a template
definition from its declaration is easy enough. You use the export keyword:
// C05:OurMin2.h
// Declares min as an exported template
// (Only works with EDG-based compilers)
#ifndef OURMIN2_H
#define OURMIN2_H
export template<typename T> const T&
min(const T&,
const T&);
#endif //
OURMIN2_H ///:~
Similar to inline or virtual, the export
keyword need only be mentioned once in a compilation stream, where an exported
template is introduced. For this reason, we need not repeat it in the
implementation file, but it is considered good practice to do so:
// C05:OurMin2.cpp
// The definition of the exported min template
// (Only works with EDG-based compilers)
#include "OurMin2.h"
export
template<typename T> const T& min(const
T& a, const T& b) {
return (a < b) ? a : b;
} ///:~
The UseMin files used previously only need to include
the correct header file (OurMin2.h), and the main program doesn’t
change. Although this appears to give true separation, the file with the
template definition (OurMin2.cpp) must still be shipped to users (because
it must be processed for each instantiation of min( )) until such
time as some form of intermediate code representation of template definitions
is supported. So while the standard does provide for a true separation model,
not all of its benefits can be reaped today. Only one family of compilers
currently supports export (those based on the EDG front end), and these
compilers currently do not exploit the potential ability to distribute template
definitions in compiled form.
Templates go far beyond simple type parameterization. When
you combine argument type deduction, custom specialization, and template
metaprogramming, C++ templates emerge as a powerful code generation mechanism.
One of the weaknesses of C++ templates that we did not
mention is the difficulty in interpreting compile-time error messages. The quantity
of inscrutable text spewed out by the compiler can be quite overwhelming. C++
compilers have improved their template error messages, and Leor Zolman has written a tool called STLFilt that renders these error messages much
more readable by extracting the useful information and throwing away the rest.
Another important idea to take away from this chapter is
that a template implies an interface. That is, even though the template
keyword says “I’ll take any type,” the code in a template definition requires
that certain operators and member functions be supported—that’s the interface.
So in reality, a template definition is saying, “I’ll take any type that
supports this interface.” Things would be much nicer if the compiler could
simply say, “Hey, this type that you’re trying to instantiate the template with
doesn’t support that interface—can’t do it.” Using templates constitutes a sort
of “latent type checking” that is more flexible than the pure object-oriented
practice of requiring all types to derive from certain base classes.
In Chapters 6 and 7 we explore in depth the most famous
application of templates, the subset of the Standard C++ library commonly known
as the Standard Template Library (STL). Chapters 9 and 10 also use template
techniques not found in this chapter.
Solutions
to selected exercises can be found in the electronic document The Thinking
in C++ Volume 2 Annotated Solution Guide, available for a small fee from www.MindView.net.
1. Write a unary function template that takes a single type template
parameter. Create a full specialization for the type int. Also create a
non-template overload for this function that takes a single int
parameter. Have your main program invoke three function variations.
2. Write a class template that uses a vector to implement a
stack data structure.
3. Modify your solution to the previous exercise so that the type of
the container used to implement the stack is a template template parameter.
4. In the following code, the class NonComparable does not
have an operator=( ). Why would the presence of the class HardLogic
cause a compile error, but SoftLogic would not?
//: C05:Exercise4.cpp {-xo}
class Noncomparable {};
struct HardLogic {
Noncomparable nc1, nc2;
void compare() {
return nc1 == nc2; // Compiler error
}
};
template<class T> struct SoftLogic {
Noncomparable nc1, nc2;
void noOp() {}
void compare() {
nc1 == nc2;
}
};
int main() {
SoftLogic<Noncomparable> l;
l.noOp();
} ///:~
5. Write a function template that takes a single type parameter (T)
and accepts four function arguments: an array of T, a start index, a
stop index (inclusive), and an optional initial value. The function returns the
sum of all the array elements in the specified range and the initial value. Use
the default constructor of T for the default initial value.
6. Repeat the previous exercise but use explicit instantiation to
manually create specializations for int and double, following the
technique explained in this chapter.
7. Why does the following code not compile? (Hint: what do class
member functions have access to?)
//: C05:Exercise7.cpp {-xo}
class Buddy {};
template<class T> class My {
int i;
public:
void play(My<Buddy>& s) {
s.i = 3;
}
};
int main() {
My<int> h;
My<Buddy> me, bud;
h.play(bud);
me.play(bud);
} ///:~
8. Why does the following code not compile?
//: C05:Exercise8.cpp {-xo}
template<class T> double pythag(T a, T b, T c) {
return (-b + sqrt(double(b*b - 4*a*c))) / 2*a;
}
int main() {
pythag(1, 2, 3);
pythag(1.0, 2.0, 3.0);
pythag(1, 2.0, 3.0);
pythag<double>(1, 2.0, 3.0);
} ///:~
9. Write templates that take non-type parameters of the following
variety: an int, a pointer to an int, a pointer to a static class
member of type int, and a pointer to a static member function.
10. Write a class template that takes two type parameters. Define a
partial specialization for the first parameter, and another partial
specialization that specifies the second parameter. In each specialization,
introduce members that are not in the primary template.
11. Define a class template named Bob that takes a single type
parameter. Make Bob a friend of all instances of a template class named Friendly,
and a friend of a class template named Picky only when the type
parameter of Bob and Picky are identical. Give Bob member
functions that demonstrate its friendship.
Algorithms are at the core of
computing. To be able to write an algorithm that works with any type of
sequence makes your programs both simpler and safer. The ability to customize
algorithms at runtime has revolutionized software development.
The subset of the Standard C++ library known as the Standard
Template Library (STL) was originally designed around generic algorithms—code that processes sequences of any type of values in a type-safe manner. The
goal was to use predefined algorithms for almost every task, instead of
hand-coding loops every time you need to process a collection of data. This
power comes with a bit of a learning curve, however. By the time you get to the
end of this chapter, you should be able to decide for yourself whether you find
the algorithms addictive or too confusing to remember. If you’re like most
people, you’ll resist them at first but then tend to use them more and more as
time goes on.
Among other things, the generic algorithms in the standard
library provide a vocabulary with which to describe solutions. Once you become
familiar with the algorithms, you’ll have a new set of words with which to
discuss what you’re doing, and these words are at a higher level than what you
had before. You don’t need to say, “This loop moves through and assigns from
here to there … oh, I see, it’s copying!” Instead, you just say copy( ).
This is what we’ve been doing in computer programming from the
beginning—creating high-level abstractions to express what you’re doing
and spending less time saying how you’re doing it. The how has
been solved once and for all and is hidden in the algorithm’s code, ready to be
reused on demand.
Here’s an example of how to use the copy algorithm:
//: C06:CopyInts.cpp
// Copies ints without an explicit loop.
#include <algorithm>
#include <cassert>
#include <cstddef> // For size_t
using namespace std;
int main() {
int a[] = { 10, 20, 30 };
const size_t SIZE = sizeof a / sizeof a[0];
int b[SIZE];
copy(a, a + SIZE, b);
for(size_t i = 0; i < SIZE; ++i)
assert(a[i] == b[i]);
} ///:~
The copy( ) algorithm’s first two parameters represent the range of the input sequence—in this case the array a.
Ranges are denoted by a pair of pointers. The first points to the first element
of the sequence, and the second points one position past the end of the
array (right after the last element). This may seem strange at first, but it is
an old C idiom that comes in quite handy. For example, the difference of these
two pointers yields the number of elements in the sequence. More important, in
implementing copy, the second pointer can act as a sentinel to stop the
iteration through the sequence. The third argument refers to the beginning of
the output sequence, which is the array b in this example. It is assumed
that the array that b represents has enough space to receive the copied
elements.
The copy( ) algorithm wouldn’t be very exciting
if it could only process integers. It can copy any kind of sequence. The
following example copies string objects:
//: C06:CopyStrings.cpp
// Copies strings.
#include <algorithm>
#include <cassert>
#include <cstddef>
#include <string>
using namespace std;
int main() {
string a[] = {"read", "my",
"lips"};
const size_t SIZE = sizeof a / sizeof a[0];
string b[SIZE];
copy(a, a + SIZE, b);
assert(equal(a, a + SIZE, b));
} ///:~
This example introduces another algorithm, equal( ), which returns true only if each element in the first sequence is equal
(using its operator==( )) to the corresponding element in the
second sequence. This example traverses each sequence twice, once for the copy,
and once for the comparison, without a single explicit loop!
Generic algorithms achieve this flexibility because they are
function templates. If you think that the implementation of copy( )
looks like the following, you’re almost right:
template<typename T> void copy(T* begin, T* end,
T* dest) {
while(begin != end)
*dest++ = *begin++;
}
We say “almost” because copy( ) can process
sequences delimited by anything that acts like a pointer, such as an iterator.
In this way, copy( ) can be used to duplicate a vector:
//: C06:CopyVector.cpp
// Copies the contents of a vector.
#include <algorithm>
#include <cassert>
#include <cstddef>
#include <vector>
using namespace std;
int main() {
int a[] = { 10, 20, 30 };
const size_t SIZE = sizeof a / sizeof a[0];
vector<int> v1(a, a + SIZE);
vector<int> v2(SIZE);
copy(v1.begin(), v1.end(), v2.begin());
assert(equal(v1.begin(), v1.end(), v2.begin()));
} ///:~
The first vector, v1, is initialized from the
sequence of integers in the array a. The definition of the vector
v2 uses a different vector constructor that makes room for SIZE
elements, initialized to zero (the default value for integers).
As with the array example earlier, it’s important that v2
have enough space to receive a copy of the contents of v1. For
convenience, a special library function, back_inserter( ), returns a special type of iterator that inserts elements instead of overwriting them, so memory is expanded
automatically by the container as needed. The following example uses back_inserter( ),
so it doesn’t have to establish the size of the output vector, v2,
ahead of time:
//: C06:InsertVector.cpp
// Appends the contents of a vector to another.
#include <algorithm>
#include <cassert>
#include <cstddef>
#include <iterator>
#include <vector>
using namespace std;
int main() {
int a[] = { 10, 20, 30 };
const size_t SIZE = sizeof a / sizeof a[0];
vector<int> v1(a, a + SIZE);
vector<int> v2; // v2 is empty here
copy(v1.begin(), v1.end(), back_inserter(v2));
assert(equal(v1.begin(), v1.end(), v2.begin()));
} ///:~
The back_inserter( ) function is defined in the <iterator>
header. We’ll explain how insert iterators work in depth in the next chapter.
Since iterators are identical to pointers in all essential
ways, you can write the algorithms in the standard library in such a way as to
allow both pointer and iterator arguments. For this reason, the implementation
of copy( ) looks more like the following code:
template<typename Iterator>
void copy(Iterator begin, Iterator end, Iterator dest)
{
while(begin != end)
*begin++ = *dest++;
}
Whichever argument type you use in the call, copy( )
assumes it properly implements the indirection and increment operators. If it
doesn’t, you’ll get a compile-time error.
At times, you might want to copy only a well-defined subset
of one sequence to another, such as only those elements that satisfy a particular
condition. To achieve this flexibility, many algorithms have alternate calling
sequences that allow you to supply a predicate, which is simply a function that returns a Boolean value based on some criterion. Suppose, for example, that you
only want to extract from a sequence of integers those numbers that are less
than or equal to 15. A version of copy( ) called remove_copy_if( ) can do the job, like this:
//: C06:CopyInts2.cpp
// Ignores ints that satisfy a predicate.
#include <algorithm>
#include <cstddef>
#include <iostream>
using namespace std;
// You supply this predicate
bool gt15(int x) { return 15 < x; }
int main() {
int a[] = { 10, 20, 30 };
const size_t SIZE = sizeof a / sizeof a[0];
int b[SIZE];
int* endb = remove_copy_if(a, a+SIZE, b, gt15);
int* beginb = b;
while(beginb != endb)
cout << *beginb++ << endl; // Prints 10
only
} ///:~
The remove_copy_if( ) function template takes
the usual range-delimiting pointers, followed by a predicate of your choosing.
The predicate must be a pointer to a function that
takes a single argument of the same type as the elements in the sequence, and
it must return a bool. Here, the function gt15 returns true
if its argument is greater than 15. The remove_copy_if( ) algorithm
applies gt15( ) to each element in the input sequence and ignores
those elements where the predicate yields true when writing to the output
sequence.
The following program illustrates yet another variation of
the copy algorithm:
//: C06:CopyStrings2.cpp
// Replaces strings that satisfy a predicate.
#include <algorithm>
#include <cstddef>
#include <iostream>
#include <string>
using namespace std;
// The predicate
bool contains_e(const string& s) {
return s.find('e') != string::npos;
}
int main() {
string a[] = {"read", "my",
"lips"};
const size_t SIZE = sizeof a / sizeof a[0];
string b[SIZE];
string* endb = replace_copy_if(a, a + SIZE, b,
contains_e, string("kiss"));
string* beginb = b;
while(beginb != endb)
cout << *beginb++ << endl;
} ///:~
Instead of just ignoring elements that don’t satisfy the
predicate, replace_copy_if( ) substitutes a fixed value for such elements when populating the output sequence. The output is:
because the original occurrence of “read,” the only input
string containing the letter e, is replaced by the word “kiss,” as
specified in the last argument in the call to replace_copy_if( ).
The replace_if( ) algorithm changes the original sequence in place, instead of writing to a separate output sequence, as the
following program shows:
//: C06:ReplaceStrings.cpp
// Replaces strings in-place.
#include <algorithm>
#include <cstddef>
#include <iostream>
#include <string>
using namespace std;
bool contains_e(const string& s) {
return s.find('e') != string::npos;
}
int main() {
string a[] = {"read", "my",
"lips"};
const size_t SIZE = sizeof a / sizeof a[0];
replace_if(a, a + SIZE, contains_e,
string("kiss"));
string* p = a;
while(p != a + SIZE)
cout << *p++ << endl;
} ///:~
Like any good software library, the Standard C++ Library
attempts to provide convenient ways to automate common tasks. We mentioned in
the beginning of this chapter that you can use generic algorithms in place of
looping constructs. So far, however, our examples have still used an explicit
loop to print their output. Since printing output is one of the most common
tasks, you would hope for a way to automate that too.
That’s where stream iterators come in. A stream iterator uses a stream as either an input or an output sequence. To eliminate the output loop
in the CopyInts2.cpp program, for instance, you can do something like
the following:
//: C06:CopyInts3.cpp
// Uses an output stream iterator.
#include <algorithm>
#include <cstddef>
#include <iostream>
#include <iterator>
using namespace std;
bool gt15(int x) { return 15 < x; }
int main() {
int a[] = { 10, 20, 30 };
const size_t SIZE = sizeof a / sizeof a[0];
remove_copy_if(a, a + SIZE,
ostream_iterator<int>(cout,
"\n"), gt15);
} ///:~
In this example we’ve replaced the output sequence b
in the third argument of remove_copy_if( ) with an output
stream iterator, which is an instance of the ostream_iterator class template declared in the <iterator> header. Output stream iterators overload their copy-assignment
operators to write to their stream. This particular instance of ostream_iterator
is attached to the output stream cout. Every time remove_copy_if( )
assigns an integer from the sequence a to cout through this
iterator, the iterator writes the integer to cout and also automatically
writes an instance of the separator string found in its second argument, which
in this case contains the newline character.
It is just as easy to write to a file by providing an output
file stream, instead of cout:
//: C06:CopyIntsToFile.cpp
// Uses an output file stream iterator.
#include <algorithm>
#include <cstddef>
#include <fstream>
#include <iterator>
using namespace std;
bool gt15(int x) { return 15 < x; }
int main() {
int a[] = { 10, 20, 30 };
const size_t SIZE = sizeof a / sizeof a[0];
ofstream outf("ints.out");
remove_copy_if(a, a + SIZE,
ostream_iterator<int>(outf,
"\n"), gt15);
} ///:~
An input stream iterator allows an algorithm to get
its input sequence from an input stream. This is accomplished by having both
the constructor and operator++( ) read the next element from the
underlying stream and by overloading operator*( ) to yield the
value previously read. Since algorithms require two pointers to delimit an
input sequence, you can construct an istream_iterator in two ways, as you can see in the program that follows.
//: C06:CopyIntsFromFile.cpp
// Uses an input stream iterator.
#include <algorithm>
#include <fstream>
#include <iostream>
#include <iterator>
#include "../require.h"
using namespace std;
bool gt15(int x) { return 15 < x; }
int main() {
ofstream ints("someInts.dat");
ints << "1 3 47 5 84 9";
ints.close();
ifstream inf("someInts.dat");
assure(inf, "someInts.dat");
remove_copy_if(istream_iterator<int>(inf),
istream_iterator<int>(),
ostream_iterator<int>(cout,
"\n"), gt15);
} ///:~
The first argument to replace_copy_if( ) in this
program attaches an istream_iterator object to the input file stream
containing ints. The second argument uses the default constructor of the
istream_iterator class. This call constructs a special value of istream_iterator
that indicates end-of-file, so that when the first iterator finally encounters
the end of the physical file, it compares equal to the value istream_iterator<int>( ),
allowing the algorithm to terminate correctly. Note that this example avoids
using an explicit array altogether.
Using a software library is a matter of trust. You trust the
implementers to not only provide correct functionality, but you also hope that
the functions execute as efficiently as possible. It’s better to write your own
loops than to use algorithms that degrade performance.
To guarantee quality library implementations, the C++
Standard not only specifies what an algorithm should do, but how fast it should
do it and sometimes how much space it should use. Any algorithm that does not
meet the performance requirements does not conform to the standard. The measure
of an algorithm’s operational efficiency is called its complexity.
When possible, the standard specifies the exact number of
operation counts an algorithm should use. The count_if( ) algorithm, for example, returns the number of elements in a sequence satisfying a given
predicate. The following call to count_if( ), if applied to a
sequence of integers similar to the examples earlier in this chapter, yields
the number of integer elements that are greater than 15:
size_t n = count_if(a, a + SIZE, gt15);
Since count_if( ) must look at every element
exactly once, it is specified to make a number of comparisons exactly equal to
the number of elements in the sequence. The copy( ) algorithm has
the same specification.
Other algorithms can be specified to take at most a
certain number of operations. The find( ) algorithm searches through a sequence in order until it encounters an element equal to its third
argument:
int* p = find(a, a + SIZE, 20);
It stops as soon as the element is found and returns a pointer
to that first occurrence. If it doesn’t find one, it returns a pointer one
position past the end of the sequence (a+SIZE in this example). So find()
makes at most a number of comparisons equal to the number of elements in the
sequence.
Sometimes the number of operations an algorithm takes cannot
be measured with such precision. In such cases, the standard specifies the
algorithm’s asymptotic complexity, which is a measure of how the
algorithm behaves with large sequences compared to well-known formulas. A good
example is the sort( ) algorithm, which the standard says takes
“approximately n log n comparisons on average” (n is the number
of elements in the sequence). Such
complexity measures give a “feel” for the cost of an algorithm and at least
give a meaningful basis for comparing algorithms. As you’ll see in the next
chapter, the find( ) member function for the set container
has logarithmic complexity, which means that the cost of searching for an
element in a set will, for large sets, be proportional to the logarithm
of the number of elements. This is much smaller than the number of elements for
large n, so it is always better to search a set by using its find( )
member function rather than by using the generic find( ) algorithm.
As you study some of the examples earlier in this chapter,
you will probably notice the limited utility of the function gt15( ).
What if you want to use a number other than 15 as a comparison threshold? You
may need a gt20( ) or gt25( ) or others as well. Having
to write a separate function is time consuming, but also unreasonable because you
must know all required values when you write your application code.
The latter limitation means that you can’t use runtime
values to govern your
searches, which is unacceptable. Overcoming this difficulty requires a way to
pass information to predicates at runtime. For example, you would need a
greater-than function that you can initialize with an arbitrary comparison
value. Unfortunately, you can’t pass that value as a function parameter because
unary predicates, such as our gt15( ), are applied to each value in
a sequence individually and must therefore take only one parameter.
The way out of this dilemma is, as always, to create an
abstraction. Here, we need an abstraction that can act like a function as well
as store state, without disturbing the number of function parameters it accepts
when used. This abstraction is called a function object.
A function object is an instance of a class that overloads operator( ), the function call operator. This operator allows an object to be used with
function call syntax. As with any other object, you can initialize it via its
constructors. Here is a function object that can be used in place of gt15( ):
//: C06:GreaterThanN.cpp
#include <iostream>
using namespace std;
class gt_n {
int value;
public:
gt_n(int val) : value(val) {}
bool operator()(int n) { return n > value; }
};
int main() {
gt_n f(4);
cout << f(3) << endl; // Prints 0 (for
false)
cout << f(5) << endl; // Prints 1 (for
true)
} ///:~
The fixed value to compare against (4) is passed when the
function object f is created. The expression f(3) is then evaluated
by the compiler as the following function call:
which returns the value of the expression 3 > value,
which is false when value is 4, as it is in this example.
Since such comparisons apply to types other than int,
it would make sense to define gt_n( ) as a class template. It turns
out you don’t need to do it yourself, though—the standard library has already
done it for you. The following descriptions of function objects should not only
make that topic clear, but also give you a better understanding of how the
generic algorithms work.
The Standard C++ library classifies a function object based
on the number of arguments its operator( ) takes and the kind of value
it returns. This classification is based on whether a function object’s operator( )
takes zero, one, or two arguments:
Generator: A type of function object that takes no
arguments and returns a value of an arbitrary type. A random number generator
is an example of a generator. The standard library provides one generator, the
function rand( ) declared in <cstdlib>, and has some
algorithms, such as generate_n( ), which apply generators to a
sequence.
Unary Function: A type of function object that takes
a single argument of any type and returns a value that may be of a different
type (which may be void).
Binary Function: A type of function object that takes
two arguments of any two (possibly distinct) types and returns a value of any
type (including void).
Unary Predicate: A Unary Function that returns a bool.
Binary Predicate: A Binary Function that returns a bool.
Strict Weak Ordering: A binary predicate that allows for a more general interpretation of “equality.” Some of the standard containers
consider two elements equivalent if neither is less than the other (using operator<( )).
This is important when comparing floating-point values, and objects of other
types where operator==( ) is unreliable or unavailable. This notion
also applies if you want to sort a sequence of data records (structs) on
a subset of the struct’s fields. That comparison scheme is considered a
strict weak ordering because two records with equal keys are not really “equal”
as total objects, but they are equal as far as the comparison you’re using is
concerned. The importance of this concept will become clearer in the next
chapter.
In addition, certain algorithms make assumptions about the
operations available for the types of objects they process. We will use the
following terms to indicate these assumptions:
LessThanComparable: A class that has a less-than operator<.
Assignable: A class that has a copy-assignment operator=
for its own type.
EqualityComparable: A class that has an equivalence operator== for its own type.
We will use these terms later in this chapter to describe
the generic algorithms in the standard library.
The <functional> header defines a number of useful generic function objects. They are admittedly simple, but you can use them to compose
more complicated function objects. Consequently, in many instances, you can
construct complicated predicates without writing a single function. You do so
by using function object adaptors to take the simple function objects and adapt them for use with other function
objects in a chain of operations.
To illustrate, let’s use only standard function objects to
accomplish what gt15( ) did earlier. The standard function object, greater, is a binary function object that returns true if its first
argument is greater than its second argument. We cannot apply this directly to
a sequence of integers through an algorithm such as remove_copy_if( )
because remove_copy_if( ) expects a unary predicate. We can
construct a unary predicate on the fly that uses greater to compare its
first argument to a fixed value. We fix the value of the second
parameter at 15 using the function object adaptor bind2nd, like this:
//: C06:CopyInts4.cpp
// Uses a standard function object and adaptor.
#include <algorithm>
#include <cstddef>
#include <functional>
#include <iostream>
#include <iterator>
using namespace std;
int main() {
int a[] = { 10, 20, 30 };
const size_t SIZE = sizeof a / sizeof a[0];
remove_copy_if(a, a + SIZE,
ostream_iterator<int>(cout,
"\n"),
bind2nd(greater<int>(), 15));
} ///:~
This program produces the same result as CopyInts3.cpp,
but without writing our own predicate function gt15( ). The
function object adaptor bind2nd( ) is a template function that
creates a function object of type binder2nd, which simply stores the two arguments passed to bind2nd( ), the first of which must be a
binary function or function object (that is, anything that can be called with
two arguments). The operator( ) function in binder2nd, which is itself a unary function, calls the binary function it stored, passing it its
incoming parameter and the fixed value it stored.
To make the explanation concrete for this example, let’s
call the instance of binder2nd created by bind2nd( ) by the
name b. When b is created, it receives two parameters (greater<int>( )
and 15) and stores them. Let’s call the instance of greater<int>
by the name g, and call the instance of the output stream iterator by
the name o. Then the call to remove_copy_if( ) earlier conceptually
becomes the following:
remove_copy_if(a, a + SIZE, o, b(g, 15).operator());
As remove_copy_if( ) iterates through the sequence, it calls b on each element, to determine whether to ignore
the element when copying to the destination. If we denote the current element
by the name e, that call inside remove_copy_if( ) is
equivalent to
but binder2nd’s function call operator just turns
around and calls g(e,15), so the earlier call is the same as
which is the comparison we were seeking. There is also a bind1st( ) adaptor that creates a binder1st object, which fixes the first argument of the associated input binary function.
As another example, let’s count the number of elements in
the sequence not equal to 20. This time we’ll use the algorithm count_if( ),
introduced earlier. There is a standard binary function object, equal_to, and also a function object adaptor, not1( ), that takes a unary function object as a parameter and invert its truth value. The following
program will do the job:
//: C06:CountNotEqual.cpp
// Count elements not equal to 20.
#include <algorithm>
#include <cstddef>
#include <functional>
#include <iostream>
using namespace std;
int main() {
int a[] = { 10, 20, 30 };
const size_t SIZE = sizeof a / sizeof a[0];
cout << count_if(a, a + SIZE,
not1(bind1st(equal_to<int>(),
20)));// 2
} ///:~
As remove_copy_if( ) did in the previous
example, count_if( ) calls the predicate in its third argument (let’s
call it n) for each element of its sequence and increments its internal
counter each time true is returned. If, as before, we call the current
element of the sequence by the name e, the statement
in the implementation of count_if is interpreted as
if(!bind1st(equal_to<int>, 20)(e))
which ends up as
if(!equal_to<int>(20, e))
because not1( ) returns the logical negation of
the result of calling its unary function argument. The first argument to equal_to
is 20 because we used bind1st( ) instead of bind2nd( ).
Since testing for equality is symmetric in its arguments, we could have used
either bind1st( ) or bind2nd( ) in this example.
The following table shows the templates that generate the
standard function objects, along with the kinds of expressions to which they
apply:
|
Name
|
Type
|
Result produced
|
|
plus
|
BinaryFunction
|
arg1 + arg2
|
|
minus
|
BinaryFunction
|
arg1 - arg2
|
|
multiplies
|
BinaryFunction
|
arg1 * arg2
|
|
divides
|
BinaryFunction
|
arg1 / arg2
|
|
modulus
|
BinaryFunction
|
arg1 % arg2
|
|
negate
|
UnaryFunction
|
- arg1
|
|
equal_to
|
BinaryPredicate
|
arg1 == arg2
|
|
not_equal_to
|
BinaryPredicate
|
arg1 != arg2
|
|
greater
|
BinaryPredicate
|
arg1 > arg2
|
|
less
|
BinaryPredicate
|
arg1 < arg2
|
|
greater_equal
|
BinaryPredicate
|
arg1 >= arg2
|
|
less_equal
|
BinaryPredicate
|
arg1 <= arg2
|
|
logical_and
|
BinaryPredicate
|
arg1 && arg2
|
|
Logical_or
|
BinaryPredicate
|
arg1 || arg2
|
|
logical_not
|
UnaryPredicate
|
!arg1
|
|
unary_negate
|
Unary Logical
|
!(UnaryPredicate(arg1))
|
|
binary_negate
|
Binary Logical
|
!(BinaryPredicate(arg1, arg2))
|
Standard function adaptors such as bind1st( )
and bind2nd( ) make some assumptions about the function objects
they process. Consider the following expression from the last line of the
earlier CountNotEqual.cpp program:
not1(bind1st(equal_to<int>(), 20))
The bind1st( ) adaptor creates a unary function
object of type binder1st, which simply stores an instance of equal_to<int>
and the value 20. The binder1st::operator( ) function needs to know
its argument type and its return type; otherwise, it will not have a valid
declaration. The convention to solve this problem is to expect all function
objects to provide nested type definitions for these types. For unary
functions, the type names are argument_type and result_type; for binary function objects they are first_argument_type, second_argument_type, and result_type. Looking at the implementation of bind1st( ) and binder1st
in the <functional> header reveals these expectations. First
inspect bind1st( ), as it might appear in a typical library
implementation:
template<class Op, class T>
binder1st<Op> bind1st(const Op& f, const
T& val) {
typedef typename Op::first_argument_type Arg1_t;
return binder1st<Op>(f, Arg1_t(val));
}
Note that the template parameter, Op, which
represents the type of the binary function being adapted by bind1st( ),
must have a nested type named first_argument_type. (Note also the use of
typename to inform the compiler that it is a member type name, as
explained in Chapter 5.) Now see how binder1st uses the type names in Op
in its declaration of its function call operator:
// Inside the implementation for binder1st<Op>
typename Op::result_type
operator()(const typename Op::second_argument_type&
x)
const;
Function objects whose classes provide these type names are
called adaptable function objects.
Since these names are expected of all standard function
objects as well as of any function objects you create to use with function
object adaptors, the <functional> header provides two templates
that define these types for you: unary_function and binary_function. You simply derive from these classes while filling in the argument types as template
parameters. Suppose, for example, that we want to make the function object gt_n,
defined earlier in this chapter, adaptable. All we need to do is the following:
class gt_n : public unary_function<int, bool> {
int value;
public:
gt_n(int val) : value(val) {}
bool operator()(int n) {
return n > value;
}
};
All unary_function does is to provide the appropriate
type definitions, which it infers from its template parameters as you can see
in its definition:
template<class Arg, class Result> struct
unary_function {
typedef Arg argument_type;
typedef Result result_type;
};
These types become accessible through gt_n because it
derives publicly from unary_function. The binary_function
template behaves in a similar manner.
The following FunctionObjects.cpp example provides
simple tests for most of the built-in basic function object templates. This
way, you can see how to use each template, along with the resulting behavior.
This example uses one of the following generators for convenience:
//: C06:Generators.h
// Different ways to fill sequences.
#ifndef GENERATORS_H
#define GENERATORS_H
#include <cstring>
#include <set>
#include <cstdlib>
// A generator that can skip over numbers:
class SkipGen {
int i;
int skp;
public:
SkipGen(int start = 0, int skip = 1)
: i(start), skp(skip) {}
int operator()() {
int r = i;
i += skp;
return r;
}
};
// Generate unique random numbers from 0 to mod:
class URandGen {
std::set<int> used;
int limit;
public:
URandGen(int lim) : limit(lim) {}
int operator()() {
while(true) {
int i = int(std::rand()) % limit;
if(used.find(i) == used.end()) {
used.insert(i);
return i;
}
}
}
};
// Produces random characters:
class CharGen {
static const char* source;
static const int len;
public:
char operator()() {
return source[std::rand() % len];
}
};
#endif // GENERATORS_H ///:~
//: C06:Generators.cpp {O}
#include "Generators.h"
const char* CharGen::source = "ABCDEFGHIJK"
"LMNOPQRSTUVWXYZabcdefghijklmnopqrstuvwxyz";
const int CharGen::len = std::strlen(source);
///:~
We’ll be using these generating functions in various
examples throughout this chapter. The SkipGen function object returns
the next number of an arithmetic sequence whose common difference is held in
its skp data member. A URandGen object generates a unique random
number in a specified range. (It uses a set container, which we’ll
discuss in the next chapter.) A CharGen object returns a random
alphabetic character. Here is a sample program using UrandGen:
//: C06:FunctionObjects.cpp {-bor}
// Illustrates selected predefined function object
// templates from the Standard C++ library.
//{L} Generators
#include <algorithm>
#include <cstdlib>
#include <ctime>
#include <functional>
#include <iostream>
#include <iterator>
#include <vector>
#include "Generators.h"
#include "PrintSequence.h"
using namespace std;
template<typename Contain, typename UnaryFunc>
void testUnary(Contain& source, Contain& dest,
UnaryFunc f) {
transform(source.begin(), source.end(), dest.begin(),
f);
}
template<typename Contain1, typename Contain2,
typename BinaryFunc>
void testBinary(Contain1& src1, Contain1& src2,
Contain2& dest, BinaryFunc f) {
transform(src1.begin(), src1.end(),
src2.begin(), dest.begin(), f);
}
// Executes the expression, then stringizes the
// expression into the print statement:
#define T(EXPR) EXPR; print(r.begin(), r.end(), \
"After " #EXPR);
// For Boolean tests:
#define B(EXPR) EXPR; print(br.begin(), br.end(), \
"After " #EXPR);
// Boolean random generator:
struct BRand {
bool operator()() { return rand() % 2 == 0; }
};
int main() {
const int SZ = 10;
const int MAX = 50;
vector<int> x(SZ), y(SZ), r(SZ);
// An integer random number generator:
URandGen urg(MAX);
srand(time(0)); // Randomize
generate_n(x.begin(), SZ, urg);
generate_n(y.begin(), SZ, urg);
// Add one to each to guarantee nonzero divide:
transform(y.begin(), y.end(), y.begin(),
bind2nd(plus<int>(), 1));
// Guarantee one pair of elements is ==:
x[0] = y[0];
print(x.begin(), x.end(), "x");
print(y.begin(), y.end(), "y");
// Operate on each element pair of x & y,
// putting the result into r:
T(testBinary(x, y, r, plus<int>()));
T(testBinary(x, y, r, minus<int>()));
T(testBinary(x, y, r, multiplies<int>()));
T(testBinary(x, y, r, divides<int>()));
T(testBinary(x, y, r, modulus<int>()));
T(testUnary(x, r, negate<int>()));
vector<bool> br(SZ); // For Boolean results
B(testBinary(x, y, br, equal_to<int>()));
B(testBinary(x, y, br, not_equal_to<int>()));
B(testBinary(x, y, br, greater<int>()));
B(testBinary(x, y, br, less<int>()));
B(testBinary(x, y, br, greater_equal<int>()));
B(testBinary(x, y, br, less_equal<int>()));
B(testBinary(x, y, br,
not2(greater_equal<int>())));
B(testBinary(x,y,br,not2(less_equal<int>())));
vector<bool> b1(SZ), b2(SZ);
generate_n(b1.begin(), SZ, BRand());
generate_n(b2.begin(), SZ, BRand());
print(b1.begin(), b1.end(), "b1");
print(b2.begin(), b2.end(), "b2");
B(testBinary(b1, b2, br, logical_and<int>()));
B(testBinary(b1, b2, br, logical_or<int>()));
B(testUnary(b1, br, logical_not<int>()));
B(testUnary(b1, br, not1(logical_not<int>())));
} ///:~
This example uses a handy function template, print( ),
which is capable of printing a sequence of any type along with an optional
message. This template appears in the header file PrintSequence.h, and
is explained later in this chapter.
The two template functions automate the process of testing
the various function object templates. There are two because the function
objects are either unary or binary. The testUnary( ) function takes
a source vector, a destination vector, and a unary function
object to apply to the source vector to produce the destination vector.
In testBinary( ), two source vectors are fed to a binary
function to produce the destination vector. In both cases, the template
functions simply turn around and call the transform( ) algorithm,
which applies the unary function or function object found in its fourth
parameter to each sequence element, writing the result to the sequence indicated
by its third parameter, which in this case is the same as the input sequence.
For each test, you want to see a string describing the test,
followed by the results of the test. To automate this, the preprocessor comes
in handy; the T( ) and B( ) macros each take the
expression you want to execute. After evaluating the expression, they pass the
appropriate range to print( ). To produce the message the
expression is “stringized” using the preprocessor. That way you see the code of
the expression that is executed followed by the result vector.
The last little tool, BRand, is a generator object
that creates random bool values. To do this, it gets a random number
from rand( ) and tests to see if it’s greater than (RAND_MAX+1)/2.
If the random numbers are evenly distributed, this should happen half the time.
In main( ), three vectors of int
are created: x and y for source values, and r for results.
To initialize x and y with random values no greater than 50, a
generator of type URandGen from Generators.h is used. The
standard generate_n( ) algorithm populates the sequence specified
in its first argument by invoking its third argument (which must be a
generator) a given number of times (specified in its second argument). Since
there is one operation where elements of x are divided by elements of y,
we must ensure that there are no zero values of y. This is accomplished
by once again using the transform( ) algorithm, taking the source values from y and putting the results back into y. The function
object for this is created with the expression:
This expression uses the plus function object to add
1 to its first argument. As we did earlier in this chapter, we use a binder adaptor
to make this a unary function so it can applied to the sequence by a single
call to transform( ).
Another test in the program compares the elements in the two
vectors for equality, so it is interesting to guarantee that at least
one pair of elements is equivalent; here element zero is chosen.
Once the two vectors are printed, T( )
tests each of the function objects that produces a numeric value, and then B( )
tests each function object that produces a Boolean result. The result is placed
into a vector<bool>, and when this vector is printed, it
produces a ‘1’ for a true value and a ‘0’ for a false value. Here
is the output from an execution of FunctionObjects.cpp:
x:
4 8 18 36 22 6 29 19 25 47
y:
4 14 23 9 11 32 13 15 44 30
After testBinary(x, y, r, plus<int>()):
8 22 41 45 33 38 42 34 69 77
After testBinary(x, y, r, minus<int>()):
0 -6 -5 27 11 -26 16 4 -19 17
After testBinary(x, y, r, multiplies<int>()):
16 112 414 324 242 192 377 285 1100 1410
After testBinary(x, y, r, divides<int>()):
1 0 0 4 2 0 2 1 0 1
After testBinary(x, y, r, limit<int>()):
0 8 18 0 0 6 3 4 25 17
After testUnary(x, r, negate<int>()):
-4 -8 -18 -36 -22 -6 -29 -19 -25 -47
After testBinary(x, y, br, equal_to<int>()):
1 0 0 0 0 0 0 0 0 0
After testBinary(x, y, br, not_equal_to<int>()):
0 1 1 1 1 1 1 1 1 1
After testBinary(x, y, br, greater<int>()):
0 0 0 1 1 0 1 1 0 1
After testBinary(x, y, br, less<int>()):
0 1 1 0 0 1 0 0 1 0
After testBinary(x, y, br, greater_equal<int>()):
1 0 0 1 1 0 1 1 0 1
After testBinary(x, y, br, less_equal<int>()):
1 1 1 0 0 1 0 0 1 0
After testBinary(x, y, br,
not2(greater_equal<int>())):
0 1 1 0 0 1 0 0 1 0
After testBinary(x,y,br,not2(less_equal<int>())):
0 0 0 1 1 0 1 1 0 1
b1:
0 1 1 0 0 0 1 0 1 1
b2:
0 1 1 0 0 0 1 0 1 1
After testBinary(b1, b2, br, logical_and<int>()):
0 1 1 0 0 0 1 0 1 1
After testBinary(b1, b2, br, logical_or<int>()):
0 1 1 0 0 0 1 0 1 1
After testUnary(b1, br, logical_not<int>()):
1 0 0 1 1 1 0 1 0 0
After testUnary(b1, br,
not1(logical_not<int>())):
0 1 1 0 0 0 1 0 1 1
If you want the Boolean values to display as “true” and
“false” instead of 1 and 0, call cout.setf(ios::boolalpha).
A binder doesn’t have to produce a unary predicate;
it can also create any unary function (that is, a function that returns
something other than bool). For example, you can to multiply every
element in a vector by 10 using a binder with the transform( )
algorithm:
//: C06:FBinder.cpp
// Binders aren't limited to producing predicates.
//{L} Generators
#include <algorithm>
#include <cstdlib>
#include <ctime>
#include <functional>
#include <iostream>
#include <iterator>
#include <vector>
#include "Generators.h"
using namespace std;
int main() {
ostream_iterator<int> out(cout," ");
vector<int> v(15);
srand(time(0)); // Randomize
generate(v.begin(), v.end(), URandGen(20));
copy(v.begin(), v.end(), out);
transform(v.begin(), v.end(),
v.begin(),
bind2nd(multiplies<int>(), 10));
copy(v.begin(), v.end(), out);
} ///:~
Since the third argument to transform( ) is the
same as the first, the resulting elements are copied back into the source vector.
The function object created by bind2nd( ) in this case produces an int result.
The “bound” argument to a binder cannot be a function
object, but it does not have to be a compile-time constant. For example:
//: C06:BinderValue.cpp
// The bound argument can vary.
#include <algorithm>
#include <functional>
#include <iostream>
#include <iterator>
#include <cstdlib>
using namespace std;
int boundedRand() { return rand() % 100; }
int main() {
const int SZ = 20;
int a[SZ], b[SZ] = {0};
generate(a, a + SZ, boundedRand);
int val = boundedRand();
int* end = remove_copy_if(a, a + SZ, b,
bind2nd(greater<int>(), val));
// Sort for easier viewing:
sort(a, a + SZ);
sort(b, end);
ostream_iterator<int> out(cout, " ");
cout << "Original Sequence:” << endl;
copy(a, a + SZ, out); cout << endl;
cout << "Values <= " << val
<< endl;
copy(b, end, out); cout << endl;
} ///:~
Here, an array is filled with 20 random numbers between 0
and 100, and the user provides a value on the command line. In the remove_copy_if( ) call, you can see that the bound argument to bind2nd( )
is random number in the same range as the sequence. Here is the output from one
run:
Original Sequence:
4 12 15 17 19 21 26 30 47 48 56 58 60 63 71 79 82 90 92
95
Values <= 41
4 12 15 17 19 21 26 30
Wherever a function-like entity is expected by an algorithm,
you can supply either a pointer to an ordinary function or a function object.
When the algorithm issues a call, if it is through a function pointer, than the
native function-call mechanism is used. If it is through a function object,
then that object’s operator( ) member executes. In CopyInts2.cpp,
we passed the raw function gt15( ) as a predicate to remove_copy_if( ).
We also passed pointers to functions returning random numbers to generate( )
and generate_n( ).
You cannot use raw functions with function object adaptors
such as bind2nd( ) because they assume the existence of type
definitions for the argument and result types. Instead of manually converting
your native functions into function objects yourself, the standard library
provides a family of adaptors to do the work for you. The ptr_fun( ) adaptors take a pointer to a function and turn it into a function
object. They are not designed for a function that takes no arguments—they must
only be used with unary functions or binary functions.
The following program uses ptr_fun( ) to wrap a
unary function:
//: C06:PtrFun1.cpp
// Using ptr_fun() with a unary function.
#include <algorithm>
#include <cmath>
#include <functional>
#include <iostream>
#include <iterator>
#include <vector>
using namespace std;
int d[] = { 123, 94, 10, 314, 315 };
const int DSZ = sizeof d / sizeof *d;
bool isEven(int x) { return x % 2 == 0; }
int main() {
vector<bool> vb;
transform(d, d + DSZ, back_inserter(vb),
not1(ptr_fun(isEven)));
copy(vb.begin(), vb.end(),
ostream_iterator<bool>(cout, " "));
cout << endl;
// Output: 1 0 0 0 1
} ///:~
We can’t simply pass isEven to not1, because not1 needs to know the actual argument type and return type its argument uses. The ptr_fun( )
adaptor deduces those types through template argument deduction. The definition
of the unary version of ptr_fun( ) looks something like this:
template<class Arg, class Result>
pointer_to_unary_function<Arg, Result>
ptr_fun(Result (*fptr)(Arg)) {
return
pointer_to_unary_function<Arg, Result>(fptr);
}
As you can see, this version of ptr_fun( )
deduces the argument and result types from fptr and uses them to
initialize a pointer_to_unary_function object that stores fptr. The function call operator for pointer_to_unary_function just calls fptr, as
you can see by the last line of its code:
template<class Arg, class Result>
class pointer_to_unary_function
: public unary_function<Arg, Result> {
Result (*fptr)(Arg); // Stores the f-ptr
public:
pointer_to_unary_function(Result (*x)(Arg)) : fptr(x)
{}
Result operator()(Arg x) const { return fptr(x); }
};
Since pointer_to_unary_function derives from unary_function, the appropriate type definitions come along for the ride and are available to not1.
There is also a binary version of ptr_fun( ),
which returns a pointer_to_binary_function object (which derives from binary_function) that behaves analogously to the unary case. The following program uses
the binary version of ptr_fun( ) to raise numbers in a sequence to
a power. It also reveals a pitfall when passing overloaded functions to ptr_fun( ).
//: C06:PtrFun2.cpp {-edg}
// Using ptr_fun() for a binary function.
#include <algorithm>
#include <cmath>
#include <functional>
#include <iostream>
#include <iterator>
#include <vector>
using namespace std;
double d[] = { 01.23, 91.370, 56.661,
023.230, 19.959, 1.0, 3.14159 };
const int DSZ = sizeof d / sizeof *d;
int main() {
vector<double> vd;
transform(d, d + DSZ, back_inserter(vd),
bind2nd(ptr_fun<double, double, double>(pow),
2.0));
copy(vd.begin(), vd.end(),
ostream_iterator<double>(cout, "
"));
cout << endl;
} ///:~
The pow( ) function is overloaded in the Standard
C++ header <cmath> for each of the floating-point data types, as
follows:
float pow(float, int); // Efficient int power versions
...
double pow(double, int);
long double pow(long double, int);
float pow(float, float);
double pow(double, double);
long double pow(long double, long double);
Since there are multiple versions of pow( ), the
compiler has no way of knowing which to choose. Here, we have to help the
compiler by using explicit function template specialization, as explained in
the previous chapter.
It’s even trickier to convert a member function into a
function object suitable for using with the generic algorithms. As a simple
example, suppose we have the classical “shape” problem and want to apply the draw( )
member function to each pointer in a container of Shape:
//: C06:MemFun1.cpp
// Applying pointers to member functions.
#include <algorithm>
#include <functional>
#include <iostream>
#include <vector>
#include "../purge.h"
using namespace std;
class Shape {
public:
virtual void draw() = 0;
virtual ~Shape() {}
};
class Circle : public Shape {
public:
virtual void draw() { cout <<
"Circle::Draw()" << endl; }
~Circle() { cout <<
"Circle::~Circle()" << endl; }
};
class Square : public Shape {
public:
virtual void draw() { cout << "Square::Draw()"
<< endl; }
~Square() { cout <<
"Square::~Square()" << endl; }
};
int main() {
vector<Shape*> vs;
vs.push_back(new Circle);
vs.push_back(new Square);
for_each(vs.begin(), vs.end(),
mem_fun(&Shape::draw));
purge(vs);
} ///:~
The for_each( ) algorithm passes each element in a sequence to the function object denoted by its third argument. Here, we want the
function object to wrap one of the member functions of the class itself, and so
the function object’s “argument” becomes the pointer to the object for the
member function call. To produce such a function object, the mem_fun( ) template takes a pointer to a member as its argument.
The mem_fun( ) functions are for producing
function objects that are called using a pointer to the object that the member
function is called for, while mem_fun_ref( ) calls the member function directly for an object. One set of overloads of both mem_fun( )
and mem_fun_ref( ) is for member functions that take zero arguments
and one argument, and this is multiplied by two to handle const vs. non-const
member functions. However, templates and overloading take care of sorting all
that out—all you need to remember is when to use mem_fun( ) vs. mem_fun_ref( ).
Suppose you have a container of objects (not pointers), and
you want to call a member function that takes an argument. The argument you
pass should come from a second container of objects. To accomplish this, use
the second overloaded form of the transform( ) algorithm:
//: C06:MemFun2.cpp
// Calling member functions through an object reference.
#include <algorithm>
#include <functional>
#include <iostream>
#include <iterator>
#include <vector>
using namespace std;
class Angle {
int degrees;
public:
Angle(int deg) : degrees(deg) {}
int mul(int times) { return degrees *= times; }
};
int main() {
vector<Angle> va;
for(int i = 0; i < 50; i += 10)
va.push_back(Angle(i));
int x[] = { 1, 2, 3, 4, 5 };
transform(va.begin(), va.end(), x,
ostream_iterator<int>(cout, " "),
mem_fun_ref(&Angle::mul));
cout << endl;
// Output: 0 20 60 120 200
} ///:~
Because the container is holding objects, mem_fun_ref( )
must be used with the pointer-to-member function. This version of transform( )
takes the start and end point of the first range (where the objects live); the
starting point of the second range, which holds the arguments to the member
function; the destination iterator, which in this case is standard output; and
the function object to call for each object. This function object is created
with mem_fun_ref( ) and the desired pointer to member. Notice that
the transform( ) and for_each( ) template functions are
incomplete; transform( ) requires that the function it calls return
a value, and there is no for_each( ) that passes two arguments to
the function it calls. Thus, you cannot call a member function that returns void
and takes an argument using transform( ) or for_each( ).
Most any member function works with mem_fun_ref( ).
You can also use standard library member functions, if your compiler doesn’t
add any default arguments beyond the normal arguments specified in the standard. For example,
suppose you’d like to read a file and search for blank lines. Your compiler may
allow you to use the string::empty( ) member function like this:
//: C06:FindBlanks.cpp
// Demonstrates mem_fun_ref() with string::empty().
#include <algorithm>
#include <cassert>
#include <cstddef>
#include <fstream>
#include <functional>
#include <string>
#include <vector>
#include "../require.h"
using namespace std;
typedef vector<string>::iterator LSI;
int main(int argc, char* argv[]) {
char* fname = "FindBlanks.cpp";
if(argc > 1) fname = argv[1];
ifstream in(fname);
assure(in, fname);
vector<string> vs;
string s;
while(getline(in, s))
vs.push_back(s);
vector<string> cpy = vs; // For testing
LSI lsi = find_if(vs.begin(), vs.end(),
mem_fun_ref(&string::empty));
while(lsi != vs.end()) {
*lsi = "A BLANK LINE";
lsi = find_if(vs.begin(), vs.end(),
mem_fun_ref(&string::empty));
}
for(size_t i = 0; i < cpy.size(); i++)
if(cpy[i].size() == 0)
assert(vs[i] == "A BLANK LINE");
else
assert(vs[i] != "A BLANK LINE");
} ///:~
This example uses find_if( ) to locate the first
blank line in the given range using mem_fun_ref( ) with string::empty( ).
After the file is opened and read into the vector, the process is
repeated to find every blank line in the file. Each time a blank line is found,
it is replaced with the characters “A BLANK LINE.” All you have to do to
accomplish this is dereference the iterator to select the current string.
Consider how to write a program that converts strings
representing floating-point numbers to their actual numeric values. To get
things started, here’s a generator that creates the strings:
//: C06:NumStringGen.h
// A random number generator that produces
// strings representing floating-point numbers.
#ifndef NUMSTRINGGEN_H
#define NUMSTRINGGEN_H
#include <cstdlib>
#include <string>
class NumStringGen {
const int sz; // Number of digits to make
public:
NumStringGen(int ssz = 5) : sz(ssz) {}
std::string operator()() {
std::string digits("0123456789");
const int ndigits = digits.size();
std::string r(sz, ' ');
// Don't want a zero as the first digit
r[0] = digits[std::rand() % (ndigits - 1)] + 1;
// Now assign the rest
for(int i = 1; i < sz; ++i)
if(sz >= 3 && i
== sz/2)
r[i] = '.'; // Insert a decimal point
else
r[i] = digits[std::rand() % ndigits];
return r;
}
};
#endif // NUMSTRINGGEN_H ///:~
You tell it how big the strings should be when you create
the NumStringGen object. The random number generator selects digits, and
a decimal point is placed in the middle.
The following program uses NumStringGen to fill a vector<string>.
However, to use the standard C library function atof( ) to convert
the strings to floating-point numbers, the string objects must first be
turned into char pointers, since there is no automatic type conversion
from string to char*. The transform( ) algorithm can
be used with mem_fun_ref( ) and string::c_str( ) to
convert all the strings to char*, and then these can be
transformed using atof.
//: C06:MemFun3.cpp
// Using mem_fun().
#include <algorithm>
#include <cstdlib>
#include <ctime>
#include <functional>
#include <iostream>
#include <iterator>
#include <string>
#include <vector>
#include "NumStringGen.h"
using namespace std;
int main() {
const int SZ = 9;
vector<string> vs(SZ);
// Fill it with random number strings:
srand(time(0)); // Randomize
generate(vs.begin(), vs.end(), NumStringGen());
copy(vs.begin(), vs.end(),
ostream_iterator<string>(cout,
"\t"));
cout << endl;
const char* vcp[SZ];
transform(vs.begin(), vs.end(), vcp,
mem_fun_ref(&string::c_str));
vector<double> vd;
transform(vcp, vcp + SZ, back_inserter(vd),
std::atof);
cout.precision(4);
cout.setf(ios::showpoint);
copy(vd.begin(), vd.end(),
ostream_iterator<double>(cout,
"\t"));
cout << endl;
} ///:~
This program does two transformations: one to convert
strings to C-style strings (arrays of characters), and one to convert the
C-style strings to numbers via atof( ). It would be nice to combine
these two operations into one. After all, we can compose functions in
mathematics, so why not C++?
The obvious approach takes the two functions as arguments
and applies them in the proper order:
//: C06:ComposeTry.cpp
// A first attempt at implementing function composition.
#include <cassert>
#include <cstdlib>
#include <functional>
#include <iostream>
#include <string>
using namespace std;
template<typename R, typename E, typename F1,
typename F2>
class unary_composer {
F1 f1;
F2 f2;
public:
unary_composer(F1 fone, F2 ftwo) : f1(fone), f2(ftwo)
{}
R operator()(E x) { return f1(f2(x)); }
};
template<typename R, typename E, typename F1,
typename F2>
unary_composer<R, E, F1, F2> compose(F1 f1, F2
f2) {
return unary_composer<R, E, F1, F2>(f1, f2);
}
int main() {
double x = compose<double, const string&>(
atof,
mem_fun_ref(&string::c_str))("12.34");
assert(x == 12.34);
} ///:~
The unary_composer object in this example stores the function pointers atof and string::c_str such that the latter
function is applied first when its operator( ) is called. The compose( ) function adaptor is a convenience, so we don’t need to supply all
four template arguments explicitly—F1 and F2 are deduced from the
call.
It would be much better if we didn’t need to supply any
template arguments. This is achieved by adhering to the convention for type
definitions for adaptable function objects. In other words, we will assume that
the functions to be composed are adaptable. This requires that we use ptr_fun( )
for atof( ). For maximum flexibility, we also make unary_composer
adaptable in case it gets passed to a function adaptor. The following program
does so and easily solves the original problem:
//: C06:ComposeFinal.cpp {-edg}
// An adaptable composer.
#include <algorithm>
#include <cassert>
#include <cstdlib>
#include <functional>
#include <iostream>
#include <iterator>
#include <string>
#include <vector>
#include "NumStringGen.h"
using namespace std;
template<typename F1, typename F2> class
unary_composer
: public unary_function<typename F2::argument_type,
typename F1::result_type> {
F1 f1;
F2 f2;
public:
unary_composer(F1 f1, F2 f2) : f1(f1), f2(f2) {}
typename F1::result_type
operator()(typename F2::argument_type x) {
return f1(f2(x));
}
};
template<typename F1, typename F2>
unary_composer<F1, F2> compose(F1 f1, F2 f2) {
return unary_composer<F1, F2>(f1, f2);
}
int main() {
const int SZ = 9;
vector<string> vs(SZ);
// Fill it with random number strings:
generate(vs.begin(), vs.end(), NumStringGen());
copy(vs.begin(), vs.end(),
ostream_iterator<string>(cout,
"\t"));
cout << endl;
vector<double> vd;
transform(vs.begin(), vs.end(), back_inserter(vd),
compose(ptr_fun(atof),
mem_fun_ref(&string::c_str)));
copy(vd.begin(), vd.end(),
ostream_iterator<double>(cout,
"\t"));
cout << endl;
} ///:~
Once again we must use typename to let the compiler
know that the member we are referring to is a nested type.
Some implementations support
composition of function objects as an extension, and the C++ Standards Committee
is likely to add these capabilities to the next version of Standard C++.
This section provides a quick reference when you’re
searching for the appropriate algorithm. We leave the full exploration of all
the STL algorithms to other references (see the end of this chapter, and
Appendix A), along with the more intimate details of issues like performance.
Our goal here is for you to rapidly become comfortable with the algorithms, and
we’ll assume you will look into the more specialized references if you need
more detail.
Although you will often see the algorithms described using
their full template declaration syntax, we’re not doing that here because you
already know they are templates, and it’s quite easy to see what the template
arguments are from the function declarations. The type names for the arguments
provide descriptions for the types of iterators required. We think you’ll find
this form is easier to read, and you can quickly find the full declaration in
the template header file if you need it.
The reason for all the fuss about iterators is to
accommodate any type of container that meets the requirements in the standard
library. So far we have illustrated the generic algorithms with only arrays and
vectors as sequences, but in the next chapter you’ll see a broad range
of data structures that support less robust iteration. For this reason, the
algorithms are categorized in part by the types of iteration facilities they
require.
The names of the iterator classes describe the iterator type
to which they must conform. There are no interface base classes to enforce
these iteration operations—they are just expected to be there. If they are not,
your compiler will complain. The various flavors of iterators are described
briefly as follows.
InputIterator. An input iterator only allows reading
elements of its sequence in a single, forward pass using operator++ and operator*.
Input iterators can also be tested with operator== and operator!=.
That’s the extent of the constraints.
OutputIterator. An output iterator only allows
writing elements to a sequence in a single, forward pass using operator++
and operator*. OutputIterators cannot be tested with operator==
and operator!=, however, because you assume that you can just keep
sending elements to the destination and that you don’t need to see if the destination’s
end marker was reached. That is, the container that an OutputIterator
references can take an infinite number of objects, so no end-checking is
necessary. This requirement is important so that an OutputIterator can
be used with ostreams (via ostream_iterator), but you’ll also
commonly use the “insert” iterators such as are the type of iterator returned
by back_inserter( )).
There is no way to determine whether multiple InputIterators
or OutputIterators point within the same range, so there is no way to use
such iterators together. Just think in terms of iterators to support istreams
and ostreams, and InputIterator and OutputIterator will
make perfect sense. Also note that algorithms that use InputIterators or
OutputIterators put the weakest restrictions on the types of iterators
they will accept, which means that you can use any “more sophisticated” type of
iterator when you see InputIterator or OutputIterator used as STL
algorithm template arguments.
ForwardIterator. Because you can only read from an InputIterator and write to an OutputIterator, you can’t use either of
them to simultaneously read and modify a range, and you can’t dereference such
an iterator more than once. With a ForwardIterator these restrictions
are relaxed; you can still only move forward using operator++, but you
can both write and read, and you can compare such iterators in the same range
for equality. Since forward iterators can both read and write, they can be used
in place of an InputIterator or OutputIterator.
BidirectionalIterator. Effectively, this is a ForwardIterator that can also go backward. That is, a BidirectionalIterator
supports all the operations that a ForwardIterator does, but in addition
it has an operator--.
RandomAccessIterator. This type of iterator supports all the operations that a regular pointer does: you can add and subtract integral values to
move it forward and backward by jumps (rather than just one element at a time),
you can subscript it with operator[ ], you can subtract one
iterator from another, and you can compare iterators to see which is greater
using operator<, operator>, and so on. If you’re
implementing a sorting routine or something similar, random access iterators
are necessary to be able to create an efficient algorithm.
The names used for the template parameter types in the
algorithm descriptions later in this chapter consist of the listed iterator
types (sometimes with a ‘1’ or ‘2’ appended to distinguish different template
arguments) and can also include other arguments, often function objects.
When describing the group of elements passed to an
operation, mathematical “range” notation is often used. In this, the square
bracket means “includes the end point,” and the parenthesis means “does not
include the end point.” When using iterators, a range is determined by the
iterator pointing to the initial element and by the “past-the-end” iterator,
pointing past the last element. Since the past-the-end element is never used,
the range determined by a pair of iterators can be expressed as [first,
last), where first is the iterator pointing to the initial element,
and last is the past-the-end iterator.
Most books and discussions of the STL algorithms arrange
them according to side-effects: non-mutating algorithms don’t change the
elements in the range, mutating algorithms do change the elements, and
so on. These descriptions are based primarily on the underlying behavior or
implementation of the algorithm—that is, on the designer’s perspective. In
practice, we don’t find this a useful categorization, so instead we’ll organize
them according to the problem you want to solve: Are you searching for an
element or set of elements, performing an operation on each element, counting
elements, replacing elements, and so on? This should help you find the
algorithm you want more easily.
If you do not see a different header such as <utility>
or <numeric> above the function declarations, it appears in <algorithm>.
Also, all the algorithms are in the namespace std.
It’s useful to create some basic tools to test the
algorithms. In the examples that follow we’ll use the generators mentioned
earlier in Generators.h, as well as what appears below.
Displaying a range is a frequent task, so here is a function
template to print any sequence, regardless of the type contained in that
sequence:
//:
C06:PrintSequence.h
// Prints
the contents of any sequence.
#ifndef
PRINTSEQUENCE_H
#define
PRINTSEQUENCE_H
#include
<algorithm>
#include
<iostream>
#include
<iterator>
template<typename
Iter>
void
print(Iter first, Iter last, const char* nm = "",
const char* sep = "\n",
std::ostream& os = std::cout) {
if(nm != 0
&& *nm != '\0')
os
<< nm << ": " << sep;
typedef
typename
std::iterator_traits<Iter>::value_type T;
std::copy(first, last,
std::ostream_iterator<T>(std::cout, sep));
os
<< std::endl;
}
#endif //
PRINTSEQUENCE_H ///:~
By default this function template prints to cout with
newlines as separators, but you can change that by modifying the default
argument. You can also provide a message to print at the head of the output.
Since print( ) uses the copy( ) algorithm to send objects to cout via an ostream_iterator, the ostream_iterator must know
the type of object it is printing, which we infer from the value_type
member of the iterator passed.
The std::iterator_traits template enables the print( )
function template to process sequences delimited by any type of iterator. The
iterator types returned by the standard containers such as vector define
a nested type, value_type, which represents the element type, but when
using arrays, the iterators are just pointers, which can have no nested types.
To supply the conventional types associated with iterators in the standard
library, std::iterator_traits provides the following partial
specialization for pointer types:
template<class T>
struct iterator_traits<T*> {
typedef random_access_iterator_tag
iterator_category;
typedef T value_type;
typedef ptrdiff_t difference_type;
typedef T* pointer;
typedef T& reference;
};
This makes the type of the elements pointed at (namely, T)
available via the type name value_type.
Stable vs. unstable reordering
A number of the STL algorithms that move elements of a sequence
around distinguish between stable and unstable reordering of a sequence. A stable sort preserves the original relative order of
the elements that are equivalent as far as the comparison function is
concerned. For example, consider a sequence { c(1), b(1), c(2), a(1), b(2),
a(2) }. These elements are tested for equivalence based on their letters,
but their numbers indicate how they first appeared in the sequence. If you sort
(for example) this sequence using an unstable sort, there’s no guarantee of any
particular order among equivalent letters, so you could end up with { a(2),
a(1), b(1), b(2), c(2), c(1) }. However, if you use a stable sort, you will
get { a(1), a(2), b(1), b(2), c(1), c(2) }. The STL sort( )
algorithm uses a variation of quicksort and is thus unstable, but a stable_sort( ) is also provided.
To demonstrate the stability versus instability of
algorithms that reorder a sequence, we need some way to keep track of how the
elements originally appeared. The following is a kind of string object
that keeps track of the order in which that particular object originally
appeared, using a static map that maps NStrings to Counters.
Each NString then contains an occurrence field that indicates the
order in which this NString was discovered.
//: C06:NString.h
// A "numbered string" that keeps track of
the
// number of occurrences of the word it contains.
#ifndef NSTRING_H
#define NSTRING_H
#include <algorithm>
#include <iostream>
#include <string>
#include <utility>
#include <vector>
typedef std::pair<std::string, int> psi;
// Only compare on the first element
bool operator==(const psi& l, const psi& r) {
return l.first == r.first;
}
class NString {
std::string s;
int thisOccurrence;
// Keep track of the number of occurrences:
typedef std::vector<psi> vp;
typedef vp::iterator vpit;
static vp words;
void addString(const std::string& x) {
psi p(x, 0);
vpit it = std::find(words.begin(), words.end(), p);
if(it != words.end())
thisOccurrence = ++it->second;
else {
thisOccurrence = 0;
words.push_back(p);
}
}
public:
NString() : thisOccurrence(0) {}
NString(const std::string& x) : s(x) {
addString(x); }
NString(const char* x) : s(x) { addString(x); }
// Implicit operator= and copy-constructor are OK
here.
friend std::ostream& operator<<(
std::ostream& os, const NString& ns) {
return os << ns.s << " ["
<< ns.thisOccurrence << "]";
}
// Need this for sorting. Notice it only
// compares strings, not occurrences:
friend bool
operator<(const NString& l, const NString&
r) {
return l.s < r.s;
}
friend
bool operator==(const NString& l, const
NString& r) {
return l.s == r.s;
}
// For sorting with greater<NString>:
friend bool
operator>(const NString& l, const NString&
r) {
return l.s > r.s;
}
// To get at the string directly:
operator const std::string&() const { return s; }
};
// Because NString::vp is a template and we are using
the
// inclusion model, it must be defined in this header
file:
NString::vp NString::words;
#endif // NSTRING_H ///:~
We would normally use a map container to associate a string
with its number of occurrences, but maps don’t appear until the next chapter,
so we use a vector of pairs instead. You’ll see plenty of similar
examples in Chapter 7.
The only operator necessary to perform an ordinary ascending
sort is NString::operator<( ). To sort in reverse order, the operator>( )
is also provided so that the greater template can call it.
These algorithms let you automatically fill a range with a
particular value or generate a set of values for a particular range. The “fill”
functions insert a single value multiple times into the container. The “generate”
functions use generators such as those described earlier to produce values to
insert into the container.
void fill(ForwardIterator
first, ForwardIterator last,
const T& value);
void fill_n(OutputIterator first, Size n, const T& value);
fill( ) assigns value to every
element in the range [first, last). fill_n( ) assigns value
to n elements starting at first.
void generate(ForwardIterator
first, ForwardIterator last,
Generator gen);
void generate_n(OutputIterator first, Size n, Generator
gen);
generate( ) makes a call to gen( )
for each element in the range [first, last), presumably to
produce a different value for each element. generate_n( ) calls gen( )
n times and assigns each result to n elements starting at first.
Example
The following example fills and generates into vectors.
It also shows the use of print( ):
//: C06:FillGenerateTest.cpp
// Demonstrates "fill" and "generate."
//{L} Generators
#include <vector>
#include <algorithm>
#include <string>
#include "Generators.h"
#include "PrintSequence.h"
using namespace std;
int main() {
vector<string> v1(5);
fill(v1.begin(), v1.end(), "howdy");
print(v1.begin(), v1.end(), "v1", "
");
vector<string> v2;
fill_n(back_inserter(v2), 7, "bye");
print(v2.begin(), v2.end(), "v2");
vector<int> v3(10);
generate(v3.begin(), v3.end(), SkipGen(4,5));
print(v3.begin(), v3.end(), "v3", "
");
vector<int> v4;
generate_n(back_inserter(v4),15, URandGen(30));
print(v4.begin(), v4.end(), "v4", "
");
} ///:~
A vector<string> is created with a predefined
size. Since storage has already been created for all the string objects
in the vector, fill( ) can use its assignment operator to
assign a copy of “howdy” to each space in the vector. Also, the default
newline separator is replaced with a space.
The second vector<string> v2 is not given an
initial size, so back_inserter( ) must be used to force new elements in instead of trying to assign to existing locations.
The generate( ) and generate_n( )
functions have the same form as the “fill” functions except that they use a
generator instead of a constant value. Here, both generators are demonstrated.
All containers have a member function size( )
that tells you how many elements they hold. The return type of size( )
is the iterator’s difference_type (usually
ptrdiff_t), which we denote by IntegralValue in the following.
The following two algorithms count objects that satisfy certain criteria.
IntegralValue count(InputIterator
first, InputIterator
last, const EqualityComparable& value);
Produces the number of elements in [first, last) that
are equivalent to value (when tested using operator==).
IntegralValue count_if(InputIterator
first, InputIterator
last, Predicate pred);
Produces the number of elements in [first, last)
that each cause pred to return true.
Example
Here, a vector<char> v is filled with
random characters (including some duplicates). A set<char> is
initialized from v, so it holds only one of each letter represented in v.
This set counts all the instances of all the characters, which are then
displayed:
//: C06:Counting.cpp
// The counting algorithms.
//{L} Generators
#include <algorithm>
#include <functional>
#include <iterator>
#include <set>
#include <vector>
#include "Generators.h"
#include "PrintSequence.h"
using namespace std;
int main() {
vector<char> v;
generate_n(back_inserter(v), 50, CharGen());
print(v.begin(), v.end(), "v",
"");
// Create a set of the characters in v:
set<char> cs(v.begin(), v.end());
typedef set<char>::iterator sci;
for(sci it = cs.begin(); it != cs.end(); it++) {
int n = count(v.begin(), v.end(), *it);
cout << *it << ": " <<
n << ", ";
}
int lc = count_if(v.begin(), v.end(),
bind2nd(greater<char>(), 'a'));
cout << "\nLowercase letters: "
<< lc << endl;
sort(v.begin(), v.end());
print(v.begin(), v.end(), "sorted",
"");
} ///:~
The count_if( ) algorithm is demonstrated by
counting all the lowercase letters; the predicate is created using the bind2nd( ) and greater function object templates.
These algorithms let you move sequences around.
OutputIterator copy(InputIterator
first, InputIterator
last, OutputIterator destination);
Using assignment, copies from [first, last) to destination,
incrementing destination after each assignment. This is essentially a
“shuffle-left” operation, and so the source sequence must not contain the
destination. Because assignment is used, you cannot directly insert elements
into an empty container or at the end of a container, but instead you must wrap
the destination iterator in an insert_iterator (typically by using back_inserter( ) or by using inserter( ) in the case of an associative container).
BidirectionalIterator2 copy_backward(BidirectionalIterator1
first, BidirectionalIterator1 last,
BidirectionalIterator2 destinationEnd);
Like copy( ), but copies the elements in reverse
order. This is essentially a “shuffle-right” operation, and, like copy( ),
the source sequence must not contain the destination. The source range [first,
last) is copied to the destination, but the first destination element is destinationEnd
- 1. This iterator is then decremented after each assignment. The space in
the destination range must already exist (to allow assignment), and the
destination range cannot be within the source range.
void reverse(BidirectionalIterator
first,
BidirectionalIterator last);
OutputIterator reverse_copy(BidirectionalIterator first,
BidirectionalIterator last, OutputIterator destination);
Both forms of this function reverse the range [first,
last). reverse( ) reverses the range in place, and reverse_copy( ) leaves the original range alone and copies the reversed elements
into destination, returning the past-the-end iterator of the resulting
range.
ForwardIterator2 swap_ranges(ForwardIterator1
first1,
ForwardIterator1 last1, ForwardIterator2 first2);
Exchanges the contents of two ranges of equal size by
swapping corresponding elements.
void rotate(ForwardIterator
first, ForwardIterator middle,
ForwardIterator last);
OutputIterator rotate_copy(ForwardIterator first,
ForwardIterator middle, ForwardIterator last,
OutputIterator destination);
Moves the contents of [first, middle) to the end of
the sequence, and the contents of [middle, last) to the beginning. With rotate( ),
the swap is performed in place; and with rotate_copy( ) the original range is untouched, and the rotated version is copied into destination,
returning the past-the-end iterator of the resulting range. Note that while swap_ranges( )
requires that the two ranges be exactly the same size, the “rotate” functions do
not.
bool next_permutation(BidirectionalIterator
first,
BidirectionalIterator last);
bool next_permutation(BidirectionalIterator first,
BidirectionalIterator last, StrictWeakOrdering
binary_pred);
bool prev_permutation(BidirectionalIterator first,
BidirectionalIterator last);
bool prev_permutation(BidirectionalIterator first,
BidirectionalIterator last, StrictWeakOrdering
binary_pred);
A permutation is one unique ordering of a set of
elements. If you have n unique elements, there are n! (n
factorial) distinct possible combinations of those elements. All these
combinations can be conceptually sorted into a sequence using a lexicographical
(dictionary-like) ordering and thus produce a concept of a “next” and
“previous” permutation. So whatever the current ordering of elements in the
range, there is a distinct “next” and “previous” permutation in the sequence of
permutations.
The next_permutation( ) and prev_permutation( ) functions rearrange the elements into their next or previous
permutation and, if successful, return true. If there are no more “next”
permutations, the elements are in sorted order so next_permutation( )
returns false. If there are no more “previous” permutations, the
elements are in descending sorted order so previous_permutation( )
returns false.
The versions of the functions that have a StrictWeakOrdering argument perform the comparisons using binary_pred instead of operator<.
void random_shuffle(RandomAccessIterator
first,
RandomAccessIterator last);
void random_shuffle(RandomAccessIterator first,
RandomAccessIterator last RandomNumberGenerator& rand);
This function randomly rearranges the elements in the range.
It yields uniformly distributed results if the random-number generator does.
The first form uses an internal random number generator, and the second uses a
user-supplied random-number generator. The generator must return a value in the
range [0, n) for some positive n.
BidirectionalIterator partition(BidirectionalIterator
first, BidirectionalIterator last, Predicate pred);
BidirectionalIterator stable_partition(BidirectionalIterator first,
BidirectionalIterator last, Predicate pred);
The “partition” functions move elements that satisfy pred
to the beginning of the sequence. An iterator pointing one past the last of
those elements is returned (which is, in effect, an “end” iterator” for the
initial subsequence of elements that satisfy pred). This location is
often called the “partition point.”
With partition( ), the order of the elements in each resulting subsequence after the function call is not specified, but with
stable_partition( ), the relative order of the elements
before and after the partition point will be the same as before the
partitioning process.
Example
This gives a basic demonstration of sequence manipulation:
//: C06:Manipulations.cpp
// Shows basic manipulations.
//{L} Generators
// NString
#include <vector>
#include <string>
#include <algorithm>
#include "PrintSequence.h"
#include "NString.h"
#include "Generators.h"
using namespace std;
int main() {
vector<int> v1(10);
// Simple counting:
generate(v1.begin(), v1.end(), SkipGen());
print(v1.begin(), v1.end(), "v1", "
");
vector<int> v2(v1.size());
copy_backward(v1.begin(), v1.end(), v2.end());
print(v2.begin(), v2.end(),
"copy_backward", " ");
reverse_copy(v1.begin(), v1.end(), v2.begin());
print(v2.begin(), v2.end(), "reverse_copy",
" ");
reverse(v1.begin(), v1.end());
print(v1.begin(), v1.end(), "reverse",
" ");
int half = v1.size() / 2;
// Ranges must be exactly the same size:
swap_ranges(v1.begin(), v1.begin() + half,
v1.begin() + half);
print(v1.begin(), v1.end(), "swap_ranges",
" ");
// Start with a fresh sequence:
generate(v1.begin(), v1.end(), SkipGen());
print(v1.begin(), v1.end(), "v1", "
");
int third = v1.size() / 3;
for(int i = 0; i < 10; i++) {
rotate(v1.begin(), v1.begin() + third, v1.end());
print(v1.begin(), v1.end(), "rotate",
" ");
}
cout << "Second rotate example:"
<< endl;
char c[] = "aabbccddeeffgghhiijj";
const char CSZ = strlen(c);
for(int i = 0; i < 10; i++) {
rotate(c, c + 2, c + CSZ);
print(c, c + CSZ, "", "");
}
cout << "All n! permutations of abcd:"
<< endl;
int nf = 4 * 3 * 2 * 1;
char p[] = "abcd";
for(int i = 0; i < nf; i++) {
next_permutation(p, p + 4);
print(p, p + 4, "", "");
}
cout << "Using prev_permutation:"
<< endl;
for(int i = 0; i < nf; i++) {
prev_permutation(p, p + 4);
print(p, p + 4, "", "");
}
cout << "random_shuffling a word:"
<< endl;
string s("hello");
cout << s << endl;
for(int i = 0; i < 5; i++) {
random_shuffle(s.begin(), s.end());
cout << s << endl;
}
NString sa[] = { "a", "b",
"c", "d", "a", "b",
"c", "d", "a",
"b", "c", "d", "a", "b",
"c"};
const int SASZ = sizeof sa / sizeof *sa;
vector<NString> ns(sa, sa + SASZ);
print(ns.begin(), ns.end(),
"ns", " ");
vector<NString>::iterator it =
partition(ns.begin(), ns.end(),
bind2nd(greater<NString>(),
"b"));
cout << "Partition point: " <<
*it << endl;
print(ns.begin(), ns.end(), "", "
");
// Reload vector:
copy(sa, sa + SASZ, ns.begin());
it = stable_partition(ns.begin(), ns.end(),
bind2nd(greater<NString>(), "b"));
cout << "Stable partition" <<
endl;
cout << "Partition point: " <<
*it << endl;
print(ns.begin(), ns.end(), "", "
");
} ///:~
The best way to see the results of this program is to run
it. (You’ll probably want to redirect the output to a file.)
The vector<int> v1 is initially loaded with a
simple ascending sequence and printed. You’ll see that the effect of copy_backward( )
(which copies into v2, which is the same size as v1) is the same
as an ordinary copy. Again, copy_backward( ) does the same thing as
copy( )—it just performs the operations in reverse order.
reverse_copy( ) actually does create a reversed
copy, and reverse( ) performs the reversal in place. Next, swap_ranges( )
swaps the upper half of the reversed sequence with the lower half. The ranges
could be smaller subsets of the entire vector, as long as they are of
equivalent size.
After re-creating the ascending sequence, rotate( )
is demonstrated by rotating one third of v1 multiple times. A second rotate( )
example uses characters and just rotates two characters at a time. This also
demonstrates the flexibility of both the STL algorithms and the print( )
template, since they can both be used with arrays of char as easily as
with anything else.
To demonstrate next_permutation( ) and prev_permutation( ),
a set of four characters “abcd” is permuted through all n! (n
factorial) possible combinations. You’ll see from the output that the
permutations move through a strictly defined order (that is, permuting is a
deterministic process).
A quick-and-dirty demonstration of random_shuffle( )
is to apply it to a string and see what words result. Because a string
object has begin( ) and end( ) member functions that
return the appropriate iterators, it too can be easily used with many of the
STL algorithms. An array of char could also have been used.
Finally, the partition( ) and stable_partition( )
are demonstrated, using an array of NString. You’ll note that the
aggregate initialization expression uses char arrays, but NString
has a char* constructor that is automatically used.
You’ll see from the output that with the unstable partition,
the objects are correctly above and below the partition point, but in no
particular order; whereas with the stable partition, their original order is maintained.
All these algorithms are used for searching for one or more
objects within a range defined by the first two iterator arguments.
InputIterator find(InputIterator
first, InputIterator last,
const EqualityComparable& value);
Searches for value within a range of elements.
Returns an iterator in the range [first, last) that points to the first
occurrence of value. If value isn’t in the range, find( ) returns last. This is a linear search; that is, it starts at the beginning and looks at each sequential element without making any
assumptions about the way the elements are ordered. In contrast, a binary_search( )
(defined later) works on a sorted sequence and can thus be much faster.
InputIterator find_if(InputIterator
first, InputIterator
last, Predicate pred);
Just like find( ), find_if( ) performs a linear search through the range. However, instead of searching for value,
find_if( ) looks for an element such that the Predicate pred
returns true when applied to that element. Returns last if no
such element can be found.
ForwardIterator adjacent_find(ForwardIterator first,
ForwardIterator last);
ForwardIterator adjacent_find(ForwardIterator first,
ForwardIterator last, BinaryPredicate binary_pred);
Like find( ), performs a linear search through
the range, but instead of looking for only one element, it searches for two
adjacent elements that are equivalent. The first form of the function looks for
two elements that are equivalent (via operator==). The second form looks
for two adjacent elements that, when passed together to binary_pred,
produce a true result. An iterator to the first of the two elements is
returned if a pair is found; otherwise, last is returned.
ForwardIterator1 find_first_of(ForwardIterator1 first1,
ForwardIterator1 last1, ForwardIterator2 first2,
ForwardIterator2 last2);
ForwardIterator1 find_first_of(ForwardIterator1 first1,
ForwardIterator1 last1, ForwardIterator2 first2,
ForwardIterator2 last2, BinaryPredicate binary_pred);
Like find( ), performs a linear search through
the range. Both forms search for an element in the second range that’s
equivalent to one in the first, the first form using operator==, and the
second using the supplied predicate. In the second form, the current element
from the first range becomes the first argument to binary_pred, and the
element from the second range becomes the second argument.
ForwardIterator1 search(ForwardIterator1 first1,
ForwardIterator1 last1, ForwardIterator2 first2,
ForwardIterator2 last2);
ForwardIterator1 search(ForwardIterator1 first1,
ForwardIterator1 last1, ForwardIterator2 first2,
ForwardIterator2 last2 BinaryPredicate binary_pred);
Checks to see if the second range occurs (in the exact order
of the second range) within the first range, and if so returns an iterator
pointing to the place in the first range where the second range begins. Returns
last1 if no subset can be found. The first form performs its test using operator==,
and the second checks to see if each pair of objects being compared causes binary_pred
to return true.
ForwardIterator1 find_end(ForwardIterator1 first1,
ForwardIterator1 last1, ForwardIterator2 first2,
ForwardIterator2 last2);
ForwardIterator1 find_end(ForwardIterator1 first1,
ForwardIterator1 last1, ForwardIterator2 first2,
ForwardIterator2 last2, BinaryPredicate binary_pred);
The forms and arguments are just like search( )
in that they look for the second range appearing as a subset of the first
range, but while search( ) looks for the first occurrence of the
subset, find_end( ) looks for the last occurrence and
returns an iterator to its first element.
ForwardIterator search_n(ForwardIterator first,
ForwardIterator last, Size count, const T& value);
ForwardIterator search_n(ForwardIterator first,
ForwardIterator last, Size count, const T& value,
BinaryPredicate binary_pred);
Looks for a group of count consecutive values in [first,
last) that are all equal to value (in the first form) or that all
cause a return value of true when passed into binary_pred along
with value (in the second form). Returns last if such a group
cannot be found.
ForwardIterator min_element(ForwardIterator first,
ForwardIterator last);
ForwardIterator min_element(ForwardIterator first,
ForwardIterator last, BinaryPredicate binary_pred);
Returns an iterator pointing to the first occurrence of the
“smallest” value in the range (as explained below—there may be multiple
occurrences of this value.) Returns last if the range is empty. The first
version performs comparisons with operator<, and the value r returned
is such that *e < *r is false for every element e in the range
[first, r). The second version compares using binary_pred, and
the value r returned is such that binary_pred(*e, *r) is false
for every element e in the range [first, r).
ForwardIterator max_element(ForwardIterator first,
ForwardIterator last);
ForwardIterator max_element(ForwardIterator first,
ForwardIterator last, BinaryPredicate binary_pred);
Returns an iterator pointing to the first occurrence of the
largest value in the range. (There may be multiple occurrences of the largest
value.) Returns last if the range is empty. The first version performs
comparisons with operator<, and the value r returned is such
that *r < *e is false for every element e in the range [first,
r). The second version compares using binary_pred, and the value r
returned is such that binary_pred(*r, *e) is false for every element e
in the range [first, r).
void replace(ForwardIterator first, ForwardIterator last,
const T& old_value, const T& new_value);
void replace_if(ForwardIterator first, ForwardIterator
last, Predicate pred, const T& new_value);
OutputIterator replace_copy(InputIterator first,
InputIterator last, OutputIterator result, const T&
old_value, const T& new_value);
OutputIterator replace_copy_if(InputIterator first,
InputIterator last, OutputIterator result, Predicate
pred, const T& new_value);
Each of the “replace” forms moves through the range [first,
last), finding values that match a criterion and replacing them with new_value.
Both replace( ) and replace_copy( ) simply look for old_value
to replace; replace_if( ) and replace_copy_if( ) look
for values that satisfy the predicate pred. The “copy” versions of the
functions do not modify the original range but instead make a copy with the
replacements into result (incrementing result after each
assignment).
Example
To provide easy viewing of the results, this example manipulates
vectors of int. Again, not every possible version of each
algorithm is shown. (Some that should be obvious have been omitted.)
//: C06:SearchReplace.cpp
// The STL search and replace algorithms.
#include <algorithm>
#include <functional>
#include <vector>
#include "PrintSequence.h"
using namespace std;
struct PlusOne {
bool operator()(int i, int j) { return j == i + 1; }
};
class MulMoreThan {
int value;
public:
MulMoreThan(int val) : value(val) {}
bool operator()(int v, int m) { return v * m >
value; }
};
int main() {
int a[] = { 1, 2, 3, 4, 5, 6, 6, 7, 7, 7,
8, 8, 8, 8, 11, 11, 11, 11, 11 };
const int ASZ = sizeof a / sizeof *a;
vector<int> v(a, a + ASZ);
print(v.begin(), v.end(), "v", "
");
vector<int>::iterator it = find(v.begin(),
v.end(), 4);
cout << "find: " << *it
<< endl;
it = find_if(v.begin(), v.end(),
bind2nd(greater<int>(), 8));
cout << "find_if: " << *it
<< endl;
it = adjacent_find(v.begin(), v.end());
while(it != v.end()) {
cout << "adjacent_find: " <<
*it
<< ", " << *(it + 1)
<< endl;
it = adjacent_find(it + 1, v.end());
}
it = adjacent_find(v.begin(), v.end(), PlusOne());
while(it != v.end()) {
cout << "adjacent_find PlusOne: "
<< *it
<< ", " << *(it + 1)
<< endl;
it = adjacent_find(it + 1, v.end(), PlusOne());
}
int b[] = { 8, 11 };
const int BSZ = sizeof b / sizeof *b;
print(b, b + BSZ, "b", " ");
it = find_first_of(v.begin(), v.end(), b, b + BSZ);
print(it, it + BSZ, "find_first_of", "
");
it = find_first_of(v.begin(), v.end(),
b, b + BSZ, PlusOne());
print(it,it + BSZ,"find_first_of
PlusOne"," ");
it = search(v.begin(), v.end(), b, b + BSZ);
print(it, it + BSZ, "search", "
");
int c[] = { 5, 6, 7 };
const int CSZ = sizeof c / sizeof *c;
print(c, c + CSZ, "c", " ");
it = search(v.begin(), v.end(), c, c + CSZ,
PlusOne());
print(it, it + CSZ,"search PlusOne", "
");
int d[] = { 11, 11, 11 };
const int DSZ = sizeof d / sizeof *d;
print(d, d + DSZ, "d", " ");
it = find_end(v.begin(), v.end(), d, d + DSZ);
print(it, v.end(),"find_end", "
");
int e[] = { 9, 9 };
print(e, e + 2, "e", "
");
it = find_end(v.begin(),
v.end(), e, e + 2, PlusOne());
print(it, v.end(),"find_end PlusOne","
");
it = search_n(v.begin(), v.end(), 3, 7);
print(it, it + 3, "search_n 3, 7", "
");
it = search_n(v.begin(), v.end(),
6, 15, MulMoreThan(100));
print(it, it + 6,
"search_n 6, 15, MulMoreThan(100)",
" ");
cout << "min_element: "
<< *min_element(v.begin(), v.end())
<< endl;
cout << "max_element: "
<< *max_element(v.begin(), v.end())
<< endl;
vector<int> v2;
replace_copy(v.begin(), v.end(),
back_inserter(v2), 8, 47);
print(v2.begin(), v2.end(), "replace_copy 8
-> 47", " ");
replace_if(v.begin(), v.end(),
bind2nd(greater_equal<int>(), 7), -1);
print(v.begin(), v.end(), "replace_if >= 7
-> -1", " ");
} ///:~
The example begins with two predicates: PlusOne,
which is a binary predicate that returns true if the second argument is
equivalent to one plus the first argument; and MulMoreThan, which
returns true if the first argument times the second argument is greater
than a value stored in the object. These binary predicates are used as tests in
the example.
In main( ), an array a is created and fed
to the constructor for vector<int> v. This vector is the
target for the search and replace activities, and you’ll note that there are
duplicate elements—these are discovered by some of the search/replace routines.
The first test demonstrates find( ), discovering
the value 4 in v. The return value is the iterator pointing to the first
instance of 4, or the end of the input range (v.end( )) if the
search value is not found.
The find_if( ) algorithm uses a predicate to
determine if it has discovered the correct element. In this example, this
predicate is created on the fly using greater<int> (that is, “see
if the first int argument is greater than the second”) and bind2nd( )
to fix the second argument to 8. Thus, it returns true if the value in v
is greater than 8.
Since two identical objects appear next to each other in a
number of cases in v, the test of adjacent_find( ) is
designed to find them all. It starts looking from the beginning and then drops
into a while loop, making sure that the iterator it has not
reached the end of the input sequence (which would mean that no more matches
can be found). For each match it finds, the loop prints the matches and then
performs the next adjacent_find( ), this time using it + 1
as the first argument (this way, it will still find two pairs in a triple).
You might look at the while loop and think that you
can do it a bit more cleverly, like this:
while(it != v.end()) {
cout << "adjacent_find: " <<
*it++
<< ", " << *it++
<< endl;
it = adjacent_find(it, v.end());
}
This is exactly what we tried first. However, we did not get
the output we expected, on any compiler. This is because there is no guarantee
about when the increments occur in this expression.
The next test uses adjacent_find( ) with the PlusOne
predicate, which discovers all the places where the next number in the sequence
v changes from the previous by one. The same while approach finds
all the cases.
The find_first_of( ) algorithm requires a second
range of objects for which to hunt; this is provided in the array b. Because
the first range and the second range in find_first_of( ) are
controlled by separate template arguments, those ranges can refer to two
different types of containers, as seen here. The second form of find_first_of( )
is also tested, using PlusOne.
The search( ) algorithm finds exactly the second
range inside the first one, with the elements in the same order. The second
form of search( ) uses a predicate, which is typically just
something that defines equivalence, but it also presents some interesting
possibilities—here, the PlusOne predicate causes the range { 4, 5, 6
} to be found.
The find_end( ) test discovers the last
occurrence of the entire sequence { 11, 11, 11 }. To show that it has in
fact found the last occurrence, the rest of v starting from it is
printed.
The first search_n( ) test looks for 3 copies of
the value 7, which it finds and prints. When using the second version of search_n( ),
the predicate is ordinarily meant to be used to determine equivalence between
two elements, but we’ve taken some liberties and used a function object that
multiplies the value in the sequence by (in this case) 15 and checks to see if
it’s greater than 100. That is, the search_n( ) test says “find me
6 consecutive values that, when multiplied by 15, each produce a number greater
than 100.” Not exactly what you normally expect to do, but it might give you
some ideas the next time you have an odd searching problem.
The min_element( ) and max_element( )
algorithms are straightforward, but they look odd, as if the function is being
dereferenced with a ‘*’. Actually, the returned iterator is being
dereferenced to produce the value for printing.
To test replacements, replace_copy( ) is used
first (so it doesn’t modify the original vector) to replace all values
of 8 with the value 47. Notice the use of back_inserter( ) with the
empty vector v2. To demonstrate replace_if( ), a
function object is created using the standard template greater_equal
along with bind2nd to replace all the values that are greater than or
equal to 7 with the value -1.
These algorithms provide ways to compare two ranges. At
first glance, the operations they perform seem similar to the search( )
function. However, search( ) tells you where the second sequence
appears within the first, and equal( ) and lexicographical_compare( )
simply tell you how two sequences compare. On the other hand, mismatch( )
does tell you where the two sequences go out of sync, but those sequences must
be exactly the same length.
bool equal(InputIterator first1, InputIterator last1,
InputIterator first2);
bool equal(InputIterator first1, InputIterator last1,
InputIterator first2 BinaryPredicate binary_pred);
In both these functions, the first range is the typical one,
[first1, last1). The second range starts at first2, but there is
no “last2” because its length is determined by the length of the first range.
The equal( ) function returns true if both ranges are exactly the
same (the same elements in the same order). In the first case, the operator==
performs the comparison, and in the second case binary_pred decides if
two elements are the same.
bool lexicographical_compare(InputIterator1 first1,
InputIterator1 last1, InputIterator2 first2,
InputIterator2 last2);
bool lexicographical_compare(InputIterator1 first1,
InputIterator1 last1, InputIterator2 first2,
InputIterator2 last2, BinaryPredicate binary_pred);
These two functions determine if the first range is
“lexicographically less” than the second. (They return true if range 1
is less than range 2, and false otherwise.) Lexicographical comparison,
or “dictionary” comparison, means that the comparison is done in the same way that
we establish the order of strings in a dictionary: one element at a time. The
first elements determine the result if these elements are different, but if
they’re equal, the algorithm moves on to the next elements and looks at those,
and so on until it finds a mismatch. At that point, it looks at the elements,
and if the element from range 1 is less than the element from range two, lexicographical_compare( )
returns true; otherwise, it returns false. If it gets all the way
through one range or the other (the ranges may be different lengths for this
algorithm) without finding an inequality, range 1 is not less than range
2, so the function returns false.
If the two ranges are different lengths, a missing element
in one range acts as one that “precedes” an element that exists in the other
range, so “abc” precedes “abcd.” If the algorithm reaches the end of one of the
ranges without a mismatch, then the shorter range comes first. In that case, if
the shorter range is the first range, the result is true, otherwise it
is false.
In the first version of the function, operator<
performs the comparisons, and in the second version, binary_pred is used.
pair<InputIterator1,
InputIterator2>
mismatch(InputIterator1 first1, InputIterator1 last1,
InputIterator2 first2);
pair<InputIterator1, InputIterator2>
mismatch(InputIterator1 first1, InputIterator1 last1,
InputIterator2 first2, BinaryPredicate binary_pred);
As in equal( ), the length of both ranges is
exactly the same, so only the first iterator in the second range is necessary,
and the length of the first range is used as the length of the second range.
Whereas equal( ) just tells you whether the two ranges are the
same, mismatch( ) tells you where they begin to differ. To
accomplish this, you must be told (1) the element in the first range where the
mismatch occurred and (2) the element in the second range where the mismatch
occurred. These two iterators are packaged together into a pair object
and returned. If no mismatch occurs, the return value is last1 combined
with the past-the-end iterator of the second range. The pair template
class is a struct with two elements denoted by the member names first
and second and is defined in the <utility> header.
As in equal( ), the first function tests for
equality using operator== while the second one uses binary_pred.
Example
Because the Standard C++ string class is built like a
container (it has begin( ) and end( ) member functions
that produce objects of type string::iterator), it can be used to
conveniently create ranges of characters to test with the STL comparison
algorithms. However, note that string has a fairly complete set of
native operations, so look at the string class before using the STL
algorithms to perform operations.
//: C06:Comparison.cpp
// The STL range comparison algorithms.
#include <algorithm>
#include <functional>
#include <string>
#include <vector>
#include "PrintSequence.h"
using namespace std;
int main() {
// Strings provide a convenient way to create
// ranges of characters, but you should
// normally look for native string operations:
string s1("This is a test");
string s2("This is a Test");
cout << "s1: " << s1 <<
endl << "s2: " << s2 << endl;
cout << "compare s1 & s1: "
<< equal(s1.begin(), s1.end(), s1.begin())
<< endl;
cout << "compare s1 & s2: "
<< equal(s1.begin(), s1.end(), s2.begin())
<< endl;
cout << "lexicographical_compare s1 &
s1: "
<< lexicographical_compare(s1.begin(),
s1.end(),
s1.begin(), s1.end()) << endl;
cout << "lexicographical_compare s1 &
s2: "
<< lexicographical_compare(s1.begin(),
s1.end(),
s2.begin(), s2.end()) << endl;
cout << "lexicographical_compare s2 &
s1: "
<< lexicographical_compare(s2.begin(),
s2.end(),
s1.begin(), s1.end()) << endl;
cout << "lexicographical_compare shortened
"
"s1 & full-length s2: "
<< endl;
string s3(s1);
while(s3.length() != 0) {
bool result = lexicographical_compare(
s3.begin(), s3.end(), s2.begin(),s2.end());
cout << s3 << endl << s2 <<
", result = "
<< result << endl;
if(result == true) break;
s3 = s3.substr(0, s3.length() - 1);
}
pair<string::iterator, string::iterator> p =
mismatch(s1.begin(), s1.end(), s2.begin());
print(p.first, s1.end(), "p.first",
"");
print(p.second, s2.end(),
"p.second","");
} ///:~
Note that the only difference between s1 and s2
is the capital ‘T’ in s2’s “Test.” Comparing s1 and s1 for
equality yields true, as expected, while s1 and s2 are not
equal because of the capital ‘T’.
To understand the output of the lexicographical_compare( )
tests, remember two things: first, the comparison is performed
character-by-character, and second, on our platform capital letters “precede”
lowercase letters. In the first test, s1 is compared to s1. These
are exactly equivalent. One is not lexicographically less than the other
(which is what the comparison is looking for), and thus the result is false.
The second test is asking “does s1 precede s2?” When the
comparison gets to the ‘t’ in “test”, it discovers that the lowercase ‘t’ in s1
is “greater” than the uppercase ‘T’ in s2, so the answer is again false.
However, if we test to see whether s2 precedes s1, the answer is true.
To further examine lexicographical comparison, the next test
in this example compares s1 with s2 again (which returned false
before). But this time it repeats the comparison, trimming one character off
the end of s1 (which is first copied into s3) each time through
the loop until the test evaluates to true. What you’ll see is that, as
soon as the uppercase ‘T’ is trimmed off s3 (the copy of s1), the
characters, which are exactly equal up to that point, no longer count. Because s3
is shorter than s2, it lexicographically precedes s2.
The final test uses mismatch( ). To capture the
return value, create the appropriate pair p, constructing the template
using the iterator type from the first range and the iterator type from the
second range (in this case, both string::iterators). To print the
results, the iterator for the mismatch in the first range is p.first,
and for the second range is p.second. In both cases, the range is
printed from the mismatch iterator to the end of the range so you can see
exactly where the iterator points.
Because of the genericity of the STL, the concept of removal
is a bit constrained. Since elements can only be “removed” via iterators, and
iterators can point to arrays, vectors, lists, and so on, it is
not safe or reasonable to try to destroy the elements that are being removed
and to change the size of the input range [first, last). (An array, for
example, cannot have its size changed.) So instead, what the STL “remove”
functions do is rearrange the sequence so that the “removed” elements are at
the end of the sequence, and the “un-removed” elements are at the beginning of
the sequence (in the same order that they were before, minus the removed
elements—that is, this is a stable operation). Then the function will
return an iterator to the “new last” element of the sequence, which is the end
of the sequence without the removed elements and the beginning of the sequence
of the removed elements. In other words, if new_last is the iterator
that is returned from the “remove” function, [first, new_last) is the
sequence without any of the removed elements, and [new_last, last) is
the sequence of removed elements.
If you are simply using your sequence, including the removed
elements, with more STL algorithms, you can just use new_last as the new
past-the-end iterator. However, if you’re using a resizable container c (not
an array) and you want to eliminate the removed elements from the container,
you can use erase( ) to do so, for example:
c.erase(remove(c.begin(), c.end(), value), c.end());
You can also use the resize( ) member function
that belongs to all standard sequences (more on this in the next chapter).
The return value of remove( ) is the new_last
iterator, so erase( ) deletes all the removed elements from c.
The iterators in [new_last, last) are
dereferenceable, but the element values are unspecified and should not be used.
ForwardIterator remove(ForwardIterator first,
ForwardIterator last, const T& value);
ForwardIterator remove_if(ForwardIterator first,
ForwardIterator last, Predicate pred);
OutputIterator remove_copy(InputIterator first,
InputIterator last, OutputIterator result, const T&
value);
OutputIterator remove_copy_if(InputIterator first,
InputIterator last, OutputIterator result, Predicate
pred);
Each of the “remove” forms moves through the range [first,
last), finding values that match a removal criterion and copying the
unremoved elements over the removed elements (thus effectively removing them).
The original order of the unremoved elements is maintained. The return value is
an iterator pointing past the end of the range that contains none of the
removed elements. The values that this iterator points to are unspecified.
The “if” versions pass each element to pred( )
to determine whether it should be removed. (If pred( ) returns true,
the element is removed.) The “copy” versions do not modify the original
sequence, but instead copy the unremoved values into a range beginning at result
and return an iterator indicating the past-the-end value of this new range.
ForwardIterator unique(ForwardIterator first,
ForwardIterator last);
ForwardIterator unique(ForwardIterator first,
ForwardIterator last, BinaryPredicate binary_pred);
OutputIterator unique_copy(InputIterator first,
InputIterator last, OutputIterator result);
OutputIterator unique_copy(InputIterator first,
InputIterator last, OutputIterator result,
BinaryPredicate binary_pred);
Each of the “unique” functions moves through the range [first,
last), finding adjacent values that are equivalent (that is, duplicates)
and “removing” the duplicate elements by copying over them. The original order
of the unremoved elements is maintained. The return value is an iterator
pointing past the end of the range that has the adjacent duplicates removed.
Because only duplicates that are adjacent are removed, it’s
likely that you’ll want to call sort( ) before calling a “unique”
algorithm, since that will guarantee that all the duplicates are removed.
For each iterator value i in the input range, the
versions containing binary_pred call:
and if the result is true, *i is considered a
duplicate.
The “copy” versions do not modify the original sequence, but
instead copy the unremoved values into a range beginning at result and
return an iterator indicating the past-the-end value of this new range.
Example
This example gives a visual demonstration of the way the
“remove” and “unique” functions work.
//: C06:Removing.cpp
// The removing algorithms.
//{L} Generators
#include <algorithm>
#include <cctype>
#include <string>
#include "Generators.h"
#include "PrintSequence.h"
using namespace std;
struct IsUpper {
bool operator()(char c) { return isupper(c); }
};
int main() {
string v;
v.resize(25);
generate(v.begin(), v.end(), CharGen());
print(v.begin(), v.end(), "v original",
"");
// Create a set of the characters in v:
string us(v.begin(), v.end());
sort(us.begin(), us.end());
string::iterator it = us.begin(), cit = v.end(),
uend = unique(us.begin(), us.end());
// Step through and remove everything:
while(it != uend) {
cit = remove(v.begin(), cit, *it);
print(v.begin(), v.end(), "Complete v",
"");
print(v.begin(), cit, "Pseudo v ", "
");
cout << "Removed element:\t"
<< *it
<< "\nPsuedo Last Element:\t"
<< *cit << endl << endl;
++it;
}
generate(v.begin(), v.end(), CharGen());
print(v.begin(), v.end(), "v",
"");
cit = remove_if(v.begin(), v.end(), IsUpper());
print(v.begin(), cit, "v after remove_if
IsUpper", " ");
// Copying versions are not shown for remove()
// and remove_if().
sort(v.begin(), cit);
print(v.begin(), cit, "sorted", "
");
string v2;
v2.resize(cit - v.begin());
unique_copy(v.begin(), cit, v2.begin());
print(v2.begin(), v2.end(), "unique_copy",
" ");
// Same behavior:
cit = unique(v.begin(), cit, equal_to<char>());
print(v.begin(), cit, "unique
equal_to<char>", " ");
} ///:~
The string v is a container of characters
filled with randomly generated characters. Each character is used in a remove
statement, but the entire string v is displayed each time so you can see
what happens to the rest of the range, after the resulting endpoint (which is
stored in cit).
To demonstrate remove_if( ), the standard C
library function isupper( ) (in <cctype>) is
called inside the function object class IsUpper, an object of which is
passed as the predicate for remove_if( ). This returns true
only if a character is uppercase, so only lowercase characters will remain.
Here, the end of the range is used in the call to print( ) so only
the remaining elements will appear. The copying versions of remove( )
and remove_if( ) are not shown because they are a simple variation
on the noncopying versions, which you should be able to use without an example.
The range of lowercase letters is sorted in preparation for
testing the “unique” functions. (The “unique” functions are not undefined if
the range isn’t sorted, but it’s probably not what you want.) First, unique_copy( )
puts the unique elements into a new vector using the default element
comparison, and then uses the form of unique( ) that takes a
predicate. The predicate is the built-in function object equal_to( ),
which produces the same results as the default element comparison.
A significant category of STL algorithms must operate on a
sorted range. STL provides a number of separate sorting algorithms, depending
on whether the sort should be stable, partial, or just regular (non-stable).
Oddly enough, only the partial sort has a copying version. If you’re using
another sort and you need to work on a copy, you’ll have to make your own copy
before sorting.
Once your sequence is sorted, you can perform many
operations on that sequence, from simply locating an element or group of
elements to merging with another sorted sequence or manipulating sequences as
mathematical sets.
Each algorithm involved with sorting or operations on sorted
sequences has two versions. The first uses the object’s own operator<
to perform the comparison, and the second uses operator( )(a, b) to
determine the relative order of a and b. Other than this, there
are no differences, so this distinction will not be pointed out in the
description of each algorithm.
Sorting
The sort algorithms require ranges delimited by
random-access iterators, such as a vector or deque. The list
container has its own built-in sort( ) function, since it only
supports bi-directional iteration.
void sort(RandomAccessIterator first, RandomAccessIterator
last);
void sort(RandomAccessIterator first, RandomAccessIterator
last, StrictWeakOrdering binary_pred);
Sorts [first, last) into ascending order. The first
form uses operator< and the second form uses the supplied comparator
object to determine the order.
void stable_sort(RandomAccessIterator first,
RandomAccessIterator last);
void stable_sort(RandomAccessIterator first,
RandomAccessIterator last, StrictWeakOrdering
binary_pred);
Sorts [first, last) into ascending order, preserving
the original ordering of equivalent elements. (This is important if elements
can be equivalent but not identical.)
void partial_sort(RandomAccessIterator first,
RandomAccessIterator middle, RandomAccessIterator last);
void partial_sort(RandomAccessIterator first,
RandomAccessIterator middle, RandomAccessIterator last,
StrictWeakOrdering binary_pred);
Sorts the number of elements from [first, last) that
can be placed in the range [first, middle). The rest of the elements end
up in [middle, last) and have no guaranteed order.
RandomAccessIterator partial_sort_copy(InputIterator first,
InputIterator last, RandomAccessIterator result_first,
RandomAccessIterator result_last);
RandomAccessIterator partial_sort_copy(InputIterator first,
InputIterator last, RandomAccessIterator result_first,
RandomAccessIterator result_last, StrictWeakOrdering
binary_pred);
Sorts the number of elements from [first, last) that
can be placed in the range [result_first, result_last) and copies those
elements into [result_first, result_last). If the range [first, last)
is smaller than [result_first, result_last), the smaller number of
elements is used.
void nth_element(RandomAccessIterator first,
RandomAccessIterator nth, RandomAccessIterator last);
void nth_element(RandomAccessIterator first,
RandomAccessIterator nth, RandomAccessIterator last,
StrictWeakOrdering binary_pred);
Just like partial_sort( ), nth_element( )
partially orders a range of elements. However, it’s much “less ordered” than partial_sort( ).
The only guarantee from nth_element( ) is that whatever location
you choose will become a dividing point. All the elements in the range [first,
nth) will pair-wise satisfy the binary predicate (operator< by
default, as usual), and all the elements in the range (nth, last]
will not. However, neither subrange is in any particular order, unlike partial_sort( )
which has the first range in sorted order.
If all you need is this very weak ordering (if, for example,
you’re determining medians, percentiles, and so on), this algorithm is faster
than partial_sort( ).
Locating elements in sorted ranges
Once a range is sorted, you can use a group of operations to
find elements within those ranges. In the following functions, there are always
two forms. One assumes that the intrinsic operator< performs the
sort, and the second operator must be used if some other comparison function
object performs the sort. You must use the same comparison for locating
elements as you do to perform the sort; otherwise, the results are undefined.
In addition, if you try to use these functions on unsorted ranges, the results
will be undefined.
bool binary_search(ForwardIterator first, ForwardIterator
last, const T& value);
bool binary_search(ForwardIterator first, ForwardIterator
last, const T& value, StrictWeakOrdering binary_pred);
Tells you whether value appears in the sorted range [first,
last).
ForwardIterator lower_bound(ForwardIterator first,
ForwardIterator last, const T& value);
ForwardIterator lower_bound(ForwardIterator first,
ForwardIterator last, const T& value, StrictWeakOrdering
binary_pred);
Returns an iterator indicating the first occurrence of value
in the sorted range [first, last). If value is not present, an
iterator to where it would fit in the sequence is returned.
ForwardIterator upper_bound(ForwardIterator first,
ForwardIterator last, const T& value);
ForwardIterator upper_bound(ForwardIterator first,
ForwardIterator last, const T& value, StrictWeakOrdering
binary_pred);
Returns an iterator indicating one past the last occurrence
of value in the sorted range [first, last). If value is
not present, an iterator to where it would fit in the sequence is returned.
pair<ForwardIterator,
ForwardIterator> equal_range(ForwardIterator first, ForwardIterator last,
const T& value);
pair<ForwardIterator, ForwardIterator> equal_range(ForwardIterator
first, ForwardIterator last,
const T& value, StrictWeakOrdering binary_pred);
Essentially
combines lower_bound( ) and upper_bound( ) to return a pair
indicating the first and one-past-the-last occurrences of value in the
sorted range [first, last). Both iterators indicate the location where value
would fit if it is not found.
You may find
it surprising that the binary search algorithms take a forward iterator instead
of a random access iterator. (Most explanations of binary search use indexing.)
Remember that a random access iterator “is-a” forward iterator, and can be used
wherever the latter is specified. If the iterator passed to one of these
algorithms in fact supports random access, then the efficient logarithmic-time
procedure is used, otherwise a linear search is performed.
Example
The following example turns each input word into an NString
and adds it to a vector<NString>. The vector is then used
to demonstrate the various sorting and searching algorithms.
//: C06:SortedSearchTest.cpp
// Test searching in sorted ranges.
// NString
#include <algorithm>
#include <cassert>
#include <ctime>
#include <cstdlib>
#include <cstddef>
#include <fstream>
#include <iostream>
#include <iterator>
#include <vector>
#include "NString.h"
#include "PrintSequence.h"
#include "../require.h"
using namespace std;
int main(int argc, char* argv[]) {
typedef vector<NString>::iterator sit;
char* fname = "Test.txt";
if(argc > 1) fname = argv[1];
ifstream in(fname);
assure(in, fname);
srand(time(0));
cout.setf(ios::boolalpha);
vector<NString> original;
copy(istream_iterator<string>(in),
istream_iterator<string>(),
back_inserter(original));
require(original.size() >= 4, "Must have four
elements");
vector<NString> v(original.begin(),
original.end()),
w(original.size() / 2);
sort(v.begin(), v.end());
print(v.begin(), v.end(), "sort");
v = original;
stable_sort(v.begin(), v.end());
print(v.begin(), v.end(), "stable_sort");
v = original;
sit it = v.begin(), it2;
// Move iterator to middle
for(size_t i = 0; i < v.size() / 2; i++)
++it;
partial_sort(v.begin(), it, v.end());
cout << "middle = " << *it
<< endl;
print(v.begin(), v.end(), "partial_sort");
v = original;
// Move iterator to a quarter position
it = v.begin();
for(size_t i = 0; i < v.size() / 4; i++)
++it;
// Less elements to copy from than to the destination
partial_sort_copy(v.begin(), it, w.begin(), w.end());
print(w.begin(), w.end(),
"partial_sort_copy");
// Not enough room in destination
partial_sort_copy(v.begin(), v.end(),
w.begin(),w.end());
print(w.begin(), w.end(), "w
partial_sort_copy");
// v remains the same through all this process
assert(v == original);
nth_element(v.begin(), it, v.end());
cout << "The nth_element = " <<
*it << endl;
print(v.begin(), v.end(), "nth_element");
string f = original[rand() % original.size()];
cout << "binary search: "
<< binary_search(v.begin(), v.end(), f)
<< endl;
sort(v.begin(), v.end());
it = lower_bound(v.begin(), v.end(), f);
it2 = upper_bound(v.begin(), v.end(), f);
print(it, it2, "found range");
pair<sit, sit> ip = equal_range(v.begin(),
v.end(), f);
print(ip.first, ip.second, "equal_range");
} ///:~
This example uses the NString class seen earlier,
which stores an occurrence number with copies of a string. The call to stable_sort( )
shows how the original order for objects with equal strings is preserved. You
can also see what happens during a partial sort (the remaining unsorted
elements are in no particular order). There is no “partial stable sort.”
Notice in the call to nth_element( ) that,
whatever the nth element turns out to be (which will vary from one run to
another because of URandGen), the elements before that are less, and
after that are greater, but the elements have no particular order other than
that. Because of URandGen, there are no duplicates, but if you use a
generator that allows duplicates, you’ll see that the elements before the nth
element will be less than or equal to the nth element.
This example also illustrates all three binary search
algorithms. As advertised, lower_bound( ) refers to the first
element in the sequence equal to a given key, upper_bound( ) points
one past the last, and equal_range( ) returns both results as a
pair.
Merging sorted ranges
As before, the first form of each function assumes that the
intrinsic operator< performs the sort. The second form must be used
if some other comparison function object performs the sort. You must use the
same comparison for locating elements as you do to perform the sort; otherwise,
the results are undefined. In addition, if you try to use these functions on
unsorted ranges, the results will be undefined.
OutputIterator merge(InputIterator1 first1, InputIterator1
last1, InputIterator2 first2, InputIterator2 last2,
OutputIterator result);
OutputIterator merge(InputIterator1 first1, InputIterator1
last1, InputIterator2 first2, InputIterator2 last2,
OutputIterator result, StrictWeakOrdering binary_pred);
Copies elements from [first1, last1) and [first2,
last2) into result, such that the resulting range is sorted in
ascending order. This is a stable operation.
void inplace_merge(BidirectionalIterator first,
BidirectionalIterator middle, BidirectionalIterator
last);
void inplace_merge(BidirectionalIterator first,
BidirectionalIterator middle, BidirectionalIterator last,
StrictWeakOrdering binary_pred);
This assumes that [first, middle) and [middle,
last) are each sorted ranges in the same sequence. The two ranges are
merged so that the resulting range [first, last) contains the combined
ranges in sorted order.
Example
It’s easier to see what goes on with merging if ints
are used. The following example also emphasizes how the algorithms (and our own
print template) work with arrays as well as containers:
//: C06:MergeTest.cpp
// Test merging in sorted ranges.
//{L} Generators
#include <algorithm>
#include "PrintSequence.h"
#include "Generators.h"
using namespace std;
int main() {
const int SZ = 15;
int a[SZ*2] = {0};
// Both ranges go in the same array:
generate(a, a + SZ, SkipGen(0, 2));
a[3] = 4;
a[4] = 4;
generate(a + SZ, a + SZ*2, SkipGen(1, 3));
print(a, a + SZ, "range1", " ");
print(a + SZ, a + SZ*2, "range2", "
");
int b[SZ*2] = {0}; // Initialize all to zero
merge(a, a + SZ, a + SZ, a + SZ*2, b);
print(b, b + SZ*2, "merge", " ");
// Reset b
for(int i = 0; i < SZ*2; i++)
b[i] = 0;
inplace_merge(a, a + SZ, a + SZ*2);
print(a, a + SZ*2, "inplace_merge", "
");
int* end = set_union(a, a + SZ, a + SZ, a + SZ*2, b);
print(b, end, "set_union", " ");
} ///:~
In main( ), instead of creating two separate
arrays, both ranges are created end to end in the array a. (This will
come in handy for the inplace_merge.) The first call to merge( )
places the result in a different array, b. For comparison, set_union( )
is also called, which has the same signature and similar behavior, except that
it removes duplicates from the second set. Finally, inplace_merge( )
combines both parts of a.
Set operations on sorted ranges
Once ranges have been sorted, you can perform mathematical
set operations on them.
bool includes(InputIterator1 first1, InputIterator1 last1,
InputIterator2 first2, InputIterator2 last2);
bool includes(InputIterator1 first1, InputIterator1 last1,
InputIterator2 first2, InputIterator2 last2,
StrictWeakOrdering binary_pred);
Returns true if [first2, last2) is a subset of
[first1, last1). Neither range is required to hold only unique elements,
but if [first2, last2) holds n elements of a particular value, [first1,
last1) must also hold at least n elements if the result is to be true.
OutputIterator set_union(InputIterator1 first1,
InputIterator1 last1, InputIterator2 first2,
InputIterator2 last2, OutputIterator result);
OutputIterator set_union(InputIterator1 first1,
InputIterator1 last1, InputIterator2 first2,
InputIterator2 last2, OutputIterator result,
StrictWeakOrdering binary_pred);
Creates the mathematical union of two sorted ranges in the result
range, returning the end of the output range. Neither input range is required
to hold only unique elements, but if a particular value appears multiple times
in both input sets, the resulting set will contain the larger number of
identical values.
OutputIterator set_intersection(InputIterator1 first1,
InputIterator1 last1, InputIterator2 first2,
InputIterator2 last2, OutputIterator result);
OutputIterator set_intersection(InputIterator1 first1,
InputIterator1 last1, InputIterator2 first2,
InputIterator2 last2, OutputIterator result,
StrictWeakOrdering binary_pred);
Produces, in result, the intersection of the two
input sets, returning the end of the output range—that is, the set of values
that appear in both input sets. Neither input range is required to hold only
unique elements, but if a particular value appears multiple times in both input
sets, the resulting set will contain the smaller number of identical values.
OutputIterator set_difference(InputIterator1 first1,
InputIterator1 last1, InputIterator2 first2,
InputIterator2 last2, OutputIterator result);
OutputIterator set_difference(InputIterator1 first1,
InputIterator1 last1, InputIterator2 first2,
InputIterator2 last2, OutputIterator result,
StrictWeakOrdering binary_pred);
Produces, in result, the mathematical set difference,
returning the end of the output range. All the elements that are in [first1,
last1) but not in [first2, last2) are placed in the result set.
Neither input range is required to hold only unique elements, but if a
particular value appears multiple times in both input sets (n times in
set 1 and m times in set 2), the resulting set will contain max(n-m,
0) copies of that value.
OutputIterator set_symmetric_difference(InputIterator1
first1, InputIterator1 last1, InputIterator2 first2,
InputIterator2 last2, OutputIterator result);
OutputIterator set_symmetric_difference(InputIterator1
first1, InputIterator1 last1, InputIterator2 first2,
InputIterator2 last2, OutputIterator result,
StrictWeakOrdering binary_pred);
Constructs, in result, the set containing:
1. All the elements in set 1 that are not in set 2.
2. All the elements in set 2 that are not in set 1.
Neither input range is required to hold only unique
elements, but if a particular value appears multiple times in both input sets (n
times in set 1 and m times in set 2), the resulting set will contain abs(n-m)
copies of that value, where abs( ) is the absolute value. The
return value is the end of the output range.
Example
It’s easiest to see the set operations demonstrated using
simple vectors of characters. These characters are randomly generated
and then sorted, but the duplicates are retained so that you can see what the
set operations do when there are duplicates.
//: C06:SetOperations.cpp
// Set operations on sorted ranges.
//{L} Generators
#include <algorithm>
#include <vector>
#include "Generators.h"
#include "PrintSequence.h"
using namespace std;
int main() {
const int SZ = 30;
char v[SZ + 1], v2[SZ + 1];
CharGen g;
generate(v, v + SZ, g);
generate(v2, v2 + SZ, g);
sort(v, v + SZ);
sort(v2, v2 + SZ);
print(v, v + SZ, "v",
"");
print(v2, v2 + SZ, "v2", "");
bool b = includes(v, v + SZ, v + SZ/2, v + SZ);
cout.setf(ios::boolalpha);
cout << "includes: " << b
<< endl;
char v3[SZ*2 + 1], *end;
end = set_union(v, v + SZ, v2, v2 + SZ, v3);
print(v3, end, "set_union", "");
end = set_intersection(v, v + SZ, v2, v2 + SZ, v3);
print(v3, end, "set_intersection",
"");
end = set_difference(v, v + SZ, v2, v2 + SZ, v3);
print(v3, end, "set_difference",
"");
end = set_symmetric_difference(v, v + SZ,
v2, v2 + SZ, v3);
print(v3, end,
"set_symmetric_difference","");
} ///:~
After v and v2 are generated, sorted, and
printed, the includes( ) algorithm is tested by seeing if the
entire range of v contains the last half of v. It does, so the
result should always be true. The array v3 holds the output of set_union( ),
set_intersection( ), set_difference( ), and set_symmetric_difference( ),
and the results of each are displayed so you can ponder them and convince
yourself that the algorithms work as promised.
A heap is an array-like data structure used to implement a
“priority queue,” which is just a range that is organized in a way that
accommodates retrieving elements by priority according to some comparison
function. The heap operations in the standard library allow a sequence to be
treated as a “heap” data structure, which always efficiently returns the
element of highest priority, without fully ordering the entire sequence.
As with the “sort” operations, there are two versions of
each function. The first uses the object’s own operator< to perform
the comparison; the second uses an additional StrictWeakOrdering object’s operator( )(a, b) to compare two objects for a <
b.
void make_heap(RandomAccessIterator first,
RandomAccessIterator last);
void make_heap(RandomAccessIterator first,
RandomAccessIterator last,
StrictWeakOrdering binary_pred);
Turns an arbitrary range into a heap.
void push_heap(RandomAccessIterator first,
RandomAccessIterator last);
void push_heap(RandomAccessIterator first,
RandomAccessIterator last,
StrictWeakOrdering binary_pred);
Adds the element *(last-1) to the heap determined by
the range [first, last-1). In other words, it places the last element in
its proper location in the heap.
void pop_heap(RandomAccessIterator first,
RandomAccessIterator last);
void pop_heap(RandomAccessIterator first,
RandomAccessIterator last,
StrictWeakOrdering binary_pred);
Places the largest element (which is actually in *first,
before the operation, because of the way heaps are defined) into the position *(last-1)
and reorganizes the remaining range so that it’s still in heap order. If
you simply grabbed *first, the next element would not be the
next-largest element; so you must use pop_heap( ) if you want to
maintain the heap in its proper priority-queue order.
void sort_heap(RandomAccessIterator first,
RandomAccessIterator last);
void sort_heap(RandomAccessIterator first,
RandomAccessIterator last,
StrictWeakOrdering binary_pred);
This could be thought of as the complement to make_heap( ).
It takes a range that is in heap order and turns it into ordinary sorted order,
so it is no longer a heap. That means that if you call sort_heap( ),
you can no longer use push_heap( ) or pop_heap( ) on
that range. (Rather, you can use those functions, but they won’t do anything
sensible.) This is not a stable sort.
These algorithms move through the entire range and perform
an operation on each element. They differ in what they do with the results of
that operation: for_each( ) discards the return value of the
operation, and transform( ) places the results of each operation
into a destination sequence (which can be the original sequence).
UnaryFunction for_each(InputIterator first, InputIterator
last, UnaryFunction f);
Applies the function object f to each element in [first,
last), discarding the return value from each individual application of f.
If f is just a function pointer, you are typically not interested in the
return value; but if f is an object that maintains some internal state,
it can capture the combined return value of being applied to the range. The
final return value of for_each( ) is f.
OutputIterator transform(InputIterator first, InputIterator
last, OutputIterator result, UnaryFunction f);
OutputIterator transform(InputIterator1 first,
InputIterator1 last, InputIterator2 first2,
OutputIterator result, BinaryFunction f);
Like for_each( ), transform( )
applies a function object f to each element in the range [first,
last). However, instead of discarding the result of each function call, transform( )
copies the result (using operator=) into *result, incrementing result
after each copy. (The sequence pointed to by result must have enough
storage; otherwise, use an inserter to force insertions instead of
assignments.)
The first form of transform( ) simply calls f(*first),
where first ranges through the input sequence. Similarly, the second form calls
f(*first1, *first2). (Note that the length of the second input
range is determined by the length of the first.) The return value in both cases
is the past-the-end iterator for the resulting output range.
Examples
Since much of what you do with objects in a container is to
apply an operation to all those objects, these are fairly important algorithms
and merit several illustrations.
First, consider for_each( ). This sweeps through
the range, pulling out each element and passing it as an argument as it calls
whatever function object it’s been given. Thus, for_each( )
performs operations that you might normally write out by hand. If you look in
your compiler’s header file at the template defining for_each( ),
you’ll see something like this:
template<class InputIterator, class Function>
Function for_each(InputIterator first, InputIterator
last,
Function f) {
while(first != last)
f(*first++);
return f;
}
The following example shows several ways this template can
be expanded. First, we need a class that keeps track of its objects so we can
know that it’s being properly destroyed:
//: C06:Counted.h
// An object that keeps track of itself.
#ifndef COUNTED_H
#define COUNTED_H
#include <vector>
#include <iostream>
class Counted {
static int count;
char* ident;
public:
Counted(char* id) : ident(id) { ++count; }
~Counted() {
std::cout << ident << " count =
"
<< --count << std::endl;
}
};
class CountedVector : public
std::vector<Counted*> {
public:
CountedVector(char* id) {
for(int i = 0; i < 5; i++)
push_back(new Counted(id));
}
};
#endif // COUNTED_H ///:~
//: C06:Counted.cpp {O}
#include "Counted.h"
int Counted::count = 0;
///:~
The class Counted keeps a static count of the number
of Counted objects that have been created, and notifies you as they are
destroyed. In
addition, each Counted keeps a char* identifier to make tracking
the output easier.
The CountedVector is derived from vector<Counted*>,
and in the constructor it creates some Counted objects, handing each one
your desired char*. The CountedVector makes testing quite simple,
as you can see here:
//: C06:ForEach.cpp {-mwcc}
// Use of STL for_each() algorithm.
//{L} Counted
#include <algorithm>
#include <iostream>
#include "Counted.h"
using namespace std;
// Function object:
template<class T> class DeleteT {
public:
void operator()(T* x) { delete x; }
};
// Template function:
template<class T> void wipe(T* x) { delete x; }
int main() {
CountedVector B("two");
for_each(B.begin(), B.end(), DeleteT<Counted>());
CountedVector C("three");
for_each(C.begin(), C.end(), wipe<Counted>);
} ///:~
Since this is obviously something you might want to do a
lot, why not create an algorithm to delete all the pointers in a
container? You could use transform( ). The value of transform( )
over for_each( ) is that transform( ) assigns the
result of calling the function object into a resulting range, which can
actually be the input range. That case means a literal transformation for the
input range, since each element would be a modification of its previous value.
In this example, this approach would be especially useful since it’s more
appropriate to assign to each pointer the safe value of zero after calling delete
for that pointer. Transform( ) can easily do this:
//: C06:Transform.cpp {-mwcc}
// Use of STL transform() algorithm.
//{L} Counted
#include <iostream>
#include <vector>
#include <algorithm>
#include "Counted.h"
using namespace std;
template<class T> T* deleteP(T* x) { delete x;
return 0; }
template<class T> struct Deleter {
T* operator()(T* x) { delete x; return 0; }
};
int main() {
CountedVector cv("one");
transform(cv.begin(), cv.end(), cv.begin(),
deleteP<Counted>);
CountedVector cv2("two");
transform(cv2.begin(), cv2.end(), cv2.begin(),
Deleter<Counted>());
} ///:~
This shows both approaches: using a template function or a
templatized function object. After the call to transform( ), the vector
contains five null pointers, which is safer since any duplicate deletes
will have no effect.
One thing you cannot do is delete every pointer in a
collection without wrapping the call to delete inside a function or an
object. That is, you do the following:
for_each(a.begin(), a.end(), ptr_fun(operator delete));
This has the same problem as the call to destroy( )
did earlier: operator delete( ) takes a void*, but iterators
aren’t pointers. Even if you could make it compile, what you’d get is a
sequence of calls to the function that releases the storage. You will not get
the effect of calling delete for each pointer in a, however—the destructor
will not be called. This is typically not what you want, so you will need to wrap
your calls to delete.
In the previous example of for_each( ), the
return value of the algorithm was ignored. This return value is the function
that is passed into for_each( ). If the function is just a pointer
to a function, the return value is not very useful, but if it is a function
object, that function object may have internal member data that it uses to
accumulate information about all the objects that it sees during for_each( ).
For example, consider a simple model of inventory. Each Inventory
object has the type of product it represents (here, single characters will be
used for product names), the quantity of that product, and the price of each
item:
//: C06:Inventory.h
#ifndef INVENTORY_H
#define INVENTORY_H
#include <iostream>
#include <cstdlib>
using std::rand;
class Inventory {
char item;
int quantity;
int value;
public:
Inventory(char it, int quant, int val)
: item(it), quantity(quant), value(val) {}
// Synthesized operator= & copy-constructor OK
char getItem() const { return item; }
int getQuantity() const { return quantity; }
void setQuantity(int q) { quantity = q; }
int getValue() const { return value; }
void setValue(int val) { value = val; }
friend std::ostream& operator<<(
std::ostream& os, const Inventory& inv) {
return os << inv.item << ": "
<< "quantity " <<
inv.quantity
<< ", value " << inv.value;
}
};
// A generator:
struct InvenGen {
Inventory operator()() {
static char c = 'a';
int q = rand() % 100;
int v = rand() % 500;
return Inventory(c++, q, v);
}
};
#endif // INVENTORY_H ///:~
Member functions get the item name and get and set quantity
and value. An operator<< prints the Inventory object to an ostream.
A generator creates objects that have sequentially labeled items and random quantities
and values.
To find out the total number of items and total value, you
can create a function object to use with for_each( ) that has data
members to hold the totals:
//: C06:CalcInventory.cpp
// More use of for_each().
#include <algorithm>
#include <ctime>
#include <vector>
#include "Inventory.h"
#include "PrintSequence.h"
using namespace std;
// To calculate inventory totals:
class InvAccum {
int quantity;
int value;
public:
InvAccum() : quantity(0), value(0) {}
void operator()(const Inventory& inv) {
quantity += inv.getQuantity();
value += inv.getQuantity() * inv.getValue();
}
friend ostream&
operator<<(ostream& os, const InvAccum&
ia) {
return os << "total quantity: "
<< ia.quantity
<< ", total value: " <<
ia.value;
}
};
int main() {
vector<Inventory> vi;
srand(time(0)); // Randomize
generate_n(back_inserter(vi), 15, InvenGen());
print(vi.begin(), vi.end(), "vi");
InvAccum ia = for_each(vi.begin(),vi.end(),
InvAccum());
cout << ia << endl;
} ///:~
InvAccum’s operator( ) takes a single
argument, as required by for_each( ). As for_each( )
moves through its range, it takes each object in that range and passes it to InvAccum::operator( ),
which performs calculations and saves the result. At the end of this process, for_each( )
returns the InvAccum object, which is printed.
You can do most things to the Inventory objects using
for_each( ). For example, for_each( ) can handily
increase all the prices by 10%. But you’ll notice that the Inventory objects
have no way to change the item value. The programmers who designed Inventory
thought this was a good idea. After all, why would you want to change the name
of an item? But marketing has decided that they want a “new, improved” look by
changing all the item names to uppercase. They’ve done studies and determined
that the new names will boost sales (well, marketing needs to have something
to do…). So for_each( ) will not work here, but transform( )
will:
//: C06:TransformNames.cpp
// More use of transform().
#include <algorithm>
#include <cctype>
#include <ctime>
#include <vector>
#include "Inventory.h"
#include "PrintSequence.h"
using namespace std;
struct NewImproved {
Inventory operator()(const Inventory& inv) {
return Inventory(toupper(inv.getItem()),
inv.getQuantity(), inv.getValue());
}
};
int main() {
vector<Inventory> vi;
srand(time(0)); // Randomize
generate_n(back_inserter(vi), 15,
InvenGen());
print(vi.begin(), vi.end(),
"vi");
transform(vi.begin(),vi.end(),vi.begin(),NewImproved());
print(vi.begin(), vi.end(),
"vi");
} ///:~
Notice that the resulting range is the same as the input
range; that is, the transformation is performed in place.
Now suppose that the sales department needs to generate
special price lists with different discounts for each item. The original list
must stay the same, and any number of special lists need to be generated. Sales
will give you a separate list of discounts for each new list. To solve this
problem, we can use the second version of transform( ):
//: C06:SpecialList.cpp
// Using the second version of transform().
#include <algorithm>
#include <ctime>
#include <vector>
#include "Inventory.h"
#include "PrintSequence.h"
using namespace std;
struct Discounter {
Inventory operator()(const Inventory& inv,
float discount) {
return Inventory(inv.getItem(), inv.getQuantity(),
int(inv.getValue() * (1 - discount)));
}
};
struct DiscGen {
float operator()() {
float r = float(rand() % 10);
return r / 100.0;
}
};
int main() {
vector<Inventory> vi;
srand(time(0)); // Randomize
generate_n(back_inserter(vi), 15, InvenGen());
print(vi.begin(), vi.end(), "vi");
vector<float> disc;
generate_n(back_inserter(disc), 15, DiscGen());
print(disc.begin(), disc.end(), "Discounts:");
vector<Inventory> discounted;
transform(vi.begin(),vi.end(), disc.begin(),
back_inserter(discounted), Discounter());
print(discounted.begin(),
discounted.end(),"discounted");
} ///:~
Given an Inventory object and a discount percentage,
the Discounter function object produces a new Inventory with the
discounted price. The DiscGen function object just generates random
discount values between 1% and 10% to use for testing. In main( ),
two vectors are created, one for Inventory and one for discounts.
These are passed to transform( ) along with a Discounter
object, and transform( ) fills a new vector<Inventory>
called discounted.
These algorithms are all tucked into the header <numeric>,
since they are primarily useful for performing numeric calculations.
T accumulate(InputIterator first, InputIterator last, T
result);
T accumulate(InputIterator first, InputIterator last, T
result, BinaryFunction f);
The first form is a generalized summation; for each element
pointed to by an iterator i in [first, last), it performs the
operation result = result + *i, where result is of type T.
However, the second form is more general; it applies the function f(result,
*i) on each element *i in the range from beginning to end.
Note the similarity between the second form of transform( )
and the second form of accumulate( ).
T inner_product(InputIterator1 first1, InputIterator1
last1, InputIterator2 first2, T init);
T inner_product(InputIterator1 first1, InputIterator1
last1, InputIterator2 first2, T init, BinaryFunction1
op1, BinaryFunction2 op2);
Calculates a generalized inner product of the two ranges [first1,
last1) and [first2, first2 + (last1 - first1)). The return value is
produced by multiplying the element from the first sequence by the “parallel”
element in the second sequence and then adding it to the sum. Thus, if you have
two sequences {1, 1, 2, 2} and {1, 2, 3, 4}, the inner product
becomes
(1*1) + (1*2) + (2*3) + (2*4)
which is 17. The init argument is the initial value
for the inner product—this is probably zero but may be anything and is especially
important for an empty first sequence, because then it becomes the default
return value. The second sequence must have at least as many elements as the
first.
The second form simply applies a pair of functions to its
sequence. The op1 function is used in place of addition and op2
is used instead of multiplication. Thus, if you applied the second version of inner_product( )
to the sequence, the result would be the following operations:
init = op1(init, op2(1,1));
init = op1(init, op2(1,2));
init = op1(init, op2(2,3));
init = op1(init, op2(2,4));
Thus, it’s similar to transform( ), but two
operations are performed instead of one.
OutputIterator partial_sum(InputIterator first,
InputIterator last, OutputIterator result);
OutputIterator partial_sum(InputIterator first,
InputIterator last, OutputIterator result,
BinaryFunction op);
Calculates a generalized partial sum. A new sequence is
created, beginning at result. Each element is the sum of all the
elements up to the currently selected element in [first, last). For
example, if the original sequence is {1, 1, 2, 2, 3}, the generated
sequence is {1, 1 + 1, 1 + 1 + 2, 1 + 1 + 2 + 2, 1 + 1 + 2 + 2 + 3},
that is, {1, 2, 4, 6, 9}.
In the second version, the binary function op is used
instead of the + operator to take all the “summation” up to that point
and combine it with the new value. For example, if you use multiplies<int>( )
as the object for the sequence, the output is {1, 1, 2, 4, 12}. Note
that the first output value is always the same as the first input value.
The return value is the end of the output range [result,
result + (last - first) ).
OutputIterator adjacent_difference(InputIterator first,
InputIterator last, OutputIterator result);
OutputIterator adjacent_difference(InputIterator first,
InputIterator last, OutputIterator result, BinaryFunction
op);
Calculates the differences of adjacent elements throughout
the range [first, last). This means that in the new sequence, the value
is the value of the difference of the current element and the previous element
in the original sequence (the first value is unchanged). For example, if the
original sequence is {1, 1, 2, 2, 3}, the resulting sequence is {1, 1
– 1, 2 – 1, 2 – 2, 3 – 2}, that is: {1, 0, 1, 0, 1}.
The second form uses the binary function op instead
of the ‘–’ operator to perform the “differencing.” For example, if you
use multiplies<int>( ) as the function object for the
sequence, the output is {1, 1, 2, 4, 6}.
The return value is the end of the output range [result,
result + (last - first) ).
Example
This program tests all the algorithms in <numeric>
in both forms, on integer arrays. You’ll notice that in the test of the form
where you supply the function or functions, the function objects used are the
ones that produce the same result as form one, so the results will be exactly
the same. This should also demonstrate a bit more clearly the operations that
are going on and how to substitute your own operations.
//: C06:NumericTest.cpp
#include <algorithm>
#include <iostream>
#include <iterator>
#include <functional>
#include <numeric>
#include "PrintSequence.h"
using namespace std;
int main() {
int a[] = { 1, 1, 2, 2, 3, 5, 7, 9, 11, 13 };
const int ASZ = sizeof a / sizeof a[0];
print(a, a + ASZ, "a", " ");
int r = accumulate(a, a + ASZ, 0);
cout << "accumulate 1: " << r
<< endl;
// Should produce the same result:
r = accumulate(a, a + ASZ, 0, plus<int>());
cout << "accumulate 2: " << r
<< endl;
int b[] = { 1, 2, 3, 4, 1, 2, 3, 4, 1, 2 };
print(b, b + sizeof b / sizeof b[0], "b",
" ");
r = inner_product(a, a + ASZ, b, 0);
cout << "inner_product 1: " <<
r << endl;
// Should produce the same result:
r = inner_product(a, a + ASZ, b, 0,
plus<int>(), multiplies<int>());
cout << "inner_product 2: " <<
r << endl;
int* it = partial_sum(a, a + ASZ, b);
print(b, it, "partial_sum 1", "
");
// Should produce the same result:
it = partial_sum(a, a + ASZ, b, plus<int>());
print(b, it, "partial_sum 2", "
");
it = adjacent_difference(a, a + ASZ, b);
print(b, it, "adjacent_difference 1","
");
// Should produce the same result:
it = adjacent_difference(a, a + ASZ, b, minus<int>());
print(b, it, "adjacent_difference 2","
");
} ///:~
Note that the return value of inner_product( )
and partial_sum( ) is the past-the-end iterator for the resulting
sequence, so it is used as the second iterator in the print( )
function.
Since the second form of each function allows you to provide
your own function object, only the first form of the function is purely
“numeric.” You could conceivably do things that are not intuitively numeric
with inner_product( ).
Finally, here are some basic tools that are used with the
other algorithms; you may or may not use them directly yourself.
(Templates in the <utility>
header)
template<class T1, class T2> struct pair;
template<class T1, class T2> pair<T1, T2>
make_pair(const T1&, const T2&);
These were described and used earlier in this chapter. A pair
is simply a way to package two objects (which may be of different types) into a
single object. This is typically used when you need to return more than one
object from a function, but it can also be used to create a container that
holds pair objects or to pass more than one object as a single argument.
You access the elements by saying p.first and p.second, where p
is the pair object. The function equal_range( ), described
in this chapter, returns its result as a pair of iterators, for example.
You can insert( ) a pair directly into a map or multimap;
a pair is the value_type for those containers.
If you want to create a pair “on the fly,” you
typically use the template function make_pair( ) rather than
explicitly constructing a pair object. make_pair( ) deduces
the types of the arguments it receives, relieving you of the typing as well as
increasing robustness.
(From <iterator>)
difference_type distance(InputIterator first, InputIterator last);
Tells you the number of elements between first and last.
More precisely, it returns an integral value that tells you the number of times
first must be incremented before it is equal to last. No
dereferencing of the iterators occurs during this process.
(From <iterator>)
Moves the iterator i forward by the value of n. (It can also be
moved backward for negative values of n if the iterator is
bidirectional.) This algorithm is aware of the different types of iterators and
will use the most efficient approach. For example, random iterators can be
incremented directly using ordinary arithmetic (i+=n), whereas a
bidirectional iterator must be incremented n times.
(From <iterator>)
back_insert_iterator<Container>
back_inserter(Container& x);
front_insert_iterator<Container>
front_inserter(Container& x);
insert_iterator<Container>
inserter(Container& x, Iterator i);
These functions are used to create iterators for the given
containers that will insert elements into the container, rather than overwrite
the existing elements in the container using operator= (which is the
default behavior). Each type of iterator uses a different operation for
insertion: back_insert_iterator uses push_back( ), front_insert_iterator
uses push_front( ), and insert_iterator uses insert( )
(and thus it can be used with the associative containers, while the other two
can be used with sequence containers). These will be shown in some detail in
the next chapter.
const
LessThanComparable& min(const LessThanComparable& a,
const LessThanComparable& b);
const T& min(const T& a, const T& b,
BinaryPredicate binary_pred);
Returns the lesser of its two arguments, or returns the
first argument if the two are equivalent. The first version performs comparisons
using operator<, and the second passes both arguments to binary_pred
to perform the comparison.
const
LessThanComparable& max(const LessThanComparable& a,
const LessThanComparable& b);
const T& max(const T& a, const T& b,
BinaryPredicate binary_pred);
Exactly like min( ), but returns the greater of
its two arguments.
void swap(Assignable& a, Assignable& b);
void iter_swap(ForwardIterator1 a, ForwardIterator2 b);
Exchanges
the values of a and b using assignment. Note that all container
classes use specialized versions of swap( ) that are typically more
efficient than this general version.
The
iter_swap( ) function swaps the values that its two arguments
reference.
Once you become comfortable with the style of STL
algorithms, you can begin to create your own generic algorithms. Because these
will conform to the conventions of all the other algorithms in the STL, they’re
easy to use for programmers who are familiar with the STL, and thus they become
a way to “extend the STL vocabulary.”
The easiest way to approach the problem is to go to the <algorithm>
header file, find something similar to what you need, and pattern your code
after that. (Virtually
all STL implementations provide the code for the templates directly in the
header files.)
If you take a close look at the list of algorithms in the
Standard C++ library, you might notice a glaring omission: there is no copy_if( )
algorithm. Although it’s true that you can accomplish the same effect with remove_copy_if( ),
this is not quite as convenient because you have to invert the condition.
(Remember, remove_copy_if( ) only copies those elements that don’t
match its predicate, in effect removing those that do.) You might be
tempted to write a function object adaptor that negates its predicate before
passing it to remove_copy_if( ), by including a statement something
like this:
// Assumes pred is the incoming condition
replace_copy_if(begin, end, not1(pred));
This seems reasonable, but when you remember that you want
to be able to use predicates that are pointers to raw functions, you see why
this won’t work—not1 expects an adaptable function object. The only
solution is to write a copy_if( ) algorithm from scratch. Since you
know from inspecting the other copy algorithms that conceptually you need
separate iterators for input and output, the following example will do the job:
//: C06:copy_if.h
// Create your own STL-style
algorithm.
#ifndef COPY_IF_H
#define COPY_IF_H
template<typename ForwardIter,
typename OutputIter, typename UnaryPred>
OutputIter copy_if(ForwardIter begin, ForwardIter end,
OutputIter dest, UnaryPred f) {
while(begin != end) {
if(f(*begin))
*dest++ = *begin;
++begin;
}
return dest;
}
#endif // COPY_IF_H ///:~
Notice that the increment of begin cannot be
integrated into the copy expression.
The goal of this chapter is to give you a practical
understanding of the algorithms in the Standard Template Library. That is, to
make you aware of and comfortable enough with the STL that you begin to use it
on a regular basis (or, at least, to think of using it so you can come back
here and hunt for the appropriate solution). The STL is powerful not only
because it’s a reasonably complete library of tools, but also because it
provides a vocabulary for thinking about problem solutions and it is a framework
for creating additional tools.
Although this chapter did show some examples of creating
your own tools, we did not go into the full depth of the theory of the STL
necessary to completely understand all the STL nooks and crannies. Such
understanding will allow you to create tools more sophisticated than those
shown here. This omission was in part because of space limitations, but mostly
because it is beyond the charter of this book—our goal here is to give you
practical understanding that will improve your day-to-day programming skills.
A number of books are dedicated solely to the STL (these are
listed in the appendices), but we especially recommend Scott Meyers’
Effective STL (Addison Wesley, 2002).
Solutions
to selected exercises can be found in the electronic document The Thinking
in C++ Volume 2 Annotated Solution Guide, available for a small fee from www.MindView.net.
1. Create a generator that returns the current value of clock( )
(in <ctime>). Create a list<clock_t>, and fill it
with your generator using generate_n( ). Remove any duplicates in
the list and print it to cout using copy( ).
2. Using transform( ) and toupper( ) (in <cctype>),
write a single function call that will convert a string to all uppercase
letters.
3. Create a Sum function object template that will accumulate
all the values in a range when used with for_each( ).
4. Write an anagram generator that takes a word as a command-line
argument and produces all possible permutations of the letters.
5. Write a “sentence anagram generator” that takes a sentence as a
command-line argument and produces all possible permutations of the words in
the sentence. (It leaves the words alone and just moves them around.)
6. Create a class hierarchy with a base class B and a derived
class D. Put a virtual member function void f( ) in B
such that it will print a message indicating that B’s f( )
was called, and redefine this function for D to print a different
message. Create a vector<B*>, and fill it with B and D
objects. Use for_each( ) to call f( ) for each of the
objects in your vector.
7. Modify FunctionObjects.cpp so that it uses float
instead of int.
8. Modify FunctionObjects.cpp so that it templatizes the main
body of tests so you can choose which type you’re going to test. (You’ll have
to pull most of main( ) out into a separate template function.)
9. Write a program that takes an integer as a command line argument
and finds all of its factors.
10. Write a program that takes as a command-line argument the name of
a text file. Open this file and read it a word at a time (hint: use >>).
Store each word into a vector<string>. Force all the words to
lowercase, sort them, remove all the duplicates, and print the results.
11. Write a program that finds all the words that are in common
between two input files, using set_intersection( ). Change it to
show the words that are not in common, using set_symmetric_difference( ).
12. Create a program that, given an integer on the command line,
creates a “factorial table” of all the factorials up to and including the
number on the command line. To do this, write a generator to fill a vector<int>,
and then use partial_sum( ) with a standard function object.
13. Modify CalcInventory.cpp so that it will find all the
objects that have a quantity that’s less than a certain amount. Provide this
amount as a command-line argument, and use copy_if( ) and bind2nd( )
to create the collection of values less than the target value.
14. Use UrandGen( ) to generate 100 numbers. (The size of
the numbers does not matter.) Find which numbers in your range are congruent
mod 23 (meaning they have the same remainder when divided by 23). Manually pick
a random number yourself, and determine whether that number is in your range by
dividing each number in the list by your number and checking if the result is 1
instead of just using find( ) with your value.
15. Fill a vector<double> with numbers representing
angles in radians. Using function object composition, take the sine of all the
elements in your vector (see <cmath>).
16. Test the speed of your computer. Call srand(time(0)), then
make an array of random numbers. Call srand(time(0)) again and generate
the same number of random numbers in a second array. Use equal( )
to see if the arrays are the same. (If your computer is fast enough, time(0)
will return the same value both times it is called.) If the arrays are not the
same, sort them and use mismatch( ) to see where they differ. If
they are the same, increase the length of your array and try again.
17. Create an STL-style algorithm transform_if( )
following the first form of transform( ) that performs
transformations only on objects that satisfy a unary predicate. Objects that
don’t satisfy the predicate are omitted from the result. It needs to return a
new “end” iterator.
18. Create an STL-style algorithm that is an overloaded version of for_each( )
which follows the second form of transform( ) and takes two input
ranges so it can pass the objects of the second input range a to a binary
function that it applies to each object of the first range.
19. Create a Matrix class template that is made from a vector<vector<T>
>. Provide it with a friend ostream&
operator<<(ostream&, const Matrix&) to display the matrix.
Create the following binary operations using the STL function objects where
possible: operator+(const Matrix&, const Matrix&) for matrix
addition, operator*(const Matrix&, const vector<int>&) for
multiplying a matrix by a vector, and operator*(const Matrix&,
const Matrix&) for matrix multiplication. (You might need to look up
the mathematical meanings of the matrix operations if you don’t remember them.)
Test your Matrix class template using int and float.
20. Using the characters
"~`!@#$%^&*( )_-+=}{[]|\:;"'<.>,?/",
generate a codebook using an input file given on the command line as a
dictionary of words. Don’t worry about stripping off the non-alphabetic
characters nor worry about case of the words in the dictionary file. Map each
permutation of the character string to a word such as the following:
"=')/%[}]|{*@?!"`,;>&^-~_:$+.#(<\" apple
"|]\~>#.+%(/-_[`':;=}{*"$^!&?),@<" carrot
"@=~['].\/<-`>#*)^%+,";&?!_{:|$}(" Carrot
etc.
Make sure that no duplicate codes or words exist in your code
book. Use lexicographical_compare( ) to perform a sort on the
codes. Use your code book to encode the dictionary file. Decode your encoding
of the dictionary file, and make sure you get the same contents back.
21. Using the following names:
Jon Brittle
Jane Brittle
Mike Brittle
Sharon Brittle
George Jensen
Evelyn Jensen
Find all the
possible ways to arrange them for a wedding picture.
22. After being separated for one picture, the bride and groom
decided they wanted to be together for all of them. Find all the possible ways
to arrange the people for the picture if the bride and groom (Jon Brittle and
Jane Brittle) are to be next to each other.</#><#TIC2V2_CHAPTER8_I350>
23. A travel company wants to find out the average number of days
people take to travel from one end of the continent to another. The problem is
that in the survey, some people did not take a direct route and took much
longer than is needed (such unusual data points are called “outliers”). Using
the following generator, generate travel days into a vector. Use remove_if( )
to remove all the outliers in your vector. Take the average of the data
in the vector to find out how long people generally take to travel.
int travelTime() {
// The "outlier"
if(rand() % 10 == 0)
return rand() % 100;
// Regular route
return rand() % 10 + 10;
}
</#><#TIC2V2_CHAPTER8_I353>
24. Determine how much faster binary_search( ) is to find( )
when it comes to searching sorted ranges.</#><#TIC2V2_CHAPTER8_I354>
25. The army wants to recruit people from its selective service
list. They have decided to recruit those that signed up for the service in 1997
starting from the oldest down to the youngest. Generate an arbitrary amount of
people (give them data members such as age and yearEnrolled) into
a vector. Partition the vector so that those who enrolled in 1997
are ordered at the beginning of the list, starting from the youngest to the
oldest, and leave the remaining part of the list sorted according to age.
26. Make a class called Town with population, altitude,
and weather data members. Make the weather an enum with { RAINY,
SNOWY, CLOUDY, CLEAR }. Make a class that generates Town objects.
Generate town names (whether they make sense or not it doesn’t matter) or pull
them off the Internet. Ensure that the whole town name is lower case and there
are no duplicate names. For simplicity, we recommend keeping your town names to
one word. For the population, altitudes, and weather fields, make a generator
that will randomly generate weather conditions, populations within the range
[100 to 1,000,000) and altitudes between [0, 8000) feet. Fill a vector
with your Town objects. Rewrite the vector out to a new file
called Towns.txt.
27. There was a baby boom, resulting in a 10% population increase in
every town. Update your town data using transform( ), rewrite your
data back out to file.
28. Find the towns with the highest and lowest population. For this
exercise, implement operator< for your Town class. Also try
implementing a function that returns true if its first parameter is less
than its second. Use it as a predicate to call the algorithm you use.
29. Find all the towns within the altitudes 2500-3500 feet inclusive.
Implement equality operators for the Town class as needed.
30. We need to place an airport in a certain altitude, but location
is not a problem. Organize your list of towns so that there are no duplicate
(duplicate meaning that no two altitudes are within the same 100 ft range. Such
classes would include [100, 199), [200, 199), etc. altitudes. Sort this list in
ascending order in at least two different ways using the function objects in <functional>.
Do the same for descending order. Implement relational operators for Town
as needed.
31. Generate an arbitrary number of random numbers in a stack-based
array. Use max_element( ) to find the largest number in array. Swap
it with the number at the end of your array. Find the next largest number and
place it in the array in the position before the previous number. Continue
doing this until all elements have been moved. When the algorithm is complete,
you will have a sorted array. (This is a “selection sort”.)
32. Write a program that will take phone numbers from a file (that
also contains names and other suitable information) and change the numbers that
begin with 222 to 863. Be sure to save the old numbers. The file format is as
follows:
222 8945
756 3920
222 8432
etc.
33. Write a program that, given a last name, will find everyone with
that last name with his or her corresponding phone number. Use the algorithms
that deal with ranges (lower_bound, upper_bound, equal_range,
etc.). Sort with the last name acting as a primary key and the first name
acting as a secondary key. Assume that you will read the names and numbers from
a file where the format will be as follows. (Be sure to order them so that the
last names are ordered, and the first names are ordered within the last
names.):
John Doe 345 9483
Nick Bonham 349 2930
Jane Doe 283 2819
34. Given a file with data similar to the following, pull all the
state acronyms from the file and put them in a separate file. (Note that you
can’t depend on the line number for the type of data. The data is on random
lines.)
ALABAMA
AL
AK
ALASKA
ARIZONA
AZ
ARKANSAS
AR
CA
CALIFORNIA
CO
COLORADO
etc.
When complete, you should have a file with all the state acronyms which
are:
AL AK AZ AR CA CO CT DE FL GA HI ID IL IN IA KS KY LA ME MD MA MI MN MS MO
MT NE NV NH NJ NM NY NC ND OH OK OR PA RI SC SD TN TX UT VT VA WA WV WI WY
35. Make an Employee class with two data members: hours and
hourlyPay. Employee shall also have a calcSalary( ) function
which returns the pay for that employee. Generate random hourly pay and hours
for an arbitrary amount of employees. Keep a vector<Employee*>.
Find out how much money the company is going to spend for this pay period.
36. Race sort( ), partial_sort( ), and
nth_element( ) against each other and find out if it’s really worth
the time saved to use one of the weaker sorts if they’re all that’s needed.
Container classes are the
solution to a specific kind of code reuse problem. They are building blocks
used to create object–oriented programs, and they make the internals of a
program much easier to construct.
A container class describes an object that holds other
objects. Container classes are so important that they were considered
fundamental to early object-oriented languages. In Smalltalk, for example, programmers
think of the language as the program translator together with the class
library, and a critical part of that library is the set of container classes. It
became natural, therefore, for C++ compiler vendors to also include a container
class library. You’ll note that the vector is so useful that it was
introduced in its simplest form early in Volume 1 of this book.
Like many other early C++ libraries, early container class
libraries followed Smalltalk’s object-based hierarchy, which worked well
for Smalltalk, but turned out to be awkward and difficult to use in C++.
Another approach was required.
The C++ approach to containers is based on templates. The
containers in the Standard C++ library represent a broad range of data
structures designed to work well with the standard algorithms and to meet
common software development needs.
If you don’t know how many objects you’re going to need to
solve a particular problem, or how long they will last, you also don’t know
ahead of time how to store those objects. How can you know how much space to
create? The answer is you don’t—until run time.
The solution to most problems in object-oriented design
seems simple; you create another type of object. For the storage problem, the
new type of object holds other objects or pointers to objects. This new type of
object, which is typically referred to in C++ as a container (also
called a collection in some languages), expands itself whenever
necessary to accommodate everything you place inside it. You don’t need to know
ahead of time how many objects you’re going to place in a container; you just
create a container object and let it take care of the details.
Fortunately, a good object-oriented programming language comes
with a set of containers. In C++, it’s the Standard Template Library (STL). In
some libraries, a generic container is considered good enough for all needs,
and in others (C++ in particular) the library has different types of containers
for different needs: a vector for efficient access to all elements, and
a linked list for efficient insertion at all positions, and several
more, so you can choose the particular type that fits your needs.
All containers have some way to put things in and get things
out. The way you place something into a container is fairly obvious; there’s a
function called “push” or “add” or a similar name. The way you retrieve things
from a container is not always as apparent; if an entity is array-like, such as
a vector, you might be able to use an indexing operator or function. But
in many situations this doesn’t make sense. Also, a single-selection function
is restrictive. What if you want to manipulate or compare a group of elements
in the container?
The solution for flexible element access is the iterator,
an object whose job is to select the elements within a container and present
them to the user of the iterator. As a class, an iterator also provides a level
of abstraction, which you can use to separate the details of the container from
the code that’s accessing that container. The container, via the iterator, is
seen as a sequence. The iterator lets you traverse the sequence without
worrying about the underlying structure—that is, whether it’s a vector,
a linked list, a set, or something else. This gives you the
flexibility to easily change the underlying data structure without disturbing
the code in your program that traverses the container. Separating iteration
from the container’s control also allows multiple simultaneous iterators.
From a design standpoint, all you really want is a sequence
that can be manipulated to solve your problem. If a single type of sequence
satisfied all your needs, there would be no reason to have different types. You
need a choice of containers for two reasons. First, containers provide
different types of interfaces and external behavior. A stack has an
interface and a behavior that is different from that of a queue, which
is different from that of a set or a list. One of these might
provide a more flexible solution to your problem than the other, or it might
provide a clearer abstraction that conveys your design intent. Second,
different containers have different efficiencies for certain operations.
Compare a vector to a list, for example. Both are simple
sequences that can have nearly identical interfaces and external behaviors. But
certain operations can have radically different costs. Randomly accessing
elements in a vector is a constant-time operation; it takes the same
amount of time regardless of the element you select. However, it is expensive
to move through a linked list to randomly access an element, and it
takes longer to find an element if it is farther down the list. On the
other hand, if you want to insert an element in the middle of a sequence, it’s
cheaper with a list than with a vector. The efficiencies of these
and other operations depend on the underlying structure of the sequence. In the
design phase, you might start with a list and, when tuning for
performance, change to a vector, or vice-versa. Because of iterators,
code that merely traverses sequences is insulated from changes in the
underlying sequence implementation.
Remember that a container is only a storage cabinet that
holds objects. If that cabinet solves all your needs, it probably doesn’t
really matter how it is implemented. If you’re working in a programming
environment that has built-in overhead due to other factors, the cost
difference between a vector and a linked list might not matter.
You might need only one type of sequence. You can even imagine the “perfect”
container abstraction, which can automatically change its underlying
implementation according to the way it is used.
As in the previous chapter, you will notice that this
chapter does not contain exhaustive documentation describing each of the member
functions in each STL container. Although we describe the member functions we
use, we’ve left the full descriptions to others. We recommend the online
resources available for the Dinkumware, Silicon Graphics, and STLPort STL
implementations.
Here’s an example using the set class template, a container modeled after a traditional mathematical set and which does not accept
duplicate values. The following set was created to work with ints:
//: C07:Intset.cpp
// Simple use of STL set.
#include <cassert>
#include <set>
using namespace std;
int main() {
set<int> intset;
for(int i = 0; i < 25; i++)
for(int j = 0; j < 10; j++)
// Try to insert duplicates:
intset.insert(j);
assert(intset.size() == 10);
} ///:~
The insert( ) member does all the work: it
attempts to insert an element and ignores it if it’s already there. Often the
only activities involved in using a set are simply insertion and testing to see
whether it contains the element. You can also form a union, an intersection, or
a difference of sets and test to see if one set is a subset of another. In this
example, the values 0–9 are inserted into the set 25 times, but only the 10
unique instances are accepted.
Now consider taking the form of Intset.cpp and
modifying it to display a list of the words used in a document. The solution
becomes remarkably simple.
//: C07:WordSet.cpp
#include <fstream>
#include <iostream>
#include <iterator>
#include <set>
#include <string>
#include "../require.h"
using namespace std;
void wordSet(const char* fileName) {
ifstream source(fileName);
assure(source, fileName);
string word;
set<string> words;
while(source >> word)
words.insert(word);
copy(words.begin(), words.end(),
ostream_iterator<string>(cout,
"\n"));
cout << "Number of unique words:"
<< words.size() << endl;
}
int main(int argc, char* argv[]) {
if(argc > 1)
wordSet(argv[1]);
else
wordSet("WordSet.cpp");
} ///:~
The only substantive difference here is that the set holds strings
instead of integers. The words are pulled from a file, but the other operations
are similar to those in Intset.cpp. Not only does the output reveal that
duplicates have been ignored, but because of the way set is implemented,
the words are automatically sorted.
A set is an example of an associative container,
one of the three categories of containers provided by the Standard C++ library.
The containers and their categories are summarized in the following table:
|
Category
|
Containers
|
|
Sequence Containers
|
vector, list, deque
|
|
Container Adaptors
|
queue, stack, priority_queue
|
|
Associative Containers
|
set, map, multiset, multimap
|
These categories represent
different models that are used for different needs. The Sequence Containers
simply organize their elements linearly, and are the most fundamental type of
containers. For some problems, special properties need to be attached to these
sequences, and that’s exactly what the Container Adaptors do—they model
abstractions such as a queue or stack. The associative containers organize
their data based on keys, allowing for fast retrieval of that data.
All the containers in the standard library hold copies
of the objects you place in them, and expand their resources as needed, so your
objects must be copy-constructible (have an accessible copy constructor)
and assignable (have an accessible assignment operator). The key
difference between one container and another is the way the objects are stored
in memory and what operations are available to the user.
A vector, as you already know, is a linear sequence
that allows rapid random access to its elements. However, it’s expensive to
insert an element in the middle of a co-located sequence like a vector,
just as it is with an array. A deque (double-ended-queue, pronounced “deck”) also allows random access that’s nearly as fast as vector, but it’s
significantly faster when it needs to allocate new storage, and you can easily
add new elements at the front as well as the back of the sequence. A list is a doubly linked list, so it’s expensive to move around randomly but cheap to
insert an element anywhere. Thus list, deque and vector
are similar in their basic functionality (they all hold linear sequences), but
different in the cost of their activities. For your first attempt at a program,
you could choose any one and experiment with the others only if you’re tuning
for efficiency.
Many of the problems you set out to solve will only require
a simple linear sequence such as a vector, deque, or list.
All three have a member function push_back( ) that you use to insert a new element at the back of the sequence (deque and list also have push_front( ), which inserts elements at the beginning of the sequence).
But how do you retrieve the elements stored in a sequence
container? With a vector or deque, it is possible to use the
indexing operator[ ], but that doesn’t work with list. You
can use iterators on all three sequences to access elements. Each container
provides the appropriate type of iterator for accessing its elements.
Even though the containers hold objects by value (that is,
they hold copies of whole objects), sometimes you’ll want to store pointers so
that you can refer to objects from a hierarchy and thus take advantage of the
polymorphic behavior of the classes represented. Consider the classic “shape”
example where shapes have a set of common operations, and you have different
types of shapes. Here’s what it looks like using the STL vector to hold
pointers to various Shape types created on the heap:
//: C07:Stlshape.cpp
// Simple shapes using the STL.
#include <vector>
#include <iostream>
using namespace std;
class Shape {
public:
virtual void draw() = 0;
virtual ~Shape() {};
};
class Circle : public Shape {
public:
void draw() { cout << "Circle::draw”
<< endl; }
~Circle() { cout << "~Circle” <<
endl; }
};
class Triangle : public Shape {
public:
void draw() { cout << "Triangle::draw”
<< endl; }
~Triangle() { cout << "~Triangle” <<
endl; }
};
class Square : public Shape {
public:
void draw() { cout << "Square::draw”
<< endl; }
~Square() { cout << "~Square” <<
endl; }
};
int main() {
typedef std::vector<Shape*> Container;
typedef Container::iterator Iter;
Container shapes;
shapes.push_back(new Circle);
shapes.push_back(new Square);
shapes.push_back(new Triangle);
for(Iter i = shapes.begin(); i != shapes.end(); i++)
(*i)->draw();
// ... Sometime later:
for(Iter j = shapes.begin(); j != shapes.end(); j++)
delete *j;
} ///:~
The creation of Shape, Circle, Square,
and Triangle should be fairly familiar. Shape is an abstract base
class (because of the pure specifier =0) that defines the
interface for all types of Shapes. The derived classes override the virtual
function draw( ) to perform the appropriate operation. Now we’d
like to create a bunch of different types of Shape objects, and the
natural place to store them is in an STL container. For convenience, this typedef:
typedef std::vector<Shape*> Container;
creates an alias for a vector of Shape*, and
this typedef:
typedef Container::iterator Iter;
uses that alias to create another one, for vector<Shape*>::iterator.
Notice that the container type name must be used to produce the appropriate
iterator, which is defined as a nested class. Although there are different
types of iterators (forward, bidirectional, random, and so on), they all have the
same basic interface: you can increment them with ++, you can
dereference them to produce the object they’re currently selecting, and you can
test them to see if they’re at the end of the sequence. That’s what you’ll want
to do 90 percent of the time. And that’s what is done in the previous example:
after a container is created, it’s filled with different types of Shape
pointers. Notice that the upcast happens as the Circle, Square,
or Rectangle pointer is added to the Shapes container, which
doesn’t know about those specific types but instead holds only Shape*.
As soon as the pointer is added to the container, it loses its specific
identity and becomes an anonymous Shape*. This is exactly what we want:
toss them all in and let polymorphism sort it out.
The first for loop creates an iterator and sets it to
the beginning of the sequence by calling the begin( ) member
function for the container. All containers have begin( ) and end( )
member functions that produce an iterator selecting, respectively, the beginning
of the sequence and one past the end of the sequence. To test to see if you’re
done, you make sure the iterator is not equal to the iterator produced
by end( ); don’t use < or <=. The only tests
that work are != and ==, so it’s common to write a loop like:
for(Iter i = shapes.begin(); i != shapes.end(); i++)
This says “take me through every element in the sequence.”
What do you do with the iterator to produce the element it’s
selecting? You dereference it using (what else?) the ‘*’ (which is
actually an overloaded operator). What you get back is whatever the container
is holding. This container holds Shape*, so that’s what *i
produces. If you want to call a Shape member function, you must do so
with the -> operator, so you write the line:
This calls the draw( ) function for the Shape*
the iterator is currently selecting. The parentheses are ugly but necessary to
produce the desired operator precedence.
As they are destroyed or in other cases where the pointers
are removed, the STL containers do not automatically call delete
for the pointers they contain. If you create an object on the heap with new
and place its pointer in a container, the container can’t tell if that pointer
is also placed inside another container, nor if it refers to heap memory in the
first place. As always, you are responsible for managing your own heap
allocations. The last lines in the program move through and delete every object
in the container so that proper cleanup occurs. The easiest and safest way to
handle pointers in containers is to use smart pointers. It should be noted that
auto_ptr can’t be used for this purpose, so you will need to look
outside of the C++ Standard Library for a suitable smart pointers.
You can change the type of container that this program uses
with two lines. Instead of including <vector>, you include <list>,
and in the first typedef you say:
typedef std::list<Shape*> Container;
instead of using a vector. Everything else goes
untouched. This is possible not because of an interface enforced by inheritance
(there is little inheritance in the STL), but because the interface is enforced
by a convention adopted by the designers of the STL, precisely so you could
perform this kind of interchange. Now you can easily switch between vector
and list or any other container that supports the same interface (both
syntactically and semantically) and see which one works fastest for your needs.
In the previous example, at the end of main( )
it was necessary to move through the whole list and delete all the Shape
pointers:
for(Iter j = shapes.begin(); j != shapes.end(); j++)
delete *j;
STL containers make sure that each object they
contain has its destructor called when the container itself is destroyed.
Pointers, however, have no destructor, so we have to delete them
ourselves.
This highlights what could be seen as an oversight in the
STL: there’s no facility in any of the STL containers to automatically delete
the pointers they contain, so you must do it manually. It’s as if the
assumption of the STL designers was that containers of pointers weren’t an
interesting problem, but that’s not the case.
Automatically deleting a pointer turns out to be problematic
because of the multiple membership problem. If a container holds a
pointer to an object, it’s not unlikely that pointer could also be in another
container. A pointer to an Aluminum object in a list of Trash
pointers could also reside in a list of Aluminum pointers. If that
happens, which list is responsible for cleaning up that object—that is, which
list “owns” the object?
This question is virtually eliminated if the object rather
than a pointer resides in the list. Then it seems clear that when the list is
destroyed, the objects it contains must also be destroyed. Here, the STL
shines, as you can see when creating a container of string objects. The
following example stores each incoming line as a string in a vector<string>:
//: C07:StringVector.cpp
// A vector of strings.
#include <fstream>
#include <iostream>
#include <iterator>
#include <sstream>
#include <string>
#include <vector>
#include "../require.h"
using namespace std;
int main(int argc, char* argv[]) {
const char* fname = "StringVector.cpp";
if(argc > 1) fname = argv[1];
ifstream in(fname);
assure(in, fname);
vector<string> strings;
string line;
while(getline(in, line))
strings.push_back(line);
// Do something to the strings...
int i = 1;
vector<string>::iterator w;
for(w = strings.begin(); w !=
strings.end(); w++) {
ostringstream ss;
ss << i++;
*w = ss.str() + ": " + *w;
}
// Now send them out:
copy(strings.begin(), strings.end(),
ostream_iterator<string>(cout,
"\n"));
// Since they aren't pointers, string
// objects clean themselves up!
} ///:~
Once the vector<string> called strings
is created, each line in the file is read into a string and put in the vector:
while(getline(in, line))
strings.push_back(line);
The operation that’s being performed on this file is to add
line numbers. A stringstream provides easy conversion from an int
to a string of characters representing that int.
Assembling string objects is quite easy, since operator+
is overloaded. Sensibly enough, the iterator w can be dereferenced to
produce a string that can be used as both an rvalue and an lvalue:
*w = ss.str() + ": " + *w;
You may be surprised that you can assign back into the
container via the iterator, but it’s a tribute to the careful design of the
STL.
Because the vector<string> contains the
objects, two things are worthy of note. First, as explained before, you don’t
need to explicitly clean up the string objects. Even if you put
addresses of the string objects as pointers into other
containers, it’s clear that strings is the “master list” and maintains
ownership of the objects.
Second, you are effectively using dynamic object creation,
and yet you never use new or delete! It’s all taken care of for
you by the vector because it stores copies of the objects you
give it. Thus your coding is significantly cleaned up.
The power of instantly creating a sequence of elements is
amazing, and it makes you realize how much time you may have lost in the past
solving this particular problem. For example, many utility programs involve
reading a file into memory, modifying the file, and writing it back out to
disk. You might as well take the functionality in StringVector.cpp and
package it into a class for later reuse.
Now the question is: do you create a member object of type vector,
or do you inherit? A general object-oriented design guideline is to prefer
composition (member objects) over inheritance, but the standard algorithms
expect sequences that implement a particular interface, so inheritance is often
necessary.
//: C07:FileEditor.h
// A file editor tool.
#ifndef FILEEDITOR_H
#define FILEEDITOR_H
#include <iostream>
#include <string>
#include <vector>
class FileEditor : public
std::vector<std::string> {
public:
void open(const char* filename);
FileEditor(const char* filename) { open(filename); }
FileEditor() {};
void write(std::ostream& out = std::cout);
};
#endif // FILEEDITOR_H ///:~
The constructor opens the file and reads it into the FileEditor,
and write( ) puts the vector of string onto any ostream.
Notice in write( ) that you can have a default argument for the
reference.
The implementation is quite simple:
//: C07:FileEditor.cpp {O}
#include "FileEditor.h"
#include <fstream>
#include "../require.h"
using namespace std;
void FileEditor::open(const char* filename) {
ifstream in(filename);
assure(in, filename);
string line;
while(getline(in, line))
push_back(line);
}
// Could also use copy() here:
void FileEditor::write(ostream& out) {
for(iterator w = begin(); w != end(); w++)
out << *w << endl;
} ///:~
The functions from StringVector.cpp are simply
repackaged. Often this is the way classes evolve—you start by creating a program
to solve a particular application and then discover some commonly used
functionality within the program that can be turned into a class.
The line-numbering program can now be rewritten using FileEditor:
//: C07:FEditTest.cpp
//{L} FileEditor
// Test the FileEditor tool.
#include <sstream>
#include "FileEditor.h"
#include "../require.h"
using namespace std;
int main(int argc, char* argv[]) {
FileEditor file;
if(argc > 1) {
file.open(argv[1]);
} else {
file.open("FEditTest.cpp");
}
// Do something to the lines...
int i = 1;
FileEditor::iterator w = file.begin();
while(w != file.end()) {
ostringstream ss;
ss << i++;
*w = ss.str() + ": " + *w;
++w;
}
// Now send them to cout:
file.write();
} ///:~
Now the operation of reading the file is in the constructor:
FileEditor file(argv[1]);
(or in the open( ) member function), and writing
happens in the single line (which defaults to sending the output to cout):
The bulk of the program is involved with modifying the file
in memory.
An iterator is an abstraction for genericity.
It works with different types of containers without knowing the underlying
structure of those containers. Most containers support iterators, so you can
say:
<ContainerType>::iterator
<ContainerType>::const_iterator
to produce the iterator types for a container. Every
container has a begin( ) member function that produces an iterator
indicating the beginning of the elements in the container, and an end( )
member function that produces an iterator which is the past-the-end marker of the container. If the container is const¸ begin( )
and end( ) produce const iterators, which disallow changing
the elements pointed to (because the appropriate operators are const).
All iterators can advance within their sequence (via operator++)
and allow == and != comparisons. Thus, to move an iterator it
forward without running it off the end, you say something like:
while(it != pastEnd) {
// Do something
++it;
}
where pastEnd is the past-the-end marker produced by
the container’s end( ) member function.
An iterator can be used to produce the container element
that it is currently selecting via the dereferencing operator (operator*).
This can take two forms. If it is an iterator traversing a container, and
f( ) is a member function of the type of objects held in the
container, you can say either:
or
Knowing this, you can create a template that works with any
container. Here, the apply( ) function template calls a member
function for every object in the container, using a pointer to member that is
passed as an argument:
//: C07:Apply.cpp
// Using simple iteration.
#include <iostream>
#include <vector>
#include <iterator>
using namespace std;
template<class Cont, class PtrMemFun>
void apply(Cont& c, PtrMemFun f) {
typename Cont::iterator it = c.begin();
while(it != c.end()) {
((*it).*f)(); // Alternate form
++it;
}
}
class Z {
int i;
public:
Z(int ii) : i(ii) {}
void g() { ++i; }
friend ostream& operator<<(ostream& os,
const Z& z) {
return os << z.i;
}
};
int main() {
ostream_iterator<Z> out(cout, " ");
vector<Z> vz;
for(int i = 0; i < 10; i++)
vz.push_back(Z(i));
copy(vz.begin(), vz.end(), out);
cout << endl;
apply(vz, &Z::g);
copy(vz.begin(), vz.end(), out);
} ///:~
You can’t use operator-> here because the
resulting statement would be:
which attempts to use the iterator’s operator->*,
which is not provided by the iterator classes.
It is much easier to use either for_each( ) or transform( )
to apply functions to sequences, as you saw in the previous chapter.
A container may also be reversible, which means that
it can produce iterators that move backward from the end, as well as iterators
that move forward from the beginning. All standard containers support such
bidirectional iteration.
A reversible container has the member functions rbegin( ) (to produce a reverse_iterator selecting the end) and rend( ) (to produce a reverse_iterator indicating “one past the beginning”). If the
container is const, rbegin( ) and rend( ) will
produce const_reverse_iterators.
The following example uses vector but will work with
all containers that support iteration:
//: C07:Reversible.cpp
// Using reversible containers.
#include <fstream>
#include <iostream>
#include <string>
#include <vector>
#include "../require.h"
using namespace std;
int main() {
ifstream in("Reversible.cpp");
assure(in, "Reversible.cpp");
string line;
vector<string> lines;
while(getline(in, line))
lines.push_back(line);
for(vector<string>::reverse_iterator r =
lines.rbegin();
r != lines.rend(); r++)
cout << *r << endl;
} ///:~
You move backward through the container using the same
syntax as you do when moving forward through a container with an ordinary
iterator.
The iterators in the Standard C++ library are classified
into “categories” that describe their capabilities. The order in which they are
generally described moves from the categories with the most restricted behavior
to those with the most powerful behavior.
Input: read–only, one pass
The only predefined implementations of input iterators are istream_iterator and istreambuf_iterator, to read from an istream. As you can
imagine, an input iterator can only be dereferenced once for each element
that’s selected, just as you can only read a particular portion of an input
stream once. They can only move forward. A special constructor defines the
past-the-end value. In summary, you can dereference it for reading (once only
for each value) and move it forward.
Output: write–only, one pass
This is the complement of an input iterator, but for writing
rather than reading. The only predefined implementations of output iterators
are ostream_iterator and ostreambuf_iterator, to write to an ostream, and the less commonly used raw_storage_iterator. Again, these can only be dereferenced once for each written value, and they can only move forward. There is no concept of
a terminal past-the-end value for an output iterator. Summarizing, you can
dereference it for writing (once only for each value) and move it forward.
Forward: multiple read/write
The forward iterator contains all the functionality of both
the input iterator and the output iterator, plus you can dereference an
iterator location multiple times, so you can read and write to a value multiple
times. As the name implies, you can only move forward. There are no predefined
iterators that are only forward iterators.
Bidirectional: operator––
The bidirectional iterator has all the functionality of the forward iterator, and in addition it can be moved backward one location at a time
using
operator--. The iterators returned by the list container are
bidirectional.
Random–access: like a pointer
Finally, the random-access iterator has all the functionality of the bidirectional iterator plus all the functionality of a pointer (a
pointer is a random-access iterator), except that there is no “null”
iterator analogue to a null pointer. Basically, anything you can do with a
pointer you can do with a random-access iterator, including indexing with operator[ ],
adding integral values to a pointer to move it forward or backward by a number
of locations, or comparing one iterator to another with comparison operators.
Is this really important?
Why do you care about this categorization? When you’re just
using containers in a straightforward way (for example, just hand-coding all
the operations you want to perform on the objects in the container), it usually
doesn’t matter. Things either work or they don’t. The iterator categories
become important when:
1. You use some of the fancier built-in iterator types that will be
demonstrated shortly, or you “graduate” to creating your own iterators
(demonstrated later in this chapter).
2. You use the STL algorithms (the subject of the previous chapter).
Each of the algorithms places requirements on its iterators. Knowledge of the
iterator categories is even more important when you create your own reusable
algorithm templates, because the iterator category required by your algorithm
determines how flexible the algorithm will be. If you require only the most
primitive iterator category (input or output), your algorithm will work with everything
(copy( ) is an example of this).
An iterator’s category is identified by a hierarchy of iterator tag classes. The class names correspond to the iterator categories, and their
derivation reflects the relationship between them:
struct input_iterator_tag {};
struct output_iterator_tag {};
struct forward_iterator_tag :
public input_iterator_tag {};
struct bidirectional_iterator_tag :
public forward_iterator_tag {};
struct random_access_iterator_tag :
public bidirectional_iterator_tag {};
The class forward_iterator_tag derives only from input_iterator_tag, not from output_iterator_tag, because we need to have past-the-end
iterator values in algorithms that use forward iterators, but algorithms that
use output iterators always assume that operator* can be dereferenced.
For this reason, it is important to make sure that a past-the-end value is
never passed to an algorithm that expects an output iterator.
For efficiency, certain algorithms provide different
implementations for different iterator types, which they infer from the
iterator tag defined by the iterator. We will use some of these tag classes
later in this chapter when we define our own iterator types.
The STL has a predefined set of iterators that can be quite
handy. For example, you’ve already seen the reverse_iterator objects produced by calling rbegin( ) and rend( ) for all the basic containers.
The insertion iterators are necessary because some of
the STL algorithms—copy( ), for example—use the assignment operator=
to place objects in the destination container. This is a problem when you’re
using the algorithm to fill the container rather than to overwrite items
that are already in the destination container—that is, when the space isn’t
already there. What the insert iterators do is change the implementation of operator=
so that instead of doing an assignment, it calls a “push” or “insert” function
for that container, thus causing it to allocate new space. The constructors for
both back_insert_iterator and front_insert_iterator take a basic sequence container object (vector, deque or list) as their argument and produce an
iterator that calls push_back( ) or push_front( ), respectively, to perform assignment. The helper functions back_inserter( ) and front_inserter( ) produce these insert-iterator objects with a
little less typing. Since all the basic sequence containers support push_back( ),
you will probably find yourself using back_inserter( ) with some
regularity.
An insert_iterator lets you insert elements in the middle of the sequence, again replacing the meaning of operator=, but this time
by automatically calling insert( ) instead of one of the “push” functions. The insert( ) member function requires an iterator indicating the
place to insert before, so the insert_iterator requires this iterator in
addition to the container object. The shorthand function inserter( ) produces the same object.
The following example shows the use of the different types
of inserters:
//: C07:Inserters.cpp
// Different types of iterator inserters.
#include <iostream>
#include <vector>
#include <deque>
#include <list>
#include <iterator>
using namespace std;
int a[] = { 1, 3, 5, 7, 11, 13, 17, 19, 23 };
template<class Cont> void
frontInsertion(Cont& ci) {
copy(a, a + sizeof(a)/sizeof(Cont::value_type),
front_inserter(ci));
copy(ci.begin(), ci.end(),
ostream_iterator<typename Cont::value_type>(
cout, " "));
cout << endl;
}
template<class Cont> void backInsertion(Cont&
ci) {
copy(a, a + sizeof(a)/sizeof(Cont::value_type),
back_inserter(ci));
copy(ci.begin(), ci.end(),
ostream_iterator<typename Cont::value_type>(
cout, " "));
cout << endl;
}
template<class Cont> void midInsertion(Cont&
ci) {
typename Cont::iterator it = ci.begin();
++it; ++it; ++it;
copy(a, a + sizeof(a)/(sizeof(Cont::value_type) * 2),
inserter(ci, it));
copy(ci.begin(), ci.end(),
ostream_iterator<typename Cont::value_type>(
cout, " "));
cout << endl;
}
int main() {
deque<int> di;
list<int> li;
vector<int> vi;
// Can't use a front_inserter() with vector
frontInsertion(di);
frontInsertion(li);
di.clear();
li.clear();
backInsertion(vi);
backInsertion(di);
backInsertion(li);
midInsertion(vi);
midInsertion(di);
midInsertion(li);
} ///:~
Since vector does not support push_front( ),
it cannot produce a front_insert_iterator. However, you can see that vector
does support the other two types of insertions (even though, as you shall see
later, insert( ) is not an efficient operation for vector).
Note the use of the nested type Cont::value_type instead of hard-coding int.
More on stream iterators
We introduced the use of the stream iterators ostream_iterator (an output iterator) and istream_iterator (an input iterator) in conjunction with copy( ) in the previous chapter. Remember that an output stream
doesn’t have any concept of an “end,” since you can always just keep writing
more elements. However, an input stream eventually terminates (for example,
when you reach the end of a file), so you need a way to represent that. An istream_iterator
has two constructors, one that takes an istream and produces the
iterator you actually read from, and the other which is the default constructor
and produces an object that is the past-the-end sentinel. In the following
program this object is named end:
//: C07:StreamIt.cpp
// Iterators for istreams and ostreams.
#include <fstream>
#include <iostream>
#include <iterator>
#include <string>
#include <vector>
#include "../require.h"
using namespace std;
int main() {
ifstream in("StreamIt.cpp");
assure(in, "StreamIt.cpp");
istream_iterator<string> begin(in), end;
ostream_iterator<string> out(cout,
"\n");
vector<string> vs;
copy(begin, end, back_inserter(vs));
copy(vs.begin(), vs.end(), out);
*out++ = vs[0];
*out++ = "That's all, folks!";
} ///:~
When in runs out of input (in this case when the end
of the file is reached), init becomes equivalent to end, and the copy( )
terminates.
Because out is an ostream_iterator<string>, you can simply assign any string object to the dereferenced iterator using operator=,
and that string will be placed on the output stream, as seen in the two assignments
to out. Because out is defined with a newline as its second
argument, these assignments also insert a newline along with each assignment.
Although it is possible to create an istream_iterator<char>
and ostream_iterator<char>, these actually parse the input
and thus will, for example, automatically eat whitespace (spaces, tabs, and
newlines), which is not desirable if you want to manipulate an exact
representation of an istream. Instead, you can use the special iterators
istreambuf_iterator and ostreambuf_iterator, which are designed strictly to move characters. Although
these are templates, they are meant to be used with template arguments of
either char or wchar_t. The
following example lets you compare the behavior of the stream iterators with
the streambuf iterators:
//: C07:StreambufIterator.cpp
// istreambuf_iterator & ostreambuf_iterator.
#include <algorithm>
#include <fstream>
#include <iostream>
#include <iterator>
#include "../require.h"
using namespace std;
int main() {
ifstream in("StreambufIterator.cpp");
assure(in, "StreambufIterator.cpp");
// Exact representation of stream:
istreambuf_iterator<char> isb(in), end;
ostreambuf_iterator<char> osb(cout);
while(isb != end)
*osb++ = *isb++; // Copy 'in' to cout
cout << endl;
ifstream in2("StreambufIterator.cpp");
// Strips white space:
istream_iterator<char> is(in2), end2;
ostream_iterator<char> os(cout);
while(is != end2)
*os++ = *is++;
cout << endl;
} ///:~
The stream iterators use the parsing defined by istream::operator>>,
which is probably not what you want if you are parsing characters directly—it’s
fairly rare that you want all the whitespace stripped out of your character
stream. You’ll virtually always want to use a streambuf iterator when using
characters and streams, rather than a stream iterator. In addition, istream::operator>>
adds significant overhead for each operation, so it is only appropriate for
higher-level operations such as parsing numbers.
Manipulating raw storage
The raw_storage_iterator is defined in <memory> and is an output iterator. It is provided to enable algorithms to store their results
in uninitialized memory. The interface is quite simple: the constructor takes
an output iterator that is pointing to the raw memory (typically a pointer),
and the operator= assigns an object into that raw memory. The template
parameters are the type of the output iterator pointing to the raw storage and
the type of object that will be stored. Here’s an example that creates Noisy
objects, which print trace statements for their construction, assignment, and
destruction (we’ll show the Noisy class definition later):
//: C07:RawStorageIterator.cpp {-bor}
// Demonstrate the raw_storage_iterator.
//{L} Noisy
#include <iostream>
#include <iterator>
#include <algorithm>
#include "Noisy.h"
using namespace std;
int main() {
const int QUANTITY = 10;
// Create raw storage and cast to desired type:
Noisy* np = reinterpret_cast<Noisy*>(
new char[QUANTITY * sizeof(Noisy)]);
raw_storage_iterator<Noisy*, Noisy> rsi(np);
for(int i = 0; i < QUANTITY; i++)
*rsi++ = Noisy(); // Place objects in storage
cout << endl;
copy(np, np + QUANTITY,
ostream_iterator<Noisy>(cout, "
"));
cout << endl;
// Explicit destructor call for cleanup:
for(int j = 0; j < QUANTITY; j++)
(&np[j])->~Noisy();
// Release raw storage:
delete reinterpret_cast<char*>(np);
} ///:~
To make the raw_storage_iterator template happy, the
raw storage must be of the same type as the objects you’re creating. That’s why
the pointer from the new array of char is cast to a Noisy*. The
assignment operator forces the objects into the raw storage using the
copy-constructor. Note that the explicit destructor call must be made for proper cleanup, and this also allows the objects to be deleted one at a time
during container manipulation. The expression delete np would be invalid
anyway since the static type of a pointer in a delete expression must be
the same as the type assigned to in the new expression.
Sequences keep objects in whatever order you store them.
They differ in the efficiency of their operations, however, so if you are going
to manipulate a sequence in a particular fashion, choose the appropriate
container for those types of manipulations. So far in this book we’ve been
using vector as the container of choice. This is quite often the case in
applications. When you start making more sophisticated uses of containers, however,
it becomes important to know more about their underlying implementations and
behavior so that you can make the right choices.
Using a template, the following example shows the operations
supported by all the basic sequences: vector, deque, and list:
//: C07:BasicSequenceOperations.cpp
// The operations available for all the
// basic sequence Containers.
#include <deque>
#include <iostream>
#include <list>
#include <vector>
using namespace std;
template<typename Container>
void print(Container& c, char* title =
"") {
cout << title << ':' << endl;
if(c.empty()) {
cout << "(empty)" << endl;
return;
}
typename Container::iterator it;
for(it = c.begin(); it != c.end(); it++)
cout << *it << " ";
cout << endl;
cout << "size() " <<
c.size()
<< " max_size() " <<
c.max_size()
<< " front() " <<
c.front()
<< " back() " <<
c.back()
<< endl;
}
template<typename ContainerOfInt> void
basicOps(char* s) {
cout << "------- " << s
<< " -------" << endl;
typedef ContainerOfInt Ci;
Ci c;
print(c, "c after default constructor");
Ci c2(10, 1); // 10 elements, values all 1
print(c2, "c2 after constructor(10,1)");
int ia[] = { 1, 3, 5, 7, 9 };
const int IASZ = sizeof(ia)/sizeof(*ia);
// Initialize with begin & end iterators:
Ci c3(ia, ia + IASZ);
print(c3, "c3 after
constructor(iter,iter)");
Ci c4(c2); // Copy-constructor
print(c4, "c4 after copy-constructor(c2)");
c = c2; // Assignment operator
print(c, "c after operator=c2");
c.assign(10, 2); // 10 elements, values all 2
print(c, "c after assign(10, 2)");
// Assign with begin & end iterators:
c.assign(ia, ia + IASZ);
print(c, "c after assign(iter, iter)");
cout << "c using reverse iterators:"
<< endl;
typename Ci::reverse_iterator rit = c.rbegin();
while(rit != c.rend())
cout << *rit++ << " ";
cout << endl;
c.resize(4);
print(c, "c after resize(4)");
c.push_back(47);
print(c, "c after push_back(47)");
c.pop_back();
print(c, "c after pop_back()");
typename Ci::iterator it = c.begin();
++it; ++it;
c.insert(it, 74);
print(c, "c after insert(it, 74)");
it = c.begin();
++it;
c.insert(it, 3, 96);
print(c, "c after insert(it, 3, 96)");
it = c.begin();
++it;
c.insert(it, c3.begin(), c3.end());
print(c, "c after insert("
"it, c3.begin(), c3.end())");
it = c.begin();
++it;
c.erase(it);
print(c, "c after erase(it)");
typename Ci::iterator it2 = it = c.begin();
++it;
++it2; ++it2; ++it2; ++it2; ++it2;
c.erase(it, it2);
print(c, "c after erase(it, it2)");
c.swap(c2);
print(c, "c after swap(c2)");
c.clear();
print(c, "c after clear()");
}
int main() {
basicOps<vector<int>
>("vector");
basicOps<deque<int> >("deque");
basicOps<list<int> >("list");
} ///:~
The first function template, print( ),
demonstrates the basic information you can get from any sequence container:
whether it’s empty, its current size, the size of the largest possible
container, the element at the beginning, and the element at the end. You can
also see that every container has begin( ) and end( )
member functions that return iterators.
The basicOps( ) function tests everything else
(and in turn calls print( )), including a variety of constructors:
default, copy-constructor, quantity and initial value, and beginning and ending
iterators. There are an assignment operator= and two kinds of assign( )
member functions. One takes a quantity and an initial value, and the other
takes a beginning and ending iterator.
All the basic sequence containers are reversible containers,
as shown by the use of the rbegin( ) and rend( ) member
functions. A sequence container can be resized, and the entire contents of the
container can be removed with clear( ). When you call resize( ) to expand a sequence, the new elements use the default constructor of the type
of element in the sequence, or if they are built-in types, they are
zero-initialized.
Using an iterator to indicate where you want to start
inserting into any sequence container, you can insert( ) a single element, a number of elements that all have the same value, and a group of
elements from another container using the beginning and ending iterators of
that group.
To erase( ) a single element from the middle, use an iterator; to erase( ) a range of elements, use a pair of iterators.
Notice that since a list supports only bidirectional iterators, all the
iterator motion must be performed with increments and decrements. (If the
containers were limited to vector and deque, which produce
random-access iterators, operator+ and operator- could have been
used to move the iterators in bigger jumps.)
Although both list and deque support push_front( )
and pop_front( ), vector does not, but push_back( )
and pop_back( ) work with all three.
The naming of the member function swap( ) is a little confusing, since there’s also a nonmember swap( ) algorithm
that interchanges the values of any two objects of same type. The member swap( )
swaps everything in one container for another (if the containers hold the same
type), effectively swapping the containers themselves. It does this efficiently
by swapping the contents of each container, which consists mostly of pointers.
The nonmember swap( ) algorithm normally uses assignment to interchange
its arguments (an expensive operation for an entire container), but it is
customized through template specialization to call the member swap( )
for the standard containers. There is also an iter_swap algorithm that uses iterators to interchange two elements in the same container.
The following sections discuss the particulars of each type
of sequence container.
The vector class template is intentionally made to
look like a souped-up array, since it has array-style indexing, but also can
expand dynamically. The vector class template is so fundamentally useful
that it was introduced in a primitive way early in this book and was used
regularly in previous examples. This section will give a more in-depth look at vector.
To achieve maximally-efficient indexing and iteration, vector
maintains its storage as a single contiguous array of objects. This is a
critical point to observe in understanding the behavior of vector. It
means that indexing and iteration are lightning-fast, being basically the same
as indexing and iterating over an array of objects. But it also means that
inserting an object anywhere but at the end (that is, appending) is not really
an acceptable operation for a vector. In addition, when a vector
runs out of preallocated storage, to maintain its contiguous array it must
allocate a whole new (larger) chunk of storage elsewhere and copy the objects
to the new storage. This approach produces a number of unpleasant side-effects.
Cost of overflowing allocated storage
A vector starts by grabbing a block of storage, as if
it’s taking a guess at how many objects you plan to put in it. As long as you
don’t try to put in more objects than can be held in the initial block of
storage, everything proceeds rapidly. (If you do know how many objects
to expect, you can preallocate storage using reserve( ).) But eventually you will put in one too many objects, and the vector responds by:
1. Allocating a new, bigger piece of storage.
2. Copying all the objects from the old storage to the new (using
the copy-constructor).
3. Destroying all the old objects (the destructor is called for each
one).
4. Releasing the old memory.
For complex objects, this copy-construction and destruction
can end up being expensive if you often overfill your vector, which is
why vectors (and STL containers in general) are designed for value types
(i.e. types that are cheap to copy). This includes pointers.
To see what happens when you’re filling a vector,
here is the Noisy class mentioned earlier. It prints information about
its creations, destructions, assignments, and copy-constructions:
//: C07:Noisy.h
// A class to track various object activities.
#ifndef NOISY_H
#define NOISY_H
#include <iostream>
using std::endl;
using std::cout;
using std::ostream;
class Noisy {
static long create, assign, copycons, destroy;
long id;
public:
Noisy() : id(create++) {
cout << "d[" << id <<
"]" << endl;
}
Noisy(const Noisy& rv) : id(rv.id) {
cout << "c[" << id <<
"]" << endl;
++copycons;
}
Noisy& operator=(const Noisy& rv) {
cout << "(" << id <<
")=[" << rv.id << "]" << endl;
id = rv.id;
++assign;
return *this;
}
friend bool operator<(const Noisy& lv, const
Noisy& rv) {
return lv.id < rv.id;
}
friend bool operator==(const Noisy& lv,const
Noisy& rv) {
return lv.id == rv.id;
}
~Noisy() {
cout << "~[" << id <<
"]" << endl;
++destroy;
}
friend ostream& operator<<(ostream& os,
const Noisy& n) {
return os << n.id;
}
friend class NoisyReport;
};
struct NoisyGen {
Noisy operator()() { return Noisy(); }
};
// A Singleton. Will automatically report the
// statistics as the program terminates:
class NoisyReport {
static NoisyReport nr;
NoisyReport() {} // Private constructor
NoisyReport & operator=(NoisyReport &); //
Disallowed
NoisyReport(const NoisyReport&); //
Disallowed
public:
~NoisyReport() {
cout << "\n-------------------\n"
<< "Noisy creations: "
<< Noisy::create
<< "\nCopy-Constructions: "
<< Noisy::copycons
<< "\nAssignments: " <<
Noisy::assign
<< "\nDestructions: " <<
Noisy::destroy << endl;
}
};
#endif // NOISY_H ///:~
//: C07:Noisy.cpp {O}
#include "Noisy.h"
long Noisy::create = 0, Noisy::assign = 0,
Noisy::copycons = 0, Noisy::destroy = 0;
NoisyReport NoisyReport::nr;
///:~
Each Noisy object has its own identifier, and static
variables keep track of all the creations, assignments (using operator=),
copy-constructions, and destructions. The id is initialized using the create
counter inside the default constructor; the copy-constructor and assignment
operator take their id values from the rvalue. With operator= the
lvalue is already an initialized object, so the old value of id is
printed before it is overwritten with the id from the rvalue.
To support certain operations such as sorting and searching
(which are used implicitly by some of the containers), Noisy must have
an operator< and operator==. These simply compare the id
values. The ostream inserter follows the usual form and simply prints
the id.
Objects of type NoisyGen are function objects (since
there is an operator( )) that produce Noisy objects during
testing.
NoisyReport is a Singleton object because we
only want one report printed at program termination. It has a private
constructor so no additional NoisyReport objects can be created, it
disallows assignment and copy-construction, and it has a single static instance
of NoisyReport called nr. The only executable statements are in
the destructor, which is called as the program exits and static destructors are
called. This destructor prints the statistics captured by the static
variables in Noisy.
Using Noisy.h, the following program shows a vector
overflowing its allocated storage:
//: C07:VectorOverflow.cpp {-bor}
// Shows the copy-construction and destruction
// that occurs when a vector must reallocate.
//{L} Noisy
#include <cstdlib>
#include <iostream>
#include <string>
#include <vector>
#include "Noisy.h"
using namespace std;
int main(int argc, char* argv[]) {
int size = 1000;
if(argc >= 2) size = atoi(argv[1]);
vector<Noisy> vn;
Noisy n;
for(int i = 0; i < size; i++)
vn.push_back(n);
cout << "\n cleaning up “ << endl;
} ///:~
You can use the default value of 1000, or you can use your
own value by putting it on the command line.
When you run this program, you’ll see a single default
constructor call (for n), then a lot of copy-constructor calls, then
some destructor calls, then some more copy-constructor calls, and so on. When
the vector runs out of space in the linear array of bytes it has
allocated, it must (to maintain all the objects in a linear array, which is an
essential part of its job) get a bigger piece of storage and move everything
over, first copying and then destroying the old objects. You can imagine that
if you store a lot of large and complex objects, this process could rapidly
become prohibitive.
There are two solutions to this problem. The nicest one
requires that you know beforehand how many objects you’re going to make. In
that case, you can use reserve( ) to tell the vector how
much storage to preallocate, thus eliminating all the copies and destructions
and making everything very fast (especially random access to the objects with operator[ ]).
Note that the use of reserve( ) is different from using the vector
constructor with an integral first argument; the latter initializes a
prescribed number of elements using the element type’s default constructor.
Generally you won’t know how many objects you’ll need. If vector
reallocations are slowing things down, you can change sequence containers. You
could use a list, but as you’ll see, the deque allows
speedy insertions at either end of the sequence and never needs to copy or
destroy objects as it expands its storage. The deque also allows random
access with operator[ ], but it’s not quite as fast as vector’s
operator[ ]. So if you’re creating all your objects in one part of
the program and randomly accessing them in another, you may find yourself
filling a deque and then creating a vector from the deque
and using the vector for rapid indexing. You don’t want to program this
way habitually—just be aware of these issues (that is, avoid premature
optimization).
There is a darker side to vector’s reallocation of
memory, however. Because vector keeps its objects in a nice, neat array,
the iterators used by vector can be simple pointers. This is good—of all
the sequence containers, these pointers allow the fastest selection and
manipulation. Whether they are simple pointers, or whether they are iterator
objects that hold an internal pointer into their container, consider what
happens when you add the one additional object that causes the vector to
reallocate storage and move it elsewhere. The iterator’s pointer is now
pointing off into nowhere:
//: C07:VectorCoreDump.cpp
// Invalidating an iterator.
#include <iterator>
#include <iostream>
#include <vector>
using namespace std;
int main() {
vector<int> vi(10, 0);
ostream_iterator<int> out(cout, " ");
vector<int>::iterator i = vi.begin();
*i = 47;
copy(vi.begin(), vi.end(), out);
cout << endl;
// Force it to move memory (could also just add
// enough objects):
vi.resize(vi.capacity() + 1);
// Now i points to wrong memory:
*i = 48; // Access violation
copy(vi.begin(), vi.end(), out); // No change to
vi[0]
} ///:~
This illustrates the concept of iterator invalidation. Certain operations cause internal changes to a container’s underlying
data, so any iterators in effect before such changes may no longer be valid
afterward. If your program is breaking mysteriously, look for places where you
hold onto an iterator while adding more objects to a vector. You’ll need
to get a new iterator after adding elements or use operator[ ] instead
for element selections. If you combine this observation with the awareness of
the potential expense of adding new objects to a vector, you may
conclude that the safest way to use a vector is to fill it up all at
once (ideally, knowing first how many objects you’ll need) and then just use it
(without adding more objects) elsewhere in the program. This is the way vector
has been used in the book up to this point. The Standard C++ library documents the
container operations that invalidate iterators.
You may observe that using vector as the “basic”
container in the earlier chapters of this book might not be the best choice in
all cases. This is a fundamental issue in containers and in data structures in
general—the “best” choice varies according to the way the container is used.
The reason vector has been the “best” choice up until now is that it
looks a lot like an array and was thus familiar and easy for you to adopt. But
from now on it’s also worth thinking about other issues when choosing
containers.
Inserting and erasing elements
The vector is most efficient if:
1. You reserve( ) the correct amount of storage at the
beginning so the vector never has to reallocate.
2. You only add and remove elements from the back end.
It is possible to insert and erase elements from the middle
of a vector using an iterator, but the following program demonstrates
what a bad idea this is:
//: C07:VectorInsertAndErase.cpp {-bor}
// Erasing an element from a vector.
//{L} Noisy
#include <algorithm>
#include <iostream>
#include <iterator>
#include <vector>
#include "Noisy.h"
using namespace std;
int main() {
vector<Noisy> v;
v.reserve(11);
cout << "11 spaces have been
reserved" << endl;
generate_n(back_inserter(v), 10, NoisyGen());
ostream_iterator<Noisy> out(cout, "
");
cout << endl;
copy(v.begin(), v.end(), out);
cout << "Inserting an element:"
<< endl;
vector<Noisy>::iterator it =
v.begin() + v.size() / 2; // Middle
v.insert(it, Noisy());
cout << endl;
copy(v.begin(), v.end(), out);
cout << "\nErasing an element:"
<< endl;
// Cannot use the previous value of it:
it = v.begin() + v.size() / 2;
v.erase(it);
cout << endl;
copy(v.begin(), v.end(), out);
cout << endl;
} ///:~
When you run the program, you’ll see that the call to reserve( )
really does only allocate storage—no constructors are called. The generate_n( )
call is busy: each call to NoisyGen::operator( ) results in a
construction, a copy-construction (into the vector), and a destruction
of the temporary. But when an object is inserted into the vector in the
middle, it must shift everything down to maintain the linear array, and, since
there is enough space, it does this with the assignment operator. (If the
argument of reserve( ) is 10 instead of 11, it must reallocate
storage.) When an object is erased from the vector, the assignment
operator is once again used to move everything up to cover the place that is
being erased. (Notice that this requires that the assignment operator properly
clean up the lvalue.) Last, the object on the end of the array is deleted.
The deque container is a basic sequence optimized for
adding and removing elements from either end. It also allows for reasonably
fast random access—it has an operator[ ] like vector.
However, it does not have vector’s constraint of keeping everything in a
single sequential block of memory. Instead, a typical implementation of deque
uses multiple blocks of sequential storage (keeping track of all the blocks and
their order in a mapping structure). For this reason, the overhead for a deque
to add or remove elements at either end is low. In addition, it never needs to
copy and destroy contained objects during a new storage allocation (like vector
does), so it is far more efficient than vector if you are adding an
unknown quantity of objects at either end. This means that vector is the
best choice only if you have a good idea of how many objects you need. In
addition, many of the programs shown earlier in this book that use vector
and push_back( ) might have been more efficient had we used a deque
instead. The interface to deque differs only slightly from vector
(deque has a push_front( ) and pop_front( )
while vector does not, for example), so converting code from using vector
to using deque is trivial. Consider StringVector.cpp, which can
be changed to use deque by replacing the word “vector” with “deque”
everywhere. The following program adds parallel deque operations to the vector
operations in StringVector.cpp and performs timing comparisons:
//: C07:StringDeque.cpp
// Converted from StringVector.cpp.
#include <cstddef>
#include <ctime>
#include <deque>
#include <fstream>
#include <iostream>
#include <iterator>
#include <sstream>
#include <string>
#include <vector>
#include "../require.h"
using namespace std;
int main(int argc, char* argv[]) {
char* fname = "StringDeque.cpp";
if(argc > 1) fname = argv[1];
ifstream in(fname);
assure(in, fname);
vector<string> vstrings;
deque<string> dstrings;
string line;
// Time reading into vector:
clock_t ticks = clock();
while(getline(in, line))
vstrings.push_back(line);
ticks = clock() - ticks;
cout << "Read into vector: " <<
ticks << endl;
// Repeat for deque:
ifstream in2(fname);
assure(in2, fname);
ticks = clock();
while(getline(in2, line))
dstrings.push_back(line);
ticks = clock() - ticks;
cout << "Read into deque: " <<
ticks << endl;
// Now compare indexing:
ticks = clock();
for(size_t i = 0; i < vstrings.size(); i++) {
ostringstream ss;
ss << i;
vstrings[i] = ss.str() + ":
" + vstrings[i];
}
ticks = clock() - ticks;
cout << "Indexing vector: " <<
ticks << endl;
ticks = clock();
for(size_t j = 0; j < dstrings.size(); j++) {
ostringstream ss;
ss << j;
dstrings[j] = ss.str() + ":
" + dstrings[j];
}
ticks = clock() - ticks;
cout << "Indexing deque: " <<
ticks << endl;
// Compare iteration
ofstream tmp1("tmp1.tmp"),
tmp2("tmp2.tmp");
ticks = clock();
copy(vstrings.begin(), vstrings.end(),
ostream_iterator<string>(tmp1,
"\n"));
ticks = clock() - ticks;
cout << "Iterating vector: " <<
ticks << endl;
ticks = clock();
copy(dstrings.begin(), dstrings.end(),
ostream_iterator<string>(tmp2,
"\n"));
ticks = clock() - ticks;
cout << "Iterating deque: " <<
ticks << endl;
} ///:~
Knowing now what you do about the inefficiency of adding
things to vector because of storage reallocation, you might expect
dramatic differences between the two. However, on a 1.7 MB text file, one
compiler’s program produced the following (measured in platform/compiler
specific clock ticks, not seconds):
Read into vector: 8350
Read into deque: 7690
Indexing vector: 2360
Indexing deque: 2480
Iterating vector: 2470
Iterating deque: 2410
A different compiler and platform roughly agreed with this.
It’s not so dramatic, is it? This points out some important issues:
1. We (programmers and authors) are typically bad at guessing where
inefficiencies occur in our programs.
2. Efficiency comes from a combination of effects. Here, reading the
lines in and converting them to strings may dominate over the cost of vector
vs. deque.
3. The string class is probably fairly well designed in terms
of efficiency.
This doesn’t mean you shouldn’t use a deque rather
than a vector when you know that an uncertain number of objects will be
pushed onto the end of the container. On the contrary, you should—when you’re
tuning for performance. But also be aware that performance issues are usually
not where you think they are, and the only way to know for sure where your
bottlenecks are is by testing. Later in this chapter, you’ll see a more “pure”
comparison of performance between vector, deque, and list.
Sometimes you need the behavior or efficiency of one kind of
container for one part of your program, and you need a different container’s
behavior or efficiency in another part of the program. For example, you may
need the efficiency of a deque when adding objects to the container but
the efficiency of a vector when indexing them. Each of the basic
sequence containers (vector, deque, and list) has a
two-iterator constructor (indicating the beginning and ending of the sequence
to read from when creating a new object) and an assign( ) member
function to read into an existing container, so you can easily move objects
from one sequence container to another.
The following example reads objects into a deque and
then converts to a vector:
//: C07:DequeConversion.cpp {-bor}
// Reading into a Deque, converting to a vector.
//{L} Noisy
#include <algorithm>
#include <cstdlib>
#include <deque>
#include <iostream>
#include <iterator>
#include <vector>
#include "Noisy.h"
using namespace std;
int main(int argc, char* argv[]) {
int size = 25;
if(argc >= 2) size = atoi(argv[1]);
deque<Noisy> d;
generate_n(back_inserter(d), size, NoisyGen());
cout << "\n Converting to a
vector(1)" << endl;
vector<Noisy> v1(d.begin(), d.end());
cout << "\n Converting to a
vector(2)" << endl;
vector<Noisy> v2;
v2.reserve(d.size());
v2.assign(d.begin(), d.end());
cout << "\n Cleanup" << endl;
} ///:~
You can try various sizes, but note that it makes no
difference—the objects are simply copy-constructed into the new vectors.
What’s interesting is that v1 does not cause multiple allocations while
building the vector, no matter how many elements you use. You might
initially think that you must follow the process used for v2 and
preallocate the storage to prevent messy reallocations, but this is unnecessary
because the constructor used for v1 determines the memory requirement
ahead of time.
Cost of overflowing allocated storage
It’s illuminating to see what happens with a deque
when it overflows a block of storage, in contrast with VectorOverflow.cpp:
//: C07:DequeOverflow.cpp {-bor}
// A deque is much more efficient than a vector when
// pushing back a lot of elements, since it doesn't
// require copying and destroying.
//{L} Noisy
#include <cstdlib>
#include <deque>
#include "Noisy.h"
using namespace std;
int main(int argc, char* argv[]) {
int size = 1000;
if(argc >= 2) size = atoi(argv[1]);
deque<Noisy> dn;
Noisy n;
for(int i = 0; i < size; i++)
dn.push_back(n);
cout << "\n cleaning up “ << endl;
} ///:~
Here you will have relatively few (if any) destructors
called before the words “cleaning up” appear in the output. Since the deque
allocates all its storage in blocks instead of a contiguous array like vector,
it never needs to move existing storage of each of its data blocks. (Thus, no
additional copy-constructions and destructions occur.) The deque simply
allocates a new block. For the same reason, the deque can just as
efficiently add elements to the beginning of the sequence, since if it
runs out of storage, it (again) just allocates a new block for the beginning.
(The index block that holds the data blocks together may need to be
reallocated, however.) Insertions in the middle of a deque, however,
could be even messier than for vector (but not as costly).
Because of deque’s clever storage management,
an existing iterator is not invalidated after you add new things to either end
of a deque, as it was demonstrated to do with vector (in VectorCoreDump.cpp).
If you stick to what deque is best at—insertions and removals from
either end, reasonably rapid traversals and fairly fast random-access using operator[ ]—you’ll
be in good shape.
Both vector and deque provide two random
access functions: the indexing operator (operator[ ]), which you’ve
seen already, and at( ), which checks the boundaries of the
container that’s being indexed and throws an exception if you go out of bounds.
It does cost more to use at( ):
//: C07:IndexingVsAt.cpp
// Comparing "at()" to operator[].
#include <ctime>
#include <deque>
#include <iostream>
#include <vector>
#include "../require.h"
using namespace std;
int main(int argc, char* argv[]) {
long count = 1000;
int sz = 1000;
if(argc >= 2) count = atoi(argv[1]);
if(argc >= 3) sz = atoi(argv[2]);
vector<int> vi(sz);
clock_t ticks = clock();
for(int i1 = 0; i1 < count; i1++)
for(int j = 0; j < sz; j++)
vi[j];
cout << "vector[] "
<< clock() - ticks << endl;
ticks = clock();
for(int i2 = 0; i2 < count; i2++)
for(int j = 0; j < sz; j++)
vi.at(j);
cout << "vector::at() " <<
clock()-ticks <<endl;
deque<int> di(sz);
ticks = clock();
for(int i3 = 0; i3 < count; i3++)
for(int j = 0; j < sz; j++)
di[j];
cout << "deque[] " << clock() -
ticks << endl;
ticks = clock();
for(int i4 = 0; i4 < count; i4++)
for(int j = 0; j < sz; j++)
di.at(j);
cout << "deque::at() " <<
clock()-ticks <<endl;
// Demonstrate at() when you go out of bounds:
try {
di.at(vi.size() + 1);
} catch(...) {
cerr << "Exception thrown" <<
endl;
}
} ///:~
As you saw in Chapter 1, different systems may handle the
uncaught exception in different ways, but you’ll know one way or another that
something went wrong with the program when using at( ), whereas
it’s possible to remain ignorant when using operator[ ].
A list is implemented as a doubly linked list data
structure and is thus designed for rapid insertion and removal of elements anywhere
in the sequence, whereas for vector and deque this is a much more
costly operation. A list is so slow when randomly accessing elements that it
does not have an operator[ ]. It’s best used when you’re traversing
a sequence, in order, from beginning to end (or vice-versa), rather than
choosing elements randomly from the middle. Even then the traversal can be
slower than with a vector, but if you aren’t doing a lot of traversals,
that won’t be your bottleneck.
The memory overhead of each link in a list requires a
forward and backward pointer on top of the storage for the actual object. Thus,
a list is a better choice when you have larger objects that you’ll be
inserting and removing from the middle of the list.
It’s better not to use a list if you think you might
be traversing it a lot, looking for objects, since the amount of time it takes
to get from the beginning of the list—which is the only place you can
start unless you’ve already got an iterator to somewhere you know is closer to
your destination—to the object of interest is proportional to the number of
objects between the beginning and that object.
The objects in a list never move after they are
created. “Moving” a list element means changing the links, but never copying or
assigning the actual objects. This means that iterators aren’t invalidated when
items are added to the list as it was demonstrated earlier to be the case vector.
Here’s an example using a list of Noisy objects:
//: C07:ListStability.cpp {-bor}
// Things don't move around in lists.
//{L} Noisy
#include <algorithm>
#include <iostream>
#include <iterator>
#include <list>
#include "Noisy.h"
using namespace std;
int main() {
list<Noisy> l;
ostream_iterator<Noisy> out(cout, "
");
generate_n(back_inserter(l), 25, NoisyGen());
cout << "\n Printing the list:"
<< endl;
copy(l.begin(), l.end(), out);
cout << "\n Reversing the list:"
<< endl;
l.reverse();
copy(l.begin(), l.end(), out);
cout << "\n Sorting the list:"
<< endl;
l.sort();
copy(l.begin(), l.end(), out);
cout << "\n Swapping two elements:"
<< endl;
list<Noisy>::iterator it1, it2;
it1 = it2 = l.begin();
++it2;
swap(*it1, *it2);
cout << endl;
copy(l.begin(), l.end(), out);
cout << "\n Using generic reverse():
" << endl;
reverse(l.begin(), l.end());
cout << endl;
copy(l.begin(), l.end(), out);
cout << "\n Cleanup" << endl;
} ///:~
Operations as seemingly radical as reversing and sorting the
list require no copying of objects because, instead of moving the objects, the
links are simply changed. However, notice that sort( ) and reverse( ) are member functions of list, so they have special knowledge of the
internals of list and can rearrange the elements instead of copying
them. On the other hand, the swap( ) function is a generic
algorithm and doesn’t know about list in particular, so it uses the
copying approach for swapping two elements. In general, use the member version
of an algorithm if that is supplied instead of its generic algorithm
equivalent. In particular, use the generic sort( ) and reverse( )
algorithms only with arrays, vectors, and deques.
If you have large, complex objects, you might want to choose
a list first, especially if construction, destruction,
copy-construction, and assignment are expensive and if you are doing things
like sorting the objects or otherwise reordering them a lot.
Special list operations
The list has some special built-in operations to make
the best use of the structure of the list. You’ve already seen reverse( )
and sort( ). Here are some of the others:
//: C07:ListSpecialFunctions.cpp
//{L} Noisy
#include <algorithm>
#include <iostream>
#include <iterator>
#include <list>
#include "Noisy.h"
#include "PrintContainer.h"
using namespace std;
int main() {
typedef list<Noisy> LN;
LN l1, l2, l3, l4;
generate_n(back_inserter(l1), 6, NoisyGen());
generate_n(back_inserter(l2), 6, NoisyGen());
generate_n(back_inserter(l3), 6, NoisyGen());
generate_n(back_inserter(l4), 6, NoisyGen());
print(l1, "l1", " "); print(l2,
"l2", " ");
print(l3, "l3", " "); print(l4,
"l4", " ");
LN::iterator it1 = l1.begin();
++it1; ++it1; ++it1;
l1.splice(it1, l2);
print(l1, "l1 after splice(it1, l2)",
" ");
print(l2, "l2 after splice(it1, l2)",
" ");
LN::iterator it2 = l3.begin();
++it2; ++it2; ++it2;
l1.splice(it1, l3, it2);
print(l1, "l1 after splice(it1, l3, it2)",
" ");
LN::iterator it3 = l4.begin(), it4 = l4.end();
++it3; --it4;
l1.splice(it1, l4, it3, it4);
print(l1, "l1 after
splice(it1,l4,it3,it4)", " ");
Noisy n;
LN l5(3, n);
generate_n(back_inserter(l5), 4, NoisyGen());
l5.push_back(n);
print(l5, "l5 before remove()", "
");
l5.remove(l5.front());
print(l5, "l5 after remove()", "
");
l1.sort(); l5.sort();
l5.merge(l1);
print(l5, "l5 after
l5.merge(l1)", " ");
cout << "\n Cleanup" << endl;
} ///:~
After filling four lists with Noisy objects,
one list is spliced into another in three ways. In the first, the entire list l2
is spliced into l1 at the iterator it1. Notice that after the
splice, l2 is empty—splicing means removing the elements from the source
list. The second splice inserts elements from l3 starting at it2
into l1 starting at it1. The third splice starts at it1
and uses elements from l4 starting at it3 and ending at it4.
The seemingly redundant mention of the source list is because the elements must
be erased from the source list as part of the transfer to the destination list.
The output from the code that demonstrates remove( ) shows that the list does not have to be sorted in order for all the elements
of a particular value to be removed.
Finally, if you merge( ) one list with another,
the merge only works sensibly if the lists have been sorted. What you end up
with in that case is a sorted list containing all the elements from both lists
(the source list is erased—that is, the elements are moved to the
destination list).
A unique( ) member function removes all duplicates, but only if you sort the list first:
//: C07:UniqueList.cpp
// Testing list's unique() function.
#include <iostream>
#include <iterator>
#include <list>
using namespace std;
int a[] = { 1, 3, 1, 4, 1, 5, 1, 6, 1 };
const int ASZ = sizeof a / sizeof *a;
int main() {
// For output:
ostream_iterator<int> out(cout, " ");
list<int> li(a, a + ASZ);
li.unique();
// Oops! No duplicates removed:
copy(li.begin(), li.end(), out);
cout << endl;
// Must sort it first:
li.sort();
copy(li.begin(), li.end(), out);
cout << endl;
// Now unique() will have an effect:
li.unique();
copy(li.begin(), li.end(), out);
cout << endl;
} ///:~
The list constructor used here takes the starting and
past-the-end iterator from another container and copies all the elements from
that container into itself. Here, the “container” is just an array, and the
“iterators” are pointers into that array, but because of the design of the STL,
the list constructor works with arrays just as easily as with any other
container.
The unique( ) function will remove only adjacent
duplicate elements, and thus sorting is typically necessary before calling unique( ).
The exception is when the problem you’re trying to solve includes eliminating
adjacent duplicates according to the current ordering.
Four additional list member functions are not
demonstrated here: a remove_if( ) that takes a predicate, which
decides whether an object should be removed; a unique( ) that takes
a binary predicate to perform uniqueness comparisons; a merge( )
that takes an additional argument which performs comparisons; and a sort( )
that takes a comparator (to provide a comparison or override the existing one).
list vs. set
Looking at the previous example, you might note that if you
want a sorted sequence with no duplicates, you could get that result with a set.
It’s interesting to compare the performance of the two containers:
//: C07:ListVsSet.cpp
// Comparing list and set performance.
#include <algorithm>
#include <cstdlib>
#include <ctime>
#include <iostream>
#include <iterator>
#include <list>
#include <set>
#include "PrintContainer.h"
using namespace std;
class Obj {
int a[20]; // To take up extra space
int val;
public:
Obj() : val(rand() % 500) {}
friend bool
operator<(const Obj& a, const Obj& b) {
return a.val < b.val;
}
friend bool
operator==(const Obj& a, const Obj& b) {
return a.val == b.val;
}
friend ostream&
operator<<(ostream& os, const Obj& a) {
return os << a.val;
}
};
struct ObjGen {
Obj operator()() { return Obj(); }
};
int main() {
const int SZ = 5000;
srand(time(0));
list<Obj> lo;
clock_t ticks = clock();
generate_n(back_inserter(lo), SZ, ObjGen());
lo.sort();
lo.unique();
cout << "list:" << clock() -
ticks << endl;
set<Obj> so;
ticks = clock();
generate_n(inserter(so, so.begin()),
SZ, ObjGen());
cout << "set:" << clock() -
ticks << endl;
print(lo);
print(so);
} ///:~
When you run the program, you should discover that set
is much faster than list. This is reassuring—after all, it is set’s
primary job description to hold only unique elements in sorted order!
This example uses the header PrintContainer.h, which
contains a function template that prints any sequence container to an output
stream. PrintContainer.h is defined as follows:
//:
C07:PrintContainer.h
// Prints a
sequence container
#ifndef
PRINT_CONTAINER_H
#define
PRINT_CONTAINER_H
#include
"../C06/PrintSequence.h"
template<class
Cont>
void
print(Cont& c, const char* nm = "",
const char* sep = "\n",
std::ostream&
os = std::cout) {
print(c.begin(), c.end(), nm, sep, os);
}
#endif ///:~
The print( ) template defined here just calls
the print( ) function template we defined in the previous chapter
in PrintSequence.h.
We mentioned earlier that all basic sequences have a member
function swap( ) that’s designed to switch one sequence with
another (but only for sequences of the same type). The member swap( )
makes use of its knowledge of the internal structure of the particular
container in order to be efficient:
//: C07:Swapping.cpp {-bor}
// All basic sequence containers can be swapped.
//{L} Noisy
#include <algorithm>
#include <deque>
#include <iostream>
#include <iterator>
#include <list>
#include <vector>
#include "Noisy.h"
#include "PrintContainer.h"
using namespace std;
ostream_iterator<Noisy> out(cout, " ");
template<class Cont> void testSwap(char* cname) {
Cont c1, c2;
generate_n(back_inserter(c1), 10, NoisyGen());
generate_n(back_inserter(c2), 5, NoisyGen());
cout << endl << cname <<
":" << endl;
print(c1, "c1"); print(c2, "c2");
cout << "\n Swapping the " <<
cname << ":" << endl;
c1.swap(c2);
print(c1, "c1"); print(c2, "c2");
}
int main() {
testSwap<vector<Noisy> >("vector");
testSwap<deque<Noisy>
>("deque");
testSwap<list<Noisy> >("list");
} ///:~
When you run this, you’ll discover that each type of
sequence container can swap one sequence for another without any copying or
assignments, even if the sequences are of different sizes. In effect, you’re
completely swapping the resources of one object for another.
The STL algorithms also contain a swap( ), and
when this function is applied to two containers of the same type, it uses the
member swap( ) to achieve fast performance. Consequently, if you
apply the sort( ) algorithm to a container of containers, you will
find that the performance is very fast—it turns out that fast sorting of a
container of containers was a design goal of the STL.
The set container accepts only one copy of each element.
It also sorts the elements. (Sorting isn’t intrinsic to the conceptual
definition of a set, but the STL set stores its elements in a balanced
tree data structure to provide rapid lookups, thus producing sorted results
when you traverse it.) The first two examples in this chapter used sets.
Consider the problem of creating an index for a book. You
might like to start with all the words in the book, but you only want one
instance of each word, and you want them sorted. A set is perfect for
this and solves the problem effortlessly. However, there’s also the problem of
punctuation and any other nonalpha characters, which must be stripped off to
generate proper words. One solution to this problem is to use the Standard C
library functions isalpha( ) and isspace( ) to extract
only the characters you want. You can replace all unwanted characters with
spaces so that you can easily extract valid words from each line you read:
//: C07:WordList.cpp
// Display a list of words used in a document.
#include <algorithm>
#include <cctype>
#include <cstring>
#include <fstream>
#include <iostream>
#include <iterator>
#include <set>
#include <sstream>
#include <string>
#include "../require.h"
using namespace std;
char replaceJunk(char c) {
// Only keep alphas, space (as a delimiter), and '
return (isalpha(c) || c == '\'') ? c : ' ';
}
int main(int argc, char* argv[]) {
char* fname = "WordList.cpp";
if(argc > 1) fname = argv[1];
ifstream in(fname);
assure(in, fname);
set<string> wordlist;
string line;
while(getline(in, line)) {
transform(line.begin(), line.end(), line.begin(),
replaceJunk);
istringstream is(line);
string word;
while(is >> word)
wordlist.insert(word);
}
// Output results:
copy(wordlist.begin(), wordlist.end(),
ostream_iterator<string>(cout,
"\n"));
} ///:~
The call to transform( ) replaces each character
to be ignored with a space. The set container not only ignores duplicate words,
but compares the words it keeps according to the function object less<string>
(the default second template argument for the set container), which in
turn uses string::operator<( ), so the words emerge in
alphabetical order.
You don’t need to use a set just to get a sorted
sequence. You can use the sort( ) function (along with a multitude
of other functions in the STL) on different STL containers. However, it’s
likely that set will be faster here. Using a set is particularly handy
when you just want to do lookup, since its find( ) member function has logarithmic complexity and so is much faster than the generic find( )
algorithm. As you recall, the generic find( ) algorithm needs to
traverse the whole range until it finds the search element (resulting in a
worst-case complexity of N, and an average complexity of N/2). However, if you
have a sequence container that is already sorted, use equal_range( )
for logarithmic complexity when finding elements.
The following version shows how to build the list of words
with an istreambuf_iterator that moves the characters from one place
(the input stream) to another (a string object), depending on whether
the Standard C library function isalpha( ) returns true:
//: C07:WordList2.cpp
// Illustrates istreambuf_iterator and insert
iterators.
#include <cstring>
#include <fstream>
#include <iostream>
#include <iterator>
#include <set>
#include <string>
#include "../require.h"
using namespace std;
int main(int argc, char* argv[]) {
char* fname = "WordList2.cpp";
if(argc > 1) fname = argv[1];
ifstream in(fname);
assure(in, fname);
istreambuf_iterator<char> p(in), end;
set<string> wordlist;
while(p != end) {
string word;
insert_iterator<string> ii(word, word.begin());
// Find the first alpha character:
while(p != end && !isalpha(*p))
++p;
// Copy until the first non-alpha character:
while(p != end && isalpha(*p))
*ii++ = *p++;
if(word.size() != 0)
wordlist.insert(word);
}
// Output results:
copy(wordlist.begin(), wordlist.end(),
ostream_iterator<string>(cout,
"\n"));
} ///:~
This example was suggested by Nathan Myers, who invented the
istreambuf_iterator and its relatives. This iterator extracts
information character by character from a stream. Although the istreambuf_iterator
template argument might imply that you could extract, for example, ints
instead of char, that’s not the case. The argument must be of some
character type—a regular char or a wide character.
After the file is open, an istreambuf_iterator called
p is attached to the istream so characters can be extracted from
it. The set<string> called wordlist will hold the resulting
words.
The while loop reads words until it finds the end of
the input stream. This is detected using the default constructor for istreambuf_iterator,
which produces the past-the-end iterator object end. Thus, if you want
to test to make sure you’re not at the end of the stream, you simply say p
!= end.
The second type of iterator that’s used here is the insert_iterator, which you saw previously. This inserts objects into a container. Here, the
“container” is the string called word, which, for the purposes of
insert_iterator, behaves like a container. The constructor for insert_iterator
requires the container and an iterator indicating where it should start
inserting the characters. You could also use a back_insert_iterator, which requires that the container have a push_back( ) (string does).
After the while loop sets everything up, it begins by
looking for the first alpha character, incrementing start until that
character is found. It then copies characters from one iterator to the other,
stopping when a nonalpha character is found. Each word, assuming it is
nonempty, is added to wordlist.
The word list examples use different approaches to extract
tokens from a stream, neither of which is very flexible. Since the STL
containers and algorithms all revolve around iterators, the most flexible
solution will itself use an iterator. You could think of the TokenIterator
as an iterator that wraps itself around any other iterator that can produce characters.
Because it is certainly a type of input iterator (the most primitive type of
iterator), it can provide input to any STL algorithm. Not only is it a useful
tool in itself, the following TokenIterator is also a good example of
how you can design your own iterators.
The TokenIterator class is doubly flexible. First,
you can choose the type of iterator that will produce the char input.
Second, instead of just saying what characters represent the delimiters, TokenIterator
will use a predicate that is a function object whose operator( )
takes a char and decides whether it should be in the token. Although the
two examples given here have a static concept of what characters belong in a
token, you could easily design your own function object to change its state as
the characters are read, producing a more sophisticated parser.
The following header file contains two basic predicates, Isalpha
and Delimiters, along with the template for TokenIterator:
//: C07:TokenIterator.h
#ifndef TOKENITERATOR_H
#define TOKENITERATOR_H
#include <algorithm>
#include <cctype>
#include <functional>
#include <iterator>
#include <string>
struct Isalpha : std::unary_function<char, bool>
{
bool operator()(char c) { return std::isalpha(c); }
};
class Delimiters : std::unary_function<char,
bool> {
std::string exclude;
public:
Delimiters() {}
Delimiters(const std::string& excl) :
exclude(excl) {}
bool operator()(char c) {
return exclude.find(c) == std::string::npos;
}
};
template<class InputIter, class Pred = Isalpha>
class TokenIterator : public std::iterator<
std::input_iterator_tag, std::string,
std::ptrdiff_t> {
InputIter first;
InputIter last;
std::string word;
Pred predicate;
public:
TokenIterator(InputIter begin, InputIter end,
Pred pred = Pred())
: first(begin), last(end), predicate(pred) {
++*this;
}
TokenIterator() {} // End sentinel
// Prefix increment:
TokenIterator& operator++() {
word.resize(0);
first = std::find_if(first, last, predicate);
while(first != last && predicate(*first))
word += *first++;
return *this;
}
// Postfix increment
class CaptureState {
std::string word;
public:
CaptureState(const std::string& w) : word(w) {}
std::string operator*() { return word; }
};
CaptureState operator++(int) {
CaptureState d(word);
++*this;
return d;
}
// Produce the actual value:
std::string operator*() const { return word; }
const std::string* operator->() const { return
&word; }
// Compare iterators:
bool operator==(const TokenIterator&) {
return word.size() == 0 && first == last;
}
bool operator!=(const TokenIterator& rv) {
return !(*this == rv);
}
};
#endif // TOKENITERATOR_H ///:~
The TokenIterator class derives from the std::iterator
template. It might appear that some kind of functionality comes with std::iterator,
but it is purely a way of tagging an iterator, to tell a container that uses it
what it can do. Here, you can see input_iterator_tag as the iterator_category
template argument—this tells anyone who asks that a TokenIterator only
has the capabilities of an input iterator and cannot be used with algorithms
requiring more sophisticated iterators. Apart from the tagging, std::iterator
doesn’t do anything beyond providing several useful type definitions. You must implement
all other functionality yourself.
The TokenIterator class may look a little strange at
first, because the first constructor requires both a “begin” and an “end”
iterator as arguments, along with the predicate. Remember, this is a “wrapper”
iterator that has no idea how to tell when it’s at the end of its input, so the
ending iterator is necessary in the first constructor. The reason for the
second (default) constructor is that the STL algorithms (and any algorithms you
write) need a TokenIterator sentinel to be the past-the-end value. Since
all the information necessary to see if the TokenIterator has reached
the end of its input is collected in the first constructor, this second
constructor creates a TokenIterator that is merely used as a placeholder
in algorithms.
The core of the behavior happens in operator++. This
erases the current value of word using string::resize( ) and
then finds the first character that satisfies the predicate (thus discovering
the beginning of the new token) using find_if( ). The resulting
iterator is assigned to first, thus moving first forward to the
beginning of the token. Then, as long as the end of the input is not reached
and the predicate is satisfied, input characters are copied into word.
Finally, the TokenIterator object is returned and must be dereferenced
to access the new token.
The postfix increment requires an object of type CaptureState
to hold the value before the increment, so it can be returned. Producing the
actual value is a straightforward operator*. The only other functions to
define for an output iterator are the operator== and operator!=
to indicate whether the TokenIterator has reached the end of its input.
You can see that the argument for operator== is ignored—it only cares
about whether it has reached its internal last iterator. Notice that operator!=
is defined in terms of operator==.
A good test of TokenIterator includes a number of
different sources of input characters, including a streambuf_iterator, a
char*, and a deque<char>::iterator. Finally, the original
word list problem is solved:
//: C07:TokenIteratorTest.cpp {-g++}
#include <fstream>
#include <iostream>
#include <vector>
#include <deque>
#include <set>
#include "TokenIterator.h"
#include "../require.h"
using namespace std;
int main(int argc, char* argv[]) {
char* fname = "TokenIteratorTest.cpp";
if(argc > 1) fname = argv[1];
ifstream in(fname);
assure(in, fname);
ostream_iterator<string> out(cout,
"\n");
typedef istreambuf_iterator<char> IsbIt;
IsbIt begin(in), isbEnd;
Delimiters delimiters("
\t\n~;()\"<>:{}[]+-=&*#.,/\\");
TokenIterator<IsbIt, Delimiters>
wordIter(begin, isbEnd, delimiters), end;
vector<string> wordlist;
copy(wordIter, end, back_inserter(wordlist));
// Output results:
copy(wordlist.begin(), wordlist.end(), out);
*out++ =
"-----------------------------------";
// Use a char array as the source:
char* cp = "typedef
std::istreambuf_iterator<char> It";
TokenIterator<char*, Delimiters>
charIter(cp, cp + strlen(cp), delimiters), end2;
vector<string> wordlist2;
copy(charIter, end2, back_inserter(wordlist2));
copy(wordlist2.begin(), wordlist2.end(), out);
*out++ =
"-----------------------------------";
// Use a deque<char> as the source:
ifstream in2("TokenIteratorTest.cpp");
deque<char> dc;
copy(IsbIt(in2), IsbIt(), back_inserter(dc));
TokenIterator<deque<char>::iterator,Delimiters>
dcIter(dc.begin(), dc.end(), delimiters), end3;
vector<string> wordlist3;
copy(dcIter, end3, back_inserter(wordlist3));
copy(wordlist3.begin(), wordlist3.end(), out);
*out++ =
"-----------------------------------";
// Reproduce the Wordlist.cpp example:
ifstream in3("TokenIteratorTest.cpp");
TokenIterator<IsbIt, Delimiters>
wordIter2(IsbIt(in3), isbEnd, delimiters);
set<string> wordlist4;
while(wordIter2 != end)
wordlist4.insert(*wordIter2++);
copy(wordlist4.begin(), wordlist4.end(), out);
} ///:~
When using an istreambuf_iterator, you create one to
attach to the istream object and one with the default constructor as the
past-the-end marker. Both are used to create the TokenIterator that will
produce the tokens; the default constructor produces the faux TokenIterator
past-the-end sentinel. (This is just a placeholder and is ignored.) The
TokenIterator produces strings that are inserted into a container of
string—here a vector<string> is used in all cases except
the last. (You could also concatenate the results onto a string.) Other
than that, a TokenIterator works like any other input iterator.
When defining a bidirectional (and therefore also a random
access) iterator, you can get reverse iterators “for free” by using the std::reverse_iterator
adaptor. If you have already defined an iterator for a container with
bidirectional capabilities, you can get a reverse iterator from your forward-traversing
iterator with lines like the following inside your container class:
// Assume "iterator" is your nested iterator type
typedef std::reverse_iterator<iterator>
reverse_iterator;
reverse_iterator rbegin() {return
reverse_iterator(end());
reverse_iterator rend() {return
reverse_iterator(begin());
The std::reverse_iterator adaptor does all the work
for you. For example, if you use the * operator to dereference your
reverse iterator, it automatically decrements a temporary copy of the forward
iterator it is holding in order to return the correct element, since reverse
iterators logically point one position past the element they refer to.
The stack container, along with queue and priority_queue, are classified as adaptors, which means they adapt one of the basic sequence containers to store their data. This is an unfortunate case of
confusing what something does with the details of its underlying
implementation—the fact that these are called “adaptors” is of primary value
only to the creator of the library. When you use them, you generally don’t care
that they’re adaptors, but instead that they solve your problem. Admittedly
it’s useful at times to know that you can choose an alternate implementation or
build an adaptor from an existing container object, but that’s generally one level
removed from the adaptor’s behavior. So, while you may see it emphasized
elsewhere that a particular container is an adaptor, we’ll only point out that
fact when it’s useful. Note that each type of adaptor has a default container
that it’s built upon, and this default is the most sensible implementation. In
most cases you won’t need to concern yourself with the underlying
implementation.
The following example shows stack<string>
implemented in the three ways: the default (which uses deque), then with
a vector, and finally with a list:
//: C07:Stack1.cpp
// Demonstrates the STL stack.
#include <fstream>
#include <iostream>
#include <list>
#include <stack>
#include <string>
#include <vector>
using namespace std;
// Rearrange comments below to use different versions.
typedef stack<string> Stack1; // Default:
deque<string>
// typedef stack<string, vector<string> >
Stack2;
// typedef stack<string, list<string> >
Stack3;
int main() {
ifstream in("Stack1.cpp");
Stack1 textlines; // Try the different versions
// Read file and store lines in the stack:
string line;
while(getline(in, line))
textlines.push(line + "\n");
// Print lines from the stack and pop them:
while(!textlines.empty()) {
cout << textlines.top();
textlines.pop();
}
} ///:~
The top( ) and pop( ) operations will probably seem non-intuitive if you’ve used other stack classes. When you call pop( ),
it returns void rather than the top element that you might have
expected. If you want the top element, you get a reference to it with top( ).
It turns out this is more efficient, since a traditional pop( ) must
return a value rather than a reference and thus invokes the copy-constructor.
More important, it is exception safe, as we discussed in Chapter 1. If pop( )
both changed the state of the stack and attempted to return the top element, an
exception in the element’s copy-constructor could cause the element to be lost.
When you’re using a stack (or a priority_queue, described later),
you can efficiently refer to top( ) as many times as you want and
then discard the top element explicitly using pop( ). (Perhaps if
some term other than the familiar “pop” had been used, this would have been a
bit clearer.)
The stack template has a simple interface—essentially
the member functions you saw earlier. Since it only makes sense to access a
stack at its top, no iterators are available for traversing it. Nor are there
sophisticated forms of initialization, but if you need that, you can use the
underlying container upon which the stack is implemented. For example,
suppose you have a function that expects a stack interface, but in the
rest of your program you need the objects stored in a list. The
following program stores each line of a file along with the leading number of
spaces in that line. (You might imagine it as a starting point for performing
some kind of source-code reformatting.)
//: C07:Stack2.cpp
// Converting a list to a stack.
#include <iostream>
#include <fstream>
#include <stack>
#include <list>
#include <string>
#include <cstddef>
using namespace std;
// Expects a stack:
template<class Stk>
void stackOut(Stk& s, ostream& os = cout) {
while(!s.empty()) {
os << s.top() << "\n";
s.pop();
}
}
class Line {
string line; // Without leading spaces
size_t lspaces; // Number of leading spaces
public:
Line(string s) : line(s) {
lspaces = line.find_first_not_of(' ');
if(lspaces == string::npos)
lspaces = 0;
line = line.substr(lspaces);
}
friend ostream& operator<<(ostream& os,
const Line& l) {
for(size_t i = 0; i < l.lspaces; i++)
os << ' ';
return os << l.line;
}
// Other functions here...
};
int main() {
ifstream in("Stack2.cpp");
list<Line> lines;
// Read file and store lines in the list:
string s;
while(getline(in, s))
lines.push_front(s);
// Turn the list into a stack for printing:
stack<Line, list<Line> > stk(lines);
stackOut(stk);
} ///:~
The function that requires the stack interface just
sends each top( ) object to an ostream and then removes it
by calling pop( ). The Line class determines the number of
leading spaces and then stores the contents of the line without the
leading spaces. The ostream operator<< re-inserts the
leading spaces so the line prints properly, but you can easily change the
number of spaces by changing the value of lspaces. (The member functions
to do this are not shown here.) In main( ), the input file is read
into a list<Line>, and then each line in the list is copied into a
stack that is sent to stackOut( ).
You cannot iterate through a stack; this emphasizes
that you only want to perform stack operations when you create a stack.
You can get equivalent “stack” functionality using a vector and its back( ),
push_back( ), and pop_back( ) member functions, and
then you have all the additional functionality of the vector. The
program Stack1.cpp can be rewritten to show this:
//: C07:Stack3.cpp
// Using a vector as a stack; modified Stack1.cpp.
#include <fstream>
#include <iostream>
#include <string>
#include <vector>
using namespace std;
int main() {
ifstream in("Stack3.cpp");
vector<string> textlines;
string line;
while(getline(in, line))
textlines.push_back(line + "\n");
while(!textlines.empty()) {
cout << textlines.back();
textlines.pop_back();
}
} ///:~
This produces the same output as Stack1.cpp, but you
can now perform vector operations as well. A list can also push
things at the front, but it’s generally less efficient than using push_back( )
with vector. (In addition, deque is usually more efficient than list
for pushing things at the front.)
The queue container is a restricted form of a deque—you
can only enter elements at one end and pull them off the other end.
Functionally, you could use a deque anywhere you need a queue,
and you would then also have the additional functionality of the deque.
The only reason you need to use a queue rather than a deque,
then, is when you want to emphasize that you will only be performing queue-like
behavior.
The queue class is an adaptor like stack, in
that it is built on top of another sequence container. As you might guess, the
ideal implementation for a queue is a deque, and that is the
default template argument for the queue; you’ll rarely need a different
implementation.
Queues are often used if you want to model a system where
some elements are waiting to be served by other elements in the system. A
classic example of this is the “bank-teller problem.” Customers arrive at
random intervals, get into a line, and then are served by a set of tellers.
Since the customers arrive randomly and each takes a random amount of time to
be served, there’s no way to deterministically know how long the line will be
at any time. However, it’s possible to simulate the situation and see what
happens.
In a realistic simulation each customer and teller should be
run by a separate thread. What we’d like is a multithreaded environment so that
each customer or teller would have his own thread. However, Standard C++ has no
support for multithreading. On the other hand, with a little adjustment to the
code, it’s possible to simulate enough multithreading to provide a satisfactory
solution.
In multithreading, multiple threads of control run
simultaneously, sharing the same address space. Quite often you have fewer CPUs
than you do threads (and often only one CPU). To give the illusion that each
thread has its own CPU, a time-slicing mechanism says “OK, current
thread, you’ve had enough time. I’m going to stop you and give time to some
other thread.” This automatic stopping and starting of threads is called preemptive,
and it means you (the programmer) don’t need to manage the threading
process.
An alternative approach has each thread voluntarily yield
the CPU to the scheduler, which then finds another thread that needs running.
Instead, we’ll build the “time-slicing” into the classes in the system. Here,
it will be the tellers that represent the “threads,” (the customers will be
passive). Each teller will have an infinite-looping run( ) member
function that will execute for a certain number of “time units” and then simply
return. By using the ordinary return mechanism, we eliminate the need for any
swapping. The resulting program, although small, provides a remarkably
reasonable simulation:
//: C07:BankTeller.cpp {RunByHand}
// Using a queue and simulated multithreading
// to model a bank teller system.
#include <cstdlib>
#include <ctime>
#include <iostream>
#include <iterator>
#include <list>
#include <queue>
using namespace std;
class Customer {
int serviceTime;
public:
Customer() : serviceTime(0) {}
Customer(int tm) : serviceTime(tm) {}
int getTime() { return serviceTime; }
void setTime(int newtime) { serviceTime = newtime; }
friend ostream&
operator<<(ostream& os, const Customer&
c) {
return os << '[' << c.serviceTime
<< ']';
}
};
class Teller {
queue<Customer>& customers;
Customer current;
enum { SLICE = 5 };
int ttime; // Time left in slice
bool busy; // Is teller serving a customer?
public:
Teller(queue<Customer>& cq)
: customers(cq), ttime(0), busy(false) {}
Teller& operator=(const Teller& rv) {
customers = rv.customers;
current = rv.current;
ttime = rv.ttime;
busy = rv.busy;
return *this;
}
bool isBusy() { return busy; }
void run(bool recursion = false) {
if(!recursion)
ttime = SLICE;
int servtime = current.getTime();
if(servtime > ttime) {
servtime -= ttime;
current.setTime(servtime);
busy = true; // Still working on current
return;
}
if(servtime < ttime) {
ttime -= servtime;
if(!customers.empty()) {
current = customers.front();
customers.pop(); // Remove it
busy = true;
run(true); // Recurse
}
return;
}
if(servtime == ttime) {
// Done with current, set to empty:
current = Customer(0);
busy = false;
return; // No more time in this slice
}
}
};
// Inherit to access protected implementation:
class CustomerQ : public queue<Customer> {
public:
friend ostream&
operator<<(ostream& os, const
CustomerQ& cd) {
copy(cd.c.begin(), cd.c.end(),
ostream_iterator<Customer>(os,
""));
return os;
}
};
int main() {
CustomerQ customers;
list<Teller> tellers;
typedef list<Teller>::iterator TellIt;
tellers.push_back(Teller(customers));
srand(time(0)); // Seed the random number generator
clock_t ticks = clock();
// Run simulation for at least 5 seconds:
while(clock() < ticks + 5 * CLOCKS_PER_SEC) {
// Add a random number of customers to the
// queue, with random service times:
for(int i = 0; i < rand() % 5; i++)
customers.push(Customer(rand() % 15 + 1));
cout << '{' << tellers.size() <<
'}'
<< customers << endl;
// Have the tellers service the queue:
for(TellIt i = tellers.begin();
i != tellers.end(); i++)
(*i).run();
cout << '{' << tellers.size() <<
'}'
<< customers << endl;
// If line is too long, add another teller:
if(customers.size() / tellers.size() > 2)
tellers.push_back(Teller(customers));
// If line is short enough, remove a teller:
if(tellers.size() > 1 &&
customers.size() / tellers.size() < 2)
for(TellIt i = tellers.begin();
i != tellers.end(); i++)
if(!(*i).isBusy()) {
tellers.erase(i);
break; // Out of for loop
}
}
} ///:~
Each customer requires a certain amount of service time,
which is the number of time units that a teller must spend on the customer to
serve that customer’s needs. The amount of service time will be different for
each customer and will be determined randomly. In addition, you won’t know how
many customers will be arriving in each interval, so this will also be
determined randomly.
The Customer objects are kept in a queue<Customer>,
and each Teller object keeps a reference to that queue. When a Teller
object is finished with its current Customer object, that Teller
will get another Customer from the queue and begin working on the new Customer,
reducing the Customer’s service time during each time slice that the Teller
is allotted. All this logic is in the run( ) member function, which
is basically a three-way if statement based on whether the amount of
time necessary to serve the customer is less than, greater than, or equal to
the amount of time left in the teller’s current time slice. Notice that if the Teller
has more time after finishing with a Customer, it gets a new customer
and recurses into itself.
Just as with a stack, when you use a queue,
it’s only a queue and doesn’t have any of the other functionality of the
basic sequence containers. This includes the ability to get an iterator in
order to step through the stack. However, the underlying sequence
container (that the queue is built upon) is held as a protected
member inside the queue, and the identifier for this member is specified
in the C++ Standard as ‘c’, which means that you can derive from queue
to access the underlying implementation. The CustomerQ class does
exactly that, for the sole purpose of defining an ostream operator<<
that can iterate through the queue and display its members.
The driver for the simulation is the while loop in main( ),
which uses processor ticks (defined in <ctime>) to determine if
the simulation has run for at least 5 seconds. At the beginning of each pass
through the loop, a random number of customers is added, with random service
times. Both the number of tellers and the queue contents are displayed so you
can see the state of the system. After running each teller, the display is
repeated. At this point, the system adapts by comparing the number of customers
and the number of tellers. If the line is too long, another teller is added,
and if it is short enough, a teller can be removed. In this adaptation section
of the program you can experiment with policies regarding the optimal addition
and removal of tellers. If this is the only section that you’re modifying, you
might want to encapsulate policies inside different objects.
We’ll revisit this example in a multithreaded exercise in
Chapter 11.
When you push( ) an object onto a priority_queue, that object is sorted into the queue according to a comparison function or
function object. (You can allow the default less template to supply
this, or you can provide one of your own.) The priority_queue ensures
that when you look at the top( ) element, it will be the one with
the highest priority. When you’re done with it, you call pop( ) to
remove it and bring the next one into place. Thus, the priority_queue
has nearly the same interface as a stack, but it behaves differently.
Like stack and queue, priority_queue is
an adaptor that is built on top of one of the basic sequences—the default
sequence being vector.
It’s trivial to make a priority_queue that works with
ints:
//: C07:PriorityQueue1.cpp
#include <cstdlib>
#include <ctime>
#include <iostream>
#include <queue>
using namespace std;
int main() {
priority_queue<int> pqi;
srand(time(0)); // Seed the random number generator
for(int i = 0; i < 100; i++)
pqi.push(rand() % 25);
while(!pqi.empty()) {
cout << pqi.top() << ' ';
pqi.pop();
}
} ///:~
This pushes into the priority_queue 100 random values
from 0 to 24. When you run this program you’ll see that duplicates are allowed,
and the highest values appear first. To show how you can change the ordering by
providing your own function or function object, the following program gives
lower-valued numbers the highest priority:
//: C07:PriorityQueue2.cpp
// Changing the priority.
#include <cstdlib>
#include <ctime>
#include <functional>
#include <iostream>
#include <queue>
using namespace std;
int main() {
priority_queue<int, vector<int>,
greater<int> > pqi;
srand(time(0));
for(int i = 0; i < 100; i++)
pqi.push(rand() % 25);
while(!pqi.empty()) {
cout << pqi.top() << ' ';
pqi.pop();
}
} ///:~
A more interesting problem is a to-do list, where each
object contains a string and a primary and secondary priority value:
//: C07:PriorityQueue3.cpp
// A more complex use of priority_queue.
#include <iostream>
#include <queue>
#include <string>
using namespace std;
class ToDoItem {
char primary;
int secondary;
string item;
public:
ToDoItem(string td, char pri = 'A', int sec = 1)
: primary(pri), secondary(sec), item(td) {}
friend bool operator<(
const ToDoItem& x, const ToDoItem& y) {
if(x.primary > y.primary)
return true;
if(x.primary == y.primary)
if(x.secondary > y.secondary)
return true;
return false;
}
friend ostream&
operator<<(ostream& os, const ToDoItem&
td) {
return os << td.primary << td.secondary
<< ": " << td.item;
}
};
int main() {
priority_queue<ToDoItem> toDoList;
toDoList.push(ToDoItem("Empty trash", 'C',
4));
toDoList.push(ToDoItem("Feed dog", 'A',
2));
toDoList.push(ToDoItem("Feed bird", 'B',
7));
toDoList.push(ToDoItem("Mow lawn", 'C',
3));
toDoList.push(ToDoItem("Water lawn", 'A',
1));
toDoList.push(ToDoItem("Feed cat", 'B',
1));
while(!toDoList.empty()) {
cout << toDoList.top() << endl;
toDoList.pop();
}
} ///:~
The ToDoItem’s operator< must be a
nonmember function for it to work with less< >. Other than that,
everything happens automatically. The output is
A1: Water lawn
A2: Feed dog
B1: Feed cat
B7: Feed bird
C3: Mow lawn
C4: Empty trash
You cannot iterate through a priority_queue, but it’s
possible to simulate the behavior of a priority_queue using a vector,
thus allowing you access to that vector. You can do this by looking at
the implementation of priority_queue, which uses make_heap( ), push_heap( ), and pop_heap( ). (These are the soul of the priority_queue—in fact you could say that the heap is the
priority queue and that priority_queue is just a wrapper around it.) This turns out to be reasonably straightforward, but you might think that a
shortcut is possible. Since the container used by priority_queue is protected
(and has the identifier, according to the Standard C++ specification, named c),
you can inherit a new class that provides access to the underlying implementation:
//: C07:PriorityQueue4.cpp
// Manipulating the underlying implementation.
#include <algorithm>
#include <cstdlib>
#include <ctime>
#include <iostream>
#include <iterator>
#include <queue>
using namespace std;
class PQI : public priority_queue<int> {
public:
vector<int>& impl() { return c; }
};
int main() {
PQI pqi;
srand(time(0));
for(int i = 0; i < 100; i++)
pqi.push(rand() % 25);
copy(pqi.impl().begin(), pqi.impl().end(),
ostream_iterator<int>(cout, " "));
cout << endl;
while(!pqi.empty()) {
cout << pqi.top() << ' ';
pqi.pop();
}
} ///:~
However, if you run this program, you’ll discover that the vector
doesn’t contain the items in the descending order that you get when you call pop( ), the order that you want from the priority queue. It would seem
that if you want to create a vector that is a priority queue, you have
to do it by hand, like this:
//: C07:PriorityQueue5.cpp
// Building your own priority queue.
#include <algorithm>
#include <cstdlib>
#include <ctime>
#include <iostream>
#include <iterator>
#include <queue>
using namespace std;
template<class T, class Compare>
class PQV : public vector<T> {
Compare comp;
public:
PQV(Compare cmp = Compare()) : comp(cmp) {
make_heap(this->begin(),this->end(), comp);
}
const T& top() { return this->front(); }
void push(const T& x) {
this->push_back(x);
push_heap(this->begin(),this->end(), comp);
}
void pop() {
pop_heap(this->begin(),this->end(), comp);
this->pop_back();
}
};
int main() {
PQV< int, less<int> > pqi;
srand(time(0));
for(int i = 0; i < 100; i++)
pqi.push(rand() % 25);
copy(pqi.begin(), pqi.end(),
ostream_iterator<int>(cout, " "));
cout << endl;
while(!pqi.empty()) {
cout << pqi.top() << ' ';
pqi.pop();
}
} ///:~
But this program behaves in the same way as the previous
one! What you are seeing in the underlying vector is called a heap.
This heap data structure represents the tree of the priority queue (stored
in the linear structure of the vector), but when you iterate through it,
you do not get a linear priority-queue order. You might think that you can
simply call sort_heap( ), but that only works once, and then you
don’t have a heap anymore, but instead a sorted list. This means that to go
back to using it as a heap, the user must remember to call make_heap( )
first. This can be encapsulated into your custom priority queue:
//: C07:PriorityQueue6.cpp
#include <algorithm>
#include <cstdlib>
#include <ctime>
#include <iostream>
#include <iterator>
#include <queue>
using namespace std;
template<class T, class Compare>
class PQV : public vector<T> {
Compare comp;
bool sorted;
void assureHeap() {
if(sorted) {
// Turn it back into a heap:
make_heap(this->begin(),this->end(), comp);
sorted = false;
}
}
public:
PQV(Compare cmp = Compare()) : comp(cmp) {
make_heap(this->begin(),this->end(), comp);
sorted = false;
}
const T& top() {
assureHeap();
return this->front();
}
void push(const T& x) {
assureHeap();
this->push_back(x); // Put it at the end
// Re-adjust the heap:
push_heap(this->begin(),this->end(), comp);
}
void pop() {
assureHeap();
// Move the top element to the last position:
pop_heap(this->begin(),this->end(), comp);
this->pop_back();// Remove that element
}
void sort() {
if(!sorted) {
sort_heap(this->begin(),this->end(), comp);
reverse(this->begin(),this->end());
sorted = true;
}
}
};
int main() {
PQV< int, less<int> > pqi;
srand(time(0));
for(int i = 0; i < 100; i++) {
pqi.push(rand() % 25);
copy(pqi.begin(), pqi.end(),
ostream_iterator<int>(cout, "
"));
cout << "\n-----” << endl;
}
pqi.sort();
copy(pqi.begin(), pqi.end(),
ostream_iterator<int>(cout, " "));
cout << "\n-----” << endl;
while(!pqi.empty()) {
cout << pqi.top() << ' ';
pqi.pop();
}
} ///:~
If sorted is true, the vector is not organized
as a heap but instead as a sorted sequence. The assureHeap( )
function guarantees that it’s put back into heap form before performing any
heap operations on it. The first for loop in main( ) now has
the additional quality that it displays the heap as it is being built.
In the previous two programs we had to introduce a seemingly
extraneous usage of the “this->” prefix. Although some compilers do
not require it, the standard definition of C++ does. Note that the class PQV
derives from vector<T>, therefore begin( ) and end( ),
inherited from vector<T>, are dependent names. Compilers can’t
look up names from dependent base classes in the definition of a template (vector,
in this case) because for a given instantiation an explicitly specialized
version of the template might be used that does not have a given member. The
special naming requirement guarantees that you won’t end up calling a base
class member in some cases and possibly a function from an enclosing scope
(such as a global one) in other cases. The compiler has no way of knowing that
a call to begin( ) is dependent, so we must give it a clue with a “this‑>”
qualification. This
tells the compiler that begin( ) is in the scope of PQV, so
it waits until an instance of PQV is fully instantiated. If this
qualifying prefix is left out, the compiler will attempt an early lookup for
the names begin and end (at template definition time, and will
fail to find them because there are no such names declared in enclosing lexical
scopes in this example). In the code above, however, the compiler waits until
the point of instantiation of pqi, and then finds the correct
specializations of begin( ) and end( ) in vector<int>.
The only drawback to this solution is that the user must
remember to call sort( ) before viewing it as a sorted sequence
(although one could conceivably redefine all the member functions that produce
iterators so that they guarantee sorting). Another solution is to create a
priority queue that is not a vector, but will build you a vector
whenever you want one:
//: C07:PriorityQueue7.cpp
// A priority queue that will hand you a vector.
#include <algorithm>
#include <cstdlib>
#include <ctime>
#include <iostream>
#include <iterator>
#include <queue>
#include <vector>
using namespace std;
template<class T, class Compare> class PQV {
vector<T> v;
Compare comp;
public:
// Don't need to call make_heap(); it's empty:
PQV(Compare cmp = Compare()) : comp(cmp) {}
void push(const T& x) {
v.push_back(x); // Put it at the end
// Re-adjust the heap:
push_heap(v.begin(), v.end(), comp);
}
void pop() {
// Move the top element to the last position:
pop_heap(v.begin(), v.end(), comp);
v.pop_back(); // Remove that element
}
const T& top() { return v.front(); }
bool empty() const { return v.empty(); }
int size() const { return v.size(); }
typedef vector<T> TVec;
TVec getVector() {
TVec r(v.begin(), v.end());
// It’s already a heap
sort_heap(r.begin(), r.end(), comp);
// Put it into priority-queue order:
reverse(r.begin(), r.end());
return r;
}
};
int main() {
PQV<int, less<int> > pqi;
srand(time(0));
for(int i = 0; i < 100; i++)
pqi.push(rand() % 25);
const vector<int>& v = pqi.getVector();
copy(v.begin(), v.end(),
ostream_iterator<int>(cout, " "));
cout << "\n-----------” << endl;
while(!pqi.empty()) {
cout << pqi.top() << ' ';
pqi.pop();
}
} ///:~
The PQV class template follows the same form as the
STL’s priority_queue, but has the additional member getVector( ),
which creates a new vector that’s a copy of the one in PQV (which
means that it’s already a heap). It then sorts that copy (leaving PQV’s vector
untouched), and reverses the order so that traversing the new vector
produces the same effect as popping the elements from the priority queue.
You may observe that the approach of deriving from priority_queue
used in PriorityQueue4.cpp could be used with the above technique to
produce more succinct code:
//: C07:PriorityQueue8.cpp
// A more compact version of PriorityQueue7.cpp.
#include <algorithm>
#include <cstdlib>
#include <ctime>
#include <iostream>
#include <iterator>
#include <queue>
using namespace std;
template<class T> class PQV : public
priority_queue<T> {
public:
typedef vector<T> TVec;
TVec getVector() {
TVec r(this->c.begin(),this->c.end());
// c is already a heap
sort_heap(r.begin(), r.end(), this->comp);
// Put it into priority-queue order:
reverse(r.begin(), r.end());
return r;
}
};
int main() {
PQV<int> pqi;
srand(time(0));
for(int i = 0; i < 100; i++)
pqi.push(rand() % 25);
const vector<int>& v = pqi.getVector();
copy(v.begin(), v.end(),
ostream_iterator<int>(cout, " "));
cout << "\n-----------” << endl;
while(!pqi.empty()) {
cout << pqi.top() << ' ';
pqi.pop();
}
} ///:~
The brevity of this solution makes it the simplest and most
desirable, plus it’s guaranteed that the user will not have a vector in
the unsorted state. The only potential problem is that the getVector( )
member function returns the vector<T> by value, which might cause
some overhead issues with complex values of the parameter type T.
Because C is a language that purports to be “close to the
hardware,” many have found it dismaying that there is no native binary
representation for numbers. Decimal, of course, and hexadecimal (tolerable only
because it’s easier to group the bits in your mind), but octal? Ugh. Whenever
you read specs for chips you’re trying to program, they don’t describe the chip
registers in octal or even hexadecimal—they use binary. And yet C won’t let you
say 0b0101101, which is the obvious solution for a language close to the
hardware.
Although there’s still no native binary representation in
C++, things have improved with the addition of two classes: bitset and vector<bool>, both of which are designed to manipulate a group of
on-off values. The
primary differences between these types are:
· Each bitset holds a fixed number of bits. You establish
the quantity of bits in the bitset template argument. The vector<bool>
can, like a regular vector, expand dynamically to hold any number of bool
values.
· The bitset template is explicitly designed for performance
when manipulating bits, and is not a “regular” STL container. As such, it has
no iterators. The number of bits, being a template parameter, is known at
compile time and allows the underlying integral array to be stored on the
runtime stack. The vector<bool> container, on the other hand, is a
specialization of a vector and so has all the operations of a normal vector—the
specialization is just designed to be space efficient for bool.
There is no trivial conversion between a bitset and a
vector<bool>, which implies that the two are for very different
purposes. Furthermore, neither is a traditional “STL container.” The bitset
template class has an interface for bit-level operations and in no way
resembles the STL containers we’ve discussed up to this point. The vector<bool>
specialization of vector is similar to an STL-like container, but it
differs as discussed below.
The template for bitset accepts an unsigned integral
template argument that is the number of bits to represent. Thus, bitset<10>
is a different type than bitset<20>, and you cannot perform
comparisons, assignments, and so on between the two.
A bitset provides the most commonly used bitwise
operations in an efficient form. However, each bitset is implemented by
logically packing bits in an array of integral types (typically unsigned
longs, which contain at least 32 bits). In addition, the only conversion
from a bitset to a numerical value is to an unsigned long (via
the function to_ulong( )).
The following example tests almost all the functionality of
the bitset (the missing operations are redundant or trivial). You’ll
see the description of each of the bitset outputs to the right of the output so
that the bits all line up and you can compare them to the source values. If you
still don’t understand bitwise operations, running this program should help.
//: C07:BitSet.cpp {-bor}
// Exercising the bitset class.
#include <bitset>
#include <climits>
#include <cstdlib>
#include <ctime>
#include <cstddef>
#include <iostream>
#include <string>
using namespace std;
const int SZ = 32;
typedef bitset<SZ> BS;
template<int bits> bitset<bits>
randBitset() {
bitset<bits> r(rand());
for(int i = 0; i < bits/16 - 1; i++) {
r <<= 16;
// "OR" together with a new lower 16
bits:
r |= bitset<bits>(rand());
}
return r;
}
int main() {
srand(time(0));
cout << "sizeof(bitset<16>) = "
<< sizeof(bitset<16>) << endl;
cout << "sizeof(bitset<32>) = "
<< sizeof(bitset<32>) << endl;
cout << "sizeof(bitset<48>) = "
<< sizeof(bitset<48>) << endl;
cout << "sizeof(bitset<64>) = "
<< sizeof(bitset<64>) << endl;
cout << "sizeof(bitset<65>) = "
<< sizeof(bitset<65>) << endl;
BS a(randBitset<SZ>()), b(randBitset<SZ>());
// Converting from a bitset:
unsigned long ul = a.to_ulong();
cout << a << endl;
// Converting a string to a bitset:
string cbits("111011010110111");
cout << "as a string = " <<
cbits <<endl;
cout << BS(cbits) << "
[BS(cbits)]" << endl;
cout << BS(cbits, 2) << " [BS(cbits,
2)]" << endl;
cout << BS(cbits, 2, 11) << " [BS(cbits,
2, 11)]"<< endl;
cout << a << " [a]" <<
endl;
cout << b << " [b]" <<
endl;
// Bitwise AND:
cout << (a & b) << " [a &
b]" << endl;
cout << (BS(a) &= b) << " [a
&= b]" << endl;
// Bitwise OR:
cout << (a | b) << " [a | b]"
<< endl;
cout << (BS(a) |= b) << " [a |=
b]" << endl;
// Exclusive OR:
cout << (a ^ b) << " [a ^ b]"
<< endl;
cout << (BS(a) ^= b) << " [a ^=
b]" << endl;
cout << a << " [a]" <<
endl; // For reference
// Logical left shift (fill with zeros):
cout << (BS(a) <<= SZ/2) << "
[a <<= (SZ/2)]" << endl;
cout << (a << SZ/2) << endl;
cout << a << " [a]" <<
endl; // For reference
// Logical right shift (fill with zeros):
cout << (BS(a) >>= SZ/2) << "
[a >>= (SZ/2)]" << endl;
cout << (a >> SZ/2) << endl;
cout << a << " [a]" <<
endl; // For reference
cout << BS(a).set() << "
[a.set()]" << endl;
for(int i = 0; i < SZ; i++)
if(!a.test(i)) {
cout << BS(a).set(i)
<< " [a.set(" << i
<<")]" << endl;
break; // Just do one example of this
}
cout << BS(a).reset() << "
[a.reset()]"<< endl;
for(int j = 0; j < SZ; j++)
if(a.test(j)) {
cout << BS(a).reset(j)
<< " [a.reset(" << j
<<")]" << endl;
break; // Just do one example of this
}
cout << BS(a).flip() << "
[a.flip()]" << endl;
cout << ~a << " [~a]" <<
endl;
cout << a << " [a]" <<
endl; // For reference
cout << BS(a).flip(1) << "
[a.flip(1)]"<< endl;
BS c;
cout << c << " [c]" <<
endl;
cout << "c.count() = " <<
c.count() << endl;
cout << "c.any() = "
<< (c.any() ? "true" :
"false") << endl;
cout << "c.none() = "
<< (c.none() ? "true" :
"false") << endl;
c[1].flip(); c[2].flip();
cout << c << " [c]" <<
endl;
cout << "c.count() = " <<
c.count() << endl;
cout << "c.any() = "
<< (c.any() ? "true" :
"false") << endl;
cout << "c.none() = "
<< (c.none() ? "true" :
"false") << endl;
// Array indexing operations:
c.reset();
for(size_t k = 0; k < c.size(); k++)
if(k % 2 == 0)
c[k].flip();
cout << c << " [c]" <<
endl;
c.reset();
// Assignment to bool:
for(size_t ii = 0; ii < c.size(); ii++)
c[ii] = (rand() % 100) < 25;
cout << c << " [c]" <<
endl;
// bool test:
if(c[1])
cout << "c[1] == true";
else
cout << "c[1] == false" <<
endl;
} ///:~
To generate interesting random bitsets, the randBitset( )
function is created. This function demonstrates operator<<= by
shifting each 16 random bits to the left until the bitset (which is
templatized in this function for size) is full. The generated number and each
new 16 bits are combined using the operator|=.
The main( ) function first shows the unit size
of a bitset. If it is less than 32 bits, sizeof produces 4 (4
bytes = 32 bits), which is the size of a single long on most implementations.
If it’s between 32 and 64, it requires two longs, greater than 64
requires 3 longs, and so on. Thus, you make the best use of space if you
use a bit quantity that fits in an integral number of longs. However,
notice there’s no extra overhead for the object—it’s as if you were hand-coding
for a long.
Although there are no other numerical conversions from bitset
besides to_ulong( ), there is a stream inserter that
produces a string containing ones and zeros, and this can be as long as
the actual bitset.
There’s still no primitive format for binary values, but bitset
supports the next best thing: a string of ones and zeros with the
least-significant bit (lsb) on the right. The three constructors demonstrated take
the entire string, the string starting at character 2, and the
string from character 2 through 11. You can write to an ostream from a bitset
using operator<<, and it comes out as ones and zeros. You
can also read from an istream using operator>> (not shown
here).
You’ll notice that bitset only has three nonmember
operators: and (&), or (|), and exclusive-or
(^). Each of these creates a new bitset as its return value. All
the member operators opt for the more efficient &=, |=, and
so on, where a temporary is not created. However, these forms change the bitset’s
value (which is a in most of the tests in the above example). To prevent
this, we created a temporary to be used as the lvalue by invoking the
copy-constructor on a; this is why you see the form BS(a). The
result of each test is displayed, and occasionally a is reprinted so you
can easily look at it for reference.
The rest of the example should be self-explanatory when you
run it; if not you can find the details in your compiler’s documentation or in
the other documentation mentioned earlier in this chapter.
The vector<bool> container is a specialization of the vector template. A normal bool variable requires at least one byte,
but since a bool only has two states, the ideal implementation of vector<bool>
is such that each bool value only requires one bit. Since typical
library implementations pack the bits into integral arrays, the iterator must
be specially defined and cannot be a pointer to bool.
The bit-manipulation functions for vector<bool>
are much more limited than those of bitset. The only member function
that was added to those already in vector is flip( ), to
invert all the bits. There is no set( ) or reset( ) as
in bitset. When you use operator[ ], you get back an object
of type vector<bool>::reference, which also has a flip( )
to invert that individual bit.
//: C07:VectorOfBool.cpp
// Demonstrate the vector<bool> specialization.
#include <bitset>
#include <cstddef>
#include <iostream>
#include <iterator>
#include <sstream>
#include <vector>
using namespace std;
int main() {
vector<bool> vb(10, true);
vector<bool>::iterator it;
for(it = vb.begin(); it != vb.end(); it++)
cout << *it;
cout << endl;
vb.push_back(false);
ostream_iterator<bool> out(cout, "");
copy(vb.begin(), vb.end(), out);
cout << endl;
bool ab[] = { true, false, false, true, true,
true, true, false, false, true };
// There's a similar constructor:
vb.assign(ab, ab + sizeof(ab)/sizeof(bool));
copy(vb.begin(), vb.end(), out);
cout << endl;
vb.flip(); // Flip all bits
copy(vb.begin(), vb.end(), out);
cout << endl;
for(size_t i = 0; i < vb.size(); i++)
vb[i] = 0; // (Equivalent to "false")
vb[4] = true;
vb[5] = 1;
vb[7].flip(); // Invert one bit
copy(vb.begin(), vb.end(), out);
cout << endl;
// Convert to a bitset:
ostringstream os;
copy(vb.begin(), vb.end(),
ostream_iterator<bool>(os, ""));
bitset<10> bs(os.str());
cout << "Bitset:” << endl <<
bs << endl;
} ///:~
The last part of this example takes a vector<bool>
and converts it to a bitset by first turning it into a string of
ones and zeros. Here, you must know the size of the bitset at compile
time. You can see that this conversion is not the kind of operation you’ll want
to do on a regular basis.
The vector<bool> specialization is a “crippled”
STL container in the sense that certain guarantees that other containers
provide are missing. For example, with the other containers the following
relationships hold:
// Let c be an STL container other than
vector<bool>:
T& r = c.front();
T* p = &*c.begin();
For all other containers, the front( ) function
yields an lvalue (something you can get a non-const reference to), and begin( )
must yield something you can dereference and then take the address of. Neither
is possible because bits are not addressable. Both vector<bool>
and bitset use a proxy class (the nested reference class,
mentioned earlier) to read and set bits as necessary.
The set, map, multiset, and multimap
are called associative containers because they associate keys
with values. Well, at least maps and multimaps associate
keys with values, but you can look at a set as a map that has no
values, only keys (and they can in fact be implemented this way), and the same
for the relationship between multiset and multimap. So, because
of the structural similarity, sets and multisets are lumped in
with associative containers.
The most important basic operations with associative
containers are putting things in and, in the case of a set, seeing if
something is in the set. In the case of a map, you want to first see if
a key is in the map, and if it exists, you want the associated value for
that key. There are many variations on this theme, but that’s the fundamental
concept. The following example shows these basics:
//: C07:AssociativeBasics.cpp {-bor}
// Basic operations with sets and maps.
//{L} Noisy
#include <cstddef>
#include <iostream>
#include <iterator>
#include <map>
#include <set>
#include "Noisy.h"
using namespace std;
int main() {
Noisy na[7];
// Add elements via constructor:
set<Noisy> ns(na, na + sizeof
na/sizeof(Noisy));
Noisy n;
ns.insert(n); // Ordinary insertion
cout << endl;
// Check for set membership:
cout << "ns.count(n)= " <<
ns.count(n) << endl;
if(ns.find(n) != ns.end())
cout << "n(" << n <<
") found in ns" << endl;
// Print elements:
copy(ns.begin(), ns.end(),
ostream_iterator<Noisy>(cout, "
"));
cout << endl;
cout << "\n-----------” << endl;
map<int, Noisy> nm;
for(int i = 0; i < 10; i++)
nm[i]; // Automatically makes pairs
cout << "\n-----------” << endl;
for(size_t j = 0; j < nm.size(); j++)
cout << "nm[" << j
<<"] = " << nm[j] << endl;
cout << "\n-----------” << endl;
nm[10] = n;
cout << "\n-----------” << endl;
nm.insert(make_pair(47, n));
cout << "\n-----------” << endl;
cout << "\n nm.count(10)= " <<
nm.count(10) << endl;
cout << "nm.count(11)= " <<
nm.count(11) << endl;
map<int, Noisy>::iterator it = nm.find(6);
if(it != nm.end())
cout << "value:" <<
(*it).second
<< " found in nm at location
6" << endl;
for(it = nm.begin(); it != nm.end(); it++)
cout << (*it).first << ":"
<< (*it).second << ", ";
cout << "\n-----------” << endl;
} ///:~
The set<Noisy> object ns is created
using two iterators into an array of Noisy objects, but there is also a
default constructor and a copy-constructor, and you can pass in an object that
provides an alternate scheme for doing comparisons. Both sets and maps
have an insert( ) member function to put things in, and you can
check to see if an object is already in an associative container in two ways.
The count( ) member function, when given a key, will tell you how
many times that key occurs. (This can only be zero or one in a set or map,
but it can be more than one with a multiset or multimap.) The find( )
member function will produce an iterator indicating the first occurrence (with set
and map, the only occurrence) of the key that you give it or will
produce the past-the-end iterator if it can’t find the key. The count( )
and find( ) member functions exist for all the associative
containers, which makes sense. The associative containers also have member
functions lower_bound( ), upper_bound( ), and equal_range( ),
which only make sense for multiset and multimap, as you will see.
(But don’t try to figure out how they would be useful for set and map,
since they are designed for dealing with a range of duplicate keys, which those
containers don’t allow.)
Designing an operator[ ] always presents a bit
of a dilemma. Because it’s intended to be treated as an array-indexing
operation, people don’t tend to think about performing a test before they use
it. But what happens if you decide to index out of the bounds of the array? One
option is to throw an exception, but with a map, “indexing out of the
array” could mean that you want to create a new entry at that location, and
that’s the way the STL map treats it. The first for loop after
the creation of the map<int, Noisy> nm just “looks up”
objects using the operator[ ], but this is actually creating new Noisy
objects! The map creates a new key-value pair (using the default
constructor for the value) if you look up a value with operator[ ]
and it isn’t there. This means that if you really just want to look something
up and not create a new entry, you must use the member functions count( )
(to see if it’s there) or find( ) (to get an iterator to it).
A number of problems are associated with the for loop
that prints the values of the container using operator[ ]. First,
it requires integral keys (which we happen to have here). Next and worse, if
all the keys are not sequential, you’ll end up counting from zero to the size
of the container, and if some spots don’t have key-value pairs, you’ll
automatically create them and miss some of the higher values of the keys.
Finally, if you look at the output from the for loop, you’ll see that
things are very busy, and it’s quite puzzling at first why there are so
many constructions and destructions for what appears to be a simple lookup. The
answer only becomes clear when you look at the code in the map template
for operator[ ], which will be something like this:
mapped_type& operator[] (const key_type& k) {
value_type tmp(k,T());
return (*((insert(tmp)).first)).second;
}
The map::insert( ) function takes a key-value
pair and does nothing if there is already an entry in the map with the given
key—otherwise it inserts an entry for the key. In either case, it returns a new
key-value pair holding an iterator to the inserted pair as its first element
and holding true as the second element if an insertion took place. The members first
and second give the key and value, respectively, because map::value_type
is really just a typedef for a std::pair:
typedef pair<const Key, T> value_type;
You’ve seen the std::pair template before. It’s a
simple holder for two values of independent types, as you can see by its
definition:
template<class T1, class T2> struct pair {
typedef T1 first_type;
typedef T2 second_type;
T1 first;
T2 second;
pair();
pair(const T1& x, const T2& y) : first(x),
second(y) {}
// Templatized copy-constructor:
template<class U, class V> pair(const
pair<U, V> &p);
};
The pair template class is very useful, especially
when you want to return two objects from a function (since a return
statement only takes one object). There’s even a shorthand for creating a pair
called make_pair( ), which is used in AssociativeBasics.cpp.
So to retrace the steps, map::value_type is a pair
of the key and the value of the map—actually, it’s a single entry for the map.
But notice that pair packages its objects by value, which means that
copy-constructions are necessary to get the objects into the pair. Thus,
the creation of tmp in map::operator[ ] will involve at
least a copy-constructor call and destructor call for each object in the pair.
Here, we’re getting off easy because the key is an int. But if you want
to really see what kind of activity can result from map::operator[ ],
try running this:
//: C07:NoisyMap.cpp
// Mapping Noisy to Noisy.
//{L} Noisy
#include <map>
#include "Noisy.h"
using namespace std;
int main() {
map<Noisy, Noisy> mnn;
Noisy n1, n2;
cout << "\n--------” << endl;
mnn[n1] = n2;
cout << "\n--------” << endl;
cout << mnn[n1] << endl;
cout << "\n--------” << endl;
} ///:~
You’ll see that both the insertion and lookup generate a lot
of extra objects, and that’s because of the creation of the tmp object.
If you look back up at map::operator[ ], you’ll see that the second
line calls insert( ), passing it tmp—that is, operator[ ]
does an insertion every time. The return value of insert( ) is a
different kind of pair, where first is an iterator pointing to
the key-value pair that was just inserted, and second is a bool
indicating whether the insertion took place. You can see that operator[ ]
grabs first (the iterator), dereferences it to produce the pair,
and then returns the second, which is the value at that location.
So on the upside, map has this fancy “make a new
entry if one isn’t there” behavior, but the downside is that you always
get a lot of extra object creations and destructions when you use map::operator[ ].
Fortunately, AssociativeBasics.cpp also demonstrates how to reduce the
overhead of insertions and deletions, by avoiding operator[ ] if
you don’t need it. The insert( ) member function is slightly more
efficient than operator[ ]. With a set, you hold only one
object, but with a map, you hold key-value pairs; so insert( )
requires a pair as its argument. Here’s where make_pair( )
comes in handy, as you can see.
For looking objects up in a map, you can use count( )
to see whether a key is in the map, or you can use find( ) to
produce an iterator pointing directly at the key-value pair. Again, since the map
contains pairs, that’s what the iterator produces when you dereference
it, so you have to select first and second. When you run AssociativeBasics.cpp,
you’ll notice that the iterator approach involves no extra object creations or
destructions. It’s not as easy to write or read, though.
You’ve seen how useful the fill( ), fill_n( ),
generate( ), and generate_n( ) function templates in <algorithm>
have been for filling the sequential containers (vector, list,
and deque) with data. However, these are implemented by using operator=
to assign values into the sequential containers, and the way that you add
objects to associative containers is with their respective insert( )
member functions. Thus, the default “assignment” behavior causes a problem when
trying to use the “fill” and “generate” functions with associative containers.
One solution is to duplicate the “fill” and “generate”
functions, creating new ones that can be used with associative containers. It
turns out that only the fill_n( ) and generate_n( )
functions can be duplicated (fill( ) and generate( ) copy
sequences, which doesn’t make sense with associative containers), but the job
is fairly easy, since you have the <algorithm> header file to work
from:
//: C07:assocGen.h
// The fill_n() and generate_n() equivalents
// for associative containers.
#ifndef ASSOCGEN_H
#define ASSOCGEN_H
template<class Assoc, class Count, class T>
void assocFill_n(Assoc& a, Count n, const T&
val) {
while(n-- > 0)
a.insert(val);
}
template<class Assoc, class Count, class Gen>
void assocGen_n(Assoc& a, Count n, Gen g) {
while(n-- > 0)
a.insert(g());
}
#endif // ASSOCGEN_H ///:~
You can see that instead of using iterators, the container
class itself is passed (by reference, of course).
This code demonstrates two valuable lessons. The first is
that if the algorithms don’t do what you want, copy the nearest thing and
modify it. You have the example at hand in the STL header, so most of the work
has already been done.
The second lesson is more pointed: if you look long enough,
there’s probably a way to do it in the STL without inventing anything
new. The present problem can instead be solved by using an insert_iterator
(produced by a call to inserter( )), which calls insert( )
to place items in the container instead of operator=. This is not
simply a variation of front_insert_iterator or back_insert_iterator
because those iterators use push_front( ) and push_back( ),
respectively. Each of the insert iterators is different by virtue of the member
function it uses for insertion, and insert( ) is the one we need.
Here’s a demonstration that shows filling and generating both a map and
a set. (It can also be used with multimap and multiset.)
First, some templatized generators are created. (This may seem like overkill,
but you never know when you’ll need them. For that reason they’re placed in a
header file.)
//: C07:SimpleGenerators.h
// Generic generators, including one that creates pairs.
#include <iostream>
#include <utility>
// A generator that increments its value:
template<typename T> class IncrGen {
T i;
public:
IncrGen(T ii) : i(ii) {}
T operator()() { return i++; }
};
// A generator that produces an STL pair<>:
template<typename T1, typename T2> class PairGen
{
T1 i;
T2 j;
public:
PairGen(T1 ii, T2 jj) : i(ii), j(jj) {}
std::pair<T1,T2> operator()() {
return std::pair<T1,T2>(i++, j++);
}
};
namespace std {
// A generic global operator<< for printing any
STL pair<>:
template<typename F, typename S> ostream&
operator<<(ostream& os, const
pair<F,S>& p) {
return os << p.first << "\t"
<< p.second << endl;
}
} ///:~
Both generators expect that T can be incremented, and
they simply use operator++ to generate new values from whatever you used
for initialization. PairGen creates an STL pair object as its
return value, and that’s what can be placed into a map or multimap
using insert( ).
The last function is a generalization of operator<<
for ostreams, so that any pair can be printed, assuming each
element of the pair supports a stream operator<<. (It is in
namespace std for the strange name lookup reasons discussed in Chapter 5,
and explained once again after Thesaurus.cpp later on in this chapter.)
As you can see in the following, this allows the use of copy( ) to
output the map:
//: C07:AssocInserter.cpp
// Using an insert_iterator so fill_n() and generate_n()
// can be used with associative containers.
#include <iterator>
#include <iostream>
#include <algorithm>
#include <set>
#include <map>
#include "SimpleGenerators.h"
using namespace std;
int main() {
set<int> s;
fill_n(inserter(s, s.begin()), 10, 47);
generate_n(inserter(s, s.begin()), 10,
IncrGen<int>(12));
copy(s.begin(), s.end(),
ostream_iterator<int>(cout, "\n"));
map<int, int> m;
fill_n(inserter(m, m.begin()), 10,
make_pair(90,120));
generate_n(inserter(m, m.begin()), 10,
PairGen<int, int>(3, 9));
copy(m.begin(), m.end(),
ostream_iterator<pair<int,int>
>(cout,"\n"));
} ///:~
The second argument to inserter is an iterator, which
is an optimization hint to help the insertion go faster (instead of always
starting the search at the root of the underlying tree). Since an insert_iterator
can be used with many different types of containers, with non-associative
containers it is more than a hint—it is required.
Note how the ostream_iterator is created to output a pair.
This won’t work if the operator<< isn’t created. Since it’s a
template, it is automatically instantiated for pair<int, int>.
An ordinary array uses an integral value to index into a
sequential set of elements of some type. A map is an associative array, which means you associate one object with another in an array-like
fashion. Instead of selecting an array element with a number as you do with an
ordinary array, you look it up with an object! The example that follows counts
the words in a text file, so the index is the string object representing
the word, and the value being looked up is the object that keeps count of the
strings.
In a single-item container such as a vector or a list,
only one thing is being held. But in a map, you’ve got two things: the key (what you look up by, as in mapname[key]) and the value
that results from the lookup with the key. If you simply want to move through
the entire map and list each key-value pair, you use an iterator, which
when dereferenced produces a pair object containing both the key and the
value. You access the members of a pair by selecting first or second.
This same philosophy of packaging two items together is also
used to insert elements into the map, but the pair is created as part of
the instantiated map and is called value_type, containing the key
and the value. So one option for inserting a new element is to create a value_type
object, loading it with the appropriate objects and then calling the insert( )
member function for the map. Instead, the following example uses the
aforementioned special feature of map: if you’re trying to find an
object by passing in a key to operator[ ] and that object doesn’t
exist, operator[ ] will automatically insert a new key-value pair
for you, using the default constructor for the value object. With that in mind,
consider an implementation of a word-counting program:
//: C07:WordCount.cpp
// Count occurrences of words using a map.
#include <iostream>
#include <fstream>
#include <map>
#include <string>
#include "../require.h"
using namespace std;
int main(int argc, char* argv[]) {
typedef map<string, int> WordMap;
typedef WordMap::iterator WMIter;
const char* fname = "WordCount.cpp";
if(argc > 1) fname = argv[1];
ifstream in(fname);
assure(in, fname);
WordMap wordmap;
string word;
while(in >> word)
wordmap[word]++;
for(WMIter w = wordmap.begin(); w != wordmap.end();
w++)
cout << w->first << ": "
<< w->second << endl;
} ///:~
This example shows the power of zero-initialization. Consider this line of code from the program:
This expression increments the int associated with word.
If there isn’t such a word in the map, a key-value pair for the word is
automatically inserted, with the value initialized to zero by a call to the
pseudo-constructor int( ), which returns a 0.
Printing the entire list requires traversing it with an
iterator. (There’s no copy( ) shortcut for a map unless you
want to write an operator<< for the pair in the map.) As
previously mentioned, dereferencing this iterator produces a pair
object, with the first member the key and the second member the
value.
If you want to find the count for a particular word, you can
use the array index operator, like this:
cout << "the: " << wordmap["the"] <<
endl;
You can see that one of the great advantages of the map
is the clarity of the syntax; an associative array makes intuitive sense to the
reader. (Note, however, that if “the” isn’t already in the wordmap, a
new entry will be created!)
A multimap is a map that can contain duplicate
keys. At first this may seem like a strange idea, but it can occur surprisingly
often. A phone book, for example, can have many entries with the same name.
Suppose you are monitoring wildlife, and you want to keep
track of where and when each type of animal is spotted. Thus, you may see many
animals of the same kind, all in different locations and at different times. So
if the type of animal is the key, you’ll need a multimap. Here’s what it
looks like:
//: C07:WildLifeMonitor.cpp
#include <algorithm>
#include <cstdlib>
#include <cstddef>
#include <ctime>
#include <iostream>
#include <iterator>
#include <map>
#include <sstream>
#include <string>
#include <vector>
using namespace std;
class DataPoint {
int x, y; // Location coordinates
time_t time; // Time of Sighting
public:
DataPoint() : x(0), y(0), time(0) {}
DataPoint(int xx, int yy, time_t tm) :
x(xx), y(yy), time(tm) {}
// Synthesized operator=, copy-constructor OK
int getX() const { return x; }
int getY() const { return y; }
const time_t* getTime() const { return &time; }
};
string animal[] = {
"chipmunk", "beaver",
"marmot", "weasel",
"squirrel", "ptarmigan",
"bear", "eagle",
"hawk", "vole", "deer",
"otter", "hummingbird",
};
const int ASZ = sizeof animal/sizeof *animal;
vector<string> animals(animal, animal + ASZ);
// All the information is contained in a
// "Sighting," which can be sent to an
ostream:
typedef pair<string, DataPoint> Sighting;
ostream&
operator<<(ostream& os, const Sighting&
s) {
return os << s.first << " sighted at
x= "
<< s.second.getX() << ", y= "
<< s.second.getY()
<< ", time = " <<
ctime(s.second.getTime());
}
// A generator for Sightings:
class SightingGen {
vector<string>& animals;
enum { D = 100 };
public:
SightingGen(vector<string>& an) :
animals(an) {}
Sighting operator()() {
Sighting result;
int select = rand() % animals.size();
result.first = animals[select];
result.second = DataPoint(
rand() % D, rand() % D, time(0));
return result;
}
};
// Display a menu of animals, allow the user to
// select one, return the index value:
int menu() {
cout << "select an animal or 'q' to quit:
";
for(size_t i = 0; i < animals.size(); i++)
cout <<'['<< i <<']'<<
animals[i] << ' ';
cout << endl;
string reply;
cin >> reply;
if(reply.at(0) == 'q') return 0;
istringstream r(reply);
int i;
r >> i; // Converts to int
i %= animals.size();
return i;
}
int main() {
typedef multimap<string, DataPoint> DataMap;
typedef DataMap::iterator DMIter;
DataMap sightings;
srand(time(0)); // Randomize
generate_n(inserter(sightings, sightings.begin()),
50, SightingGen(animals));
// Print everything:
copy(sightings.begin(), sightings.end(),
ostream_iterator<Sighting>(cout,
""));
// Print sightings for selected animal:
for(int count = 1; count < 10; count++) {
// Use menu to get selection:
// int i = menu();
// Generate randomly (for automated testing):
int i = rand() % animals.size();
// Iterators in "range" denote begin, one
// past end of matching range:
pair<DMIter, DMIter> range =
sightings.equal_range(animals[i]);
copy(range.first, range.second,
ostream_iterator<Sighting>(cout,
""));
}
} ///:~
All the data about a sighting is encapsulated into the class
DataPoint, which is simple enough that it can rely on the synthesized
assignment and copy-constructor. It uses the Standard C library time functions
to record the time of the sighting.
In the array of string, animal, notice that
the char* constructor is automatically used during initialization, which
makes initializing an array of string quite convenient. Since it’s
easier to use the animal names in a vector, the length of the array is
calculated, and a vector<string> is initialized using the vector(iterator,
iterator) constructor.
The key-value pairs that make up a Sighting are the string,
which names the type of animal, and the DataPoint, which says where and
when it was sighted. The standard pair template combines these two types
and is typedefed to produce the Sighting type. Then an ostream operator<<
is created for Sighting; this will allow you to iterate through a map
or multimap of Sightings and display it.
SightingGen generates random sightings at random data
points to use for testing. It has the usual operator( ) necessary
for a function object, but it also has a constructor to capture and store a
reference to a vector<string>, which is where the aforementioned
animal names are stored.
A DataMap is a multimap of string-DataPoint
pairs, which means it stores Sightings. It is filled with 50 Sightings
using generate_n( ) and displayed. (Notice that because there is an
operator<< that takes a Sighting, an ostream_iterator
can be created.) At this point the user is asked to select the animal for which
they want to see all the sightings. If you press q, the program will
quit, but if you select an animal number, the equal_range( ) member
function is invoked. This returns an iterator (DMIter) to the beginning
of the set of matching pairs and an iterator indicating past-the-end of the
set. Since only one object can be returned from a function, equal_range( )
makes use of pair. Since the range pair has the beginning and
ending iterators of the matching set, those iterators can be used in copy( )
to print all the sightings for a particular type of animal.
You’ve seen the set, which allows only one object of
each value to be inserted. The multiset is odd by comparison since it allows more than one object of each value to be inserted. This seems to go against the whole
idea of “setness,” where you can ask, “Is ‘it’ in this set?” If there can be
more than one “it,” what does that question mean?
With some thought, you can see that it makes little sense to
have more than one object of the same value in a set if those duplicate objects
are exactly the same (with the possible exception of counting
occurrences of objects, but as seen earlier in this chapter that can be handled
in an alternative, more elegant fashion). Thus, each duplicate object will have
something that makes it “different” from the other duplicates—most likely
different state information that is not used in the calculation of the key
during the comparison. That is, to the comparison operation, the objects look
the same, but they contain some differing internal state.
Like any STL container that must order its elements, the multiset
template uses the less function object by default to determine element
ordering. This uses the contained class’s operator<, but you can always
substitute your own comparison function.
Consider a simple class that contains one element that is
used in the comparison and another that is not:
//: C07:MultiSet1.cpp
// Demonstration of multiset behavior.
#include <algorithm>
#include <cstdlib>
#include <ctime>
#include <iostream>
#include <iterator>
#include <set>
using namespace std;
class X {
char c; // Used in comparison
int i; // Not used in comparison
// Don't need default constructor and operator=
X();
X& operator=(const X&);
// Usually need a copy-constructor (but the
// synthesized version works here)
public:
X(char cc, int ii) : c(cc), i(ii) {}
// Notice no operator== is
required
friend bool operator<(const X& x, const X&
y) {
return x.c < y.c;
}
friend ostream& operator<<(ostream& os,
X x) {
return os << x.c << ":"
<< x.i;
}
};
class Xgen {
static int i;
// Number of characters to select from:
enum { SPAN = 6 };
public:
X operator()() {
char c = 'A' + rand() % SPAN;
return X(c, i++);
}
};
int Xgen::i = 0;
typedef multiset<X> Xmset;
typedef Xmset::const_iterator Xmit;
int main() {
Xmset mset;
// Fill it with X's:
srand(time(0)); // Randomize
generate_n(inserter(mset, mset.begin()), 25, Xgen());
// Initialize a regular set from mset:
set<X> unique(mset.begin(), mset.end());
copy(unique.begin(), unique.end(),
ostream_iterator<X>(cout, " "));
cout << "\n----” << endl;
// Iterate over the unique values:
for(set<X>::iterator i = unique.begin();
i != unique.end(); i++) {
pair<Xmit, Xmit> p = mset.equal_range(*i);
copy(p.first,p.second,
ostream_iterator<X>(cout, " "));
cout << endl;
}
} ///:~
In X, all the comparisons are made with the char c.
The comparison is performed with operator<, which is all that is
necessary for the multiset, since in this example the default less
comparison object is used. The class Xgen randomly generates X
objects, but the comparison value is restricted to the span from ‘A’ to
‘E’. In main( ), a multiset<X> is created and
filled with 25 X objects using Xgen, guaranteeing that there will
be duplicate keys. So that we know what the unique values are, a regular set<X>
is created from the multiset (using the iterator, iterator
constructor). These values are displayed, and then each one produces the equal_range( )
in the multiset (equal_range( ) has the same meaning here as
it does with multimap: all the elements with matching keys). Each set of
matching keys is then printed.
As a second example, a (possibly) more elegant version of WordCount.cpp
can be created using multiset:
//: C07:MultiSetWordCount.cpp
// Count occurrences of words using a multiset.
#include <fstream>
#include <iostream>
#include <iterator>
#include <set>
#include <string>
#include "../require.h"
using namespace std;
int main(int argc, char* argv[]) {
const char* fname =
"MultiSetWordCount.cpp";
if(argc > 1) fname = argv[1];
ifstream in(fname);
assure(in, fname);
multiset<string> wordmset;
string word;
while(in >> word)
wordmset.insert(word);
typedef multiset<string>::iterator MSit;
MSit it = wordmset.begin();
while(it != wordmset.end()) {
pair<MSit, MSit> p = wordmset.equal_range(*it);
int count = distance(p.first, p.second);
cout << *it << ": " <<
count << endl;
it = p.second; // Move to the next word
}
} ///:~
The setup in main( ) is identical to WordCount.cpp,
but then each word is simply inserted into the multiset<string>.
An iterator is created and initialized to the beginning of the multiset;
dereferencing this iterator produces the current word. The equal_range( )
member function (not generic algorithm) produces the starting and ending
iterators of the word that’s currently selected, and the algorithm distance( )
(defined in <iterator>) counts the number of elements in that
range. The iterator it is then moved forward to the end of the range,
which puts it at the next word. If you’re unfamiliar with the multiset,
this code can seem more complex. The density of it and the lack of need for
supporting classes such as Count has a lot of appeal.
In the end, is this really a “set,” or should it be called
something else? An alternative is the generic “bag” that is defined in some
container libraries, since a bag holds anything, without
discrimination—including duplicate objects. This is close, but it doesn’t quite
fit since a bag has no specification about how elements should be ordered. A multiset
(which requires that all duplicate elements be adjacent to each other) is even
more restrictive than the concept of a set. A set implementation might use a
hashing function to order its elements, which would not put them in sorted
order. Besides, if you want to store a bunch of objects without any special
criteria, you will probably just use a vector, deque, or list.
When using a thesaurus, you want to know all the words that
are similar to a particular word. When you look up a word, then, you want a
list of words as the result. Here, the “multi” containers (multimap or multiset)
are not appropriate. The solution is to combine containers, which is easily
done using the STL. Here, we need a tool that turns out to be a powerful
general concept, which is a map that associates a string with a vector:
//: C07:Thesaurus.cpp
// A map of vectors.
#include <map>
#include <vector>
#include <string>
#include <iostream>
#include <iterator>
#include <algorithm>
#include <ctime>
#include <cstdlib>
using namespace std;
typedef map<string, vector<string> >
Thesaurus;
typedef pair<string, vector<string> >
TEntry;
typedef Thesaurus::iterator TIter;
// Name lookup work-around:
namespace std {
ostream& operator<<(ostream& os,const
TEntry& t) {
os << t.first << ": ";
copy(t.second.begin(), t.second.end(),
ostream_iterator<string>(os, " "));
return os;
}
}
// A generator for thesaurus test entries:
class ThesaurusGen {
static const string letters;
static int count;
public:
int maxSize() { return letters.size(); }
TEntry operator()() {
TEntry result;
if(count >= maxSize()) count = 0;
result.first = letters[count++];
int entries = (rand() % 5) + 2;
for(int i = 0; i < entries; i++) {
int choice = rand() % maxSize();
char cbuf[2] = { 0 };
cbuf[0] = letters[choice];
result.second.push_back(cbuf);
}
return result;
}
};
int ThesaurusGen::count = 0;
const string ThesaurusGen::letters("ABCDEFGHIJKL"
"MNOPQRSTUVWXYZabcdefghijklmnopqrstuvwxyz");
// Ask for a "word" to look up:
string menu(Thesaurus& thesaurus) {
while(true) {
cout << "Select a \"word\", 0
to quit: ";
for(TIter it = thesaurus.begin();
it != thesaurus.end(); it++)
cout << (*it).first << ' ';
cout << endl;
string reply;
cin >> reply;
if(reply.at(0) == '0') exit(0); // Quit
if(thesaurus.find(reply) == thesaurus.end())
continue; // Not in list, try again
return reply;
}
}
int main() {
srand(time(0)); // Seed the random number generator
Thesaurus thesaurus;
// Fill with 10 entries:
generate_n(inserter(thesaurus, thesaurus.begin()),
10, ThesaurusGen());
// Print everything:
copy(thesaurus.begin(), thesaurus.end(),
ostream_iterator<TEntry>(cout,
"\n"));
// Create a list of the keys:
string keys[10];
int i = 0;
for(TIter it = thesaurus.begin();
it != thesaurus.end(); it++)
keys[i++] = (*it).first;
for(int count = 0; count < 10; count++) {
// Enter from the console:
// string reply = menu(thesaurus);
// Generate randomly
string reply = keys[rand() % 10];
vector<string>& v = thesaurus[reply];
copy(v.begin(), v.end(),
ostream_iterator<string>(cout, "
"));
cout << endl;
}
} ///:~
A Thesaurus maps a string (the word) to a vector<string>
(the synonyms). A TEntry is a single entry in a Thesaurus. By
creating an ostream operator<< for a TEntry, a single entry
from the Thesaurus can easily be printed (and the whole Thesaurus
can easily be printed with copy( )). Notice the very strange placement
of the stream inserter: we put it inside the std namespace! This operator<<( )
function is used by ostream_iterator in the first call to copy( )
in main( ) above. When the compiler instantiates the needed ostream_iterator
specialization, according to the rules of argument-dependent lookup (ADL) it
only looks in std because that is where all the arguments to copy( )
are declared. If we declared our inserter in the global namespace (by removing
the namespace block around it), then it would not be found. By placing it in std
we enable ADL to find it.
The ThesaurusGen creates “words” (which are just
single letters) and “synonyms” for those words (which are just other randomly
chosen single letters) to be used as thesaurus entries. It randomly chooses the
number of synonym entries to make, but there must be at least two. All the
letters are chosen by indexing into a static string that is part of ThesaurusGen.
In main( ), a Thesaurus is created,
filled with 10 entries and printed using the copy( ) algorithm. The
menu( ) function asks the user to choose a “word” to look up by
typing the letter of that word. The find( ) member function discovers
whether the entry exists in the map. (Remember, you don’t want to use operator[ ],
which will automatically make a new entry if it doesn’t find a match!) If so, operator[ ]
fetches out the vector<string> that is displayed. The selection of
the reply string is generated randomly, to allow automated testing.
Because templates make the expression of powerful concepts
easy, you can take this concept much further, creating a map of vectors
containing maps, and so on. For that matter, you can combine any of the
STL containers this way.
In Stlshape.cpp, the pointers did not clean
themselves up automatically. It would be convenient to be able to do this
easily, rather than writing out the code each time. Here is a function template
that will clean up the pointers in any sequence container. Note that it is
placed in the book’s root directory for easy access:
//: :purge.h
// Delete pointers in an STL sequence container.
#ifndef PURGE_H
#define PURGE_H
#include <algorithm>
template<class Seq> void purge(Seq& c) {
typename Seq::iterator i;
for(i = c.begin(); i != c.end(); ++i) {
delete *i;
*i = 0;
}
}
// Iterator version:
template<class InpIt> void purge(InpIt begin,
InpIt end) {
while(begin != end) {
delete *begin;
*begin = 0;
++begin;
}
}
#endif // PURGE_H ///:~
In the first version of purge( ), note that typename
is absolutely necessary. This is exactly the case that keyword was designed to
solve: Seq is a template argument, and iterator is something that
is nested within that template. So what does Seq::iterator refer to? The
typename keyword specifies that it refers to a type, and not something
else.
Although the container version of purge( ) must
work with an STL-style container, the iterator version of purge( )
will work with any range, including an array.
Here is a rewrite of Stlshape.cpp, modified to use
the purge( ) function:
//: C07:Stlshape2.cpp
// Stlshape.cpp with the purge() function.
#include <iostream>
#include <vector>
#include "../purge.h"
using namespace std;
class Shape {
public:
virtual void draw() = 0;
virtual ~Shape() {};
};
class Circle : public Shape {
public:
void draw() { cout << "Circle::draw”
<< endl; }
~Circle() { cout << "~Circle” <<
endl; }
};
class Triangle : public Shape {
public:
void draw() { cout << "Triangle::draw”
<< endl; }
~Triangle() { cout << "~Triangle” <<
endl; }
};
class Square : public Shape {
public:
void draw() { cout << "Square::draw”
<< endl; }
~Square() { cout << "~Square” <<
endl; }
};
int main() {
typedef std::vector<Shape*> Container;
typedef Container::iterator Iter;
Container shapes;
shapes.push_back(new Circle);
shapes.push_back(new Square);
shapes.push_back(new Triangle);
for(Iter i = shapes.begin(); i != shapes.end(); i++)
(*i)->draw();
purge(shapes);
} ///:~
When using purge( ), carefully consider
ownership issues. If an object pointer is held in more than one container, be
sure not to delete it twice, and you don’t want to destroy the object in the
first container before the second one is finished with it. Purging the same
container twice is not a problem because purge( ) sets the pointer
to zero once it deletes that pointer, and calling delete for a zero
pointer is a safe operation.
With the STL as a foundation, you can create your own
containers. Assuming you follow the same model of providing iterators, your new
container will behave as if it were a built-in STL container.
Consider the “ring” data structure, which is a circular
sequence container. If you reach the end, it just wraps around to the
beginning. This can be implemented on top of a list as follows:
//: C07:Ring.cpp
// Making a "ring" data structure from the
STL.
#include <iostream>
#include <iterator>
#include <list>
#include <string>
using namespace std;
template<class T> class Ring {
list<T> lst;
public:
// Declaration necessary so the following
// 'friend' statement sees this 'iterator'
// instead of std::iterator:
class iterator;
friend class iterator;
class iterator : public std::iterator<
std::bidirectional_iterator_tag,T,ptrdiff_t>{
typename list<T>::iterator it;
list<T>* r;
public:
iterator(list<T>& lst,
const typename list<T>::iterator& i)
: it(i), r(&lst) {}
bool operator==(const iterator& x) const {
return it == x.it;
}
bool operator!=(const iterator& x) const {
return !(*this == x);
}
typename list<T>::reference operator*() const
{
return *it;
}
iterator& operator++() {
++it;
if(it == r->end())
it = r->begin();
return *this;
}
iterator operator++(int) {
iterator tmp = *this;
++*this;
return tmp;
}
iterator& operator--() {
if(it == r->begin())
it = r->end();
--it;
return *this;
}
iterator operator--(int) {
iterator tmp = *this;
--*this;
return tmp;
}
iterator insert(const T& x) {
return iterator(*r, r->insert(it, x));
}
iterator erase() {
return iterator(*r, r->erase(it));
}
};
void push_back(const T& x) { lst.push_back(x); }
iterator begin() { return iterator(lst, lst.begin());
}
int size() { return lst.size(); }
};
int main() {
Ring<string> rs;
rs.push_back("one");
rs.push_back("two");
rs.push_back("three");
rs.push_back("four");
rs.push_back("five");
Ring<string>::iterator it = rs.begin();
++it; ++it;
it.insert("six");
it = rs.begin();
// Twice around the ring:
for(int i = 0; i < rs.size() * 2; i++)
cout << *it++ << endl;
} ///:~
You can see that most of the coding is in the iterator. The Ring
iterator must know how to loop back to the beginning, so it must keep a
reference to the list of its “parent” Ring object in order
to know if it’s at the end and how to get back to the beginning.
You’ll notice that the interface for Ring is quite
limited; in particular, there is no end( ), since a ring just keeps
looping. This means that you won’t be able to use a Ring in any STL
algorithms that require a past-the-end iterator, which are many. (It turns out that
adding this feature is a nontrivial exercise.) Although this can seem limiting,
consider stack, queue, and priority_queue, which don’t
produce any iterators at all!
Although the STL containers may provide all the functionality
you’ll ever need, they are not complete. For example, the standard
implementations of set and map use trees, and although these are
reasonably fast, they may not be fast enough for your needs. In the C++
Standards Committee it was generally agreed that hashed implementations of set
and map should have been included in Standard C++, however, there was
not enough time to add these components, and thus they were left out.
Fortunately, alternatives are freely available. One of the
nice things about the STL is that it establishes a basic model for creating
STL-like classes, so anything built using the same model is easy to understand
if you are already familiar with the STL.
The SGI STL from Silicon Graphics is one of the
most robust implementations of the STL and can be used to replace your
compiler’s STL if that is found wanting. In addition, SGI has added a number of
extensions including hash_set, hash_multiset, hash_map, hash_multimap, slist (a singly linked list), and rope (a variant of string optimized for very large strings and fast concatenation
and substring operations).
Let’s consider a performance comparison between a tree-based
map and the SGI hash_map. To keep things simple, the mappings
will be from int to int:
//: C07:MapVsHashMap.cpp
// The hash_map header is not part of the Standard C++
STL.
// It is an extension that is only available as part of
the
// SGI STL (Included with the dmc distribution).
// You can add the header by hand for all of these:
//{-bor}{-msc}{-g++}{-mwcc}
#include <hash_map>
#include <iostream>
#include <map>
#include <ctime>
using namespace std;
int main() {
hash_map<int, int> hm;
map<int, int> m;
clock_t ticks = clock();
for(int i = 0; i < 100; i++)
for(int j = 0; j < 1000; j++)
m.insert(make_pair(j,j));
cout << "map insertions: " <<
clock() - ticks << endl;
ticks = clock();
for(int i = 0; i < 100; i++)
for(int j = 0; j < 1000; j++)
hm.insert(make_pair(j,j));
cout << "hash_map insertions: "
<< clock() - ticks << endl;
ticks = clock();
for(int i = 0; i < 100; i++)
for(int j = 0; j < 1000; j++)
m[j];
cout << "map::operator[] lookups: "
<< clock() - ticks << endl;
ticks = clock();
for(int i = 0; i < 100; i++)
for(int j = 0; j < 1000; j++)
hm[j];
cout << "hash_map::operator[] lookups:
"
<< clock() - ticks << endl;
ticks = clock();
for(int i = 0; i < 100; i++)
for(int j = 0; j < 1000; j++)
m.find(j);
cout << "map::find() lookups: "
<< clock() - ticks << endl;
ticks = clock();
for(int i = 0; i < 100; i++)
for(int j = 0; j < 1000; j++)
hm.find(j);
cout << "hash_map::find() lookups: "
<< clock() - ticks << endl;
} ///:~
The performance test we ran showed a speed improvement of
roughly 4: 1 for the hash_map over the map in all operations (and
as expected, find( ) is slightly faster than operator[ ]
for lookups for both types of map). If a profiler shows a bottleneck in your map,
consider a hash_map.
There are two “non-STL” containers in the standard library: bitset and valarray. We
say “non-STL” because neither of these containers fulfills all the requirements
of STL containers. The bitset container, which we covered earlier in
this chapter, packs bits into integers and does not allow direct addressing of
its members. The valarray template class is a vector-like
container that is optimized for efficient numeric computation. Neither
container provides iterators. Although you can instantiate a valarray
with nonnumeric types, it has mathematical functions that are intended to
operate with numeric data, such as sin, cos, tan, and so
on.
Here’s a tool to print elements in a valarray:
//: C07:PrintValarray.h
#ifndef PRINTVALARRAY_H
#define PRINTVALARRAY_H
#include <valarray>
#include <iostream>
#include <cstddef>
template<class T>
void print(const char* lbl, const
std::valarray<T>& a) {
std::cout << lbl << ": ";
for(std::size_t i = 0; i < a.size(); ++i)
std::cout << a[i] << ' ';
std::cout << std::endl;
}
#endif // PRINTVALARRAY_H ///:~
Most of valarray’s functions and operators operate on
a valarray as a whole, as the following example illustrates:
//: C07:Valarray1.cpp {-bor}
// Illustrates basic valarray functionality.
#include "PrintValarray.h"
using namespace std;
double f(double x) { return 2.0 * x - 1.0; }
int main() {
double n[] = { 1.0, 2.0, 3.0, 4.0 };
valarray<double> v(n, sizeof n / sizeof n[0]);
print("v", v);
valarray<double> sh(v.shift(1));
print("shift 1", sh);
valarray<double> acc(v + sh);
print("sum", acc);
valarray<double> trig(sin(v) + cos(acc));
print("trig", trig);
valarray<double> p(pow(v, 3.0));
print("3rd power", p);
valarray<double> app(v.apply(f));
print("f(v)", app);
valarray<bool> eq(v == app);
print("v == app?", eq);
double x = v.min();
double y = v.max();
double z = v.sum();
cout << "x = " << x <<
", y = " << y
<< ", z = " << z <<
endl;
} ///:~
The valarray class provides a constructor that takes
an array of the target type and the count of elements in the array to
initialize the new valarray. The shift( ) member function
shifts each valarray element one position to the left (or to the right,
if its argument is negative) and fills in holes with the default value for the
type (zero in this case). There is also a cshift( ) member function
that does a circular shift (or “rotate”). All mathematical operators and
functions are overloaded to operate on valarrays, and binary operators
require valarray arguments of the same type and size. The apply( )
member function, like the transform( ) algorithm, applies a
function to each element, but the result is collected into a result valarray.
The relational operators return suitably-sized instances of valarray<bool>
that indicate the result of element-by-element comparisons, such as with eq
above. Most operations return a new result array, but a few, such as min( ),
max( ), and sum( ), return a single scalar value, for
obvious reasons.
The most interesting thing you can do with valarrays
is reference subsets of their elements, not only for extracting information,
but also for updating it. A subset of a valarray is called a slice, and certain operators use slices to do their work. The following sample program
uses slices:
//: C07:Valarray2.cpp {-bor}{-dmc}
// Illustrates slices and masks.
#include "PrintValarray.h"
using namespace std;
int main() {
int data[] = { 1, 2, 3, 4, 5, 6, 7, 8, 9, 10, 11, 12
};
valarray<int> v(data, 12);
valarray<int> r1(v[slice(0, 4, 3)]);
print("slice(0,4,3)", r1);
// Extract conditionally
valarray<int> r2(v[v > 6]);
print("elements > 6", r2);
// Square first column
v[slice(0, 4, 3)] *= valarray<int>(v[slice(0,
4, 3)]);
print("after squaring first column", v);
// Restore it
int idx[] = { 1, 4, 7, 10 };
valarray<int> save(idx, 4);
v[slice(0, 4, 3)] = save;
print("v restored", v);
// Extract a 2-d subset: { { 1, 3, 5 }, { 7, 9, 11 }
}
valarray<size_t> siz(2);
siz[0] = 2;
siz[1] = 3;
valarray<size_t> gap(2);
gap[0] = 6;
gap[1] = 2;
valarray<int> r3(v[gslice(0, siz, gap)]);
print("2-d slice", r3);
// Extract a subset via a boolean mask (bool
elements)
valarray<bool> mask(false, 5);
mask[1] = mask[2] = mask[4] = true;
valarray<int> r4(v[mask]);
print("v[mask]", r4);
// Extract a subset via an index mask (size_t
elements)
size_t idx2[] = { 2, 2, 3, 6 };
valarray<size_t> mask2(idx2, 4);
valarray<int> r5(v[mask2]);
print("v[mask2]", r5);
// Use an index mask in assignment
valarray<char> text("now is the
time", 15);
valarray<char> caps("NITT", 4);
valarray<size_t> idx3(4);
idx3[0] = 0;
idx3[1] = 4;
idx3[2] = 7;
idx3[3] = 11;
text[idx3] = caps;
print("capitalized", text);
} ///:~
A slice object takes three arguments: the starting
index, the number of elements to extract, and the “stride,” which is the gap
between elements of interest. Slices can be used as indexes into an existing valarray,
and a new valarray containing the extracted elements is returned. A valarray
of bool, such as is returned by the expression v > 6, can be
used as an index into another valarray; the elements corresponding to
the true slots are extracted. As you can see, you can also use slices
and masks as indexes on the left side of an assignment. A gslice object
(for “generalized slice”) is like a slice, except that the counts and strides
are themselves arrays, which means you can interpret a valarray as a
multidimensional array. The example above extracts a 2 by 3 array from v,
where the numbers start at zero and the numbers for the first dimension are
found six slots apart in v, and the others two apart, which effectively
extracts the matrix
Here is the complete output for this program:
slice(0,4,3): 1 4 7 10
elements > 6: 7 8 9 10
after squaring v: 1 2 3 16 5 6 49 8 9 100 11 12
v restored: 1 2 3 4 5 6 7 8 9 10 11 12
2-d slice: 1 3 5 7 9 11
v[mask]: 2 3 5
v[mask2]: 3 3 4 7
capitalized: N o w I s T h e T i m e
A practical example of slices is found in matrix
multiplication. Consider how you would write a function to multiply two
matrices of integers with arrays.
void matmult(const int a[][MAXCOLS], size_t m, size_t
n,
const int b[][MAXCOLS], size_t p, size_t
q,
int result[][MAXCOLS);
This function multiplies the m-by-n matrix a
by the p-by-q matrix b, where n and p are expected
to be equal. As you can see, without something like valarray, you need
to fix the maximum value for the second dimension of each matrix, since
locations in arrays are statically determined. It is also difficult to return a
result array by value, so the caller usually passes the result array as an
argument.
Using valarray, you can not only pass any size matrix,
but you can also easily process matrices of any type, and return the result by
value. Here’s how:
//: C07:MatrixMultiply.cpp
// Uses valarray to multiply matrices
#include <cassert>
#include <cstddef>
#include <cmath>
#include <iostream>
#include <iomanip>
#include <valarray>
using namespace std;
// Prints a valarray as a square matrix
template<class T>
void printMatrix(const valarray<T>& a, size_t
n) {
size_t siz = n*n;
assert(siz <= a.size());
for(size_t i = 0; i < siz; ++i) {
cout << setw(5) << a[i];
cout << ((i+1)%n ? ' ' : '\n');
}
cout << endl;
}
// Multiplies compatible matrices in valarrays
template<class T>
valarray<T>
matmult(const valarray<T>& a, size_t arows,
size_t acols,
const valarray<T>& b, size_t brows,
size_t bcols) {
assert(acols == brows);
valarray<T> result(arows * bcols);
for(size_t i = 0; i < arows; ++i)
for(size_t j = 0; j < bcols; ++j) {
// Take dot product of row a[i] and col b[j]
valarray<T> row = a[slice(acols*i, acols,
1)];
valarray<T> col = b[slice(j, brows,
bcols)];
result[i*bcols + j] = (row * col).sum();
}
return result;
}
int main() {
const int n = 3;
int adata[n*n] = {1,0,-1,2,2,-3,3,4,0};
int bdata[n*n] = {3,4,-1,1,-3,0,-1,1,2};
valarray<int> a(adata, n*n);
valarray<int> b(bdata, n*n);
valarray<int> c(matmult(a, n, n, b, n, n));
printMatrix(c, n);
} ///:~
Each entry in the result matrix c is the dot product
of a row in a with a column in b. By taking slices, you can
extract these rows and columns as valarrays and use the global *
operator and sum( ) function provided by valarray to do the
work succinctly. The result valarray is computed at runtime; there’s no
need to worry about the static limitations of array dimensions. You do have to
compute linear offsets of the position [i][j] yourself (see the formula i*bcols
+ j above), but the size and type freedom is worth it.
The goal of this chapter was not just to introduce the STL
containers in some considerable depth. Although every detail could not be
covered here, you now know enough that you can look up further information in
the other resources. Our hope is that this chapter has helped you grasp the
power available in the STL and shown you how much faster and more efficient
your programming activities can be by understanding and using the STL.
Solutions
to selected exercises can be found in the electronic document The Thinking
in C++ Volume 2 Annotated Solution Guide, available for a small fee from www.MindView.net.
1. Create a set<char>, open a file (whose name is
provided on the command line), and read that file in a char at a time,
placing each char in the set. Print the results, and observe the
organization. Are there any letters in the alphabet that are not used in that
particular file?
2. Create three sequences of Noisy objects, a vector, deque,
and list. Sort them. Now write a function template to receive the vector
and deque sequences as a parameter to sort them and record the sorting
time. Write a specialized template function to do the same for list
(ensure to call its member sort( ) instead of the generic
algorithm). Compare the performance of the different sequence types.
3. Write a program to compare the speed of sorting a list using list::sort( )
vs. using std::sort( ) (the STL algorithm version of sort( )).
4. Create a generator that produces random int values between
0 and 20 inclusive, and use it to fill a multiset<int>. Count the
occurrences of each value, following the example given in MultiSetWordCount.cpp.
5. Change StlShape.cpp so that it uses a deque instead
of a vector.
6. Modify Reversible.cpp so it works with deque and list
instead of vector.
7. Use a stack<int> and populate it with a Fibonacci
sequence. The program’s command line should take the number of Fibonacci
elements desired, and you should have a loop that looks at the last two
elements on the stack and pushes a new one for every pass through the loop.
8. Using only three stacks (source, sorted, and
losers), sort a random sequence of numbers by first placing the numbers on
the source stack. Assume the number on the top of the source is
the largest, and push it on the sorted stack. Continue to pop the source
stack comparing it with the top of the sorted stack. Whichever number is
the smallest, pop it from its stack and push it onto the on the losers’
stack. Once the source stack is empty, repeat the process using the losers’
stack as the source stack, and use the source stack as the losers’
stack. The algorithm completes when all the numbers have been placed into the winners’
stack.
9. Open a text file whose name is provided on the command line. Read
the file a word at a time, and use a multiset<string> to create a
word count for each word.
10. Modify WordCount.cpp so that it uses insert( )
instead of operator[ ] to insert elements in the map.
11. Create a class that has an operator< and an ostream&
operator<<. The class should contain a priority number. Create a
generator for your class that makes a random priority number. Fill a priority_queue
using your generator, and then pull the elements out to show they are in the
proper order.
12. Rewrite Ring.cpp so it uses a deque instead of a list
for its underlying implementation.
13. Modify Ring.cpp so that the underlying implementation can
be chosen using a template argument. (Let that template argument default to list.)
14. Create an iterator class called BitBucket that just
absorbs whatever you send to it without writing it anywhere.
15. Create a kind of “hangman” game. Create a class that contains a char
and a bool to indicate whether that char has been guessed yet.
Randomly select a word from a file, and read it into a vector of your
new type. Repeatedly ask the user for a character guess, and after each guess,
display the characters in the word that have been guessed, and display
underscores for the characters that haven’t. Allow a way for the user to guess
the whole word. Decrement a value for each guess, and if the user can get the
whole word before the value goes to zero, they win.
16. Open a file and read it into a single string. Turn the string
into a stringstream. Read tokens from the stringstream into a list<string>
using a TokenIterator.
17. Compare the performance of stack based on whether it is
implemented with vector, deque, or list.
18. Create a template that implements a singly-linked list called SList.
Provide a default constructor and begin( ) and end( )
functions (via an appropriate nested iterator), insert( ), erase( )
and a destructor.
19. Generate a sequence of random integers, storing them into an
array of int. Initialize a valarray<int> with its contents.
Compute the sum, minimum value, maximum value, average, and median of the
integers using valarray operations.
20. Create a valarray<int> with 12 random values. Create
another valarray<int> with 20 random values. You will interpret
the first valarray as a 3 x 4 matrix of ints and the second as a
4 x 5 matrix of ints, and multiply them by the rules of matrix
multiplication. Store the result in a valarray<int> of size 15,
representing the 3 x 5 result matrix. Use slices to multiply the rows of the
first matrix time the columns of the second. Print the result in rectangular
matrix form.
The mark of a professional appears in his or her attention to
the finer points of the craft. In this section of the book we discuss advanced
features of C++ along with development techniques used by polished C++
professionals.
Sometimes you may need to depart from the conventional
wisdom of sound object-oriented design by inspecting the runtime type of an
object. Most of the time you should let virtual functions do that job for you,
but when writing special-purpose software tools, such as debuggers, database
viewers, or class browsers, you’ll need to determine type information at
runtime. This is where the runtime type identification (RTTI) mechanism becomes
useful. RTTI is the topic of Chapter 8.
Multiple inheritance has taken abuse over the years, and
some languages don’t even support it. Nonetheless, when used properly, it can
be a powerful tool for crafting elegant, efficient code. A number of standard
practices involving multiple inheritance have evolved over the years, which we
present in Chapter 9.
Perhaps the most notable innovation in software development
since object-oriented techniques is the use of design patterns. A design
pattern describes solutions for many of the common problems involved in
designing software, and can be applied in many situations and implemented in
any language. In chapter 10 we describe a selected number of design patterns
and implement them in C++.
Chapter 11 explains the benefits and challenges of multithreaded
programming. The current version of Standard C++ does not specify support for
threads, even though most operating systems provide them. We use a portable, freely
available threading library to illustrate how C++ programmers can take
advantage of threads to build more usable and responsive applications.
Runtime type identification (RTTI)
lets you find the dynamic type of an object when you have only a pointer or a
reference to the base type.
This can be thought of as a “secondary” feature in C++, pragmatism
to help out when you get into rare difficult situations. Normally, you’ll want
to intentionally ignore the exact type of an object and let the virtual
function mechanism implement the correct behavior for that type. On occasion,
however, it’s useful to know the exact runtime (that is, most derived)
type of an object for which you only have a base pointer. With this information,
you may perform a special-case operation more efficiently or prevent a
base-class interface from becoming ungainly. It happens enough that most class
libraries contain virtual functions to produce runtime type information. When
exception handling was added to C++, that feature required information about
the runtime type of objects, so it became an easy next step to build in access
to that information. This chapter explains what RTTI is for and how to use it.
One way to determine the runtime type of an object through a
pointer or reference is to employ a runtime cast, which verifies that the attempted conversion is valid. This is useful when you need to cast a base-class
pointer to a derived type. Since inheritance hierarchies are typically depicted
with base classes above derived classes, such a cast is called a downcast.
Consider the following class hierarchy:
In the code that follows, the Investment class has an
extra operation that the other classes do not, so it is important to be able to
know at runtime whether a Security pointer refers to a Investment
object or not. To implement checked runtime casts, each class keeps an integral
identifier to distinguish it from other classes in the hierarchy.
//: C08:CheckedCast.cpp
// Checks casts at runtime.
#include <iostream>
#include <vector>
#include "../purge.h"
using namespace std;
class Security {
protected:
enum { BASEID = 0 };
public:
virtual ~Security() {}
virtual bool isA(int id) { return (id == BASEID); }
};
class Stock : public Security {
typedef Security Super;
protected:
enum { OFFSET = 1, TYPEID = BASEID + OFFSET };
public:
bool isA(int id) {
return id == TYPEID || Super::isA(id);
}
static Stock* dynacast(Security* s) {
return (s->isA(TYPEID)) ?
static_cast<Stock*>(s) : 0;
}
};
class Bond : public Security {
typedef Security Super;
protected:
enum { OFFSET = 2, TYPEID = BASEID + OFFSET };
public:
bool isA(int id) {
return id == TYPEID || Super::isA(id);
}
static Bond* dynacast(Security* s) {
return (s->isA(TYPEID)) ?
static_cast<Bond*>(s) : 0;
}
};
class Investment : public Security {
typedef Security Super;
protected:
enum { OFFSET = 3, TYPEID = BASEID + OFFSET };
public:
bool isA(int id) {
return id == TYPEID || Super::isA(id);
}
static Investment* dynacast(Security* s) {
return (s->isA(TYPEID)) ?
static_cast<Investment*>(s) : 0;
}
void special() {
cout << "special Investment
function" << endl;
}
};
class Metal : public Investment {
typedef Investment Super;
protected:
enum { OFFSET = 4, TYPEID = BASEID + OFFSET };
public:
bool isA(int id) {
return id == TYPEID || Super::isA(id);
}
static Metal* dynacast(Security* s) {
return (s->isA(TYPEID)) ?
static_cast<Metal*>(s) : 0;
}
};
int main() {
vector<Security*> portfolio;
portfolio.push_back(new Metal);
portfolio.push_back(new Investment);
portfolio.push_back(new Bond);
portfolio.push_back(new Stock);
for(vector<Security*>::iterator it =
portfolio.begin();
it != portfolio.end(); ++it) {
Investment* cm = Investment::dynacast(*it);
if(cm)
cm->special();
else
cout << "not an Investment"
<< endl;
}
cout << "cast from intermediate
pointer:" << endl;
Security* sp = new Metal;
Investment* cp = Investment::dynacast(sp);
if(cp) cout << " it's an Investment"
<< endl;
Metal* mp = Metal::dynacast(sp);
if(mp) cout << "
it's a Metal too!" << endl;
purge(portfolio);
} ///:~
The polymorphic isA( ) function checks to see if
its argument is compatible with its type argument (id), which means that
either id matches the object’s typeID exactly or it matches one
of the object’s ancestors (hence the call to Super::isA( ) in that
case). The dynacast( ) function, which is static in each class,
calls isA( ) for its pointer argument to check if the cast is
valid. If isA( ) returns true, the cast is valid, and a
suitably cast pointer is returned. Otherwise, the null pointer is returned,
which tells the caller that the cast is not valid, meaning that the original
pointer is not pointing to an object compatible with (convertible to) the
desired type. All this machinery is necessary to be able to check intermediate
casts, such as from a Security pointer that refers to a Metal
object to a Investment pointer in the previous example program.
For most programs downcasting is unnecessary, and is actually
discouraged, since everyday polymorphism solves most problems in object-oriented
application programs. However, the ability to check a cast to a more derived
type is important for utility programs such as debuggers, class browsers, and
databases. C++ provides such a checked cast with the dynamic_cast operator. The following program is a rewrite of the previous example using dynamic_cast:
//: C08:Security.h
#ifndef SECURITY_H
#define SECURITY_H
#include <iostream>
class Security {
public:
virtual ~Security() {}
};
class Stock : public Security {};
class Bond : public Security {};
class Investment : public Security {
public:
void special() {
std::cout << "special Investment
function” <<std::endl;
}
};
class Metal : public Investment {};
#endif // SECURITY_H ///:~
//: C08:CheckedCast2.cpp
// Uses RTTI’s dynamic_cast.
#include <vector>
#include "../purge.h"
#include "Security.h"
using namespace std;
int main() {
vector<Security*> portfolio;
portfolio.push_back(new Metal);
portfolio.push_back(new Investment);
portfolio.push_back(new Bond);
portfolio.push_back(new Stock);
for(vector<Security*>::iterator it =
portfolio.begin();
it != portfolio.end(); ++it) {
Investment* cm =
dynamic_cast<Investment*>(*it);
if(cm)
cm->special();
else
cout << "not a Investment"
<< endl;
}
cout << "cast from intermediate pointer:”
<< endl;
Security* sp = new Metal;
Investment* cp = dynamic_cast<Investment*>(sp);
if(cp) cout << " it's an Investment”
<< endl;
Metal* mp = dynamic_cast<Metal*>(sp);
if(mp) cout << " it's a Metal too!”
<< endl;
purge(portfolio);
} ///:~
This example is much shorter, since most of the code in the
original example was just the overhead for checking the casts. The target type
of a dynamic_cast is placed in angle brackets, like the other new-style
C++ casts (static_cast, and so on), and the object to cast appears as
the operand. dynamic_cast requires that the types you use it with be polymorphic if you want safe downcasts. This
in turn requires that the class must have at least one virtual function.
Fortunately, the Security base class has a virtual destructor, so we
didn’t have to invent an extra function to get the job done. Because dynamic_cast
does its work at runtime, using the virtual table, it tends to be more
expensive than the other new-style casts.
You can also use dynamic_cast with references instead
of pointers, but since there is no such thing as a null reference, you need
another way to know if the cast fails. That “other way” is to catch a bad_cast exception, as follows:
//: C08:CatchBadCast.cpp
#include <typeinfo>
#include "Security.h"
using namespace std;
int main() {
Metal m;
Security& s = m;
try {
Investment& c =
dynamic_cast<Investment&>(s);
cout << "It's an Investment"
<< endl;
} catch(bad_cast&) {
cout << "s is not an Investment
type" << endl;
}
try {
Bond& b = dynamic_cast<Bond&>(s);
cout << "It's a Bond" <<
endl;
} catch(bad_cast&) {
cout << "It's not a Bond type"
<< endl;
}
} ///:~
The bad_cast class is defined in the <typeinfo> header, and, like most of the standard library, is declared in the std
namespace.
The
typeid operator
The other way to get runtime information for an object is
through the typeid operator. This operator returns an object of class type_info, which yields information about the type of object to which it was applied. If the type is polymorphic, it gives information about the most derived
type that applies (the dynamic type); otherwise it yields static type information. One use of the typeid operator is to get the name of the dynamic
type of an object as a const char*, as you can see in the following
example:
//: C08:TypeInfo.cpp
// Illustrates the typeid operator.
#include <iostream>
#include <typeinfo>
using namespace std;
struct PolyBase { virtual ~PolyBase() {} };
struct PolyDer : PolyBase { PolyDer() {} };
struct NonPolyBase {};
struct NonPolyDer : NonPolyBase { NonPolyDer(int) {} };
int main() {
// Test polymorphic Types
const PolyDer pd;
const PolyBase* ppb = &pd;
cout << typeid(ppb).name() << endl;
cout << typeid(*ppb).name() << endl;
cout << boolalpha << (typeid(*ppb) ==
typeid(pd))
<< endl;
cout << (typeid(PolyDer) == typeid(const
PolyDer))
<< endl;
// Test non-polymorphic Types
const NonPolyDer npd(1);
const NonPolyBase* nppb = &npd;
cout << typeid(nppb).name() << endl;
cout << typeid(*nppb).name() << endl;
cout << (typeid(*nppb) == typeid(npd)) <<
endl;
// Test a built-in type
int i;
cout << typeid(i).name() << endl;
} ///:~
The output from this program using one particular compiler is
struct PolyBase const *
struct PolyDer
true
true
struct NonPolyBase const *
struct NonPolyBase
false
int
The first output line just echoes the static type of ppb
because it is a pointer. To get RTTI to kick in, you need to look at the
pointer or reference destination object, which is illustrated in the second
line. Notice that RTTI ignores top-level const and volatile qualifiers. With non-polymorphic types, you just get the static type (the type of the pointer
itself). As you can see, built-in types are also supported.
It turns out that you can’t store the result of a typeid
operation in a type_info object, because there are no accessible
constructors and assignment is disallowed. You must use it as we have shown. In
addition, the actual string returned by type_info::name( ) is compiler dependent. For a class named C, for example, some compilers
return “class C” instead of just “C.” Applying typeid to an expression
that dereferences a null pointer will cause a bad_typeid exception (also defined in <typeinfo>) to be thrown.
The following example shows that the class name that type_info::name( )
returns is fully qualified:
//: C08:RTTIandNesting.cpp
#include <iostream>
#include <typeinfo>
using namespace std;
class One {
class Nested {};
Nested* n;
public:
One() : n(new Nested) {}
~One() { delete n; }
Nested* nested() { return n; }
};
int main() {
One o;
cout << typeid(*o.nested()).name() <<
endl;
} ///:~
Since Nested is a member type of the One
class, the result is One::Nested.
You can also ask a type_info object if it precedes
another type_info object in the implementation-defined “collation
sequence” (the native ordering rules for text), using before(type_info&), which returns true or false. When you say,
if(typeid(me).before(typeid(you))) // ...
you’re asking if me occurs before you in the
current collation sequence. This is useful if you use type_info objects
as keys.
As you saw in the earlier program that used the hierarchy of
Security classes, dynamic_cast can detect both exact types and, in an inheritance hierarchy with multiple levels, intermediate types. Here is
another example.
//: C08:IntermediateCast.cpp
#include <cassert>
#include <typeinfo>
using namespace std;
class B1 {
public:
virtual ~B1() {}
};
class B2 {
public:
virtual ~B2() {}
};
class MI : public B1, public B2 {};
class Mi2 : public MI {};
int main() {
B2* b2 = new Mi2;
Mi2* mi2 =
dynamic_cast<Mi2*>(b2);
MI* mi = dynamic_cast<MI*>(b2);
B1* b1 =
dynamic_cast<B1*>(b2);
assert(typeid(b2) != typeid(Mi2*));
assert(typeid(b2) == typeid(B2*));
delete b2;
} ///:~
This example has the extra complication of multiple
inheritance (you’ll learn more about multiple inheritance later in this chapter,
and in Chapter 9). If you create an Mi2 and upcast it to the root (in this case, one of the two possible roots is chosen), the dynamic_cast
back to either of the derived levels MI or Mi2 is successful.
You can even cast from one root to the other:
B1* b1 = dynamic_cast<B1*>(b2);
This is successful because B2 is actually pointing to
a Mi2 object, which contains a subobject of type B1.
Casting to intermediate levels brings up an interesting
difference between dynamic_cast and typeid. The typeid operator always produces a reference to a static type_info object that describes the dynamic type of the object. Thus, it doesn’t give you
intermediate-level information. In the following expression (which is true),
typeid doesn’t see b2 as a pointer to the derived type, like dynamic_cast
does:
typeid(b2) != typeid(Mi2*)
The type of b2 is simply the exact type of the
pointer:
typeid(b2) == typeid(B2*)
RTTI only works for complete types, meaning that all class
information must be available when typeid is used. In particular, it
doesn’t work with void pointers:
//: C08:VoidRTTI.cpp
// RTTI & void pointers.
//!#include <iostream>
#include <typeinfo>
using namespace std;
class Stimpy {
public:
virtual void happy() {}
virtual void joy() {}
virtual ~Stimpy() {}
};
int main() {
void* v = new Stimpy;
// Error:
//! Stimpy* s = dynamic_cast<Stimpy*>(v);
// Error:
//! cout << typeid(*v).name() << endl;
} ///:~
A void* truly means “no type information.”
Class templates work well with RTTI, since all they do is
generate classes. As usual, RTTI provides a convenient way to obtain the name
of the class you’re in. The following example prints the order of constructor
and destructor calls:
//: C08:ConstructorOrder.cpp
// Order of constructor calls.
#include <iostream>
#include <typeinfo>
using namespace std;
template<int id> class Announce {
public:
Announce() {
cout << typeid(*this).name() << "
constructor" << endl;
}
~Announce() {
cout << typeid(*this).name() << "
destructor" << endl;
}
};
class X : public Announce<0> {
Announce<1> m1;
Announce<2> m2;
public:
X() { cout << "X::X()" << endl;
}
~X() { cout << "X::~X()" <<
endl; }
};
int main() { X x; } ///:~
This template uses a constant int to differentiate
one class from another, but type arguments would work as well. Inside both the
constructor and destructor, RTTI information produces the name of the class to
print. The class X uses both inheritance and composition to create a
class that has an interesting order of constructor and destructor calls. The output
is
Announce<0> constructor
Announce<1> constructor
Announce<2> constructor
X::X()
X::~X()
Announce<2> destructor
Announce<1> destructor
Announce<0> destructor
Of course, you may get different output depending on how
your compiler represents its name( ) information.
The RTTI mechanisms must work properly with all the complexities of multiple inheritance, including virtual base
classes (discussed in depth in the next chapter—you may want to come back here
after reading Chapter 9):
//: C08:RTTIandMultipleInheritance.cpp
#include <iostream>
#include <typeinfo>
using namespace std;
class BB {
public:
virtual void f() {}
virtual ~BB() {}
};
class B1 : virtual public BB {};
class B2 : virtual public BB {};
class MI : public B1, public B2 {};
int main() {
BB* bbp = new MI; // Upcast
// Proper name detection:
cout << typeid(*bbp).name() << endl;
// Dynamic_cast works properly:
MI* mip = dynamic_cast<MI*>(bbp);
// Can't force old-style cast:
//! MI* mip2 = (MI*)bbp; // Compile error
} ///:~
The typeid( ) operator properly detects
the name of the actual object, even through the virtual base class
pointer. The dynamic_cast also works correctly. But the compiler won’t
even allow you to try to force a cast the old way:
MI* mip = (MI*)bbp; // Compile-time error
The compiler knows this is never the right thing to do, so
it requires that you use a dynamic_cast.
Because you can discover type information from an anonymous
polymorphic pointer, RTTI is ripe for misuse by the novice, because RTTI may make sense before virtual functions do. For many people coming from a
procedural background, it’s difficult not to organize programs into sets of switch
statements. They could accomplish this with RTTI and thus lose the important
value of polymorphism in code development and maintenance. The intent of C++ is
that you use virtual functions throughout your code and that you only use RTTI
when you must.
However, using virtual functions as they are intended
requires that you have control of the base-class definition, because at some
point in the extension of your program you may discover the base class doesn’t
include the virtual function you need. If the base class comes from a library
or is otherwise controlled by someone else, one solution to the problem is RTTI;
you can derive a new type and add your extra member function. Elsewhere in the
code you can detect your particular type and call that member function. This
doesn’t destroy the polymorphism and extensibility of the program, because
adding a new type will not require you to hunt for switch statements. However,
when you add new code in the main body that requires your new feature, you’ll
have to detect your particular type.
Putting a feature in a base class might mean that, for the
benefit of one particular class, all the other classes derived from that base
require some meaningless stub for a pure virtual function. This makes the
interface less clear and annoys those who must override pure virtual functions
when they derive from that base class.
Finally, RTTI will sometimes solve efficiency problems. If your code uses polymorphism in a nice way, but it turns out that one of your objects
reacts to this general-purpose code in a horribly inefficient way, you can pick
that type out using RTTI and write case-specific code to improve the efficiency.
To further illustrate a practical use of RTTI, the following
program simulates a trash recycler. Different kinds of “trash” are inserted
into a single container and then later sorted according to their dynamic types.
//: C08:Trash.h
// Describing trash.
#ifndef TRASH_H
#define TRASH_H
#include <iostream>
class Trash {
float _weight;
public:
Trash(float wt) : _weight(wt) {}
virtual float value() const = 0;
float weight() const { return _weight; }
virtual ~Trash() {
std::cout << "~Trash()" <<
std::endl;
}
};
class Aluminum : public Trash {
static float val;
public:
Aluminum(float wt) : Trash(wt) {}
float value() const { return val; }
static void value(float newval) {
val = newval;
}
};
class Paper : public Trash {
static float val;
public:
Paper(float wt) : Trash(wt) {}
float value() const { return val; }
static void value(float newval) {
val = newval;
}
};
class Glass : public Trash {
static float val;
public:
Glass(float wt) : Trash(wt) {}
float value() const { return val; }
static void value(float newval) {
val = newval;
}
};
#endif // TRASH_H ///:~
The static values representing the price per unit of
the trash types are defined in the implementation file:
//: C08:Trash.cpp {O}
// A Trash Recycler.
#include "Trash.h"
float Aluminum::val = 1.67;
float Paper::val = 0.10;
float Glass::val = 0.23;
///:~
The sumValue( ) template iterates through a
container, displaying and calculating results:
//: C08:Recycle.cpp
//{L} Trash
// A Trash Recycler.
#include <cstdlib>
#include <ctime>
#include <iostream>
#include <typeinfo>
#include <vector>
#include "Trash.h"
#include "../purge.h"
using namespace std;
// Sums up the value of the Trash in a bin:
template<class Container>
void sumValue(Container& bin, ostream& os) {
typename Container::iterator tally = bin.begin();
float val = 0;
while(tally != bin.end()) {
val += (*tally)->weight() *
(*tally)->value();
os << "weight of " <<
typeid(**tally).name()
<< " = " <<
(*tally)->weight() << endl;
++tally;
}
os << "Total value = " << val
<< endl;
}
int main() {
srand(time(0)); // Seed the random number generator
vector<Trash*> bin;
// Fill up the Trash bin:
for(int i = 0; i < 30; i++)
switch(rand() % 3) {
case 0 :
bin.push_back(new Aluminum((rand() %
1000)/10.0));
break;
case 1 :
bin.push_back(new Paper((rand() % 1000)/10.0));
break;
case 2 :
bin.push_back(new Glass((rand() % 1000)/10.0));
break;
}
// Note: bins hold exact type of object, not base
type:
vector<Glass*> glassBin;
vector<Paper*> paperBin;
vector<Aluminum*> alumBin;
vector<Trash*>::iterator sorter = bin.begin();
// Sort the Trash:
while(sorter != bin.end()) {
Aluminum* ap =
dynamic_cast<Aluminum*>(*sorter);
Paper* pp = dynamic_cast<Paper*>(*sorter);
Glass* gp = dynamic_cast<Glass*>(*sorter);
if(ap) alumBin.push_back(ap);
else if(pp) paperBin.push_back(pp);
else if(gp) glassBin.push_back(gp);
++sorter;
}
sumValue(alumBin, cout);
sumValue(paperBin, cout);
sumValue(glassBin, cout);
sumValue(bin, cout);
purge(bin);
} ///:~
The trash
is thrown unclassified into a single bin, so the specific type information is
“lost.” But later the specific type information must be recovered to properly
sort the trash, and so RTTI is used.
We can improve this solution by using a map that
associates pointers to type_info objects with a vector of Trash
pointers. Since a map requires an ordering predicate, we provide one named TInfoLess
that calls type_info::before( ). As we insert Trash pointers
into the map, they are automatically associated with their type_info
key. Notice that sumValue( ) must be defined differently here:
//: C08:Recycle2.cpp
//{L} Trash
// Recyling with a map.
#include <cstdlib>
#include <ctime>
#include <iostream>
#include <map>
#include <typeinfo>
#include <utility>
#include <vector>
#include "Trash.h"
#include "../purge.h"
using namespace std;
// Comparator for type_info pointers
struct TInfoLess {
bool operator()(const type_info* t1, const type_info*
t2)
const { return t1->before(*t2); }
};
typedef map<const type_info*, vector<Trash*>,
TInfoLess>
TrashMap;
// Sums up the value of the Trash in a bin:
void sumValue(const TrashMap::value_type& p,
ostream& os) {
vector<Trash*>::const_iterator tally =
p.second.begin();
float val = 0;
while(tally != p.second.end()) {
val += (*tally)->weight() *
(*tally)->value();
os << "weight of "
<< p.first->name() //
type_info::name()
<< " = " <<
(*tally)->weight() << endl;
++tally;
}
os << "Total value = " << val
<< endl;
}
int main() {
srand(time(0)); // Seed the random number generator
TrashMap bin;
// Fill up the Trash bin:
for(int i = 0; i < 30; i++) {
Trash* tp;
switch(rand() % 3) {
case 0 :
tp = new Aluminum((rand() % 1000)/10.0);
break;
case 1 :
tp = new Paper((rand() % 1000)/10.0);
break;
case 2 :
tp = new Glass((rand() % 1000)/10.0);
break;
}
bin[&typeid(*tp)].push_back(tp);
}
// Print sorted results
for(TrashMap::iterator p = bin.begin();
p != bin.end(); ++p) {
sumValue(*p, cout);
purge(p->second);
}
} ///:~
We’ve modified sumValue( ) to call type_info::name( )
directly, since the type_info object is now available as the first
member of the TrashMap::value_type pair. This avoids the extra call to typeid
to get the name of the type of Trash being processed that was necessary
in the previous version of this program.
Typically, RTTI is implemented by placing an additional pointer in a class’s virtual function table. This pointer points to the type_info structure for that particular type. The effect of a typeid( )
expression is quite simple: the virtual function table pointer fetches the type_info
pointer, and a reference to the resulting type_info structure is
produced. Since this is just a two-pointer dereference operation, it is a
constant time operation.
For a dynamic_cast<destination*>(source_pointer),
most cases are quite straightforward: source_pointer’s RTTI information
is retrieved, and RTTI information for the type destination* is fetched.
A library routine then determines whether source_pointer’s type is of
type destination* or a base class of destination*. The pointer it
returns may be adjusted because of multiple inheritance if the base type isn’t the first base of the derived class. The situation is more complicated with
multiple inheritance because a base type may appear more than once in an
inheritance hierarchy and virtual base classes are used.
Because the library routine used for dynamic_cast
must check through a list of base classes, the overhead for dynamic_cast
may be higher than typeid( ) (but you get different information,
which may be essential to your solution), and it may take more time to discover
a base class than a derived class. In addition, dynamic_cast compares
any type to any other type; you aren’t restricted to comparing types within the
same hierarchy. This adds extra overhead to the library routine used by dynamic_cast.
Although normally you upcast a pointer to a base class and
then use the generic interface of that base class (via virtual functions),
occasionally you get into a corner where things can be more effective if you
know the dynamic type of the object pointed to by a base pointer, and that’s
what RTTI provides. The most common misuse may come from the programmer who
doesn’t understand virtual functions and uses RTTI to do type-check coding
instead. The philosophy of C++ seems to be to provide you with powerful tools
and guard for type violations and integrity, but if you want to deliberately
misuse or get around a language feature, there’s nothing to stop you. Sometimes
a slight burn is the fastest way to gain experience.
Solutions
to selected exercises can be found in the electronic document The Thinking
in C++ Volume 2 Annotated Solution Guide, available for a small fee from www.MindView.net.
1. Create a Base class with a virtual destructor and a
Derived class that inherits from Base. Create a vector of Base
pointers that point to Base and Derived objects randomly. Using the
contents your vector, fill a second vector with all the Derived
pointers. Compare execution times between typeid( ) and dynamic_cast
to see which is faster.
2. Modify C16:AutoCounter.h in Volume 1 of this book so that
it becomes a useful debugging tool. It will be used as a nested member of each
class that you are interested in tracing. Turn AutoCounter into a
template that takes the class name of the surrounding class as the template
argument, and in all the error messages use RTTI to print the name of the
class.
3. Use RTTI to assist in program debugging by printing out the exact
name of a template using typeid( ). Instantiate the template for
various types and see what the results are.
4. Modify the Instrument hierarchy from Chapter 14 of Volume
1 by first copying Wind5.cpp to a new location. Now add a virtual clearSpitValve( )
function to the Wind class, and redefine it for all the classes
inherited from Wind. Instantiate a vector to hold Instrument
pointers, and fill it with various types of Instrument objects created
using the new operator. Now use RTTI to move through the container
looking for objects in class Wind, or derived from Wind. Call the
clearSpitValve( ) function for these objects. Notice that it would
unpleasantly confuse the Instrument base class if it contained a clearSpitValve( )
function.
5. Modify the previous exercise to place a prepareInstrument( )
function in the base class, which calls appropriate functions (such as clearSpitValve( ),
when it fits). Note that prepareInstrument( ) is a sensible
function to place in the base class, and it eliminates the need for RTTI in the
previous exercise.
6. Create a vector of pointers to 10 random Shape
objects (at least Squares and Circles, for example). The draw( )
member function should be overridden in each concrete class to print the
dimensions of the object being drawn (the length or the radius, whichever
applies). Write a main( ) program that draws all the Squares
in your container first, sorted by length, and then draws all Circles,
sorted by radius.
7. Create a large vector of pointers to random Shape
objects. Write a non-virtual draw( ) function in Shape that
uses RTTI to determine the dynamic type of each object and executes the
appropriate code to “draw” the object with a switch statement. Then rewrite
your Shape hierarchy the “right way,” using virtual functions. Compare
the code sizes and execution times of the two approaches.
8. Create a hierarchy of Pet classes, including Dog, Cat,
and Horse. Also create a hierarchy of Food classes: Beef, Fish,
and Oats. The Dog class has a member function, eat( ),
that takes a Beef parameter, likewise, Cat::eat( ) takes a Fish
object, and Oats objects are passed to Horse::eat( ). Create
a vector of pointers to random Pet objects, and visit each Pet,
passing the correct type of Food object to its eat( )
function.
9. Create a global function named drawQuad( ) that takes
a reference to a Shape object. It calls the draw( ) function
of its Shape parameter if it has four sides (that is, if it’s a Square
or Rectangle). Otherwise, it prints the message “Not a quadrilateral”.
Traverse a vector of pointers to random Shapes, calling drawQuad( )
for each one. Place Squares, Rectangles, Circles and Triangles
in your vector.
10. Sort a vector of random Shape objects by class
name. Use type_info::before( ) as the comparison function for
sorting.
The basic concept of multiple
inheritance (MI) sounds simple enough: you create a new type by inheriting from
more than one base class. The syntax is exactly what you’d expect, and as long
as the inheritance diagrams are simple, MI can be simple as well.
However, MI can introduce a number of ambiguities and
strange situations, which are covered in this chapter. But first, it is helpful
to get some perspective on the subject.
Before C++, the most successful object-oriented language was
Smalltalk. Smalltalk was created from the ground up as an object-oriented
language. It is often referred to as pure, whereas C++ is called a hybrid
language because it supports multiple programming paradigms, not just the object-oriented paradigm. One of the design decisions made with Smalltalk was that all
classes would be derived in a single hierarchy, rooted in a single base class
(called Object—this is the model for the object-based hierarchy). You cannot
create a new class in Smalltalk without deriving it from an existing class,
which is why it takes a certain amount of time to become productive in
Smalltalk: you must learn the class library before you can start making new
classes. The Smalltalk class hierarchy is therefore a single monolithic tree.
Classes in Smalltalk usually have a number of things in
common, and they always have some things in common (the characteristics
and behaviors of Object), so you don’t often run into a situation where
you need to inherit from more than one base class. However, with C++ you can create as many distinct inheritance trees as you want. So for logical completeness the language
must be able to combine more than one class at a time—thus the need for multiple
inheritance.
It was not obvious, however, that programmers required
multiple inheritance, and there was (and still is) a lot of disagreement about
whether it is essential in C++. MI was added in AT&T cfront release 2.0 in 1989 and was the first significant change to the language over
version 1.0. Since
then, a number of other features have been added to Standard C++ (notably
templates) that change the way we think about programming and place MI in a
much less important role. You can think of MI as a “minor” language feature
that is seldom involved in your daily design decisions.
One of the most pressing arguments for MI involved
containers. Suppose you want to create a container that everyone can easily
use. One approach is to use void* as the type inside the container. The
Smalltalk approach, however, is to make a container that holds Objects,
since Object is the base type of the Smalltalk hierarchy. Because
everything in Smalltalk is ultimately derived from Object, a container
that holds Objects can hold anything.
Now consider the situation in C++. Suppose vendor A
creates an object-based hierarchy that includes a useful set of containers
including one you want to use called Holder. Next you come across vendor
B’s class hierarchy that contains some other class that is important to
you, a BitImage class, for example, that holds graphic images. The only
way to make a Holder of BitImages is to derive a new class from
both Object, so it can be held in the Holder, and BitImage:

This was seen as an important reason for MI, and a number of
class libraries were built on this model. However, as you saw in Chapter 5, the
addition of templates has changed the way containers are created, so this
situation is no longer a driving issue for MI.
The other reason you may need MI is related to design. You
can intentionally use MI to make a design more flexible or useful (or at least
seemingly so). An example of this is in the original iostream library
design (which still persists in today’s template design, as you saw in Chapter
4):
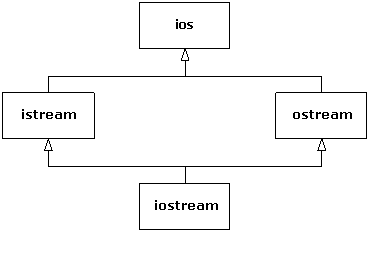
Both istream and ostream are useful classes by
themselves, but they can also be derived from simultaneously by a class that
combines both their characteristics and behaviors. The class ios
provides what is common to all stream classes, and so in this case MI is a
code-factoring mechanism.
Regardless of what motivates you to use MI, it’s harder to
use than it might appear.
One use of multiple inheritance that is not controversial
pertains to interface inheritance. In C++, all inheritance is implementation
inheritance, because everything in a base class, interface and
implementation, becomes part of a derived class. It is not possible to inherit
only part of a class (the interface alone, say). As Chapter 14 of Volume 1
explains, private and protected inheritance make it possible to restrict access
to members inherited from base classes when used by clients of a derived class
object, but this doesn’t affect the derived class; it still contains all base
class data and can access all non-private base class members.
Interface inheritance, on the other hand, only adds member
function declarations to a derived class interface and is not directly
supported in C++. The usual technique to simulate interface inheritance in C++
is to derive from an interface class, which is a class that contains
only declarations (no data or function bodies). These declarations will be pure
virtual functions, except for the destructor. Here is an example:
//: C09:Interfaces.cpp
// Multiple interface inheritance.
#include <iostream>
#include <sstream>
#include <string>
using namespace std;
class Printable {
public:
virtual ~Printable() {}
virtual void print(ostream&) const = 0;
};
class Intable {
public:
virtual ~Intable() {}
virtual int toInt() const = 0;
};
class Stringable {
public:
virtual ~Stringable() {}
virtual string toString() const = 0;
};
class Able : public Printable, public Intable,
public Stringable {
int myData;
public:
Able(int x) { myData = x; }
void print(ostream& os) const { os <<
myData; }
int toInt() const { return myData; }
string toString() const {
ostringstream os;
os << myData;
return os.str();
}
};
void testPrintable(const Printable& p) {
p.print(cout);
cout << endl;
}
void testIntable(const Intable& n) {
cout << n.toInt() + 1 << endl;
}
void testStringable(const Stringable& s) {
cout << s.toString() + "th" <<
endl;
}
int main() {
Able a(7);
testPrintable(a);
testIntable(a);
testStringable(a);
} ///:~
The class Able “implements” the interfaces Printable,
Intable, and Stringable because it provides implementations for
the functions they declare. Because Able derives from all three classes,
Able objects have multiple “is-a” relationships. For example, the object
a can act as a Printable object because its class, Able,
derives publicly from Printable and provides an implementation for print( ).
The test functions have no need to know the most-derived type of their
parameter; they just need an object that is substitutable for their parameter’s
type.
As usual, a template solution is more compact:
//: C09:Interfaces2.cpp
// Implicit interface inheritance via templates.
#include <iostream>
#include <sstream>
#include <string>
using namespace std;
class Able {
int myData;
public:
Able(int x) { myData = x; }
void print(ostream& os) const { os << myData;
}
int toInt() const { return myData; }
string toString() const {
ostringstream os;
os << myData;
return os.str();
}
};
template<class Printable>
void testPrintable(const Printable& p) {
p.print(cout);
cout << endl;
}
template<class Intable>
void testIntable(const Intable& n) {
cout << n.toInt() + 1 << endl;
}
template<class Stringable>
void testStringable(const Stringable& s) {
cout << s.toString() + "th" <<
endl;
}
int main() {
Able a(7);
testPrintable(a);
testIntable(a);
testStringable(a);
} ///:~
The names Printable, Intable, and Stringable
are now just template parameters that assume the existence of the operations
indicated in their respective contexts. In other words, the test functions can
accept arguments of any type that provides a member function definition with
the correct signature and return type; deriving from a common base class in not
necessary. Some people are more comfortable with the first version because the
type names guarantee by inheritance that the expected interfaces are
implemented. Others are content with the fact that if the operations required
by the test functions are not satisfied by their template type arguments, the
error is still caught at compile time. The latter approach is technically a
“weaker” form of type checking than the former (inheritance) approach, but the
effect on the programmer (and the program) is the same. This is one form of weak typing that is acceptable to many of today’s C++ programmers.
As we stated earlier, C++ provides only implementation
inheritance, meaning that you always inherit everything from your base
classes. This can be good because it frees you from having to implement everything
in the derived class, as we had to do with the interface inheritance examples
earlier. A common use of multiple inheritance involves using mixin classes, which are classes that exist to add capabilities to other classes through
inheritance. Mixin classes are not intended to be instantiated by themselves.
As an example, suppose we are clients of a class that
supports access to a database. In this scenario, you only have a header file
available—part of the point here is that you don’t have access to the source
code for the implementation. For illustration, assume the following
implementation of a Database class:
//: C09:Database.h
// A prototypical resource class.
#ifndef DATABASE_H
#define DATABASE_H
#include <iostream>
#include <stdexcept>
#include <string>
struct DatabaseError : std::runtime_error {
DatabaseError(const std::string& msg)
: std::runtime_error(msg) {}
};
class Database {
std::string dbid;
public:
Database(const std::string& dbStr) : dbid(dbStr)
{}
virtual ~Database() {}
void open() throw(DatabaseError) {
std::cout << "Connected to "
<< dbid << std::endl;
}
void close() {
std::cout << dbid << "
closed" << std::endl;
}
// Other database functions...
};
#endif // DATABASE_H ///:~
We’re leaving out actual database functionality (storing,
retrieving, and so on), but that’s not important here. Using this class
requires a database connection string and that you call Database::open( )
to connect and Database::close( ) to disconnect:
//: C09:UseDatabase.cpp
#include "Database.h"
int main() {
Database db("MyDatabase");
db.open();
// Use other db functions...
db.close();
}
/* Output:
connected to MyDatabase
MyDatabase closed
*/ ///:~
In a typical client-server situation, a client will have
multiple objects sharing a connection to a database. It is important that the
database eventually be closed, but only after access to it is no longer
required. It is common to encapsulate this behavior through a class that tracks
the number of client entities using the database connection and to
automatically terminate the connection when that count goes to zero. To add
reference counting to the Database class, we use multiple inheritance to
mix a class named Countable into the Database class to create a
new class, DBConnection. Here’s the Countable mixin class:
//: C09:Countable.h
// A "mixin" class.
#ifndef COUNTABLE_H
#define COUNTABLE_H
#include <cassert>
class Countable {
long count;
protected:
Countable() { count = 0; }
virtual ~Countable() { assert(count == 0); }
public:
long attach() { return ++count; }
long detach() {
return (--count > 0) ? count : (delete this, 0);
}
long refCount() const { return count; }
};
#endif // COUNTABLE_H ///:~
It is evident that this is not a standalone class because
its constructor is protected; it requires a friend or a derived class to
use it. It is important that the destructor is virtual, because it is called
only from the delete this statement in detach( ), and we
want derived objects to be properly destroyed.
The DBConnection class inherits both Database
and Countable and provides a static create( ) function that
initializes its Countable subobject. This is an example of the Factory
Method design pattern, discussed in the next chapter:
//: C09:DBConnection.h
// Uses a "mixin" class.
#ifndef DBCONNECTION_H
#define DBCONNECTION_H
#include <cassert>
#include <string>
#include "Countable.h"
#include "Database.h"
using std::string;
class DBConnection : public Database, public Countable
{
DBConnection(const DBConnection&); // Disallow
copy
DBConnection& operator=(const DBConnection&);
protected:
DBConnection(const string& dbStr)
throw(DatabaseError)
: Database(dbStr) { open(); }
~DBConnection() { close(); }
public:
static DBConnection*
create(const string& dbStr) throw(DatabaseError)
{
DBConnection* con = new DBConnection(dbStr);
con->attach();
assert(con->refCount() == 1);
return con;
}
// Other added functionality as desired...
};
#endif // DBCONNECTION_H ///:~
We now have a reference-counted database connection without
modifying the Database class, and we can safely assume that it will not
be surreptitiously terminated. The opening and closing is done using the Resource Acquisition Is Initialization (RAII) idiom mentioned in Chapter 1 via the DBConnection
constructor and destructor. This makes the DBConnection easy to use:
//: C09:UseDatabase2.cpp
// Tests the Countable "mixin" class.
#include <cassert>
#include "DBConnection.h"
class DBClient {
DBConnection* db;
public:
DBClient(DBConnection* dbCon) {
db = dbCon;
db->attach();
}
~DBClient() { db->detach(); }
// Other database requests using db…
};
int main() {
DBConnection* db =
DBConnection::create("MyDatabase");
assert(db->refCount() == 1);
DBClient c1(db);
assert(db->refCount() == 2);
DBClient c2(db);
assert(db->refCount() == 3);
// Use database, then release attach from original
create
db->detach();
assert(db->refCount() == 2);
} ///:~
The call to DBConnection::create( ) calls attach( ),
so when we’re finished, we must explicitly call detach( ) to
release the original hold on the connection. Note that the DBClient
class also uses RAII to manage its use of the connection. When the program
terminates, the destructors for the two DBClient objects will decrement
the reference count (by calling detach( ), which DBConnection
inherited from Countable), and the database connection will be closed (because
of Countable’s virtual destructor) when the count reaches zero after the
object c1 is destroyed.
A template approach is commonly used for mixin inheritance,
allowing the user to specify at compile time which flavor of mixin is desired.
This way you can use different reference-counting approaches without explicitly
defining DBConnection twice. Here’s how it’s done:
//: C09:DBConnection2.h
// A parameterized mixin.
#ifndef DBCONNECTION2_H
#define DBCONNECTION2_H
#include <cassert>
#include <string>
#include "Database.h"
using std::string;
template<class Counter>
class DBConnection : public Database, public Counter {
DBConnection(const DBConnection&); // Disallow
copy
DBConnection& operator=(const DBConnection&);
protected:
DBConnection(const string& dbStr)
throw(DatabaseError)
: Database(dbStr) { open(); }
~DBConnection() { close(); }
public:
static DBConnection* create(const string& dbStr)
throw(DatabaseError) {
DBConnection* con = new DBConnection(dbStr);
con->attach();
assert(con->refCount() == 1);
return con;
}
// Other added functionality as desired...
};
#endif // DBCONNECTION2_H ///:~
The only change here is the template prefix to the class
definition (and renaming Countable to Counter for clarity). We
could also make the database class a template parameter (had we multiple
database access classes to choose from), but it is not a mixin since it is a
standalone class. The following example uses the original Countable as
the Counter mixin type, but we could use any type that implements the
appropriate interface (attach( ), detach( ), and so
on):
//: C09:UseDatabase3.cpp
// Tests a parameterized "mixin" class.
#include <cassert>
#include "Countable.h"
#include "DBConnection2.h"
class DBClient {
DBConnection<Countable>* db;
public:
DBClient(DBConnection<Countable>* dbCon) {
db = dbCon;
db->attach();
}
~DBClient() { db->detach(); }
};
int main() {
DBConnection<Countable>* db =
DBConnection<Countable>::create("MyDatabase");
assert(db->refCount() == 1);
DBClient c1(db);
assert(db->refCount() == 2);
DBClient c2(db);
assert(db->refCount() == 3);
db->detach();
assert(db->refCount() == 2);
} ///:~
The general pattern for multiple parameterized mixins is
simply
template<class Mixin1, class Mixin2, … , class
MixinK>
class Subject : public Mixin1,
public Mixin2,
…
public MixinK {…};
When you inherit from a base class, you get a copy of all the data members of that base class in your derived class. The following
program shows how multiple base subobjects might be laid out in memory:
//: C09:Offset.cpp
// Illustrates layout of subobjects with MI.
#include <iostream>
using namespace std;
class A { int x; };
class B { int y; };
class C : public A, public B { int z; };
int main() {
cout << "sizeof(A) == " <<
sizeof(A) << endl;
cout << "sizeof(B) == " <<
sizeof(B) << endl;
cout << "sizeof(C) == " <<
sizeof(C) << endl;
C c;
cout << "&c == " << &c
<< endl;
A* ap = &c;
B* bp = &c;
cout << "ap == " <<
static_cast<void*>(ap) << endl;
cout << "bp == " <<
static_cast<void*>(bp) << endl;
C* cp = static_cast<C*>(bp);
cout << "cp == " <<
static_cast<void*>(cp) << endl;
cout << "bp == cp? " <<
boolalpha << (bp == cp) << endl;
cp = 0;
bp = cp;
cout << bp << endl;
}
/* Output:
sizeof(A) == 4
sizeof(B) == 4
sizeof(C) == 12
&c == 1245052
ap == 1245052
bp == 1245056
cp == 1245052
bp == cp? true
0
*/ ///:~
As you can see, the B portion of the object c
is offset 4 bytes from the beginning of the entire object, suggesting the
following layout:
The object c begins with it’s A subobject,
then the B portion, and finally the data from the complete type C
itself. Since a C is-an A and is-a B, it is possible to
upcast to either base type. When upcasting to an A, the resulting
pointer points to the A portion, which happens to be at the beginning of
the C object, so the address ap is the same as the expression &c.
When upcasting to a B, however, the resulting pointer must point to
where the B subobject actually resides because class B knows nothing
about class C (or class A, for that matter). In other words, the
object pointed to by bp must be able to behave as a standalone B
object (except for any required polymorphic behavior).
When casting bp back to a C*, since the
original object was a C in the first place, the location where the B
subobject resides is known, so the pointer is adjusted back to the original
address of the complete object. If bp had been pointing to a standalone B
object instead of a C object in the first place, the cast would be
illegal. Furthermore,
in the comparison bp == cp, cp is implicitly converted to a B*,
since that is the only way to make the comparison meaningful (that is,
upcasting is always allowed), hence the true result. So when converting
back and forth between subobjects and complete types, the appropriate offset is
applied.
The null pointer requires special handling, obviously, since
blindly subtracting an offset when converting to or from a B subobject
will result in an invalid address if the pointer was zero to start with. For
this reason, when casting to or from a B*, the compiler generates logic
to check first to see if the pointer is zero. If it isn’t, it applies the
offset; otherwise, it leaves it as zero.
With the syntax we’ve seen so far, if you have multiple base
classes, and if those base classes in turn have a common base class, you will
have two copies of the top-level base, as you can see in the following example:
//: C09:Duplicate.cpp
// Shows duplicate subobjects.
#include <iostream>
using namespace std;
class Top {
int x;
public:
Top(int n) { x = n; }
};
class Left : public Top {
int y;
public:
Left(int m, int n) : Top(m) { y = n; }
};
class Right : public Top {
int z;
public:
Right(int m, int n) : Top(m) { z = n; }
};
class Bottom : public Left, public Right {
int w;
public:
Bottom(int i, int j, int k, int m)
: Left(i, k), Right(j, k) { w = m; }
};
int main() {
Bottom b(1, 2, 3, 4);
cout << sizeof b << endl; // 20
} ///:~
Since the size of b is 20 bytes, there are
five integers altogether in a complete Bottom object. A typical class
diagram for this scenario usually appears as:
This is the so-called “diamond inheritance”, but in this case it would be better rendered as:

The awkwardness of this design surfaces in the constructor
for the Bottom class in the previous code. The user thinks that only
four integers are required, but which arguments should be passed to the two
parameters that Left and Right require? Although this design is
not inherently “wrong,” it is usually not what an application needs. It also
presents a problem when trying to convert a pointer to a Bottom object
to a pointer to Top. As we showed earlier, the address may need to be
adjusted, depending on where the subobject resides within the complete object,
but here there are two Top subobjects to choose from. The
compiler doesn’t know which to choose, so such an upcast is ambiguous and is
not allowed. The same reasoning explains why a Bottom object would not
be able to call a function that is only defined in Top. If such a
function Top::f( ) existed, calling b.f( ) above would
need to refer to a Top subobject as an execution context, and there are
two to choose from.
What we usually want in such cases is true diamond
inheritance, where a single Top object is shared by both Left and
Right subobjects within a complete Bottom object, which is what
the first class diagram depicts. This is achieved by making Top a virtual
base class of Left and Right:
//: C09:VirtualBase.cpp
// Shows a shared subobject via a virtual base.
#include <iostream>
using namespace std;
class Top {
protected:
int x;
public:
Top(int n) { x = n; }
virtual ~Top() {}
friend ostream&
operator<<(ostream& os, const Top& t) {
return os << t.x;
}
};
class Left : virtual public Top {
protected:
int y;
public:
Left(int m, int n) : Top(m) { y = n; }
};
class Right : virtual public Top {
protected:
int z;
public:
Right(int m, int n) : Top(m) { z = n; }
};
class Bottom : public Left, public Right {
int w;
public:
Bottom(int i, int j, int k, int m)
: Top(i), Left(0, j), Right(0, k) { w = m; }
friend ostream&
operator<<(ostream& os, const Bottom&
b) {
return os << b.x << ',' << b.y
<< ',' << b.z
<< ',' << b.w;
}
};
int main() {
Bottom b(1, 2, 3, 4);
cout << sizeof b << endl;
cout << b << endl;
cout << static_cast<void*>(&b)
<< endl;
Top* p = static_cast<Top*>(&b);
cout << *p << endl;
cout << static_cast<void*>(p) <<
endl;
cout << dynamic_cast<void*>(p) <<
endl;
} ///:~
Each virtual base of a given type refers to the same object,
no matter where it appears in the hierarchy. This
means that when a Bottom object is instantiated, the object layout may
look something like this:

The Left and Right subobjects each have a
pointer (or some conceptual equivalent) to the shared Top subobject, and
all references to that subobject in Left and Right member
functions will go through those these pointers. Here, there
is no ambiguity when upcasting from a Bottom to a Top object,
since there is only one Top object to convert to.
The output of the previous program is as follows:
36
1,2,3,4
1245032
1
1245060
1245032
The addresses printed suggest that this particular
implementation does indeed store the Top subobject at the end of the
complete object (although it’s not really important where it goes). The result
of a dynamic_cast to void* always resolves to the address of the
complete object.
Although it is technically illegal to do so, if you
remove the virtual destructor (and the dynamic_cast statement, so the
program will compile), the size of Bottom decreases to 24 bytes. That
seems to be a decrease equivalent to the size of three pointers. Why?
It’s important not to take these numbers too literally.
Other compilers we use manage only to increase the size by four bytes when the
virtual constructor is added. Not being compiler writers, we can’t tell you
their secrets. We can tell you, however, that with multiple inheritance, a
derived object must behave as if it has multiple VPTRs, one for each of its
direct base classes that also have virtual functions. It’s as simple as that.
Compilers make whatever optimizations their authors invent, but the behavior
must be the same.
The strangest thing in the previous code is the initializer
for Top in the Bottom constructor. Normally one doesn’t worry
about initializing subobjects beyond direct base classes, since all classes
take care of initializing their own bases. There are, however, multiple paths
from Bottom to Top, so relying on the intermediate classes Left
and Right to pass along the necessary initialization data results in an
ambiguity—who is responsible for performing the initialization? For this
reason, the most derived class must initialize a virtual base. But what
about the expressions in the Left and Right constructors that
also initialize Top? They are certainly necessary when creating
standalone Left or Right objects, but must be ignored when
a Bottom object is created (hence the zeros in their initializers in the
Bottom constructor—any values in those slots are ignored when the Left
and Right constructors execute in the context of a Bottom
object). The compiler takes care of all this for you, but it’s important to
understand where the responsibility lies. Always make sure that all concrete
(nonabstract) classes in a multiple inheritance hierarchy are aware of any
virtual bases and initialize them appropriately.
These rules of responsibility apply not only to
initialization, but to all operations that span the class hierarchy. Consider
the stream inserter in the previous code. We made the data protected so we
could “cheat” and access inherited data in operator<<(ostream&,
const Bottom&). It usually makes more sense to assign the work of
printing each subobject to its corresponding class and have the derived class
call its base class functions as needed. What would happen if we tried that
with operator<<( ), as the following code illustrates?
//: C09:VirtualBase2.cpp
// How NOT to implement operator<<.
#include <iostream>
using namespace std;
class Top {
int x;
public:
Top(int n) { x = n; }
virtual ~Top() {}
friend ostream& operator<<(ostream& os,
const Top& t) {
return os << t.x;
}
};
class Left : virtual public Top {
int y;
public:
Left(int m, int n) : Top(m) { y = n; }
friend ostream& operator<<(ostream& os,
const Left& l) {
return os << static_cast<const
Top&>(l) << ',' << l.y;
}
};
class Right : virtual public Top {
int z;
public:
Right(int m, int n) : Top(m) { z = n; }
friend ostream& operator<<(ostream& os,
const Right& r) {
return os << static_cast<const
Top&>(r) << ',' << r.z;
}
};
class Bottom : public Left, public Right {
int w;
public:
Bottom(int i, int j, int k, int m)
: Top(i), Left(0, j), Right(0, k) { w = m; }
friend ostream& operator<<(ostream& os,
const Bottom& b){
return os << static_cast<const
Left&>(b)
<< ',' << static_cast<const
Right&>(b)
<< ',' << b.w;
}
};
int main() {
Bottom b(1, 2, 3, 4);
cout << b << endl; // 1,2,1,3,4
} ///:~
You can’t just blindly share the responsibility upward in
the usual fashion, because the Left and Right stream inserters
each call the Top inserter, and again there will be duplication of data.
Instead you need to mimic what the compiler does with initialization. One
solution is to provide special functions in the classes that know about the virtual
base class, which ignore the virtual base when printing (leaving the job to the
most derived class):
//: C09:VirtualBase3.cpp
// A correct stream inserter.
#include <iostream>
using namespace std;
class Top {
int x;
public:
Top(int n) { x = n; }
virtual ~Top() {}
friend ostream& operator<<(ostream& os,
const Top& t) {
return os << t.x;
}
};
class Left : virtual public Top {
int y;
protected:
void specialPrint(ostream& os) const {
// Only print Left's part
os << ','<< y;
}
public:
Left(int m, int n) : Top(m) { y = n; }
friend ostream& operator<<(ostream& os,
const Left& l) {
return os << static_cast<const
Top&>(l) << ',' << l.y;
}
};
class Right : virtual public Top {
int z;
protected:
void specialPrint(ostream& os) const {
// Only print Right's part
os << ','<< z;
}
public:
Right(int m, int n) : Top(m) { z = n; }
friend ostream& operator<<(ostream& os,
const Right& r) {
return os << static_cast<const
Top&>(r) << ',' << r.z;
}
};
class Bottom : public Left, public Right {
int w;
public:
Bottom(int i, int j, int k, int m)
: Top(i), Left(0, j), Right(0, k) { w = m; }
friend ostream& operator<<(ostream& os,
const Bottom& b){
os << static_cast<const Top&>(b);
b.Left::specialPrint(os);
b.Right::specialPrint(os);
return os << ','
<< b.w;
}
};
int main() {
Bottom b(1, 2, 3, 4);
cout << b << endl; // 1,2,3,4
} ///:~
The specialPrint( ) functions are protected
since they will be called only by Bottom. They print only their own data
and ignore their Top subobject because the Bottom inserter is in
control when these functions are called. The Bottom inserter must know
about the virtual base, just as a Bottom constructor needs to. This same
reasoning applies to assignment operators in a hierarchy with a virtual base,
as well as to any function, member or not, that wants to share the work
throughout all classes in the hierarchy.
Having discussed virtual base classes, we can now illustrate
the “full story” of object initialization. Since virtual bases give rise to shared subobjects, it makes sense that they should be available before the sharing
takes place. So the order of initialization of subobjects follows these rules,
recursively:
1. All virtual base class subobjects are initialized, in top-down,
left-to-right order according to where they appear in class definitions.
2. Non-virtual base classes are then initialized in the usual order.
3. All member objects are initialized in declaration order.
4. The complete object’s constructor executes.
The following program illustrates this behavior:
//: C09:VirtInit.cpp
// Illustrates initialization order with virtual bases.
#include <iostream>
#include <string>
using namespace std;
class M {
public:
M(const string& s) { cout << "M "
<< s << endl; }
};
class A {
M m;
public:
A(const string& s) : m("in A") {
cout << "A " << s <<
endl;
}
virtual ~A() {}
};
class B {
M m;
public:
B(const string& s) : m("in B") {
cout << "B " << s <<
endl;
}
virtual ~B() {}
};
class C {
M m;
public:
C(const string& s) : m("in C") {
cout << "C " << s <<
endl;
}
virtual ~C() {}
};
class D {
M m;
public:
D(const string& s) : m("in D") {
cout << "D " << s <<
endl;
}
virtual ~D() {}
};
class E : public A, virtual public B, virtual public C
{
M m;
public:
E(const string& s) : A("from E"),
B("from E"),
C("from E"), m("in
E") {
cout << "E "
<< s << endl;
}
};
class F : virtual public B, virtual public C, public D
{
M m;
public:
F(const string& s) : B("from F"),
C("from F"),
D("from F"), m("in F") {
cout << "F " << s <<
endl;
}
};
class G : public E, public F {
M m;
public:
G(const string& s) : B("from G"),
C("from G"),
E("from G"), F("from G"),
m("in G") {
cout << "G " << s <<
endl;
}
};
int main() {
G g("from main");
} ///:~
The classes in this code can be represented by the following
diagram:
 Each
class has an embedded member of type M. Note that only four derivations
are virtual: E from B and C, and F from B
and C. The output of this program is:
Each
class has an embedded member of type M. Note that only four derivations
are virtual: E from B and C, and F from B
and C. The output of this program is:
M in B
B from G
M in C
C from G
M in A
A from E
M in E
E from G
M in D
D from F
M in F
F from G
M in G
G from main
The initialization of g requires its E and F
part to first be initialized, but the B and C subobjects are
initialized first because they are virtual bases and are initialized from G’s
initializer, G being the most-derived class. The class B has no
base classes, so according to rule 3, its member object m is initialized,
then its constructor prints “B from G”, and similarly for the C
subject of E. The E subobject requires A, B, and C
subobjects. Since B and C have already been initialized, the A
subobject of the E subobject is initialized next, and then the E
subobject itself. The same scenario repeats for g’s F subobject,
but without duplicating the initialization of the virtual bases.
The ambiguities we have illustrated with subobjects apply to
any names, including function names. If a class has multiple direct base
classes that share member functions of the same name, and you call one of those
member functions, the compiler doesn’t know which one to choose. The following
sample program would report such an error:
//: C09:AmbiguousName.cpp {-xo}
class Top {
public:
virtual ~Top() {}
};
class Left : virtual public Top {
public:
void f() {}
};
class Right : virtual public Top {
public:
void f() {}
};
class Bottom : public Left, public Right {};
int main() {
Bottom b;
b.f(); // Error here
} ///:~
The class Bottom has inherited two functions of the
same name (the signature is irrelevant, since name lookup occurs before
overload resolution), and there is no way to choose between them. The usual
technique to disambiguate the call is to qualify the function call with the
base class name:
//: C09:BreakTie.cpp
class Top {
public:
virtual ~Top() {}
};
class Left : virtual public Top {
public:
void f() {}
};
class Right : virtual public Top {
public:
void f() {}
};
class Bottom : public Left, public Right {
public:
using Left::f;
};
int main() {
Bottom b;
b.f(); // Calls Left::f()
} ///:~
The name Left::f is now found in the scope of Bottom,
so the name Right::f is not even considered. To introduce extra
functionality beyond what Left::f( ) provides, you implement a Bottom::f( )
function that calls Left::f( ).
Functions with the same name occurring in different branches
of a hierarchy often conflict. The following hierarchy has no such problem:
//: C09:Dominance.cpp
class Top {
public:
virtual ~Top() {}
virtual void f() {}
};
class Left : virtual public Top {
public:
void f() {}
};
class Right : virtual public Top {};
class Bottom : public Left, public Right {};
int main() {
Bottom b;
b.f(); // Calls Left::f()
} ///:~
Here, there is no explicit Right::f( ). Since Left::f( )
is the most derived, it is chosen. Why? Well, pretend that Right did not
exist, giving the single-inheritance hierarchy Top <= Left <= Bottom.
You would certainly expect Left::f( ) to be the function called by
the expression b.f( ) because of normal scope rules: a derived
class is considered a nested scope of a base class. In general, a name A::f
dominates the name B::f if A derives from B,
directly or indirectly, or in other words, if A is “more derived” in the
hierarchy than B. Therefore,
in choosing between two functions with the same name, the compiler chooses the
one that dominates. If there is no dominant name, there is an ambiguity.
The following program further illustrates the dominance
principle:
//: C09:Dominance2.cpp
#include <iostream>
using namespace std;
class A {
public:
virtual ~A() {}
virtual void f() { cout << "A::f\n";
}
};
class B : virtual public A {
public:
void f() { cout << "B::f\n"; }
};
class C : public B {};
class D : public C, virtual public A {};
int main() {
B* p = new D;
p->f(); // Calls B::f()
delete p;
} ///:~
The class diagram for this hierarchy is
The class A is a (direct, in
this case) base class for B, and so the name B::f dominates A::f.
When the question of whether to use multiple inheritance
comes up, ask at least two questions:
1. Do you need to show the public interfaces of both these classes
through your new type? (See instead if one class can be contained within the
other, with only some of its interface exposed in the new class.)
2. Do you need to upcast to both of the base classes? (This also
applies when you have more than two base classes.)
If you can answer “no” to either question, you can avoid
using MI and should probably do so.
Watch for the situation where one class needs to be upcast
only as a function argument. In that case, the class can be embedded and an
automatic type conversion function provided in your new class to produce a
reference to the embedded object. Any time you use an object of your new class
as an argument to a function that expects the embedded object, the type
conversion function is used. However,
type conversion can’t be used for normal polymorphic member function selection;
that requires inheritance. Preferring composition over inheritance is a good
overall design guideline.
One of the best uses for multiple inheritance involves code that’s out of your control. Suppose you’ve acquired a library that consists
of a header file and compiled member functions, but no source code for member
functions. This library is a class hierarchy with virtual functions, and it
contains some global functions that take pointers to the base class of the
library; that is, it uses the library objects polymorphically. Now suppose you
build an application around this library and write your own code that uses the
base class polymorphically.
Later in the development of the project or sometime during
its maintenance, you discover that the base-class interface provided by the
vendor doesn’t provide what you need: a function may be non-virtual and you
need it to be virtual, or a virtual function is completely missing in the
interface, but essential to the solution of your problem. Multiple inheritance can
be the solution.
For example, here’s the header file for a library you
acquire:
//: C09:Vendor.h
// Vendor-supplied class header
// You only get this & the compiled Vendor.obj.
#ifndef VENDOR_H
#define VENDOR_H
class Vendor {
public:
virtual void v() const;
void f() const; // Might want this to be virtual...
~Vendor(); // Oops! Not virtual!
};
class Vendor1 : public Vendor {
public:
void v() const;
void f() const;
~Vendor1();
};
void A(const Vendor&);
void B(const Vendor&);
// Etc.
#endif // VENDOR_H ///:~
Assume the library is much bigger, with more derived classes
and a larger interface. Notice that it also includes the functions A( )
and B( ), which take a base reference and treat it polymorphically.
Here’s the implementation file for the library:
//: C09:Vendor.cpp {O}
// Assume this is compiled and unavailable to you.
#include "Vendor.h"
#include <iostream>
using namespace std;
void Vendor::v() const { cout <<
"Vendor::v()" << endl; }
void Vendor::f() const { cout <<
"Vendor::f()" << endl; }
Vendor::~Vendor() { cout << "~Vendor()"
<< endl; }
void Vendor1::v() const { cout <<
"Vendor1::v()" << endl; }
void Vendor1::f() const { cout <<
"Vendor1::f()" << endl; }
Vendor1::~Vendor1() { cout <<
"~Vendor1()" << endl; }
void A(const Vendor& v) {
// ...
v.v();
v.f();
// ...
}
void B(const Vendor& v) {
// ...
v.v();
v.f();
// ...
} ///:~
In your project, this source code is unavailable to you.
Instead, you get a compiled file as Vendor.obj or Vendor.lib (or
with the equivalent file suffixes for your system).
The problem occurs in the use of this library. First, the
destructor isn’t virtual. In
addition, f( ) was not made virtual; we assume the library creator
decided it wouldn’t need to be. You also discover that the interface to the
base class is missing a function essential to the solution of your problem.
Also suppose you’ve already written a fair amount of code using the existing
interface (not to mention the functions A( ) and B( ),
which are out of your control), and you don’t want to change it.
To repair the problem, create your own class interface and
multiply inherit a new set of derived classes from your interface and from the
existing classes:
//: C09:Paste.cpp
//{L} Vendor
// Fixing a mess with MI.
#include <iostream>
#include "Vendor.h"
using namespace std;
class MyBase { // Repair Vendor interface
public:
virtual void v() const = 0;
virtual void f() const = 0;
// New interface function:
virtual void g() const = 0;
virtual ~MyBase() { cout <<
"~MyBase()" << endl; }
};
class Paste1 : public MyBase, public Vendor1 {
public:
void v() const {
cout << "Paste1::v()" <<
endl;
Vendor1::v();
}
void f() const {
cout << "Paste1::f()" <<
endl;
Vendor1::f();
}
void g() const { cout << "Paste1::g()”
<< endl; }
~Paste1() { cout << "~Paste1()” <<
endl; }
};
int main() {
Paste1& p1p = *new Paste1;
MyBase& mp = p1p; // Upcast
cout << "calling f()” << endl;
mp.f(); // Right behavior
cout << "calling g()” << endl;
mp.g(); // New behavior
cout << "calling A(p1p)” << endl;
A(p1p); // Same old behavior
cout << "calling B(p1p)” << endl;
B(p1p); // Same old behavior
cout << "delete mp” << endl;
// Deleting a reference to a heap object:
delete ∓ // Right behavior
} ///:~
In MyBase (which does not use MI), both f( )
and the destructor are now virtual, and a new virtual function g( )
is added to the interface. Now each of the derived classes in the original
library must be re-created, mixing in the new interface with MI. The functions Paste1::v( )
and Paste1::f( ) need to call only the original base-class versions
of their functions. But now, if you upcast to MyBase as in main( ):
MyBase* mp = p1p; // Upcast
any function calls made through mp will be
polymorphic, including delete. Also, the new interface function g( )
can be called through mp. Here’s the output of the program:
calling f()
Paste1::f()
Vendor1::f()
calling g()
Paste1::g()
calling A(p1p)
Paste1::v()
Vendor1::v()
Vendor::f()
calling B(p1p)
Paste1::v()
Vendor1::v()
Vendor::f()
delete mp
~Paste1()
~Vendor1()
~Vendor()
~MyBase()
The original library functions A( ) and B( )
still work the same (assuming the new v( ) calls its base-class
version). The destructor is now virtual and exhibits the correct
behavior.
Although this is a messy example, it does occur in practice,
and it’s a good demonstration of where multiple inheritance is clearly
necessary: You must be able to upcast to both base classes.
One reason MI exists in C++ is that it is a hybrid language
and couldn’t enforce a single monolithic class hierarchy the way Smalltalk and
Java do. Instead, C++ allows many inheritance trees to be formed, so sometimes
you may need to combine the interfaces from two or more trees into a new class.
If no “diamonds” appear in your class hierarchy, MI is
fairly simple (although identical function signatures in base classes must
still be resolved). If a diamond appears, you may want to eliminate duplicate
subobjects by introducing virtual base classes. This not only adds confusion,
but the underlying representation becomes more complex and less efficient.
Multiple inheritance has been called the “goto of the ’90s.” This seems
appropriate because, like a goto, MI is best avoided in normal programming, but
can occasionally be very useful. It’s a “minor” but more advanced feature of
C++, designed to solve problems that arise in special situations. If you find
yourself using it often, you might want to take a look at your reasoning. Ask
yourself, “Must I upcast to all the base classes?” If not, your life will be
easier if you embed instances of all the classes you don’t need to
upcast to.
Solutions
to selected exercises can be found in the electronic document The Thinking
in C++ Volume 2 Annotated Solution Guide, available for a small fee from www.MindView.net.
1. Create a base class X with a single constructor that takes
an int argument and a member function f( ), which takes no
arguments and returns void. Now derive Y and Z from X,
creating constructors for each of them that take a single int argument.
Next, derive A from Y and Z. Create an object of class A,
and call f( ) for that object. Fix the problem with explicit
disambiguation.
2. Starting with the results of Exercise 1, create a pointer to an X
called px and assign to it the address of the object of type A
you created before. Fix the problem using a virtual base class. Now fix X
so you no longer have to call the constructor for X inside A.
3. Starting with the results of Exercise 2, remove the explicit
disambiguation for f( ) and see if you can call f( )
through px. Trace it to see which function gets called. Fix the problem
so the correct function will be called in a class hierarchy.
4. Make an Animal interface class with a makeNoise( )
function declaration. Make a SuperHero interface class with a savePersonFromFire( )
function declaration. Place a move( ) function declaration in both
interface classes. (Remember to make your interface methods pure virtual.) Now
define three separate classes: SuperlativeMan, Amoeba (a
superhero of uncertain gender), and TarantulaWoman; SuperlativeMan
implements the SuperHero interface while Amoeba and TarantulaWoman
implement both Animal and SuperHero. Define two global functions animalSound(Animal*)
and saveFromFire(SuperHero*). Invoke all the methods that are callable
from each interface in both of these functions.
5. Repeat the previous exercise, but use templates instead of
inheritance to implement the interfaces, as we did in Interfaces2.cpp.
6. Define some concrete mixin classes that represent superhero
capabilities (such as StopTrain, BendSteel, ClimbBuilding,
etc.). Redo exercise 4 so that your derived SuperHero classes derive
from these mixins and call their member functions.
7. Repeat the previous exercise using templates by making your
superhero powers mixin template parameters. Use these powers to do some good in
the community.
8. Dropping the Animal interface from exercise 4, redefine Amoeba
to only implement SuperHero. Now define a SuperlativeAmoeba class
that inherits from both SuperlativeMan and Amoeba. Try to pass a SuperlativeAmoeba
object to saveFromFire( ). What do you have to do to make this
legal? How does using virtual inheritance change the size of your objects?
9. Continuing with the previous exercise, add an integer strengthFactor
data member to SuperHero from exercise 4, along with a constructor to
initialize it. Add constructors in the three derived classes to initialize strengthFactor
as well. What must you do differently in SuperlativeAmoeba?
10. Continuing with the previous exercise, add an eatFood( )
member function to both SuperlativeMan and Amoeba (but not SuperlativeAmoeba),
such that the two versions of eatFood( ) take different types of
food objects (so the signatures of the two functions differ). What must you do
in SuperlativeAmoeba to call either eatFood( ) function?
Why?
11. Define a well-behaved output stream inserter and assignment
operator for SuperlativeAmoeba.
12. Remove SuperlativeAmoeba from your hierarchy and modify Amoeba
to derive from both SuperlativeMan (which still derives from SuperHero)
and SuperHero. Implement a virtual workout( ) function in
both SuperHero and SuperlativeMan (with identical signatures),
and call it with a Amoeba object. Which function gets called?
13. Redefine SuperlativeAmoeba to use composition instead of
inheritance to act as a SuperlativeMan or Amoeba. Use conversion
operators to provide implicit upcasting. Compare this approach to the
inheritance approach.
14. Suppose you are given a pre-compiled Person class (you
only have the header and compiled object file). Suppose also that Person
has a non-virtual work( ) function. Have SuperHero be able
to act as a mild-mannered ordinary Person by deriving from Person
and using the implementation of Person::work( ), but make SuperHero::work( )
virtual.
15. Define a reference-counted error logging mixin class, ErrorLog,
that holds a static file stream to which you can send messages. The class opens
the stream when its reference count exceeds 0 and closes the stream when the
count returns to 0 (and always appends to the file). Have objects of multiple
classes send messages to the static log stream. Watch the stream open and close
via trace statements in ErrorLog.
16. Modify BreakTie.cpp by adding a class named VeryBottom
that derives (non-virtually) from Bottom. VeryBottom should look
just like Bottom except change “Left” to “Right” in the using
declaration for f. Change main( ) to instantiate a VeryBottom
instead of a Bottom object. Which f( ) gets called?
“… describe a problem which occurs
over and over again in our environment, and then describe the core of the
solution to that problem, in such a way that you can use this solution a
million times over, without ever doing it the same way twice”—Christopher
Alexander
This chapter introduces the important
and yet nontraditional “patterns” approach to program design.
The most important recent step forward in object-oriented
design is probably the “design patterns” movement, initially chronicled in Design Patterns, by Gamma, Helm, Johnson & Vlissides (Addison Wesley,
1995), which is
commonly called the “Gang of Four” book (GoF). GoF shows 23 solutions to
particular classes of problems. In this chapter, we discuss the basic concepts
of design patterns and provide code examples that illustrate selected patterns.
This should whet your appetite for reading more about design patterns, a source
of what has now become an essential, almost mandatory vocabulary for
object-oriented programming.
Initially, you can think of a pattern as an especially
clever and insightful way to solve a particular class of problem. It appears
that a team of people have worked out all the angles of a problem and have come
up with the most general, flexible solution for that type of problem. This
problem could be one that you have seen and solved before, but your solution
probably didn’t have the kind of completeness you’ll see embodied in a pattern.
Furthermore, the pattern exists independently of any particular implementation
and it can be implemented in a number of ways.
Although they’re called “design patterns,” they really
aren’t tied to the realm of design. A pattern seems to stand apart from the
traditional way of thinking about analysis, design, and implementation.
Instead, a pattern embodies a complete idea within a program, and thus it might
also span the analysis phase and high-level design phase. However, because a
pattern often has a direct implementation in code, it might not show up until
low-level design or implementation (and you might not realize that you need a
particular pattern until you get to those phases).
The basic concept of a pattern can also be seen as the basic
concept of program design in general: adding layers of abstraction. Whenever you abstract something, you’re isolating particular details, and one of the most
compelling motivations for this is to separate things that change from
things that stay the same. Another way to put this is that once you find
some part of your program that’s likely to change, you’ll want to keep those
changes from propagating side effects throughout your code. If you achieve
this, your code will not only be easier to read and understand, but also easier
to maintain—which invariably results in lowered costs over time.
The most difficult part of developing an elegant and
maintainable design is often discovering what we call “the vector of change.” (Here, “vector” refers to the maximum gradient as understood in the sciences,
and not a container class.) This means finding the most important thing that
changes in your system or, put another way, discovering where your greatest
cost is. Once you discover the vector of change, you have the focal point
around which to structure your design.
So the goal of design patterns is to encapsulate change.
If you look at it this way, you’ve been seeing some design patterns already in
this book. For example, inheritance could be thought of as a design pattern
(albeit one implemented by the compiler). It expresses differences in behavior
(that’s the thing that changes) in objects that all have the same interface
(that’s what stays the same). Composition could also be considered a pattern,
since you can change—dynamically or statically—the objects that implement your
class, and thus the way that class works. Normally, however, features that are
directly supported by a programming language have not been classified as design
patterns.
You’ve also already seen another pattern that appears in
GoF: the iterator. This is the fundamental tool used in the design of
the STL, described earlier in this book. The iterator hides the particular
implementation of the container as you’re stepping through and selecting the
elements one by one. Iterators allow you to write generic code that performs an
operation on all the elements in a range without regard to the container that
holds the range. Thus, your generic code can be used with any container that
can produce iterators.
The most important contribution of GoF may not be a pattern,
but rather a maxim that they introduce in Chapter 1: “Favor object composition
over class inheritance.” Understanding inheritance and polymorphism is such a
challenge that you may begin to assign undue importance to these techniques. We
see many over-complicated designs (our own included) that result from
“inheritance indulgence”— for example, many multiple inheritance designs evolve
by insisting that inheritance be used everywhere.
One of the guidelines in Extreme Programming is “Do the simplest thing that could possibly work.” A design that seems to want
inheritance can often be dramatically simplified by using composition instead,
and you will also discover that the result is more flexible, as you will
understand by studying some of the design patterns in this chapter. So when
pondering a design, ask yourself: “Could this be simpler using composition? Do
I really need inheritance here, and what is it buying me?”
GoF discusses 23 patterns, classified under three purposes
(all of which revolve around the particular aspect that can vary):
1. Creational: How an object can be created. This often
involves isolating the details of object creation so your code isn’t dependent
on what types of objects there are and thus doesn’t have to be changed when you
add a new type of object. This chapter introduces Singleton, Factories, and
Builder.
2. Structural: These affect the way objects are connected
with other objects to ensure that changes in the system don’t require changes
to those connections. Structural patterns are often dictated by project
constraints. In this chapter you’ll see Proxy and Adapter.
3. Behavioral: Objects that handle particular types of
actions within a program. These encapsulate processes that you want to perform,
such as interpreting a language, fulfilling a request, moving through a
sequence (as in an iterator), or implementing an algorithm. This chapter
contains examples of Command, Template Method, State, Strategy, Chain of
Responsibility, Observer, Multiple Dispatching, and Visitor.
GoF includes a section on each of its 23 patterns along with
one or more examples of each, typically in C++ but sometimes in Smalltalk. This
book will not repeat the details of the patterns shown in GoF since that book
stands on its own and should be studied separately. The description and
examples provided here are intended to give you a grasp of the patterns, so you
can get a feel for what patterns are about and why they are important.
Work continues beyond what is in the GoF book. Since its
publication, there are more patterns and a more refined process for defining
design patterns. This
is important because it is not easy to identify new patterns or to properly
describe them. There is some confusion in the popular literature on what a
design pattern is, for example. Patterns are not trivial, nor are they
typically represented by features that are built into a programming language. Constructors and destructors, for example, could be called the “guaranteed
initialization and cleanup design pattern.” These are important and essential
constructs, but they’re routine language features and are not rich enough to be
considered design patterns.
Another non-example comes from various forms of aggregation. Aggregation is a completely fundamental principle in object-oriented
programming: you make objects out of other objects. Yet sometimes this idea is
erroneously classified as a pattern. This is unfortunate because it pollutes
the idea of the design pattern and suggests that anything that surprises you
the first time you see it should be made into a design pattern.
The Java language provides another misguided example: The
designers of the JavaBeans specification decided to refer to the simple
“get/set” naming convention as a design pattern (for example, getInfo( )
returns an Info property and setInfo( ) changes it). This is
just a commonplace naming convention and in no way constitutes a design
pattern.
Before getting into more complex techniques, it’s helpful to
look at some basic ways to keep code simple and straightforward.
The most trivial of these is the messenger, which
packages information into an object which is passed around, instead of passing
all the pieces around separately. Note that without the messenger, the code for
translate( ) would be much more confusing to read:
//: C10:MessengerDemo.cpp
#include <iostream>
#include <string>
using namespace std;
class Point { // A messenger
public:
int x, y, z; // Since it's just a carrier
Point(int xi, int yi, int zi) : x(xi), y(yi), z(zi)
{}
Point(const Point& p) : x(p.x), y(p.y), z(p.z)
{}
Point& operator=(const Point& rhs) {
x = rhs.x;
y = rhs.y;
z = rhs.z;
return *this;
}
friend ostream&
operator<<(ostream& os, const Point& p)
{
return os << "x=" << p.x
<< " y=" << p.y
<< " z=" << p.z;
}
};
class Vector { // Mathematical vector
public:
int magnitude, direction;
Vector(int m, int d) : magnitude(m), direction(d) {}
};
class Space {
public:
static Point translate(Point p, Vector v) {
// Copy-constructor prevents modifying the
original.
// A dummy calculation:
p.x += v.magnitude + v.direction;
p.y += v.magnitude + v.direction;
p.z += v.magnitude + v.direction;
return p;
}
};
int main() {
Point p1(1, 2, 3);
Point p2 = Space::translate(p1, Vector(11, 47));
cout << "p1: " << p1 <<
" p2: " << p2 << endl;
} ///:~
The code here is trivialized to prevent distractions.
Since the goal of a messenger is only to carry data, that
data is made public for easy access. However, you may also have reasons to make
the fields private.
Messenger’s big brother is the collecting parameter, whose job is to capture information from the function to which it is passed.
Generally, this is used when the collecting parameter is passed to multiple
functions, so it’s like a bee collecting pollen.
A container makes an especially useful collecting parameter,
since it is already set up to dynamically add objects:
//: C10:CollectingParameterDemo.cpp
#include <iostream>
#include <string>
#include <vector>
using namespace std;
class CollectingParameter : public vector<string>
{};
class Filler {
public:
void f(CollectingParameter& cp) {
cp.push_back("accumulating");
}
void g(CollectingParameter& cp) {
cp.push_back("items");
}
void h(CollectingParameter& cp) {
cp.push_back("as we go");
}
};
int main() {
Filler filler;
CollectingParameter cp;
filler.f(cp);
filler.g(cp);
filler.h(cp);
vector<string>::iterator it = cp.begin();
while(it != cp.end())
cout << *it++ << " ";
cout << endl;
} ///:~
The collecting parameter must have some way to set or insert
values. Note that by this definition, a messenger could be used as a collecting
parameter. The key is that a collecting parameter is passed about and modified
by the functions that receive it.
Possibly the simplest GoF design pattern is the Singleton, which is a way to allow one and only one instance of a class. The
following program shows how to implement a Singleton in C++:
//: C10:SingletonPattern.cpp
#include <iostream>
using namespace std;
class Singleton {
static Singleton s;
int i;
Singleton(int x) : i(x) { }
Singleton&
operator=(Singleton&); // Disallowed
Singleton(const Singleton&); // Disallowed
public:
static Singleton& instance() { return s; }
int getValue() { return i; }
void setValue(int x) { i = x; }
};
Singleton Singleton::s(47);
int main() {
Singleton& s = Singleton::instance();
cout << s.getValue() << endl;
Singleton& s2 = Singleton::instance();
s2.setValue(9);
cout << s.getValue() << endl;
} ///:~
The key to creating a Singleton is to prevent the client
programmer from having any control over the lifetime of the object. To do this,
declare all constructors private, and prevent the compiler from
implicitly generating any constructors. Note that the copy constructor and assignment operator (which intentionally have no implementations, since they
will never be called) are declared private to prevent any sort of copies being
made.
You must also decide how you’re going to create the object.
Here, it’s created statically, but you can also wait until the client
programmer asks for one and create it on demand. This is called lazy initialization, and it only makes sense if it is expensive to create your object,
and if you don’t always need it.
If you return a pointer instead of a reference, the user
could inadvertently delete the pointer, so the implementation above is
considered safest (the destructor can also be declared private or protected to
alleviate that problem). In any case, the object should be stored privately.
You provide access through public member functions. Here, instance( )
produces a reference to the Singleton object. The rest of the interface
(getValue( ) and setValue( )) is the regular class
interface.
Note that you aren’t restricted to creating only one object.
This technique also supports the creation of a limited pool of objects. In that
case, however, you can be confronted with the problem of sharing objects in the
pool. If this is an issue, you can create a solution involving a check-out and
check-in of the shared objects.
Any static member object inside a class is an
expression of Singleton: one and only one will be made. So in a sense, the
language has direct support for the idea; we certainly use it on a regular
basis. However, there’s a problem with static objects (member or not):
the order of initialization, as described in Volume 1 of this book. If one static
object depends on another, it’s important that the objects are initialized in
the correct order.
In Volume 1, you were shown how to control initialization order by defining a static object inside a function. This delays the initialization
of the object until the first time the function is called. If the function
returns a reference to the static object, it gives you the effect of a
Singleton while removing much of the worry of static initialization. For
example, suppose you want to create a log file upon the first call to a
function that returns a reference to that log file. This header file will do
the trick:
//: C10:LogFile.h
#ifndef LOGFILE_H
#define LOGFILE_H
#include <fstream>
std::ofstream& logfile();
#endif // LOGFILE_H ///:~
The implementation must not be inlined because that
would mean that the whole function, including the static object definition
within, could be duplicated in any translation unit where it’s included, which
violates C++’s one-definition rule. This
would most certainly foil the attempts to control the order of initialization
(but potentially in a subtle and hard-to-detect fashion). So the implementation
must be separate:
//: C10:LogFile.cpp {O}
#include "LogFile.h"
std::ofstream& logfile() {
static std::ofstream log("Logfile.log");
return log;
} ///:~
Now the log object will not be initialized until the
first time logfile( ) is called. So if you create a function:
//: C10:UseLog1.h
#ifndef USELOG1_H
#define USELOG1_H
void f();
#endif // USELOG1_H ///:~
that uses logfile( ) in its implementation:
//: C10:UseLog1.cpp {O}
#include "UseLog1.h"
#include "LogFile.h"
void f() {
logfile() << __FILE__ << std::endl;
} ///:~
And you use logfile( ) again in another file:
//: C10:UseLog2.cpp
//{L} LogFile UseLog1
#include "UseLog1.h"
#include "LogFile.h"
using namespace std;
void g() {
logfile() << __FILE__ << endl;
}
int main() {
f();
g();
} ///:~
the log object doesn’t get created until the first
call to f( ).
You can easily combine the creation of the static object
inside a member function with the Singleton class. SingletonPattern.cpp can be modified to use this approach:
//: C10:SingletonPattern2.cpp
// Meyers’ Singleton.
#include <iostream>
using namespace std;
class Singleton {
int i;
Singleton(int x) : i(x) { }
void operator=(Singleton&);
Singleton(const Singleton&);
public:
static Singleton& instance() {
static Singleton s(47);
return s;
}
int getValue() { return i; }
void setValue(int x) { i = x; }
};
int main() {
Singleton& s = Singleton::instance();
cout << s.getValue() << endl;
Singleton& s2 = Singleton::instance();
s2.setValue(9);
cout << s.getValue() << endl;
} ///:~
An especially interesting case occurs if two Singletons
depend on each other, like this:
//: C10:FunctionStaticSingleton.cpp
class Singleton1 {
Singleton1() {}
public:
static Singleton1& ref() {
static Singleton1 single;
return single;
}
};
class Singleton2 {
Singleton1& s1;
Singleton2(Singleton1& s) : s1(s) {}
public:
static Singleton2& ref() {
static Singleton2 single(Singleton1::ref());
return single;
}
Singleton1& f() { return s1; }
};
int main() {
Singleton1& s1 = Singleton2::ref().f();
} ///:~
When Singleton2::ref( ) is called, it causes its
sole Singleton2 object to be created. In the process of this creation, Singleton1::ref( )
is called, and that causes the sole Singleton1 object to be created.
Because this technique doesn’t rely on the order of linking or loading, the
programmer has much better control over initialization, leading to fewer
problems.
Yet another variation on Singleton separates the
“Singleton-ness” of an object from its implementation. This is achieved using
the Curiously Recurring Template Pattern mentioned in Chapter 5:
//: C10:CuriousSingleton.cpp
// Separates a class from its Singleton-ness (almost).
#include <iostream>
using namespace std;
template<class T> class Singleton {
Singleton(const Singleton&);
Singleton& operator=(const Singleton&);
protected:
Singleton() {}
virtual ~Singleton() {}
public:
static T& instance() {
static T theInstance;
return theInstance;
}
};
// A sample class to be made into a Singleton
class MyClass : public Singleton<MyClass> {
int x;
protected:
friend class Singleton<MyClass>;
MyClass() { x = 0; }
public:
void setValue(int n) { x = n; }
int getValue() const { return x; }
};
int main() {
MyClass& m = MyClass::instance();
cout << m.getValue() << endl;
m.setValue(1);
cout << m.getValue() << endl;
} ///:~
MyClass is made a Singleton by:
1. Making
its constructor private or protected.
2. Making
Singleton<MyClass> a friend.
3. Deriving
MyClass from Singleton<MyClass>.
The self-referencing in step 3 may sound implausible, but as
we explained in Chapter 5, it works because there is only a static dependency
on the template argument in the Singleton template. In other words, the
code for the class Singleton<MyClass> can be instantiated by the
compiler because it is not dependent on the size of MyClass. It’s only
later, when Singleton<MyClass>::instance( ) is first called,
that the size of MyClass is needed, and by then MyClass has been
compiled and its size is known.
It’s interesting how intricate such a simple pattern as
Singleton can be, and we haven’t even addressed issues of thread safety. Finally,
Singleton should be used sparingly. True Singleton objects arise rarely, and
the last thing a Singleton should be used for is to replace a global variable.
The Command pattern is structurally very simple, but can
have an important impact on decoupling—and thus cleaning up—your code.
In Advanced C++: Programming Styles And Idioms (Addison Wesley,
1992), Jim Coplien coins the term functor which is an object whose
sole purpose is to encapsulate a function (since “functor” has a meaning in
mathematics, we shall use the more explicit term function object). The point is to decouple the choice of function to be called from the site
where that function is called.
This term is mentioned but not used in GoF. However, the
theme of the function object is repeated in a number of patterns in that book.
A Command is a function object in its purest sense: a
function that’s an object. By wrapping a function in an object, you can pass it
to other functions or objects as a parameter, to tell them to perform this
particular operation in the process of fulfilling your request. You could say
that a Command is a Messenger that carries behavior.
//: C10:CommandPattern.cpp
#include <iostream>
#include <vector>
using namespace std;
class Command {
public:
virtual void execute() = 0;
};
class Hello : public Command {
public:
void execute() { cout << "Hello "; }
};
class World : public Command {
public:
void execute() { cout << "World! "; }
};
class IAm : public Command {
public:
void execute() { cout << "I'm the command
pattern!"; }
};
// An object that holds commands:
class Macro {
vector<Command*> commands;
public:
void add(Command* c) { commands.push_back(c); }
void run() {
vector<Command*>::iterator it =
commands.begin();
while(it != commands.end())
(*it++)->execute();
}
};
int main() {
Macro macro;
macro.add(new Hello);
macro.add(new World);
macro.add(new IAm);
macro.run();
} ///:~
The primary point of Command is to allow you to hand a
desired action to a function or object. In the above example, this provides a
way to queue a set of actions to be performed collectively. Here, you can dynamically
create new behavior, something you can normally only do by writing new code but
in the above example could be done by interpreting a script (see the Interpreter
pattern if what you need to do gets very complex).
GoF says that “Commands are an object-oriented replacement
for callbacks.” However,
we think that the word “back” is an essential part of the concept of
callbacks—a callback reaches back to the creator of the callback. On the other
hand, with a Command object you typically just create it and hand it to some function
or object, and you are not otherwise connected over time to the Command object.
A common example of Command is the implementation of “undo”
functionality in an application. Each time the user performs an operation, the
corresponding “undo” Command object is placed into a queue. Each Command object
that is executed backs up the state of the program by one step.
As you shall see in the next chapter, one of the reasons for
employing concurrency techniques is to more easily manage event-driven programming, where the events can appear unpredictably in your
program. For example, a user pressing a “quit” button while you’re performing
an operation expects the program to respond quickly.
An argument for using concurrency is that it prevents
coupling across the pieces of your code. That is, if you’re running a separate
thread to watch the quit button, your program’s “normal” operations don’t need
to know about the quit button or any of the other operations that need to be
watched.
However, once you understand that coupling is the issue, you
can avoid it using the Command pattern. Each “normal” operation must
periodically call a function to check the state of the events, but with the
Command pattern these normal operations don’t need to know anything about what
they are checking, and thus are decoupled from the event-handling code:
//: C10:MulticastCommand.cpp {RunByHand}
// Decoupling event management with the Command
pattern.
#include <iostream>
#include <vector>
#include <string>
#include <ctime>
#include <cstdlib>
using namespace std;
// Framework for running tasks:
class Task {
public:
virtual void operation() = 0;
};
class TaskRunner {
static vector<Task*> tasks;
TaskRunner() {} // Make it a Singleton
TaskRunner& operator=(TaskRunner&); //
Disallowed
TaskRunner(const TaskRunner&); // Disallowed
static TaskRunner tr;
public:
static void add(Task& t) {
tasks.push_back(&t); }
static void run() {
vector<Task*>::iterator it = tasks.begin();
while(it != tasks.end())
(*it++)->operation();
}
};
TaskRunner TaskRunner::tr;
vector<Task*> TaskRunner::tasks;
class EventSimulator {
clock_t creation;
clock_t delay;
public:
EventSimulator() : creation(clock()) {
delay = CLOCKS_PER_SEC/4 * (rand() % 20 + 1);
cout << "delay = " << delay
<< endl;
}
bool fired() {
return clock() > creation + delay;
}
};
// Something that can produce asynchronous events:
class Button {
bool pressed;
string id;
EventSimulator e; // For demonstration
public:
Button(string name) : pressed(false), id(name) {}
void press() { pressed = true; }
bool isPressed() {
if(e.fired()) press(); // Simulate the event
return pressed;
}
friend ostream&
operator<<(ostream& os, const Button&
b) {
return os << b.id;
}
};
// The Command object
class CheckButton : public Task {
Button& button;
bool handled;
public:
CheckButton(Button & b) : button(b),
handled(false) {}
void operation() {
if(button.isPressed() && !handled) {
cout << button << "
pressed" << endl;
handled = true;
}
}
};
// The procedures that perform the main processing.
These
// need to be occasionally "interrupted" in
order to
// check the state of the buttons or other events:
void procedure1() {
// Perform procedure1 operations here.
// ...
TaskRunner::run(); // Check all events
}
void procedure2() {
// Perform procedure2 operations here.
// ...
TaskRunner::run(); // Check all events
}
void procedure3() {
// Perform procedure3 operations here.
// ...
TaskRunner::run(); // Check all events
}
int main() {
srand(time(0)); // Randomize
Button b1("Button 1"), b2("Button
2"), b3("Button 3");
CheckButton cb1(b1), cb2(b2), cb3(b3);
TaskRunner::add(cb1);
TaskRunner::add(cb2);
TaskRunner::add(cb3);
cout << "Control-C to exit" <<
endl;
while(true) {
procedure1();
procedure2();
procedure3();
}
} ///:~
Here, the Command object is represented by Tasks
executed by the Singleton TaskRunner. EventSimulator creates a
random delay time, so if you periodically call fired( ) the result
will change from false to true at some random time. EventSimulator
objects are used inside Buttons to simulate the act of a user event
occurring at some unpredictable time. CheckButton is the implementation
of the Task that is periodically checked by all the “normal” code in the
program—you can see this happening at the end of procedure1( ), procedure2( )
and procedure3( ).
Although this requires a little bit of extra thought to set
up, you’ll see in Chapter 11 that threading requires a lot of thought
and care to prevent the various difficulties inherent to concurrent
programming, so the simpler solution may be preferable. You can also create a
very simple threading scheme by moving the TaskRunner::run( ) calls
into a multithreaded “timer” object. By doing this, you eliminate all coupling
between the “normal operations” (procedures, in the above example) and the
event code.
Both Proxy and State provide a surrogate class. Your code talks to this surrogate class, and the real class that does the work is
hidden behind this surrogate class. When you call a function in the surrogate,
it simply turns around and calls the function in the implementing class. These
two patterns are so similar that, structurally, Proxy is simply a special case
of State. One is tempted to just lump the two together into a pattern called Surrogate,
but the intent of the two patterns is different. It can be easy to fall
into the trap of thinking that if the structure is the same, the patterns are
the same. You must always look to the intent of the pattern in order to be
clear about what it does.
The basic idea is simple: from a base class, the surrogate
is derived along with the class or classes that provide the actual
implementation:
When a surrogate object is created, it is given an
implementation to which it sends the function calls.
Structurally, the difference between Proxy and State is
simple: a Proxy has only one implementation, while State has more than one. The
application of the patterns is considered (in GoF) to be distinct: Proxy
controls access to its implementation, while State changes the implementation
dynamically. However, if you expand your notion of “controlling access to
implementation” then the two seem to be part of a continuum.
Proxy: fronting for another object
If we implement Proxy using the above diagram, it looks like
this:
//: C10:ProxyDemo.cpp
// Simple demonstration of the Proxy pattern.
#include <iostream>
using namespace std;
class ProxyBase {
public:
virtual void f() = 0;
virtual void g() = 0;
virtual void h() = 0;
virtual ~ProxyBase() {}
};
class Implementation : public ProxyBase {
public:
void f() { cout <<
"Implementation.f()" << endl; }
void g() { cout <<
"Implementation.g()" << endl; }
void h() { cout <<
"Implementation.h()" << endl; }
};
class Proxy : public ProxyBase {
ProxyBase* implementation;
public:
Proxy() { implementation = new Implementation(); }
~Proxy() { delete implementation; }
// Forward calls to the implementation:
void f() { implementation->f(); }
void g() { implementation->g(); }
void h() { implementation->h(); }
};
int main() {
Proxy p;
p.f();
p.g();
p.h();
} ///:~
In some cases, Implementation doesn’t need the same
interface as Proxy—as long as Proxy is somehow “speaking for” the
Implementation class and referring function calls to it, then the basic
idea is satisfied (note that this statement is at odds with the definition for
Proxy in GoF). However, with a common interface you are able to do a drop-in
replacement of the proxy into the client code—the client code is written to
talk to the original object, and it doesn’t need to be changed in order to
accept the proxy (This is probably the key issue with Proxy). In addition, Implementation
is forced, through the common interface, to fulfill all the functions that Proxy
needs to call.
The difference between Proxy and State is in the problems
that are solved. The common uses for Proxy as described in GoF are:
1. Remote proxy. This proxies for an object in a different
address space. This is implemented by some remote object technologies.
2. Virtual proxy. This provides “lazy initialization” to create expensive objects on demand.
3. Protection proxy. Used when you don’t want the client
programmer to have full access to the proxied object.
4. Smart reference. To add additional actions when the
proxied object is accessed. Reference counting is an example: this keeps
track of the number of references that are held for a particular object, in
order to implement the copy-on-write idiom and prevent object aliasing. A simpler
example is counting the calls to a particular function.
State: changing object behavior
The State pattern produces an object that appears to change
its class, and is useful when you discover that you have conditional code in
most or all functions. Like Proxy, State is created by having a front-end
object that uses a back-end implementation object to fulfill its duties.
However, the State pattern switches from one implementation to another during
the lifetime of the front-end object, in order to produce different behavior
for the same function call(s). It’s a way to improve the implementation of your
code when you seem to be doing a lot of testing inside each of your functions
before deciding what to do for that function. For example, the fairy tale of
the frog-prince contains an object (the creature) that behaves differently
depending on what state it’s in. You could implement this by testing a bool:
//: C10:KissingPrincess.cpp
#include <iostream>
using namespace std;
class Creature {
bool isFrog;
public:
Creature() : isFrog(true) {}
void greet() {
if(isFrog)
cout << "Ribbet!" << endl;
else
cout << "Darling!"
<< endl;
}
void kiss() { isFrog = false; }
};
int main() {
Creature creature;
creature.greet();
creature.kiss();
creature.greet();
} ///:~
However, the greet( ) function, and any other
functions that must test isFrog before they perform their operations,
end up with awkward code, especially if you find yourself adding additional
states to the system. By delegating the operations to a State object that can
be changed, this code is simplified.
//: C10:KissingPrincess2.cpp
// The State pattern.
#include <iostream>
#include <string>
using namespace std;
class Creature {
class State {
public:
virtual string response() = 0;
};
class Frog : public State {
public:
string response() { return "Ribbet!"; }
};
class Prince : public State {
public:
string response() { return "Darling!"; }
};
State* state;
public:
Creature() : state(new Frog()) {}
void greet() {
cout << state->response() << endl;
}
void kiss() {
delete state;
state = new Prince();
}
};
int main() {
Creature creature;
creature.greet();
creature.kiss();
creature.greet();
} ///:~
It is not necessary to make the implementing classes nested
or private, but if you can it creates cleaner code.
Note that changes to the State classes are automatically
propagated throughout your code, rather than requiring an edit across the
classes in order to effect changes.
Adapter takes one type and produces an interface to some
other type. This is useful when you’re given a library or piece of code that
has a particular interface, and you’ve got a second library or piece of code
that uses the same basic ideas as the first piece, but expresses itself
differently. If you adapt the forms of expression to each other, you can
rapidly produce a solution.
Suppose you have a generator class that produces Fibonacci numbers:
//: C10:FibonacciGenerator.h
#ifndef FIBONACCIGENERATOR_H
#define FIBONACCIGENERATOR_H
class FibonacciGenerator {
int n;
int val[2];
public:
FibonacciGenerator() : n(0) { val[0] =
val[1] = 0; }
int operator()() {
int result = n > 2 ? val[0] +
val[1] : n > 0 ? 1 : 0;
++n;
val[0] = val[1];
val[1] = result;
return result;
}
int count() { return n; }
};
#endif // FIBONACCIGENERATOR_H
///:~
Since it’s a generator, you use it by calling the operator( ),
like this:
//: C10:FibonacciGeneratorTest.cpp
#include <iostream>
#include "FibonacciGenerator.h"
using namespace std;
int main() {
FibonacciGenerator f;
for(int i =0; i < 20; i++)
cout << f.count() << ": "
<< f() << endl;
} ///:~
Perhaps you would like to take this generator and perform
STL numeric algorithm operations with it. Unfortunately, the STL algorithms
only work with iterators, so you have an interface mismatch. The solution is to
create an adapter that will take the FibonacciGenerator and produce an iterator for the STL algorithms to use. Since the numeric algorithms only require an
input iterator, the Adapter is fairly straightforward (for something that
produces an STL iterator, that is):
//: C10:FibonacciAdapter.cpp
// Adapting an interface to something you already have.
#include <iostream>
#include <numeric>
#include "FibonacciGenerator.h"
#include "../C06/PrintSequence.h"
using namespace std;
class FibonacciAdapter { // Produce an iterator
FibonacciGenerator f;
int length;
public:
FibonacciAdapter(int size) : length(size) {}
class iterator;
friend class iterator;
class iterator : public std::iterator<
std::input_iterator_tag, FibonacciAdapter,
ptrdiff_t> {
FibonacciAdapter& ap;
public:
typedef int value_type;
iterator(FibonacciAdapter& a) : ap(a) {}
bool operator==(const iterator&) const {
return ap.f.count() == ap.length;
}
bool operator!=(const iterator& x) const {
return !(*this == x);
}
int operator*() const { return ap.f(); }
iterator& operator++() { return *this; }
iterator operator++(int) { return *this; }
};
iterator begin() { return iterator(*this); }
iterator end() { return iterator(*this); }
};
int main() {
const int SZ = 20;
FibonacciAdapter a1(SZ);
cout << "accumulate: "
<< accumulate(a1.begin(), a1.end(), 0)
<< endl;
FibonacciAdapter a2(SZ), a3(SZ);
cout << "inner
product: "
<< inner_product(a2.begin(), a2.end(),
a3.begin(), 0)
<< endl;
FibonacciAdapter a4(SZ);
int r1[SZ] = {0};
int* end = partial_sum(a4.begin(), a4.end(), r1);
print(r1, end, "partial_sum", "
");
FibonacciAdapter a5(SZ);
int r2[SZ] = {0};
end = adjacent_difference(a5.begin(), a5.end(), r2);
print(r2, end, "adjacent_difference",
" ");
} ///:~
You initialize a FibonacciAdapter by telling it how
long the Fibonacci sequence can be. When an iterator is created, it
simply captures a reference to the containing FibonacciAdapter so that
it can access the FibonacciGenerator and length. Note that the
equivalence comparison ignores the right-hand value because the only important
issue is whether the generator has reached its length. In addition, the operator++( )
doesn’t modify the iterator; the only operation that changes the state of the FibonacciAdapter
is calling the generator function operator( ) on the FibonacciGenerator.
We can get away with this extremely simple version of the iterator because the
constraints on an Input Iterator are so strong; in particular, you can only
read each value in the sequence once.
In main( ), you can see that all four different
types of numeric algorithms are successfully tested with the FibonacciAdapter.
An application framework allows you to inherit from a class
or set of classes and create a new application, reusing most of the code in the
existing classes and overriding one or more functions in order to customize the
application to your needs. A fundamental concept in the application framework
is the Template Method, which is typically hidden beneath the covers and drives
the application by calling the various functions in the base class (some of
which you have overridden in order to create the application).
An important characteristic of the Template Method is that
it is defined in the base class (sometimes as a private member function) and
cannot be changed—the Template Method is the “thing that stays the same.” It
calls other base-class functions (the ones you override) in order to do its
job, but the client programmer isn’t necessarily able to call it directly, as
you can see here:
//: C10:TemplateMethod.cpp
// Simple demonstration of Template Method.
#include <iostream>
using namespace std;
class ApplicationFramework {
protected:
virtual void customize1() = 0;
virtual void customize2() = 0;
public:
void templateMethod() {
for(int i = 0; i < 5; i++) {
customize1();
customize2();
}
}
};
// Create a new "application":
class MyApp : public ApplicationFramework {
protected:
void customize1() { cout << "Hello ";
}
void customize2() { cout << "World!"
<< endl; }
};
int main() {
MyApp app;
app.templateMethod();
} ///:~
The “engine” that runs the application is the Template
Method. In a GUI application, this “engine” would be the main event loop. The
client programmer simply provides definitions for customize1( ) and
customize2( ) and the “application” is ready to run.
Note that the Template Method is the “code that stays the
same,” and the functions that you override are the “code that changes.”
However, this change is fixed at compile time via inheritance. Following the
maxim of “prefer composition to inheritance,” we can use composition to
approach the problem of separating code that changes from code that stays the
same, and produce the Strategy pattern. This approach has a distinct benefit:
at runtime, you can plug in the code that changes. Strategy also adds a
“Context” which can be a surrogate class that controls the selection and use of
the particular strategy object—just like State!
“Strategy” means just that: you can solve a problem in a number
of ways. Consider the situation where you’ve forgotten someone’s name. Here are
the different ways you can cope:
//: C10:Strategy.cpp
// The Strategy design pattern.
#include <iostream>
using namespace std;
class NameStrategy {
public:
virtual void greet() = 0;
};
class SayHi : public NameStrategy {
public:
void greet() {
cout << "Hi! How's it going?"
<< endl;
}
};
class Ignore : public NameStrategy {
public:
void greet() {
cout << "(Pretend I don't see you)"
<< endl;
}
};
class Admission : public NameStrategy {
public:
void greet() {
cout << "I'm sorry. I forgot your
name." << endl;
}
};
// The "Context" controls the strategy:
class Context {
NameStrategy& strategy;
public:
Context(NameStrategy& strat) : strategy(strat) {}
void greet() { strategy.greet(); }
};
int main() {
SayHi sayhi;
Ignore ignore;
Admission admission;
Context c1(sayhi), c2(ignore), c3(admission);
c1.greet();
c2.greet();
c3.greet();
} ///:~
Context::greet( ) would normally be more complex;
it’s the analog of the Template Method because it contains the code that
doesn’t change. But you can see in main( ) that the choice of
strategy can be made at runtime. If you go one step further you can combine
this with the State pattern and change the Strategy during the lifetime of the Context
object.
Chain of Responsibility might be thought of as a “dynamic
generalization of recursion” using Strategy objects. You make a call, and each Strategy
in a linked sequence tries to satisfy the call. The process ends when one of
the strategies is successful or the chain ends. In recursion, one function calls
itself over and over until a termination condition is reached; with Chain of
Responsibility, a function calls itself, which (by moving down the chain of Strategies)
calls a different implementation of the function, etc., until a termination
condition is reached. The termination condition is either that the bottom of
the chain is reached (this returns a default object; you may or may not be able
to provide a default result so you must be able to determine the success or
failure of the chain) or one of the Strategies is successful.
Instead of calling a single function to satisfy a request,
multiple functions in the chain have a chance to satisfy the request, so it has
the flavor of an expert system. Since the chain is effectively a list, it can
be dynamically created, so you could also think of it as a more general,
dynamically-built switch statement.
In GoF, there’s a fair amount of discussion of how to create
the chain of responsibility as a linked list. However, when you look at the
pattern it really shouldn’t matter how the chain is created; that’s an
implementation detail. Since GoF was written before the STL containers were
available in most C++ compilers, the reason for this is most likely (1) there
was no built-in list and thus they had to create one and (2) data structures
are often taught as a fundamental skill in academia, and the idea that data
structures should be standard tools available with the programming language may
not have occurred to the GoF authors. We maintain that the details of the container
used to implement Chain of Responsibility as a chain (in GoF, a linked list)
adds nothing to the solution and can just as easily be implemented using an STL
container, as shown below.
Here you can see Chain of Responsibility automatically
finding a solution using a mechanism to automatically recurse through each
Strategy in the chain:
//: C10:ChainOfReponsibility.cpp
// The approach of the five-year-old.
#include <iostream>
#include <vector>
#include "../purge.h"
using namespace std;
enum Answer { NO, YES };
class GimmeStrategy {
public:
virtual Answer canIHave() = 0;
virtual ~GimmeStrategy() {}
};
class AskMom : public GimmeStrategy {
public:
Answer canIHave() {
cout << "Mooom? Can I have this?"
<< endl;
return NO;
}
};
class AskDad : public GimmeStrategy {
public:
Answer canIHave() {
cout << "Dad, I really need this!"
<< endl;
return NO;
}
};
class AskGrandpa : public GimmeStrategy {
public:
Answer canIHave() {
cout << "Grandpa, is it my birthday
yet?" << endl;
return NO;
}
};
class AskGrandma : public GimmeStrategy {
public:
Answer canIHave() {
cout << "Grandma, I really love
you!" << endl;
return YES;
}
};
class Gimme : public GimmeStrategy {
vector<GimmeStrategy*> chain;
public:
Gimme() {
chain.push_back(new AskMom());
chain.push_back(new AskDad());
chain.push_back(new AskGrandpa());
chain.push_back(new AskGrandma());
}
Answer canIHave() {
vector<GimmeStrategy*>::iterator it =
chain.begin();
while(it != chain.end())
if((*it++)->canIHave() == YES)
return YES;
// Reached end without success...
cout << "Whiiiiinnne!" <<
endl;
return NO;
}
~Gimme() { purge(chain); }
};
int main() {
Gimme chain;
chain.canIHave();
} ///:~
Notice that the “Context” class Gimme and all the
Strategy classes are all derived from the same base class, GimmeStrategy.
If you study the section on Chain of Responsibility in GoF,
you’ll find that the structure differs significantly from the one above because
they focus on creating their own linked list. However, if you keep in mind that
the essence of Chain of Responsibility is to try a number of solutions until
you find one that works, you’ll realize that the implementation of the
sequencing mechanism is not an essential part of the pattern.
When you discover that you need to add new types to a
system, the most sensible first step is to use polymorphism to create a common
interface to those new types. This separates the rest of the code in your
system from the knowledge of the specific types that you are adding. New types
can be added without disturbing existing code … or so it seems. At first it
would appear that you need to change the code only in the place where you inherit
a new type, but this is not quite true. You must still create an object of your
new type, and at the point of creation you must specify the exact constructor
to use. Thus, if the code that creates objects is distributed throughout your
application, you have the same problem when adding new types—you must still
chase down all the points of your code where type matters. It is the creation
of the type that matters here, rather than the use of the type (which is
taken care of by polymorphism), but the effect is the same: adding a new type
can cause problems.
The solution is to force the creation of objects to occur
through a common factory rather than to allow the creational code to be
spread throughout your system. If all the code in your program must go to this
factory whenever it needs to create one of your objects, all you must do when
you add a new object is modify the factory. This design is a variation of the
pattern commonly known as Factory Method. Since every object-oriented program
creates objects, and since it’s likely you will extend your program by adding
new types, factories may be the most useful of all design patterns.
As an example, consider the commonly-used Shape
example. One approach to implementing a factory is to define a static
member function in the base class:
//: C10:ShapeFactory1.cpp
#include <iostream>
#include <stdexcept>
#include <cstddef>
#include <string>
#include <vector>
#include "../purge.h"
using namespace std;
class Shape {
public:
virtual void draw() = 0;
virtual void erase() = 0;
virtual ~Shape() {}
class BadShapeCreation : public logic_error {
public:
BadShapeCreation(string type)
: logic_error("Cannot create type " +
type) {}
};
static Shape* factory(const string& type)
throw(BadShapeCreation);
};
class Circle : public Shape {
Circle() {} // Private constructor
friend class Shape;
public:
void draw() { cout << "Circle::draw”
<< endl; }
void erase() { cout << "Circle::erase”
<< endl; }
~Circle() { cout << "Circle::~Circle”
<< endl; }
};
class Square : public Shape {
Square() {}
friend class Shape;
public:
void draw() { cout << "Square::draw”
<< endl; }
void erase() { cout << "Square::erase”
<< endl; }
~Square() { cout << "Square::~Square”
<< endl; }
};
Shape* Shape::factory(const string& type)
throw(Shape::BadShapeCreation) {
if(type == "Circle") return new Circle;
if(type == "Square") return new Square;
throw BadShapeCreation(type);
}
char* sl[] = { "Circle", "Square",
"Square",
"Circle", "Circle",
"Circle", "Square" };
int main() {
vector<Shape*> shapes;
try {
for(size_t i = 0; i < sizeof sl / sizeof sl[0];
i++)
shapes.push_back(Shape::factory(sl[i]));
} catch(Shape::BadShapeCreation e) {
cout << e.what() << endl;
purge(shapes);
return EXIT_FAILURE;
}
for(size_t i = 0; i < shapes.size(); i++) {
shapes[i]->draw();
shapes[i]->erase();
}
purge(shapes);
} ///:~
The factory( ) function takes an argument that
allows it to determine what type of Shape to create. Here, the argument is
a string, but it could be any set of data. The factory( ) is
now the only other code in the system that needs to be changed when a new type
of Shape is added. (The initialization data for the objects will
presumably come from somewhere outside the system and will not be a hard-coded
array as in this example.)
To ensure that the creation can only happen in the factory( ),
the constructors for the specific types of Shape are made private,
and Shape is declared a friend so that factory( ) has
access to the constructors. (You could also declare only Shape::factory( )
to be a friend, but it seems reasonably harmless to declare the entire
base class as a friend.) There is another important implication of this
design—the base class, Shape, must now know the details about every
derived class—a property that object-oriented designs try to avoid. For
frameworks or any class library that should support extension, this can quickly
become unwieldy, as the base class must be updated as soon as a new type is
added to the hierarchy. Polymorphic factories, described in the next
subsection, can be used to avoid this unfortunate circular dependency.
The static factory( ) member function in the
previous example forces all the creation operations to be focused in one spot,
so that’s the only place you need to change the code. This is certainly a
reasonable solution, as it nicely encapsulates the process of creating objects.
However, GoF emphasizes that the reason for the Factory Method pattern is so
that different types of factories can be derived from the basic factory.
Factory Method is in fact a special type of polymorphic factory. Here is ShapeFactory1.cpp
modified so the Factory Methods are in a separate class as virtual functions:
//: C10:ShapeFactory2.cpp
// Polymorphic Factory Methods.
#include <iostream>
#include <map>
#include <string>
#include <vector>
#include <stdexcept>
#include <cstddef>
#include "../purge.h"
using namespace std;
class Shape {
public:
virtual void draw() = 0;
virtual void erase() = 0;
virtual ~Shape() {}
};
class ShapeFactory {
virtual Shape* create() = 0;
static map<string, ShapeFactory*> factories;
public:
virtual ~ShapeFactory() {}
friend class ShapeFactoryInitializer;
class BadShapeCreation : public logic_error {
public:
BadShapeCreation(string type)
: logic_error("Cannot create type " +
type) {}
};
static Shape*
createShape(const string& id) throw(BadShapeCreation)
{
if(factories.find(id) != factories.end())
return factories[id]->create();
else
throw BadShapeCreation(id);
}
};
// Define the static object:
map<string, ShapeFactory*>
ShapeFactory::factories;
class Circle : public Shape {
Circle() {} // Private constructor
friend class ShapeFactoryInitializer;
class Factory;
friend class Factory;
class Factory : public ShapeFactory {
public:
Shape* create() { return new Circle; }
friend class ShapeFactoryInitializer;
};
public:
void draw() { cout << "Circle::draw”
<< endl; }
void erase() { cout << "Circle::erase”
<< endl; }
~Circle() { cout << "Circle::~Circle”
<< endl; }
};
class Square : public Shape {
Square() {}
friend class ShapeFactoryInitializer;
class Factory;
friend class Factory;
class Factory : public ShapeFactory {
public:
Shape* create() { return new Square; }
friend class ShapeFactoryInitializer;
};
public:
void draw() { cout << "Square::draw”
<< endl; }
void erase() { cout << "Square::erase”
<< endl; }
~Square() { cout << "Square::~Square”
<< endl; }
};
// Singleton to initialize the ShapeFactory:
class ShapeFactoryInitializer {
static ShapeFactoryInitializer si;
ShapeFactoryInitializer() {
ShapeFactory::factories["Circle"]= new
Circle::Factory;
ShapeFactory::factories["Square"]= new
Square::Factory;
}
~ShapeFactoryInitializer() {
map<string, ShapeFactory*>::iterator it =
ShapeFactory::factories.begin();
while(it != ShapeFactory::factories.end())
delete it++->second;
}
};
// Static member definition:
ShapeFactoryInitializer ShapeFactoryInitializer::si;
char* sl[] = { "Circle", "Square",
"Square",
"Circle", "Circle",
"Circle", "Square" };
int main() {
vector<Shape*> shapes;
try {
for(size_t i = 0; i < sizeof sl / sizeof sl[0];
i++)
shapes.push_back(ShapeFactory::createShape(sl[i]));
} catch(ShapeFactory::BadShapeCreation e) {
cout << e.what() << endl;
return EXIT_FAILURE;
}
for(size_t i = 0; i < shapes.size(); i++) {
shapes[i]->draw();
shapes[i]->erase();
}
purge(shapes);
} ///:~
Now the Factory Method appears in its own class, ShapeFactory,
as virtual create( ). This is a private member function, which
means it cannot be called directly but can be overridden. The subclasses of Shape
must each create their own subclasses of ShapeFactory and override the create( )
member function to create an object of their own type. These factories are
private, so that they are only accessible from the main Factory Method. This
way, all client code must go through the Factory Method in order to create
objects.
The actual creation of shapes is performed by calling ShapeFactory::createShape( ),
which is a static member function that uses the map in ShapeFactory
to find the appropriate factory object based on an identifier that you pass it.
The factory creates the shape object directly, but you could imagine a more
complex problem where the appropriate factory object is returned and then used
by the caller to create an object in a more sophisticated way. However, it
seems that much of the time you don’t need the intricacies of the polymorphic
Factory Method, and a single static member function in the base class (as shown
in ShapeFactory1.cpp) will work fine.
Notice that the ShapeFactory must be initialized by
loading its map with factory objects, which takes place in the Singleton
ShapeFactoryInitializer. So to add a new type to this design you must
define the type, create a factory, and modify ShapeFactoryInitializer so
that an instance of your factory is inserted in the map. This extra complexity
again suggests the use of a static Factory Method if you don’t need to
create individual factory objects.
The Abstract Factory pattern looks like the factories we’ve
seen previously, but with several Factory Methods. Each of the Factory Methods
creates a different kind of object. When you create the factory object, you
decide how all the objects created by that factory will be used. The example in
GoF implements portability across various graphical user interfaces (GUIs): you
create a factory object appropriate to the GUI that you’re working with, and
from then on when you ask it for a menu, a button, a slider, and so on, it will
automatically create the appropriate version of that item for the GUI. Thus,
you’re able to isolate, in one place, the effect of changing from one GUI to
another.
As another example, suppose you are creating a
general-purpose gaming environment and you want to be able to support different
types of games. Here’s how it might look using an Abstract Factory:
//: C10:AbstractFactory.cpp
// A gaming environment.
#include <iostream>
using namespace std;
class Obstacle {
public:
virtual void action() = 0;
};
class Player {
public:
virtual void interactWith(Obstacle*) = 0;
};
class Kitty: public Player {
virtual void interactWith(Obstacle* ob) {
cout << "Kitty has encountered a ";
ob->action();
}
};
class KungFuGuy: public Player {
virtual void interactWith(Obstacle* ob) {
cout << "KungFuGuy now battles against a
";
ob->action();
}
};
class Puzzle: public Obstacle {
public:
void action() { cout << "Puzzle"
<< endl; }
};
class NastyWeapon: public Obstacle {
public:
void action() { cout << "NastyWeapon"
<< endl; }
};
// The abstract factory:
class GameElementFactory {
public:
virtual Player* makePlayer() = 0;
virtual Obstacle* makeObstacle() = 0;
};
// Concrete factories:
class KittiesAndPuzzles : public GameElementFactory {
public:
virtual Player* makePlayer() { return new Kitty; }
virtual Obstacle* makeObstacle() { return new Puzzle;
}
};
class KillAndDismember : public GameElementFactory {
public:
virtual Player* makePlayer() { return new KungFuGuy;
}
virtual Obstacle* makeObstacle() {
return new NastyWeapon;
}
};
class GameEnvironment {
GameElementFactory* gef;
Player* p;
Obstacle* ob;
public:
GameEnvironment(GameElementFactory* factory)
: gef(factory), p(factory->makePlayer()),
ob(factory->makeObstacle()) {}
void play() { p->interactWith(ob); }
~GameEnvironment() {
delete p;
delete ob;
delete gef;
}
};
int main() {
GameEnvironment
g1(new KittiesAndPuzzles),
g2(new KillAndDismember);
g1.play();
g2.play();
}
/* Output:
Kitty has encountered a Puzzle
KungFuGuy now battles against a
NastyWeapon */ ///:~
In this environment, Player objects interact with Obstacle
objects, but the types of players and obstacles depend on the game. You
determine the kind of game by choosing a particular GameElementFactory,
and then the GameEnvironment controls the setup and play of the game. In
this example, the setup and play are simple, but those activities (the initial
conditions and the state change) can determine much of the game’s
outcome. Here, GameEnvironment is not designed to be inherited, although
it could possibly make sense to do that.
This example also illustrates double dispatching,
which will be explained later.
One of the primary goals of using a factory is to organize your code so you don’t need to select the exact constructor type when
creating an object. That is, you can tell a factory: “I don’t know precisely
what kind of object I need, but here’s the information. Create the appropriate
type.”
In addition, during a constructor call the virtual mechanism
does not operate (early binding occurs). Sometimes this is awkward. For
example, in the Shape program it seems logical that inside the
constructor for a Shape object, you would want to set everything up and
then draw( ) the Shape. The draw( ) function
should be a virtual function, a message to the Shape that it should draw
itself appropriately, depending on whether it is a Circle, a Square,
a Line, and so on. However, this doesn’t work inside the constructor
because virtual functions resolve to the “local” function bodies when called in constructors.
If you want to be able to call a virtual function inside the
constructor and have it do the right thing, you must use a technique to simulate
a virtual constructor. This is a conundrum. Remember, the idea of a virtual
function is that you send a message to an object and let the object figure out
the right thing to do. But a constructor builds an object. So a virtual
constructor would be like saying, “I don’t know exactly what kind of object you
are, but build the right type anyway.” In an ordinary constructor, the compiler
must know which VTABLE address to bind to the VPTR, and even if it existed, a
virtual constructor couldn’t do this because it doesn’t know all the type
information at compile time. It makes sense that a constructor can’t be virtual
because it is the one function that absolutely must know everything about the
type of the object.
And yet there are times when you want something
approximating the behavior of a virtual constructor.
In the Shape example, it would be nice to hand the Shape
constructor some specific information in the argument list and let the
constructor create a specific type of Shape (a Circle or a Square)
with no further intervention. Ordinarily, you’d have to make an explicit call
to the Circle or Square constructor yourself.
Coplien calls
his solution to this problem “envelope and letter classes.” The “envelope” class is the base class, a shell that contains a pointer to an object,
also of the base class type. The constructor for the “envelope” determines (at
runtime, when the constructor is called, not at compile time, when the type
checking is normally done) what specific type to make, creates an object of
that specific type (on the heap), and then assigns the object to its pointer.
All the function calls are then handled by the base class through its pointer.
It’s really just a slight variation of the State pattern, where the base class
is acting as a surrogate for the derived class, and the derived class provides
the variation in behavior:
//: C10:VirtualConstructor.cpp
#include <iostream>
#include <string>
#include <stdexcept>
#include <stdexcept>
#include <cstddef>
#include <vector>
#include "../purge.h"
using namespace std;
class Shape {
Shape* s;
// Prevent copy-construction & operator=
Shape(Shape&);
Shape operator=(Shape&);
protected:
Shape() { s = 0; }
public:
virtual void draw() { s->draw(); }
virtual void erase() { s->erase(); }
virtual void test() { s->test(); }
virtual ~Shape() {
cout << "~Shape" << endl;
if(s) {
cout << "Making virtual call: ";
s->erase(); // Virtual call
}
cout << "delete s: ";
delete s; // The polymorphic deletion
// (delete 0 is legal; it produces a no-op)
}
class BadShapeCreation : public logic_error {
public:
BadShapeCreation(string type)
: logic_error("Cannot create type " +
type) {}
};
Shape(string type) throw(BadShapeCreation);
};
class Circle : public Shape {
Circle(Circle&);
Circle operator=(Circle&);
Circle() {} // Private constructor
friend class Shape;
public:
void draw() { cout << "Circle::draw"
<< endl; }
void erase() { cout <<
"Circle::erase" << endl; }
void test() { draw(); }
~Circle() { cout << "Circle::~Circle"
<< endl; }
};
class Square : public Shape {
Square(Square&);
Square operator=(Square&);
Square() {}
friend class Shape;
public:
void draw() { cout << "Square::draw"
<< endl; }
void erase() { cout <<
"Square::erase" << endl; }
void test() { draw(); }
~Square() { cout << "Square::~Square"
<< endl; }
};
Shape::Shape(string type)
throw(Shape::BadShapeCreation) {
if(type == "Circle")
s = new Circle;
else if(type == "Square")
s = new Square;
else throw BadShapeCreation(type);
draw(); // Virtual call in the constructor
}
char* sl[] = { "Circle", "Square",
"Square",
"Circle", "Circle",
"Circle", "Square" };
int main() {
vector<Shape*> shapes;
cout << "virtual constructor calls:"
<< endl;
try {
for(size_t i = 0; i < sizeof sl / sizeof sl[0];
i++)
shapes.push_back(new Shape(sl[i]));
} catch(Shape::BadShapeCreation e) {
cout << e.what() << endl;
purge(shapes);
return EXIT_FAILURE;
}
for(size_t i = 0; i < shapes.size(); i++) {
shapes[i]->draw();
cout << "test" << endl;
shapes[i]->test();
cout << "end test" << endl;
shapes[i]->erase();
}
Shape c("Circle"); // Create on the stack
cout << "destructor calls:" <<
endl;
purge(shapes);
} ///:~
The base class Shape contains a pointer to an object
of type Shape as its only data member. (When you create a “virtual
constructor” scheme, exercise special care to ensure this pointer is always
initialized to a live object.) This base class is effectively a proxy because
it is the only thing the client code sees and interacts with.
Each time you derive a new subtype from Shape, you
must go back and add the creation for that type in one place, inside the
“virtual constructor” in the Shape base class. This is not too onerous a
task, but the disadvantage is you now have a dependency between the Shape
class and all classes derived from it.
In this example, the information you must hand the virtual
constructor about what type to create is explicit: it’s a string that
names the type. However, your scheme can use other information—for example, in
a parser the output of the scanner can be handed to the virtual constructor,
which then uses that information to determine which token to create.
The virtual constructor Shape(type) cannot be defined
until after all the derived classes have been declared. However, the default
constructor can be defined inside class Shape, but it should be made protected
so temporary Shape objects cannot be created. This default constructor
is only called by the constructors of derived-class objects. You are forced to
explicitly create a default constructor because the compiler will create one
for you automatically only if there are no constructors defined. Because
you must define Shape(type), you must also define Shape( ).
The default constructor in this scheme has at least one
important chore—it must set the value of the s pointer to zero. This may
sound strange at first, but remember that the default constructor will be
called as part of the construction of the actual object—in Coplien’s
terms, the “letter,” not the “envelope.” However, the “letter” is derived from
the “envelope,” so it also inherits the data member s. In the
“envelope,” s is important because it points to the actual object, but
in the “letter,” s is simply excess baggage. Even excess baggage should
be initialized, however, and if s is not set to zero by the default
constructor called for the “letter,” bad things happen (as you’ll see later).
The virtual constructor takes as its argument information
that completely determines the type of the object. Notice, though, that this
type information isn’t read and acted upon until runtime, whereas normally the
compiler must know the exact type at compile time (one other reason this system
effectively imitates virtual constructors).
The virtual constructor uses its argument to select the
actual (“letter”) object to construct, which is then assigned to the pointer
inside the “envelope.” At that point, the construction of the “letter” has been
completed, so any virtual calls will be properly redirected.
As an example, consider the call to draw( )
inside the virtual constructor. If you trace this call (either by hand or with
a debugger), you can see that it starts in the draw( ) function in
the base class, Shape. This function calls draw( ) for the
“envelope” s pointer to its “letter.” All types derived from Shape
share the same interface, so this virtual call is properly executed, even
though it seems to be in the constructor. (Actually, the constructor for the
“letter” has already completed.) As long as all virtual calls in the base class
simply make calls to identical virtual functions through the pointer to the
“letter,” the system operates properly.
To understand how it works, consider the code in main( ).
To fill the vector shapes, “virtual constructor” calls are made to Shape.
Ordinarily in a situation like this, you would call the constructor for the
actual type, and the VPTR for that type would be installed in the object. Here,
however, the VPTR used in each case is the one for Shape, not the one
for the specific Circle, Square, or Triangle.
In the for loop where the draw( ) and erase( )
functions are called for each Shape, the virtual function call
resolves, through the VPTR, to the corresponding type. However, this is Shape
in each case. In fact, you might wonder why draw( ) and erase( )
were made virtual. The reason shows up in the next step: the
base-class version of draw( ) makes a call, through the “letter”
pointer s, to the virtual function draw( ) for the
“letter.” This time the call resolves to the actual type of the object, not
just the base class Shape. Thus, the runtime cost of using virtual
constructors is one extra virtual indirection every time you make a virtual
function call.
To create any function that is overridden, such as draw( ),
erase( ), or test( ), you must forward all calls to the
s pointer in the base class implementation, as shown earlier. This is
because, when the call is made, the call to the envelope’s member function will
resolve as being to Shape, and not to a derived type of Shape.
Only when you forward the call to s will the virtual behavior take
place. In main( ), you can see that everything works correctly,
even when calls are made inside constructors and destructors.
Destructor operation
The activities of destruction in this scheme are also
tricky. To understand, let’s verbally walk through what happens when you call delete
for a pointer to a Shape object—specifically, a Square—created on
the heap. (This is more complicated than an object created on the stack.) This
will be a delete through the polymorphic interface, and will happen via
the call to purge( ).
The type of any pointer in shapes is of the base
class Shape, so the compiler makes the call through Shape. Normally,
you might say that it’s a virtual call, so Square’s destructor will be
called. But with the virtual constructor scheme, the compiler is creating
actual Shape objects, even though the constructor initializes the letter
pointer to a specific type of Shape. The virtual mechanism is
used, but the VPTR inside the Shape object is Shape’s VPTR, not Square’s.
This resolves to Shape’s destructor, which calls delete for the
letter pointer s, which actually points to a Square object. This
is again a virtual call, but this time it resolves to Square’s
destructor.
C++ guarantees, via the compiler, that all destructors in
the hierarchy are called. Square’s destructor is called first, followed
by any intermediate destructors, in order, until finally the base-class destructor
is called. This base-class destructor contains code that says delete s.
When this destructor was called originally, it was for the “envelope” s,
but now it’s for the “letter” s, which is there because the “letter” was
inherited from the “envelope,” and not because it contains anything. So this
call to delete should do nothing.
The solution to the problem is to make the “letter” s
pointer zero. Then when the “letter” base-class destructor is called, you get delete
0, which by definition does nothing. Because the default constructor is
protected, it will be called only during the construction of a “letter,”
so that’s the only situation where s is set to zero.
Although it’s interesting, you can see this is a complex
approach, and the most common tool for hiding construction will generally be
ordinary Factory Methods rather than something like this “virtual constructor”
scheme.
The goal of Builder (which is a Creational pattern, like the
Factories we’ve just looked at) is to separate the construction of an object
from its “representation.” This means that the construction process stays the
same, but the resulting object has different possible representations. GoF
points out that the main difference between Builder and Abstract Factory is
that a Builder creates the object step-by-step, so the fact that the creation
process is spread out in time seems to be important. In addition, the
“director” gets a stream of pieces that it passes to the Builder, and each
piece is used to perform one of the steps in the build process.
The following example models a bicycle that can have a
choice of parts, according to its type (mountain bike, touring bike, or racing
bike). A Builder class is associated with each type of bicycle, and each Builder
implements the interface specified in the abstract class BicycleBuilder.
A separate class, BicycleTechnician, represents the “director” object
described in GoF, and uses a concrete BicycleBuilder object to construct
a Bicycle object.
//: C10:Bicycle.h
// Defines classes to build bicycles;
// Illustrates the Builder design pattern.
#ifndef BICYCLE_H
#define BICYCLE_H
#include <iostream>
#include <string>
#include <vector>
#include <cstddef>
#include "../purge.h"
using std::size_t;
class BicyclePart {
public:
enum BPart { FRAME, WHEEL, SEAT, DERAILLEUR,
HANDLEBAR, SPROCKET, RACK, SHOCK, NPARTS };
private:
BPart id;
static std::string names[NPARTS];
public:
BicyclePart(BPart bp) { id = bp; }
friend std::ostream&
operator<<(std::ostream& os, const
BicyclePart& bp) {
return os << bp.names[bp.id];
}
};
class Bicycle {
std::vector<BicyclePart*> parts;
public:
~Bicycle() { purge(parts); }
void addPart(BicyclePart* bp) { parts.push_back(bp);
}
friend std::ostream&
operator<<(std::ostream& os, const
Bicycle& b) {
os << "{ ";
for(size_t i = 0; i < b.parts.size(); ++i)
os << *b.parts[i] << '
';
return os << '}';
}
};
class BicycleBuilder {
protected:
Bicycle* product;
public:
BicycleBuilder() { product = 0; }
void createProduct() { product = new Bicycle; }
virtual void buildFrame() = 0;
virtual void buildWheel() = 0;
virtual void buildSeat() = 0;
virtual void buildDerailleur() = 0;
virtual void buildHandlebar() = 0;
virtual void buildSprocket() = 0;
virtual void buildRack() = 0;
virtual void buildShock() = 0;
virtual std::string getBikeName() const = 0;
Bicycle* getProduct() {
Bicycle* temp = product;
product = 0; // Relinquish product
return temp;
}
};
class MountainBikeBuilder : public BicycleBuilder {
public:
void buildFrame();
void buildWheel();
void buildSeat();
void buildDerailleur();
void buildHandlebar();
void buildSprocket();
void buildRack();
void buildShock();
std::string getBikeName() const { return
"MountainBike";}
};
class TouringBikeBuilder : public BicycleBuilder {
public:
void buildFrame();
void buildWheel();
void buildSeat();
void buildDerailleur();
void buildHandlebar();
void buildSprocket();
void buildRack();
void buildShock();
std::string getBikeName() const { return
"TouringBike"; }
};
class RacingBikeBuilder : public BicycleBuilder {
public:
void buildFrame();
void buildWheel();
void buildSeat();
void buildDerailleur();
void buildHandlebar();
void buildSprocket();
void buildRack();
void buildShock();
std::string getBikeName() const { return
"RacingBike"; }
};
class BicycleTechnician {
BicycleBuilder* builder;
public:
BicycleTechnician() { builder = 0; }
void setBuilder(BicycleBuilder* b) { builder = b; }
void construct();
};
#endif // BICYCLE_H ///:~
A Bicycle holds a vector of pointers to BicyclePart,
representing the parts used to construct the bicycle. To initiate the construction
of a bicycle, a BicycleTechnician (the “director” in this example) calls
BicycleBuilder::createproduct( ) on a derived BicycleBuilder
object. The BicycleTechnician::construct( ) function calls all the
functions in the BicycleBuilder interface (since it doesn’t know what
type of concrete builder it has). The concrete builder classes omit (via empty
function bodies) those actions that do not apply to the type of bicycle they
build, as you can see in the following implementation file:
//: C10:Bicycle.cpp {O} {-mwcc}
#include "Bicycle.h"
#include <cassert>
#include <cstddef>
using namespace std;
std::string BicyclePart::names[NPARTS] = {
"Frame", "Wheel",
"Seat", "Derailleur",
"Handlebar", "Sprocket",
"Rack", "Shock" };
// MountainBikeBuilder implementation
void MountainBikeBuilder::buildFrame() {
product->addPart(new
BicyclePart(BicyclePart::FRAME));
}
void MountainBikeBuilder::buildWheel() {
product->addPart(new
BicyclePart(BicyclePart::WHEEL));
}
void MountainBikeBuilder::buildSeat() {
product->addPart(new
BicyclePart(BicyclePart::SEAT));
}
void MountainBikeBuilder::buildDerailleur() {
product->addPart(
new BicyclePart(BicyclePart::DERAILLEUR));
}
void MountainBikeBuilder::buildHandlebar() {
product->addPart(
new BicyclePart(BicyclePart::HANDLEBAR));
}
void MountainBikeBuilder::buildSprocket() {
product->addPart(new
BicyclePart(BicyclePart::SPROCKET));
}
void MountainBikeBuilder::buildRack() {}
void MountainBikeBuilder::buildShock() {
product->addPart(new BicyclePart(BicyclePart::SHOCK));
}
// TouringBikeBuilder implementation
void TouringBikeBuilder::buildFrame() {
product->addPart(new
BicyclePart(BicyclePart::FRAME));
}
void TouringBikeBuilder::buildWheel() {
product->addPart(new
BicyclePart(BicyclePart::WHEEL));
}
void TouringBikeBuilder::buildSeat() {
product->addPart(new
BicyclePart(BicyclePart::SEAT));
}
void TouringBikeBuilder::buildDerailleur() {
product->addPart(
new BicyclePart(BicyclePart::DERAILLEUR));
}
void TouringBikeBuilder::buildHandlebar() {
product->addPart(
new BicyclePart(BicyclePart::HANDLEBAR));
}
void TouringBikeBuilder::buildSprocket() {
product->addPart(new
BicyclePart(BicyclePart::SPROCKET));
}
void TouringBikeBuilder::buildRack() {
product->addPart(new BicyclePart(BicyclePart::RACK));
}
void TouringBikeBuilder::buildShock() {}
// RacingBikeBuilder implementation
void RacingBikeBuilder::buildFrame() {
product->addPart(new
BicyclePart(BicyclePart::FRAME));
}
void RacingBikeBuilder::buildWheel() {
product->addPart(new BicyclePart(BicyclePart::WHEEL));
}
void RacingBikeBuilder::buildSeat() {
product->addPart(new
BicyclePart(BicyclePart::SEAT));
}
void RacingBikeBuilder::buildDerailleur() {}
void RacingBikeBuilder::buildHandlebar() {
product->addPart(
new BicyclePart(BicyclePart::HANDLEBAR));
}
void RacingBikeBuilder::buildSprocket() {
product->addPart(new
BicyclePart(BicyclePart::SPROCKET));
}
void RacingBikeBuilder::buildRack() {}
void RacingBikeBuilder::buildShock() {}
// BicycleTechnician implementation
void BicycleTechnician::construct() {
assert(builder);
builder->createProduct();
builder->buildFrame();
builder->buildWheel();
builder->buildSeat();
builder->buildDerailleur();
builder->buildHandlebar();
builder->buildSprocket();
builder->buildRack();
builder->buildShock();
} ///:~
The Bicycle stream inserter calls the corresponding
inserter for each BicyclePart, and that prints its type name so that you
can see what a Bicycle contains. Here is a sample program:
//: C10:BuildBicycles.cpp
//{L} Bicycle
// The Builder design pattern.
#include <cstddef>
#include <iostream>
#include <map>
#include <vector>
#include "Bicycle.h"
#include "../purge.h"
using namespace std;
// Constructs a bike via a concrete builder
Bicycle* buildMeABike(
BicycleTechnician& t, BicycleBuilder* builder) {
t.setBuilder(builder);
t.construct();
Bicycle* b = builder->getProduct();
cout << "Built a " <<
builder->getBikeName() << endl;
return b;
}
int main() {
// Create an order for some bicycles
map <string, size_t> order;
order["mountain"] = 2;
order["touring"] = 1;
order["racing"] = 3;
// Build bikes
vector<Bicycle*> bikes;
BicycleBuilder* m = new MountainBikeBuilder;
BicycleBuilder* t = new TouringBikeBuilder;
BicycleBuilder* r = new RacingBikeBuilder;
BicycleTechnician tech;
map<string, size_t>::iterator it =
order.begin();
while(it != order.end()) {
BicycleBuilder* builder;
if(it->first == "mountain")
builder = m;
else if(it->first == "touring")
builder = t;
else if(it->first == "racing")
builder = r;
for(size_t i = 0; i < it->second; ++i)
bikes.push_back(buildMeABike(tech, builder));
++it;
}
delete m;
delete t;
delete r;
// Display inventory
for(size_t i = 0; i < bikes.size(); ++i)
cout << "Bicycle: " <<
*bikes[i] << endl;
purge(bikes);
}
/* Output:
Built a MountainBike
Built a MountainBike
Built a RacingBike
Built a RacingBike
Built a RacingBike
Built a TouringBike
Bicycle: {
Frame Wheel Seat Derailleur Handlebar Sprocket Shock
}
Bicycle: {
Frame Wheel Seat Derailleur Handlebar Sprocket Shock
}
Bicycle: { Frame Wheel Seat Handlebar Sprocket }
Bicycle: { Frame Wheel Seat Handlebar Sprocket }
Bicycle: { Frame Wheel Seat Handlebar Sprocket }
Bicycle: {
Frame Wheel Seat Derailleur Handlebar Sprocket Rack }
*/ ///:~
The power of this pattern is that it separates the algorithm
for assembling parts into a complete product from the parts themselves and
allows different algorithms for different products via different implementations
of a common interface.
The Observer pattern solves a fairly common problem: what if
a group of objects needs to update themselves when some other object changes
state? This can be seen in the “model-view” aspect of Smalltalk’s MVC (model-view-controller) or the almost-equivalent “Document-View Architecture.” Suppose that you have some data (the “document”) and two views: a plot view
and a textual view. When you change the data, the views must be told to update
themselves, and that’s what the observer facilitates.
Two types of objects are used to implement the observer
pattern in the following code. The Observable class keeps track of the
objects that want to be informed when a change happens. The Observable
class calls the notifyObservers( ) member function for each
observer on the list. The notifyObservers( ) member function is
part of the base class Observable.
There are two “things that change” in the observer
pattern: the quantity of observing objects and the way an update occurs. That
is, the observer pattern allows you to modify both of these without affecting
the surrounding code.
You can implement the observer pattern in a number of ways,
but the code shown here will create a framework from which you can build your
own observer code, by following the example. First, this interface describes
what an observer looks like:
//: C10:Observer.h
// The Observer interface.
#ifndef OBSERVER_H
#define OBSERVER_H
class Observable;
class Argument {};
class Observer {
public:
// Called by the observed object, whenever
// the observed object is changed:
virtual void update(Observable* o, Argument* arg) =
0;
virtual ~Observer() {}
};
#endif // OBSERVER_H ///:~
Since Observer interacts with Observable in
this approach, Observable must be declared first. In addition, the Argument
class is empty and only acts as a base class for any type of argument you want
to pass during an update. If you want, you can simply pass the extra argument
as a void*. You’ll have to downcast in either case.
The Observer type is an “interface” class that only
has one member function, update( ). This function is called by the
object that’s being observed, when that object decides it’s time to update all
its observers. The arguments are optional; you could have an update( )
with no arguments, and that would still fit the observer pattern. However this
is more general—it allows the observed object to pass the object that caused
the update (since an Observer may be registered with more than one
observed object) and any extra information if that’s helpful, rather than
forcing the Observer object to hunt around to see who is updating and to
fetch any other information it needs.
The “observed object” will be of type Observable:
//: C10:Observable.h
// The Observable class.
#ifndef OBSERVABLE_H
#define OBSERVABLE_H
#include <set>
#include "Observer.h"
class Observable {
bool changed;
std::set<Observer*> observers;
protected:
virtual void setChanged() { changed = true; }
virtual void clearChanged() { changed = false; }
public:
virtual void addObserver(Observer& o) {
observers.insert(&o);
}
virtual void deleteObserver(Observer& o) {
observers.erase(&o);
}
virtual void deleteObservers() {
observers.clear();
}
virtual int countObservers() {
return observers.size();
}
virtual bool hasChanged() { return changed; }
// If this object has changed, notify all
// of its observers:
virtual void notifyObservers(Argument* arg = 0) {
if(!hasChanged()) return;
clearChanged(); // Not "changed" anymore
std::set<Observer*>::iterator it;
for(it = observers.begin();it != observers.end(); it++)
(*it)->update(this, arg);
}
virtual ~Observable() {}
};
#endif // OBSERVABLE_H ///:~
Again, the design here is more elaborate than is necessary. As
long as there’s a way to register an Observer with an Observable
and a way for the Observable to update its Observers, the set of
member functions doesn’t matter. However, this design is intended to be
reusable. (It was lifted from the design used in the Java standard library.)
The Observable object has a flag to indicate whether
it’s been changed. In a simpler design, there would be no flag; if something
happened, everyone would be notified. Notice, however, that the control of the
flag’s state is protected so that only an inheritor can decide what
constitutes a change, and not the end user of the resulting derived Observer
class.
The collection of Observer objects is kept in a set<Observer*>
to prevent duplicates; the set insert( ), erase( ), clear( ),
and size( ) functions are exposed to allow Observers to be
added and removed at any time, thus providing runtime flexibility.
Most of the work is done in notifyObservers( ).
If the changed flag has not been set, this does nothing. Otherwise, it
first clears the changed flag so that repeated calls to notifyObservers( )
won’t waste time. This is done before notifying the observers in case the calls
to update( ) do anything that causes a change back to this Observable
object. It then moves through the set and calls back to the update( )
member function of each Observer.
At first it may appear that you can use an ordinary Observable
object to manage the updates. But this doesn’t work; to get any effect, you must
derive from Observable and somewhere in your derived-class code call setChanged( ).
This is the member function that sets the “changed” flag, which means that when
you call notifyObservers( ) all the observers will, in fact, get
notified. Where you call setChanged( ) depends on the logic
of your program.
Now we encounter a dilemma. Objects that are being observed
may have more than one such item of interest. For example, if you’re dealing
with a GUI item—a button, say—the items of interest might be the mouse clicked
the button, the mouse moved over the button, and (for some reason) the button
changed its color. So we’d like to be able to report all these events to
different observers, each of which is interested in a different type of event.
The problem is that we would normally reach for multiple
inheritance in such a situation: “I’ll inherit from Observable to deal
with mouse clicks, and I’ll … er … inherit from Observable to deal with
mouse-overs, and, well, … hmm, that doesn’t work.”
Here’s a situation where we must (in effect) upcast to more
than one type, but in this case we need to provide several different
implementations of the same base type. The solution is something we’ve lifted
from Java, which takes C++’s nested class one step further. Java has a built-in
feature called an inner class, which is like a nested class in C++, but
it has access to the nonstatic data of its containing class by implicitly using
the “this” pointer of the class object it was created within.
To implement the inner class idiom in C++, we must obtain
and use a pointer to the containing object explicitly. Here’s an example:
//: C10:InnerClassIdiom.cpp
// Example of the "inner class" idiom.
#include <iostream>
#include <string>
using namespace std;
class Poingable {
public:
virtual void poing() = 0;
};
void callPoing(Poingable& p) {
p.poing();
}
class Bingable {
public:
virtual void bing() = 0;
};
void callBing(Bingable& b) {
b.bing();
}
class Outer {
string name;
// Define one inner class:
class Inner1;
friend class Outer::Inner1;
class Inner1 : public Poingable {
Outer* parent;
public:
Inner1(Outer* p) : parent(p) {}
void poing() {
cout << "poing called for "
<< parent->name << endl;
// Accesses data in the outer class object
}
} inner1;
// Define a second inner class:
class Inner2;
friend class Outer::Inner2;
class Inner2 : public Bingable {
Outer* parent;
public:
Inner2(Outer* p) : parent(p) {}
void bing() {
cout << "bing called for "
<< parent->name << endl;
}
} inner2;
public:
Outer(const string& nm)
: name(nm), inner1(this), inner2(this) {}
// Return reference to interfaces
// implemented by the inner classes:
operator Poingable&() { return inner1; }
operator Bingable&() { return inner2; }
};
int main() {
Outer x("Ping Pong");
// Like upcasting to multiple base types!:
callPoing(x);
callBing(x);
} ///:~
The example (intended to show the simplest syntax for the
idiom; you’ll see a real use shortly) begins with the Poingable and Bingable
interfaces, each containing a single member function. The services provided
by callPoing( ) and callBing( ) require that the object
they receive implements the Poingable and Bingable interfaces,
respectively, but they put no other requirements on that object so as to
maximize the flexibility of using callPoing( ) and callBing( ).
Note the lack of virtual destructors in either interface—the intent is
that you never perform object destruction via the interface.
The Outer constructor contains some private data (name),
and it wants to provide both a Poingable interface and a Bingable interface
so it can be used with callPoing( ) and callBing( ). (In
this situation we could simply use multiple inheritance, but it is kept simple for clarity.) To provide a Poingable object without deriving Outer
from Poingable, the inner class idiom is used. First, the declaration class
Inner says that, somewhere, there is a nested class of this name. This
allows the friend declaration for the class, which follows. Finally, now
that the nested class has been granted access to all the private elements of Outer,
the class can be defined. Notice that it keeps a pointer to the Outer
which created it, and this pointer must be initialized in the constructor.
Finally, the poing( ) function from Poingable is
implemented. The same process occurs for the second inner class which
implements Bingable. Each inner class has a single private
instance created, which is initialized in the Outer constructor. By
creating the member objects and returning references to them, issues of object
lifetime are eliminated.
Notice that both inner class definitions are private,
and in fact the client code doesn’t have any access to details of the
implementation, since the two access functions operator Poingable&( )
and operator Bingable&( ) only return a reference to the upcast
interface, not to the object that implements it. In fact, since the two inner
classes are private, the client code cannot even downcast to the
implementation classes, thus providing complete isolation between interface and
implementation.
We’ve taken the extra liberty here of defining the automatic
type conversion functions operator Poingable&( ) and operator
Bingable&( ). In main( ), you can see that these allow
a syntax that looks as if Outer multiply inherits from Poingable
and Bingable. The difference is that the “casts” in this case are one-way.
You can get the effect of an upcast to Poingable or Bingable, but
you cannot downcast back to an Outer. In the following example of observer,
you’ll see the more typical approach: you provide access to the inner class
objects using ordinary member functions, not automatic type conversion
functions.
Armed with the Observer and Observable header
files and the inner class idiom, we can look at an example of the Observer
pattern:
//: C10:ObservedFlower.cpp
// Demonstration of "observer" pattern.
#include <algorithm>
#include <iostream>
#include <string>
#include <vector>
#include "Observable.h"
using namespace std;
class Flower {
bool isOpen;
public:
Flower() : isOpen(false),
openNotifier(this), closeNotifier(this) {}
void open() { // Opens its petals
isOpen = true;
openNotifier.notifyObservers();
closeNotifier.open();
}
void close() { // Closes its petals
isOpen = false;
closeNotifier.notifyObservers();
openNotifier.close();
}
// Using the "inner class" idiom:
class OpenNotifier;
friend class Flower::OpenNotifier;
class OpenNotifier : public Observable {
Flower* parent;
bool alreadyOpen;
public:
OpenNotifier(Flower* f) : parent(f),
alreadyOpen(false) {}
void notifyObservers(Argument* arg = 0) {
if(parent->isOpen && !alreadyOpen) {
setChanged();
Observable::notifyObservers();
alreadyOpen = true;
}
}
void close() { alreadyOpen = false; }
} openNotifier;
class CloseNotifier;
friend class Flower::CloseNotifier;
class CloseNotifier : public Observable {
Flower* parent;
bool alreadyClosed;
public:
CloseNotifier(Flower* f) : parent(f),
alreadyClosed(false) {}
void notifyObservers(Argument* arg = 0) {
if(!parent->isOpen && !alreadyClosed)
{
setChanged();
Observable::notifyObservers();
alreadyClosed = true;
}
}
void open() { alreadyClosed = false; }
} closeNotifier;
};
class Bee {
string name;
// An "inner class" for observing openings:
class OpenObserver;
friend class Bee::OpenObserver;
class OpenObserver : public Observer {
Bee* parent;
public:
OpenObserver(Bee* b) : parent(b) {}
void update(Observable*, Argument *) {
cout << "Bee " <<
parent->name
<< "'s breakfast time!” <<
endl;
}
} openObsrv;
// Another "inner class" for closings:
class CloseObserver;
friend class Bee::CloseObserver;
class CloseObserver : public Observer {
Bee* parent;
public:
CloseObserver(Bee* b) : parent(b) {}
void update(Observable*, Argument *) {
cout << "Bee " <<
parent->name
<< "'s bed time!” << endl;
}
} closeObsrv;
public:
Bee(string nm) : name(nm),
openObsrv(this), closeObsrv(this) {}
Observer& openObserver() { return openObsrv; }
Observer& closeObserver() { return closeObsrv;}
};
class Hummingbird {
string name;
class OpenObserver;
friend class Hummingbird::OpenObserver;
class OpenObserver : public Observer {
Hummingbird* parent;
public:
OpenObserver(Hummingbird* h) : parent(h) {}
void update(Observable*, Argument *) {
cout << "Hummingbird " <<
parent->name
<< "'s breakfast time!” <<
endl;
}
} openObsrv;
class CloseObserver;
friend class Hummingbird::CloseObserver;
class CloseObserver : public Observer {
Hummingbird* parent;
public:
CloseObserver(Hummingbird* h) : parent(h) {}
void update(Observable*, Argument *) {
cout << "Hummingbird " <<
parent->name
<< "'s bed time!” << endl;
}
} closeObsrv;
public:
Hummingbird(string nm) : name(nm),
openObsrv(this), closeObsrv(this) {}
Observer& openObserver() { return openObsrv; }
Observer& closeObserver() { return closeObsrv;}
};
int main() {
Flower f;
Bee ba("A"), bb("B");
Hummingbird ha("A"), hb("B");
f.openNotifier.addObserver(ha.openObserver());
f.openNotifier.addObserver(hb.openObserver());
f.openNotifier.addObserver(ba.openObserver());
f.openNotifier.addObserver(bb.openObserver());
f.closeNotifier.addObserver(ha.closeObserver());
f.closeNotifier.addObserver(hb.closeObserver());
f.closeNotifier.addObserver(ba.closeObserver());
f.closeNotifier.addObserver(bb.closeObserver());
// Hummingbird B decides to sleep in:
f.openNotifier.deleteObserver(hb.openObserver());
// Something changes that interests observers:
f.open();
f.open(); // It's already open, no change.
// Bee A doesn't want to go to bed:
f.closeNotifier.deleteObserver(
ba.closeObserver());
f.close();
f.close(); // It's already closed; no change
f.openNotifier.deleteObservers();
f.open();
f.close();
} ///:~
The events of interest are that a Flower can open or
close. Because of the use of the inner class idiom, both these events can be
separately observable phenomena. The OpenNotifier and CloseNotifier
classes both derive from Observable, so they have access to setChanged( )
and can be handed to anything that needs an Observable. You’ll notice
that, contrary to InnerClassIdiom.cpp, the Observable descendants
are public. This is because some of their member functions must be
available to the client programmer. There’s nothing that says that an inner
class must be private; in InnerClassIdiom.cpp we were simply
following the design guideline “make things as private as possible.” You could
make the classes private and expose the appropriate member functions by
proxy in Flower, but it wouldn’t gain much.
The inner class idiom also comes in handy to define more
than one kind of Observer in Bee and Hummingbird, since
both those classes may want to independently observe Flower openings and
closings. Notice how the inner class idiom provides something that has most of
the benefits of inheritance (the ability to access the private data in the
outer class, for example).
In main( ), you can see one of the primary
benefits of the Observer pattern: the ability to change behavior at runtime by
dynamically registering and unregistering Observers with Observables.
This flexibility is achieved at the cost of significant additional code—you
will often see this kind of tradeoff in design patterns: more complexity in one
place in exchange for increased flexibility and/or lowered complexity in
another place.
If you study the previous example, you’ll see that OpenNotifier
and CloseNotifier use the basic Observable interface. This
means that you could derive from other completely different Observer
classes; the only connection the Observers have with Flowers is
the Observer interface.
Another way to accomplish this fine granularity of
observable phenomena is to use some form of tags for the phenomena, for example
empty classes, strings, or enumerations that denote different types of
observable behavior. This approach can be implemented using aggregation rather
than inheritance, and the differences are mainly tradeoffs between time and
space efficiency. For the client, the differences are negligible.
When dealing with multiple interacting types, a program can
get particularly messy. For example, consider a system that parses and executes
mathematical expressions. You want to be able to say Number + Number, Number
* Number, and so on, where Number is the base class for a family of
numerical objects. But when you say a + b, and you don’t know the exact
type of either a or b, how can you get them to interact properly?
The answer starts with something you probably don’t think
about: C++ performs only single dispatching. That is, if you are performing an
operation on more than one object whose type is unknown, C++ can invoke the
dynamic binding mechanism on only one of those types. This doesn’t solve the
problem described here, so you end up detecting some types manually and
effectively producing your own dynamic binding behavior.
The solution is called multiple dispatching (described in GoF in the context of the Visitor pattern, shown in the next section). Here,
there will be only two dispatches, which is referred to as double dispatching. Remember that polymorphism can occur only via virtual function calls,
so if you want multiple dispatching to occur, there must be a virtual function
call to determine each unknown type. Thus, if you are working with two
different type hierarchies that are interacting, you’ll need a virtual call in
each hierarchy. Generally, you’ll set up a configuration such that a single
member function call generates more than one virtual member function call and
thus determines more than one type in the process: you’ll need a virtual
function call for each dispatch. The virtual functions in the following example
are called compete( ) and eval( ) and are both members
of the same type (this is not a requirement for multiple dispatching):
//: C10:PaperScissorsRock.cpp
// Demonstration of multiple dispatching.
#include <algorithm>
#include <iostream>
#include <iterator>
#include <vector>
#include <ctime>
#include <cstdlib>
#include "../purge.h"
using namespace std;
class Paper;
class Scissors;
class Rock;
enum Outcome { WIN, LOSE, DRAW };
ostream& operator<<(ostream& os, const
Outcome out) {
switch(out) {
default:
case WIN: return os << "win";
case LOSE: return os << "lose";
case DRAW: return os << "draw";
}
}
class Item {
public:
virtual Outcome compete(const Item*) = 0;
virtual Outcome eval(const Paper*) const = 0;
virtual Outcome eval(const Scissors*) const= 0;
virtual Outcome eval(const Rock*) const = 0;
virtual ostream& print(ostream& os) const =
0;
virtual ~Item() {}
friend ostream& operator<<(ostream& os,
const Item* it) {
return it->print(os);
}
};
class Paper : public Item {
public:
Outcome compete(const Item* it) { return
it->eval(this);}
Outcome eval(const Paper*) const { return DRAW; }
Outcome eval(const Scissors*) const { return WIN; }
Outcome eval(const Rock*) const { return LOSE; }
ostream& print(ostream& os) const {
return os << "Paper ";
}
};
class Scissors : public Item {
public:
Outcome compete(const Item* it) { return
it->eval(this);}
Outcome eval(const Paper*) const { return LOSE; }
Outcome eval(const Scissors*) const { return DRAW; }
Outcome eval(const Rock*) const { return WIN; }
ostream& print(ostream& os) const {
return os << "Scissors";
}
};
class Rock : public Item {
public:
Outcome compete(const Item* it) { return
it->eval(this);}
Outcome eval(const Paper*) const { return WIN; }
Outcome eval(const Scissors*) const { return LOSE; }
Outcome eval(const Rock*) const { return DRAW; }
ostream& print(ostream& os) const {
return os << "Rock ";
}
};
struct ItemGen {
Item* operator()() {
switch(rand() % 3) {
default:
case 0: return new Scissors;
case 1: return new Paper;
case 2: return new Rock;
}
}
};
struct Compete {
Outcome operator()(Item* a, Item* b) {
cout << a << "\t" << b
<< "\t";
return a->compete(b);
}
};
int main() {
srand(time(0)); // Seed the random number generator
const int sz = 20;
vector<Item*> v(sz*2);
generate(v.begin(), v.end(), ItemGen());
transform(v.begin(), v.begin() + sz,
v.begin() + sz,
ostream_iterator<Outcome>(cout,
"\n"),
Compete());
purge(v);
} ///:~
Outcome categorizes the different possible results of
a compete( ), and the operator<< simplifies the
process of displaying a particular Outcome.
Item is the base class for the types that will be
multiply-dispatched. Compete::operator( ) takes two Item*
(the exact type of both are unknown) and begins the double-dispatching process
by calling the virtual Item::compete( ) function. The virtual
mechanism determines the type a, so it wakes up inside the compete( )
function of a’s concrete type. The compete( ) function
performs the second dispatch by calling eval( ) on the remaining
type. Passing itself (this) as an argument to eval( ) produces
a call to the overloaded eval( ) function, thus preserving the type
information of the first dispatch. When the second dispatch is completed, you
know the exact types of both Item objects.
In main( ), the STL algorithm generate( )
populates the vector v, then transform( ) applies Compete::operator( )
to the two ranges. This version of transform( ) takes the start and
end point of the first range (containing the left-hand Items used in the
double dispatch); the starting point of the second range, which holds the
right-hand Items; the destination iterator, which in this case is
standard output; and the function object (a temporary of type Compete)
to call for each object.
It requires a lot of ceremony to set up multiple
dispatching, but keep in mind that the benefit is the syntactic elegance
achieved when making the call—instead of writing awkward code to determine the
type of one or more objects during a call, you simply say: “You two! I don’t
care what types you are, interact properly with each other!” Make sure this
kind of elegance is important to you before embarking on multiple dispatching,
however.
Note that multiple dispatching is, in effect, performing a
table lookup. Here, the lookup is performed using virtual functions, but you
could instead perform a literal table lookup. With more than a few dispatches
(and if you are prone to making additions and changes), a table lookup may be a
better solution to the problem.
The goal of Visitor (the final, and arguably most complex,
pattern in GoF) is to separate the operations on a class hierarchy from the
hierarchy itself. This is quite an odd motivation because most of what we do in
object-oriented programming is to combine data and operations into objects, and
to use polymorphism to automatically select the correct variation of an
operation, depending on the exact type of an object.
With Visitor you extract the operations from inside your
class hierarchy into a separate, external hierarchy. The “main” hierarchy then
contains a visit( ) function that accepts any object from your
hierarchy of operations. As a result, you get two class hierarchies instead of
one. In addition, you’ll see that your “main” hierarchy becomes very brittle—if
you add a new class, you will force changes throughout the second hierarchy. GoF
says that the main hierarchy should thus “rarely change.” This constraint is
very limiting, and it further reduces the applicability of this pattern.
For the sake of argument, then, assume that you have a
primary class hierarchy that is fixed; perhaps it’s from another vendor and you
can’t make changes to that hierarchy. If you had the source code for the
library, you could add new virtual functions in the base class, but this is,
for some reason, not feasible. A more likely scenario is that adding new
virtual functions is somehow awkward, ugly or otherwise difficult to maintain. GoF
argues that “distributing all these operations across the various node classes
leads to a system that’s hard to understand, maintain, and change.” (As you’ll
see, Visitor can be much harder to understand, maintain and change.) Another
GoF argument is that you want to avoid “polluting” the interface of the main
hierarchy with too many operations (but if your interface is too “fat,” you
might ask whether the object is trying to do too many things).
The library creator must have foreseen, however, that you
will want to add new operations to that hierarchy, so that they can know to include
the visit( ) function.
So (assuming you really need to do this) the dilemma is that
you need to add member functions to the base class, but for some reason you
can’t touch the base class. How do you get around this?
Visitor builds on the double-dispatching scheme shown in the
previous section. The Visitor pattern allows you to effectively extend the
interface of the primary type by creating a separate class hierarchy of type Visitor
to “virtualize” the operations performed on the primary type. The objects
of the primary type simply “accept” the visitor and then call the visitor’s
dynamically bound member function. Thus, you create a visitor, pass it into the
primary hierarchy, and you get the effect of a virtual function. Here’s a
simple example:
//: C10:BeeAndFlowers.cpp
// Demonstration of "visitor" pattern.
#include <algorithm>
#include <iostream>
#include <string>
#include <vector>
#include <ctime>
#include <cstdlib>
#include "../purge.h"
using namespace std;
class Gladiolus;
class Renuculus;
class Chrysanthemum;
class Visitor {
public:
virtual void visit(Gladiolus* f) = 0;
virtual void visit(Renuculus* f) = 0;
virtual void visit(Chrysanthemum* f) = 0;
virtual ~Visitor() {}
};
class Flower {
public:
virtual void accept(Visitor&) = 0;
virtual ~Flower() {}
};
class Gladiolus : public Flower {
public:
virtual void accept(Visitor& v) {
v.visit(this);
}
};
class Renuculus : public Flower {
public:
virtual void accept(Visitor& v) {
v.visit(this);
}
};
class Chrysanthemum : public Flower {
public:
virtual void accept(Visitor& v) {
v.visit(this);
}
};
// Add the ability to produce a string:
class StringVal : public Visitor {
string s;
public:
operator const string&() { return s; }
virtual void visit(Gladiolus*) {
s = "Gladiolus";
}
virtual void visit(Renuculus*) {
s = "Renuculus";
}
virtual void visit(Chrysanthemum*) {
s = "Chrysanthemum";
}
};
// Add the ability to do "Bee" activities:
class Bee : public Visitor {
public:
virtual void visit(Gladiolus*) {
cout << "Bee and Gladiolus” <<
endl;
}
virtual void visit(Renuculus*) {
cout << "Bee and Renuculus” <<
endl;
}
virtual void visit(Chrysanthemum*) {
cout << "Bee and Chrysanthemum” <<
endl;
}
};
struct FlowerGen {
Flower* operator()() {
switch(rand() % 3) {
default:
case 0: return new Gladiolus;
case 1: return new Renuculus;
case 2: return new Chrysanthemum;
}
}
};
int main() {
srand(time(0)); // Seed the random number generator
vector<Flower*> v(10);
generate(v.begin(), v.end(), FlowerGen());
vector<Flower*>::iterator it;
// It's almost as if I added a virtual function
// to produce a Flower string representation:
StringVal sval;
for(it = v.begin(); it != v.end(); it++) {
(*it)->accept(sval);
cout << string(sval) << endl;
}
// Perform "Bee" operation on all Flowers:
Bee bee;
for(it = v.begin(); it != v.end(); it++)
(*it)->accept(bee);
purge(v);
} ///:~
Flower is the primary hierarchy, and each subtype of Flower
can accept( ) a Visitor. The Flower hierarchy has no
operations other than accept( ), so all the functionality of the Flower
hierarchy is contained in the Visitor hierarchy. Note that the Visitor
classes must know about all the specific types of Flower, and if you add
a new type of Flower the entire Visitor hierarchy must be
reworked.
The accept( ) function in each Flower
begins a double dispatch as described in the previous section. The first
dispatch determines the exact type of Flower and the second determines
the exact type of Visitor. Once you know the exact types you can perform
an operation appropriate to both.
It’s very unlikely that you’ll use Visitor because its
motivation is unusual and its constraints are stultifying. The GoF examples are
not convincing—the first is a compiler (not many people write compilers, and it
seems quite rare that Visitor is used within these compilers), and they
apologize for the other examples, saying you wouldn’t actually use Visitor for
anything like this. You would need a stronger compulsion than that presented in
GoF to abandon an ordinary OO structure for Visitor—what benefit does it really
buy you in exchange for much greater complexity and constraint? Why can’t you
simply add more virtual functions in the base class when you discover you need
them? Or, if you really need to paste new functions into an existing hierarchy
and you are unable to modify that hierarchy, why not try multiple inheritance
first? (Even then, the likelihood of “saving” the existing hierarchy this way
is slim). Consider also that, to use Visitor, the existing hierarchy must
incorporate a visit( ) function from the beginning, because to add
it later would mean that you had permission to modify the hierarchy, so you
could just add ordinary virtual functions as you need them. No, Visitor must be
part of the architecture from the beginning, and to use it requires a
motivation greater than that in GoF.
We present Visitor here because we have seen it used when it
shouldn’t be, just as multiple inheritance and any number of other approaches
have been used inappropriately. If you find yourself using Visitor, ask why.
Are you really unable to add new virtual functions in the base class? Do
you really want to be restricted from adding new types in your primary
hierarchy?
The point of design patterns, like the point of any
abstraction, is to make your life easier. Usually something in your system is
changing—this could be code during the lifetime of the project, or objects
during the lifetime of one program execution. Discover what is changing, and a
design pattern may help you encapsulate that change, and thus bring it under
control.
It’s easy to get infatuated with a particular design, and to
create trouble for yourself by applying it just because you know how. What’s
hard, ironically, is to follow the XP maxim of “do the simplest thing that
could possibly work.” But by doing the simplest thing, you not only get a
design that’s faster to implement, but also easier to maintain. And if the
simplest thing doesn’t do the job, you’ll find out a lot sooner than if you
spend the time implementing something complex, and then find out that
doesn’t work.
Solutions
to selected exercises can be found in the electronic document The Thinking
in C++ Volume 2 Annotated Solution Guide, available for a small fee from www.MindView.net.
1. Create a variation of SingletonPattern.cpp where all
functions are static. Is the instance( ) function still necessary
in this case?
2. Starting with SingletonPattern.cpp, create a class that
provides a connection to a service that stores and retrieves data from a
configuration file.
3. Using SingletonPattern.cpp as a starting point, create a
class that manages a fixed number of its own objects. Assume the objects are
database connections and you only have a license to use a fixed quantity of
these at any one time.
4. Modify KissingPrincess2.cpp by adding another state to the
system, so that each kiss cycles the creature to the next state.
5. Find C16:TStack.h from Thinking in C++, Volume 1, 2nd
Edition (downloadable from www. BruceEckel.com). Create an Adapter for this
class such that you can apply the STL algorithm for_each( ) to the
elements of the TStack, using your adapter. Create a TStack of string,
fill it with strings and use for_each( ) to count all the letters
in all the strings in the TStack.
6. Create a framework (that is, use the Template Method pattern)
that takes a list of file names on the command line. It opens each file except
the last for reading, and the last file it opens for writing. The framework
will process each input file using an undetermined policy and write the output
to the last file. Inherit to customize this framework to create two separate
applications:
1) Converts all the letters in each file to uppercase.
2) Searches the files for words given in the first file.
7. Modify Exercise 6 to use Strategy instead of Template Method.
8. Modify Strategy.cpp to include State behavior, so that the
Strategy can be changed during the lifetime of the Context object.
9. Modify Strategy.cpp to use a Chain of Responsibility
approach, where you keep trying different ways to get someone to say their name
without admitting you’ve forgotten it.
10. Add a class Triangle to ShapeFactory1.cpp.
11. Add a class Triangle to ShapeFactory2.cpp.
12. Add a new type of GameEnvironment called GnomesAndFairies
to AbstractFactory.cpp.
13. Modify ShapeFactory2.cpp so that it uses an Abstract
Factory to create different sets of shapes (for example, one particular type of
factory object creates “thick shapes,” another creates “thin shapes,” but each
factory object can create all the shapes: circles, squares, triangles, and so
on).
14. Modify VirtualConstructor.cpp to use a map instead
of if-else statements inside Shape::Shape(string type).
15. Break a text file up into an input stream of words (keep it
simple: just break the input stream on white space). Create one Builder that
puts the words into a set, and another that produces a map
containing words and occurrences of those words (that is, it does a word
count).
16. Create a minimal Observer-Observable design in two classes,
without base classes and without the extra arguments in Observer.h and
the member functions in Observable.h. Just create the bare minimum in
the two classes, and then demonstrate your design by creating one Observable
and many Observers and cause the Observable to update the Observers.
17. Change InnerClassIdiom.cpp so that Outer uses
multiple inheritance instead of the inner class idiom.
18. Modify PaperScissorsRock.java to replace the double
dispatch with a table lookup. The easiest way to do this is to create a map of
maps, with the key of each map the typeid(obj).name( )
information of each object. Then you can do the lookup by saying: map[typeid(obj1).name( )][typeid(obj2).name( )].
Notice how much easier it is to reconfigure the system. When is it more
appropriate to use this approach vs. hard-coding the dynamic dispatches? Can
you create a system that has the syntactic simplicity of use of the dynamic
dispatch but uses a table lookup?
19. Create a business-modeling environment with three types of Inhabitant:
Dwarf (for engineers), Elf (for marketers), and Troll (for
managers). Now create a class called Project that instantiates the different
inhabitants and causes them to interact( ) with each other using
multiple dispatching.
20. Modify the previous exercise to make the interactions more
detailed. Each Inhabitant can randomly produce a Weapon using getWeapon( ):
a Dwarf uses Jargon or Play, an Elf uses InventFeature
or SellImaginaryProduct, and a Troll uses Edict and Schedule.
You decide which weapons “win” and “lose” in each interaction (as in PaperScissorsRock.cpp).
Add a battle( ) member function to Project that takes two Inhabitants
and matches them against each other. Now create a meeting( ) member
function for Project that creates groups of Dwarf, Elf,
and Manager and battles the groups against each other until only members
of one group are left standing. These are the “winners.”
21. Add a Hummingbird Visitor to BeeAndFlowers.cpp.
22. Add a Sunflower type to BeeAndFlowers.cpp and
notice what you need to change to accommodate this new type.
23. Modify BeeAndFlowers.cpp so that it does not use
Visitor, but “reverts” to a regular class hierarchy instead. Turn Bee
into a collecting parameter.
Objects provide a way to divide a program into independent
sections. Often, you also need to partition a program into separate,
independently running subtasks.
Using multithreading, each of these independent
subtasks is driven by a thread of execution, and you program as if each
thread has the CPU to itself. An underlying mechanism is dividing up the CPU
time for you, but in general, you don’t need to think about it, which helps to
simplify programming with multiple threads.
A process is a self-contained program running within
its own address space. A multitasking operating system can run more than
one process (program) at a time, while making it look as if each one is
chugging along on its own, by periodically switching the CPU from one task to
another. A thread is a single sequential flow of control within a
process. A single process can thus have multiple concurrently executing
threads. Since the threads run within a single process, they share memory and
other resources. The fundamental difficulty in writing multithreaded programs
is coordinating the use of those resources between different threads.
There are many possible uses for multithreading, but you’ll
most often want to use it when you have some part of your program tied to a
particular event or resource. To keep from holding up the rest of your program,
you create a thread associated with that event or resource and let it run
independently of the main program.
Concurrent programming is like stepping into an entirely new
world and learning a new programming language, or at least a new set of language
concepts. With the appearance of thread support in most microcomputer operating
systems, extensions for threads have also been appearing in programming
languages or libraries. In all cases, thread programming:
1. Seems mysterious and requires a shift in the way you think about
programming.
2. Looks similar to thread support in other languages. When you understand
threads, you understand a common tongue.
Understanding concurrent programming is on the same order of
difficulty as understanding polymorphism. If you apply some effort, you can
fathom the basic mechanism, but it generally takes deep study and understanding
to develop a true grasp of the subject. The goal of this chapter is to give you
a solid foundation in the basics of concurrency so that you can understand the
concepts and write reasonable multithreaded programs. Be aware that you can
easily become overconfident. If you are writing anything complex, you will need
to study dedicated books on the topic.
One of the most compelling reasons for using concurrency is
to produce a responsive user interface. Consider a program that performs some CPU-intensive operation and thus ends up ignoring user input and being
unresponsive. The program needs to continue performing its operations, and at
the same time it needs to return control to the user interface so that the
program can respond to the user. If you have a “quit” button, you don’t want to
be forced to poll it in every piece of code you write in your program. (This
would couple your quit button across the program and be a maintenance
headache.) Yet you want the quit button to be responsive, as if you were
checking it regularly.
A conventional function cannot continue performing its
operations and at the same time return control to the rest of the program. In
fact, this sounds like an impossibility, as if the CPU must be in two places at
once, but this is precisely the illusion that concurrency provides (in the case
of multiprocessor systems, this may be more than an illusion).
You can also use concurrency to optimize throughput. For example, you might be able to do important work while you’re stuck waiting for
input to arrive on an I/O port. Without threading, the only reasonable solution
is to poll the I/O port, which is awkward and can be difficult.
If you have a multiprocessor machine, multiple threads can be distributed across multiple processors, which can dramatically improve
throughput. This is often the case with powerful multiprocessor web servers, which can distribute large numbers of user requests across CPUs in a
program that allocates one thread per request.
A program that uses threads on a single-CPU machine is still
just doing one thing at a time, so it must be theoretically possible to write
the same program without using any threads. However, multithreading provides an
important organizational benefit: The design of your program can be greatly
simplified. Some types of problems, such as simulation—a video game, for
example—are difficult to solve without support for concurrency.
The threading model is a programming convenience to simplify
juggling several operations at the same time within a single program: The CPU
will pop around and give each thread some of its time. Each thread
has the consciousness of constantly having the CPU to itself, but the CPU’s
time is actually sliced among all the threads. The exception is a program that
is running on multiple CPU. But one of the great things about threading is that
you are abstracted away from this layer, so your code does not need to know
whether it is running on a single CPU or many. Thus, using
threads is a way to create transparently scalable programs—if a program is
running too slowly, you can easily speed it up by adding CPUs to your computer.
Multitasking and multithreading tend to be the most reasonable ways to utilize
multiprocessor systems.
Threading can reduce computing efficiency somewhat, but the
net improvement in program design, resource balancing, and user convenience is
often quite valuable. In general, threads enable you to create a more loosely
coupled design; otherwise, parts of your code would be forced to pay explicit
attention to tasks that would normally be handled by threads.
When the C++ Standards Committee was creating the initial C++
Standard, a concurrency mechanism was explicitly excluded because C didn’t have
one and also because there were a number of competing approaches to
implementing concurrency. It seemed too much of a constraint to force
programmers to use only one of these.
The alternative turned out to be worse, however. To use
concurrency, you had to find and learn a library and deal with its
idiosyncrasies and the uncertainties of working with a particular vendor. In
addition, there was no guarantee that such a library would work on different
compilers or across different platforms. Also, since concurrency was not part
of the standard language, it was more difficult to find C++ programmers who
also understood concurrent programming.
Another influence may have been the Java language, which
included concurrency in the core language. Although multithreading is still
complicated, Java programmers tend to start learning and using it from the
beginning.
The C++ Standards Committee is considering the addition of
concurrency support to the next iteration of C++, but at the time of this
writing it is unclear what the library will look like. We decided to use the ZThread library as the basis for this chapter. We preferred the design, and it is
open-source and freely available at http://zthread.sourceforge.net. Eric Crahen of IBM, the author of the ZThread library, was instrumental in creating
this chapter.
This chapter uses only a subset of the ZThread library, in
order to convey the fundamental ideas of threading. The ZThread library
contains significantly more sophisticated thread support than is shown here,
and you should study that library further in order to fully understand its
capabilities.
Please note that the ZThread library is an independent
project and is not supported by the authors of this book; we are simply using
the library in this chapter and cannot provide technical support for
installation issues. See the ZThread web site for installation support and
error reports.
The ZThread library is distributed as source code. After
downloading it (version 2.3 or greater) from the ZThread web site, you must
first compile the library, and then configure your project to use the library.
The preferred method for compiling ZThreads for most flavors
of UNIX (Linux, SunOS, Cygwin, etc.) is to use the configure script. After unpacking
the files (using tar), simply execute:
./configure && make
install
from the main directory of the ZThreads archive to compile
and install a copy of the library in the /usr/local directory. You can
customize a number of options when using this script, including the locations
of files. For details, use this command:
The ZThreads code is structured to simplify compilation for
other platforms and compilers (such as Borland, Microsoft, and Metrowerks). To
do this, create a new project and add all the .cxx files in the src
directory of the ZThreads archive to the list of files to be compiled. Also, be
sure to include the include directory of the archive in the header
search path for your project. The exact details will vary from compiler to
compiler so you’ll need to be somewhat familiar with your toolset to be able to
use this option.
Once the compilation has succeeded, the next step is to
create a project that uses the newly compiled library. First, let the compiler
know where the headers are located so that your #include statements will
work properly. Typically, you will add an option such as the following to your
project:
-I/path/to/installation/include
If you used the configure script, the installation
path will be whatever you selected for the prefix (which defaults to /usr/local).
If you used one of the project files in the build directory, the
installation path would simply be the path to the main directory of the
ZThreads archive.
Next, you’ll need to add an option to your project that will
let the linker know where to find the library. If you used the configure
script, this will look like:
-L/path/to/installation/lib
–lZThread
If you used one of the project files provided, this will
look like:
-L/path/to/installation/Debug
ZThread.lib
Again, if you used the configure script, the
installation path will be whatever you selected for the prefix. If you used a
provided project file, the path will be the path to the main directory of the
ZThreads archive.
Note that if you’re using Linux, or if you are using Cygwin (www.cygwin.com) under Windows, you may not need to modify your
include or library path; the installation process and defaults will often take
care of everything for you.
Under Linux, you will probably need to add the following to
your .bashrc so that the runtime system can find the shared library file
LibZThread-x.x.so.O when it executes the programs in this chapter:
export
LD_LIBRARY_PATH=/usr/local/lib:${LD_LIBRARY_PATH}
(Assuming you used the default installation process and the
shared library ended up in /user/local/lib; otherwise, change the path to your
location).
A thread carries out a task, so you need a way to describe that task. The Runnable class provides a common interface to
execute any arbitrary task. Here is the core of the ZThread Runnable
class, which you will find in Runnable.h in the include
directory, after installing the ZThread library:
class Runnable {
public:
virtual void run() = 0;
virtual ~Runnable() {}
};
By making this an abstract base class, Runnable is easily
combinable with a base class and other classes.
To define a task, simply inherit from the Runnable
class and override run( ) to make the task do your bidding.
For example, the following LiftOff task displays the
countdown before liftoff:
//: C11:LiftOff.h
// Demonstration of the Runnable interface.
#ifndef LIFTOFF_H
#define LIFTOFF_H
#include <iostream>
#include "zthread/Runnable.h"
class LiftOff : public ZThread::Runnable {
int countDown;
int id;
public:
LiftOff(int count, int ident = 0) :
countDown(count), id(ident) {}
~LiftOff() {
std::cout << id << "
completed" << std::endl;
}
void run() {
while(countDown--)
std::cout << id << ":"
<< countDown << std::endl;
std::cout << "Liftoff!" <<
std::endl;
}
};
#endif // LIFTOFF_H ///:~
The identifier id distinguishes between multiple
instances of the task. If you only make a single instance, you can use the
default value for ident. The destructor will allow you to see that a
task is properly destroyed.
In the following example, the task’s run( ) is
not driven by a separate thread; it is simply called directly in main( ):
//: C11:NoThread.cpp
#include "LiftOff.h"
int main() {
LiftOff launch(10);
launch.run();
} ///:~
When a class is derived from Runnable, it must have a
run( ) function, but that’s nothing special—it doesn’t produce any
innate threading abilities.
To achieve threading behavior, you must use the Thread
class.
To drive a Runnable object with a thread, you create
a separate Thread object and hand a Runnable pointer to the Thread’s
constructor. This performs the thread initialization and then calls the Runnable’s
run( ) as an interruptible thread. By driving LiftOff with a Thread,
the example below shows how any task can be run in the context of another
thread:
//: C11:BasicThreads.cpp
// The most basic use of the Thread class.
//{L} ZThread
#include <iostream>
#include "LiftOff.h"
#include "zthread/Thread.h"
using namespace ZThread;
using namespace std;
int main() {
try {
Thread t(new LiftOff(10));
cout << "Waiting for LiftOff"
<< endl;
} catch(Synchronization_Exception& e) {
cerr << e.what() << endl;
}
} ///:~
Synchronization_Exception is part of the ZThread library and is the base class for all ZThread exceptions. It will be
thrown if there is an error starting or using a thread.
A Thread constructor only needs a pointer to a Runnable
object. Creating a Thread object will perform the necessary
initialization for the thread and then call that Runnable’s run( )
member function to start the task. Even though the Thread constructor
is, in effect, making a call to a long-running function, that constructor
quickly returns. In effect, you have made a member function call to LiftOff::run( ),
and that function has not yet finished, but because LiftOff::run( ) is
being executed by a different thread, you can still perform other operations in
the main( ) thread. (This ability is not restricted to the main( )
thread—any thread can start another thread.) You can see this by running the
program. Even though LiftOff::run( ) has been called, the “Waiting
for LiftOff” message will appear before the countdown has completed. Thus, the
program is running two functions at once—LiftOff::run( ) and main( ).
You can easily add more threads to drive more tasks. Here,
you can see how all the threads run in concert with one another:
//: C11:MoreBasicThreads.cpp
// Adding more threads.
//{L} ZThread
#include <iostream>
#include "LiftOff.h"
#include "zthread/Thread.h"
using namespace ZThread;
using namespace std;
int main() {
const int SZ = 5;
try {
for(int i = 0; i < SZ; i++)
Thread t(new LiftOff(10, i));
cout << "Waiting for LiftOff"
<< endl;
} catch(Synchronization_Exception& e) {
cerr << e.what() << endl;
}
} ///:~
The second argument for the LiftOff constructor
identifies each task. When you run the program, you’ll see that the execution
of the different tasks is mixed together as the threads are swapped in and out.
This swapping is automatically controlled by the thread scheduler. If you have
multiple processors on your machine, the thread scheduler will quietly
distribute the threads among the processors.
The for loop can seem a little strange at first
because t is being created locally inside the for loop and then
immediately goes out of scope and is destroyed. This makes it appear that the thread
itself might be immediately lost, but you can see from the output that the
threads are indeed running to conclusion. When you create a Thread
object, the associated thread is registered with the threading system, which
keeps it alive. Even though the stack-based Thread object is lost, the
thread itself lives on until its associated task completes. Although this may
be counterintuitive from a C++ standpoint, the concept of threads is a
departure from the norm: a thread creates a separate thread of execution that
persists after the function call ends. This departure is reflected in the
persistence of the underlying thread after the object vanishes.
As stated earlier, one of the motivations for using
threading is to create a responsive user interface. Although we don’t cover graphical
user interfaces in this book, you can still see a simple example of a console-based
user interface.
The following example reads lines from a file and prints
them to the console, sleeping (suspending the current thread) for a
second after each line is displayed. (You’ll learn more about sleeping later in
the chapter.) During this process, the program doesn’t look for user input, so
the UI is unresponsive:
//: C11:UnresponsiveUI.cpp {RunByHand}
// Lack of threading produces an unresponsive UI.
//{L} ZThread
#include <iostream>
#include <fstream>
#include <string>
#include "zthread/Thread.h"
using namespace std;
using namespace ZThread;
int main() {
cout << "Press <Enter> to
quit:" << endl;
ifstream file("UnresponsiveUI.cpp");
string line;
while(getline(file, line)) {
cout << line << endl;
Thread::sleep(1000); // Time in milliseconds
}
// Read input from the console
cin.get();
cout << "Shutting down..." <<
endl;
} ///:~
To make the program responsive, you can execute a task that
displays the file in a separate thread. The main thread can then watch for user
input so the program becomes responsive:
//: C11:ResponsiveUI.cpp {RunByHand}
// Threading for a responsive user interface.
//{L} ZThread
#include <iostream>
#include <fstream>
#include <string>
#include "zthread/Thread.h"
using namespace ZThread;
using namespace std;
class DisplayTask : public Runnable {
ifstream in;
string line;
bool quitFlag;
public:
DisplayTask(const string& file) : quitFlag(false)
{
in.open(file.c_str());
}
~DisplayTask() { in.close(); }
void run() {
while(getline(in, line) && !quitFlag) {
cout << line << endl;
Thread::sleep(1000);
}
}
void quit() { quitFlag = true; }
};
int main() {
try {
cout << "Press <Enter> to
quit:" << endl;
DisplayTask* dt = new
DisplayTask("ResponsiveUI.cpp");
Thread t(dt);
cin.get();
dt->quit();
} catch(Synchronization_Exception& e) {
cerr << e.what() << endl;
}
cout << "Shutting down..." <<
endl;
} ///:~
Now the main( ) thread can respond immediately
when you press <Return> and call quit( ) on the DisplayTask.
This example also shows the need for communication between
tasks—the task in the main( ) thread needs to tell the DisplayTask
to shut down. Since we have a pointer to the DisplayTask, you might
think of just calling delete on that pointer to kill the task, but this
produces unreliable programs. The problem is that the task could be in the
middle of something important when you destroy it, and so you are likely to put
the program in an unstable state. Here, the task itself decides when it’s safe
to shut down. The easiest way to do this is by simply notifying the task that
you’d like it to stop by setting a Boolean flag. When the task gets to a stable
point it can check that flag and do whatever is necessary to clean up before
returning from run( ). When the task returns from run( ),
the Thread knows that the task has completed.
Although this program is simple enough that it should not
have any problems, there are some small flaws regarding inter-task
communication. This is an important topic that will be covered later in this
chapter.
You can simplify your coding overhead by using ZThread Executors. Executors provide a layer of indirection between a client
and the execution of a task; instead of a client executing a task directly, an
intermediate object executes the task.
We can show this by using an Executor instead of
explicitly creating Thread objects in MoreBasicThreads.cpp. A LiftOff
object knows how to run a specific task; like the Command Pattern, it exposes a
single function to be executed. An Executor object knows how build the
appropriate context to execute Runnable objects. In the following
example, the ThreadedExecutor creates one thread per task:
//: c11:ThreadedExecutor.cpp
//{L} ZThread
#include <iostream>
#include "zthread/ThreadedExecutor.h"
#include "LiftOff.h"
using namespace ZThread;
using namespace std;
int main() {
try {
ThreadedExecutor executor;
for(int i = 0; i < 5; i++)
executor.execute(new LiftOff(10, i));
} catch(Synchronization_Exception& e) {
cerr << e.what() << endl;
}
} ///:~
Note that in some cases a single Executor can be used
to create and manage all the threads in your system. You must still place the
threading code inside a try block because an Executor’s execute( )
function may throw a Synchronization_Exception if something goes wrong. This is true for any function that involves changing the state of a
synchronization object (starting threads, acquiring mutexes, waiting on
conditions, etc.), as you will learn later in this chapter.
The program will exit as soon as all the tasks in the Executor
complete.
In the previous example, the ThreadedExecutor creates
a thread for each task that you want to run, but you can easily change the way
these tasks are executed by replacing the ThreadedExecutor with a
different type of Executor. In this chapter, using a ThreadedExecutor
is fine, but in production code it might result in excessive costs from the
creation of too many threads. In that case, you can replace it with a PoolExecutor, which will use a limited set of threads to execute the
submitted tasks in parallel:
//: C11:PoolExecutor.cpp
//{L} ZThread
#include <iostream>
#include "zthread/PoolExecutor.h"
#include "LiftOff.h"
using namespace ZThread;
using namespace std;
int main() {
try {
// Constructor argument is minimum number of
threads:
PoolExecutor executor(5);
for(int i = 0; i < 5; i++)
executor.execute(new LiftOff(10, i));
} catch(Synchronization_Exception& e) {
cerr << e.what() << endl;
}
} ///:~
With the PoolExecutor, you do expensive thread
allocation once, up front, and the threads are reused when possible. This saves
time because you aren’t constantly paying for thread creation overhead for
every single task. Also, in an event-driven system, events that require threads
to handle them can be generated as quickly as you want by simply fetching them
from the pool. You don’t overrun the available resources because the PoolExecutor
uses a bounded number of Thread objects. Thus, although this book will
use ThreadedExecutors, consider using PoolExecutors in production
code.
A ConcurrentExecutor is like a PoolExecutor
with a fixed size of one thread. This is useful for anything you want to run in
another thread continually (a long-lived task), such as a task that listens to
incoming socket connections. It is also handy for short tasks that you want to
run in a thread, for example, small tasks that update a local or remote log, or
for an event-dispatching thread.
If more than one task is submitted to a ConcurrentExecutor,
each task will run to completion before the next task is begun, all using the
same thread. In the following example, you’ll see each task completed, in the
order that it was submitted, before the next one is begun. Thus, a ConcurrentExecutor
serializes the tasks that are submitted to it.
//: C11:ConcurrentExecutor.cpp
//{L} ZThread
#include <iostream>
#include "zthread/ConcurrentExecutor.h"
#include "LiftOff.h"
using namespace ZThread;
using namespace std;
int main() {
try {
ConcurrentExecutor executor;
for(int i = 0; i < 5; i++)
executor.execute(new LiftOff(10, i));
} catch(Synchronization_Exception& e) {
cerr << e.what() << endl;
}
} ///:~
Like a ConcurrentExecutor, a SynchronousExecutor is used when you want only one task at a time to run, serially instead of concurrently.
Unlike ConcurrentExecutor, a SynchronousExecutor doesn’t create
or manage threads on it own. It uses the thread that submits the task and thus
only acts as a focal point for synchronization. If you have n threads
submitting tasks to a SynchronousExecutor, no two tasks are ever run at
once. Instead, each one is run to completion, then the next one in the queue is
begun.
For example, suppose you have a number of threads running
tasks that use the file system, but you are writing portable code so you don’t
want to use flock( ) or another OS-specific call to lock a file. You can run these tasks with a SynchronousExecutor to ensure
that only one task at a time is running from any thread. This way, you don’t
need to deal with synchronizing on the shared resource (and you won’t clobber
the file system in the meantime). A better solution is to synchronize on the
resource (which you’ll learn about later in this chapter), but a SynchronousExecutor
lets you skip the trouble of getting coordinated properly just to prototype
something.
//: C11:SynchronousExecutor.cpp
//{L} ZThread
#include <iostream>
#include "zthread/SynchronousExecutor.h"
#include "LiftOff.h"
using namespace ZThread;
using namespace std;
int main() {
try {
SynchronousExecutor executor;
for(int i = 0; i < 5; i++)
executor.execute(new LiftOff(10, i));
} catch(Synchronization_Exception& e) {
cerr << e.what() << endl;
}
} ///:~
When you run the program, you’ll see that the tasks are
executed in the order they are submitted, and each task runs to completion
before the next one starts. What you don’t see is that no new threads are
created—the main( ) thread is used for each task, since in this
example, that’s the thread that submits all the tasks. Because SynchronousExecutor
is primarily for prototyping, you may not use it much in production code.
If you know that you’ve accomplished what you need to during
one pass through a loop in your run( ) function (most run( )
functions involve a long-running loop), you can give a hint to the thread
scheduling mechanism that you’ve done enough and that some other thread might
as well have the CPU. This hint (and it is a hint—there’s no guarantee
your implementation will listen to it) takes the form of the yield( ) function.
We can make a modified version of the LiftOff
examples by yielding after each loop:
//: C11:YieldingTask.cpp
// Suggesting when to switch threads with yield().
//{L} ZThread
#include <iostream>
#include "zthread/Thread.h"
#include "zthread/ThreadedExecutor.h"
using namespace ZThread;
using namespace std;
class YieldingTask : public Runnable {
int countDown;
int id;
public:
YieldingTask(int ident = 0) : countDown(5), id(ident)
{}
~YieldingTask() {
cout << id << " completed"
<< endl;
}
friend ostream&
operator<<(ostream& os, const
YieldingTask& yt) {
return os << "#" << yt.id
<< ": " << yt.countDown;
}
void run() {
while(true) {
cout << *this << endl;
if(--countDown == 0) return;
Thread::yield();
}
}
};
int main() {
try {
ThreadedExecutor executor;
for(int i = 0; i < 5; i++)
executor.execute(new YieldingTask(i));
} catch(Synchronization_Exception& e) {
cerr << e.what() << endl;
}
} ///:~
You can see that the task’s run( ) member
function consists entirely of an infinite loop. By using yield( ),
the output is evened up quite a bit over that without yielding. Try commenting
out the call to Thread::yield( ) to see the difference. In general,
however, yield( ) is useful only in rare situations, and you can’t
rely on it to do any serious tuning of your application.
Another way you can control the behavior of your threads is
by calling sleep( ) to cease execution of a thread for a given
number of milliseconds. In the preceding example, if you replace the call to yield( )
with a call to sleep( ), you get the following:
//: C11:SleepingTask.cpp
// Calling sleep() to pause for awhile.
//{L} ZThread
#include <iostream>
#include "zthread/Thread.h"
#include "zthread/ThreadedExecutor.h"
using namespace ZThread;
using namespace std;
class SleepingTask : public Runnable {
int countDown;
int id;
public:
SleepingTask(int ident = 0) : countDown(5), id(ident)
{}
~SleepingTask() {
cout << id << " completed"
<< endl;
}
friend ostream&
operator<<(ostream& os, const
SleepingTask& st) {
return os << "#" << st.id
<< ": " << st.countDown;
}
void run() {
while(true) {
try {
cout << *this << endl;
if(--countDown == 0) return;
Thread::sleep(100);
} catch(Interrupted_Exception& e) {
cerr << e.what() << endl;
}
}
}
};
int main() {
try {
ThreadedExecutor executor;
for(int i = 0; i < 5; i++)
executor.execute(new SleepingTask(i));
} catch(Synchronization_Exception& e) {
cerr << e.what() << endl;
}
} ///:~
Thread::sleep( ) can throw an Interrupted_Exception
(you’ll learn about interrupts later), and you can see that this is caught in run( ).
But the task is created and executed inside a try block in main( )
that catches Synchronization_Exception (the base class for all ZThread
exceptions), so wouldn’t it be possible to just ignore the exception in run( )
and assume that it will propagate to the handler in main( )? This
won’t work because exceptions won’t propagate across threads back to main( ).
Thus, you must handle any exceptions locally that may arise within a task.
You’ll notice that the threads tend to run in any order,
which means that sleep( ) is also not a way for you to control the order of thread execution. It just stops the execution of the thread for awhile. The
only guarantee that you have is that the thread will sleep at least 100
milliseconds (in this example), but it may take longer before the thread
resumes execution because the thread scheduler still has to get back to it
after the sleep interval expires.
If you must control the order of execution of threads, your
best bet is to use synchronization controls (described later) or, in some
cases, not to use threads at all, but instead to write your own cooperative
routines that hand control to each other in a specified order.
The priority of a thread conveys the importance of a
thread to the scheduler. Although the order that the CPU runs a set of threads
is indeterminate, the scheduler will lean toward running the waiting
thread with the highest priority first. However, this doesn’t mean that threads
with lower priority aren’t run (that is, you can’t get deadlocked because of priorities). Lower priority threads just tend to run less often.
Here’s MoreBasicThreads.cpp modified so that the
priority levels are demonstrated. The priorities are adjusting by using Thread’s
setPriority( ) function.
//: C11:SimplePriorities.cpp
// Shows the use of thread priorities.
//{L} ZThread
#include <iostream>
#include "zthread/Thread.h"
using namespace ZThread;
using namespace std;
const double pi = 3.14159265358979323846;
const double e = 2.7182818284590452354;
class SimplePriorities : public Runnable {
int countDown;
volatile double d; // No optimization
int id;
public:
SimplePriorities(int ident=0): countDown(5),
id(ident) {}
~SimplePriorities() {
cout << id << " completed"
<< endl;
}
friend ostream&
operator<<(ostream& os, const
SimplePriorities& sp) {
return os << "#" << sp.id
<< " priority: "
<< Thread().getPriority()
<< " count: "<<
sp.countDown;
}
void run() {
while(true) {
// An expensive, interruptable operation:
for(int i = 1; i < 100000; i++)
d = d + (pi + e) / double(i);
cout << *this << endl;
if(--countDown == 0) return;
}
}
};
int main() {
try {
Thread high(new SimplePriorities);
high.setPriority(High);
for(int i = 0; i < 5; i++) {
Thread low(new SimplePriorities(i));
low.setPriority(Low);
}
} catch(Synchronization_Exception& e) {
cerr << e.what() << endl;
}
} ///:~
Here, operator<<( ) is overridden to
display the identifier, priority, and countDown value of the task.
You can see that the priority level of thread high is
at the highest level, and all the rest of the threads are at the lowest level.
We are not using an Executor in this example because we need direct
access to the threads in order to set their priorities.
Inside SimplePriorities::run( ), 100,000
repetitions of a rather expensive floating-point calculation are performed,
involving double addition and division. The variable d is volatile
to try to ensure that no compilers optimizations are performed. Without this
calculation, you don’t see the effect of setting the priority levels. (Try it:
comment out the for loop containing the double calculations.)
With the calculation, you see that thread high is given a higher
preference by the thread scheduler. (At least, this was the behavior on a
Windows machine.) The calculation takes long enough that the thread scheduling
mechanism jumps in, changes threads, and pays attention to the priorities so
that thread high gets preference.
You can also read the priority of an existing thread with getPriority( ) and change it at any time (not just before the thread is
run, as in SimplePriorities.cpp)
with setPriority( ).
Mapping priorities to operating systems is problematic. For
example, Windows 2000 has seven priority levels, while Sun’s Solaris has 231
levels. The only portable approach is to stick to very large priority
granulations, such as the Low, Medium, and High used in
the ZThread library.
You can think of a single-threaded program as one lonely
entity moving around through your problem space and doing one thing at a time.
Because there’s only one entity, you never have to think about the problem of
two entities trying to use the same resource at the same time: problems such as
two people trying to park in the same space, walk through a door at the same
time, or even talk at the same time.
With multithreading things aren’t lonely anymore, but you
now have the possibility of two or more threads trying to use the same resource
at once. This can cause two different kinds of problems. The first is that the
necessary resources may not exist. In C++, the programmer has complete control
over the lifetime of objects, and it’s easy to create threads that try to use
objects that get destroyed before those threads complete.
The second problem is that two or more threads may collide
when they try to access the same resource at the same time. If you don’t
prevent such a collision, you’ll have two threads trying to access the same
bank account at the same time, print to the same printer, adjust the same
valve, and so on.
This section introduces the problem of objects that vanish
while tasks are still using them and the problem of tasks colliding over shared
resources. You’ll learn about the tools that are used to solve these problems.
Memory and resource management are major concerns in C++.
When you create any C++ program, you have the option of creating objects on the
stack or on the heap (using new). In a single-threaded program, it’s
usually easy to keep track of object lifetimes so that you don’t try to use
objects that are already destroyed.
The examples shown in this chapter create Runnable
objects on the heap using new, but you’ll notice that these objects are
never explicitly deleted. However, you can see from the output when you
run the programs that the thread library keeps track of each task and
eventually deletes it, because the destructors for the tasks are called. This
happens when the Runnable::run( ) member function
completes—returning from run( ) indicates that the task is
finished.
Burdening the thread with deleting a task is a problem. That
thread doesn’t necessarily know if another thread still needs to make a
reference to that Runnable, and so the Runnable may be
prematurely destroyed. To deal with this problem, tasks in ZThreads are
automatically reference-counted by the ZThread library mechanism. A task is
maintained until the reference count for that task goes to zero, at which point
the task is deleted. This means that tasks must always be deleted dynamically,
and so they cannot be created on the stack. Instead, tasks must always be
created using new, as you see in all the examples in this chapter.
Often you must also ensure that non-task objects stay alive
as long as tasks need them. Otherwise, it’s easy for objects that are used by
tasks to go out of scope before those tasks are completed. If this happens, the
tasks will try to access illegal storage and will cause program faults. Here’s
a simple example:
//: C11:Incrementer.cpp {RunByHand}
// Destroying objects while threads are still
// running will cause serious problems.
//{L} ZThread
#include <iostream>
#include "zthread/Thread.h"
#include "zthread/ThreadedExecutor.h"
using namespace ZThread;
using namespace std;
class Count {
enum { SZ = 100 };
int n[SZ];
public:
void increment() {
for(int i = 0; i < SZ; i++)
n[i]++;
}
};
class Incrementer : public Runnable {
Count* count;
public:
Incrementer(Count* c) : count(c) {}
void run() {
for(int n = 100; n > 0; n--) {
Thread::sleep(250);
count->increment();
}
}
};
int main() {
cout << "This will cause a segmentation
fault!" << endl;
Count count;
try {
Thread t0(new Incrementer(&count));
Thread t1(new Incrementer(&count));
} catch(Synchronization_Exception& e) {
cerr << e.what() << endl;
}
} ///:~
The Count class may seem like overkill at first, but
if n is only a single int (rather than an array), the compiler
can put it into a register and that storage will still be available (albeit
technically illegal) after the Count object goes out of scope. It’s
difficult to detect the memory violation in that case. Your results may vary
depending on your compiler and operating system, but try making it n a single
int and see what happens. In any event, if Count contains an
array of ints as above, the compiler is forced to put it on the stack
and not in a register.
Incrementer is a simple task that uses a Count
object. In main( ), you can see that the Incrementer tasks
are running for long enough that the Count object will go out of scope,
and so the tasks try to access an object that no longer exists. This produces a
program fault.
To fix the problem, we must guarantee that any objects
shared between tasks will be around as long as those tasks need them. (If the
objects were not shared, they could be composed directly into the task’s class
and thus tie their lifetime to that task.) Since we don’t want the static
program scope to control the lifetime of the object, we put the object on the
heap. And to make sure that the object is not destroyed until there are no
other objects (tasks, in this case) using it, we use reference counting.
Reference counting was explained thoroughly in volume one of
this book and further revisited in this volume. The ZThread library includes a
template called CountedPtr that automatically performs reference counting and deletes an object when the reference count goes to zero. Here’s the
above program modified to use CountedPtr to prevent the fault:
//: C11:ReferenceCounting.cpp
// A CountedPtr prevents too-early destruction.
//{L} ZThread
#include <iostream>
#include "zthread/Thread.h"
#include "zthread/CountedPtr.h"
using namespace ZThread;
using namespace std;
class Count {
enum { SZ = 100 };
int n[SZ];
public:
void increment() {
for(int i = 0; i < SZ; i++)
n[i]++;
}
};
class Incrementer : public Runnable {
CountedPtr<Count> count;
public:
Incrementer(const CountedPtr<Count>& c ) : count(c)
{}
void run() {
for(int n = 100; n > 0; n--) {
Thread::sleep(250);
count->increment();
}
}
};
int main() {
CountedPtr<Count> count(new Count);
try {
Thread t0(new Incrementer(count));
Thread t1(new Incrementer(count));
} catch(Synchronization_Exception& e) {
cerr << e.what() << endl;
}
} ///:~
Incrementer now contains a CountedPtr object,
which manages a Count. In main( ), the CountedPtr
objects are passed into the two Incrementer objects by value, so the
copy-constructor is called, increasing the reference count. As long as the
tasks are still running, the reference count will be nonzero, and so the Count
object managed by the CountedPtr will not be destroyed. Only when all
the tasks using the Count are completed will delete be called
(automatically) on the Count object by the CountedPtr.
Whenever you have objects that are used by more than one
task, you’ll almost always need to manage those objects using the CountedPtr
template in order to prevent problems arising from object lifetime issues.
Consider the following example where one task generates even numbers and other tasks consume those numbers. Here, the only job of the
consumer threads is to check the validity of the even numbers.
We’ll first define EvenChecker, the consumer
thread, since it will be reused in all the subsequent examples. To decouple EvenChecker
from the various types of generators that we will experiment with, we’ll create
an interface called Generator, which contains the minimum necessary
functions that EvenChecker must know about: that it has a nextValue( )
function and that it can be canceled.
//: C11:EvenChecker.h
#ifndef EVENCHECKER_H
#define EVENCHECKER_H
#include <iostream>
#include "zthread/CountedPtr.h"
#include "zthread/Thread.h"
#include "zthread/Cancelable.h"
#include "zthread/ThreadedExecutor.h"
class Generator : public ZThread::Cancelable {
bool canceled;
public:
Generator() : canceled(false) {}
virtual int nextValue() = 0;
void cancel() { canceled = true; }
bool isCanceled() { return canceled; }
};
class EvenChecker : public ZThread::Runnable {
ZThread::CountedPtr<Generator> generator;
int id;
public:
EvenChecker(ZThread::CountedPtr<Generator>&
g, int ident)
: generator(g), id(ident) {}
~EvenChecker() {
std::cout << "~EvenChecker "
<< id << std::endl;
}
void run() {
while(!generator->isCanceled()) {
int val = generator->nextValue();
if(val % 2 != 0) {
std::cout << val << " not
even!" << std::endl;
generator->cancel(); // Cancels all
EvenCheckers
}
}
}
// Test any type of generator:
template<typename GenType> static void test(int
n = 10) {
std::cout << "Press Control-C to
exit" << std::endl;
try {
ZThread::ThreadedExecutor executor;
ZThread::CountedPtr<Generator> gp(new
GenType);
for(int i = 0; i < n; i++)
executor.execute(new
EvenChecker(gp, i));
} catch(ZThread::Synchronization_Exception& e)
{
std::cerr << e.what() << std::endl;
}
}
};
#endif // EVENCHECKER_H ///:~
The Generator class introduces the abstract Cancelable class, which is part of the ZThread library. The goal of Cancelable
is to provide a consistent interface to change the state of an object via
the cancel( ) function and to see whether the object has been
canceled with the isCanceled( ) function. Here, we use the simple
approach of a bool canceled flag, similar to the quitFlag
previously seen in ResponsiveUI.cpp. Note that in this example the class
that is Cancelable is not Runnable. Instead, all the EvenChecker
tasks that depend on the Cancelable object (the Generator) test
it to see if it’s been canceled, as you can see in run( ). This
way, the tasks that share the common resource (the Cancelable Generator)
watch that resource for the signal to terminate. This eliminates the so-called race condition, where two or more tasks race to respond to a condition and
thus collide or otherwise produce inconsistent results. You must be careful to
think about and protect against all the possible ways a concurrent system can
fail. For example, a task cannot depend on another task because task shutdown
order is not guaranteed. Here, by making tasks depend on non-task objects
(which are reference counted using CountedPtr) we eliminate the
potential race condition.
In later sections, you’ll see that the ZThread library
contains more general mechanisms for termination of threads.
Since multiple EvenChecker objects may end up sharing
a Generator, the CountedPtr template is used to reference count
the Generator objects.
The last member function in EvenChecker is a static
member template that sets up and performs a test of any type of Generator
by creating one inside a CountedPtr and then starting a number of EvenCheckers
that use that Generator. If the Generator causes a failure, test( )
will report it and return; otherwise, you must press Control-C to terminate it.
EvenChecker tasks constantly read and test the values
from their associated Generator. Note that if generator->isCanceled( )
is true, run( ) returns, which tells the Executor in EvenChecker::test( )
that the task is complete. Any EvenChecker task can call cancel( )
on its associated Generator, which will cause all other EvenCheckers
using that Generator to gracefully shut down.
The EvenGenerator is simple—nextValue( )
produces the next even value:
//: C11:EvenGenerator.cpp
// When threads collide.
//{L} ZThread
#include <iostream>
#include "EvenChecker.h"
#include "zthread/ThreadedExecutor.h"
using namespace ZThread;
using namespace std;
class EvenGenerator : public Generator {
unsigned int currentEvenValue; // Unsigned can’t
overflow
public:
EvenGenerator() { currentEvenValue = 0; }
~EvenGenerator() { cout <<
"~EvenGenerator" << endl; }
int nextValue() {
++currentEvenValue; // Danger point here!
++currentEvenValue;
return currentEvenValue;
}
};
int main() {
EvenChecker::test<EvenGenerator>();
} ///:~
It’s possible for one thread to call nextValue( )
after the first increment of currentEvenValue and before the second (at
the place in the code commented “Danger point here!”), which puts the value into
an “incorrect” state. To prove that this can happen, EvenChecker::test( )
creates a group of EvenChecker objects to continually read the output of
an EvenGenerator and test to see if each one is even. If not, the error
is reported and the program is shut down.
This program may not detect the problem until the EvenGenerator
has completed many cycles, depending on the particulars of your operating
system and other implementation details. If you want to see it fail much
faster, try putting a call to yield( ) between the first and second
increments. In any event, it will eventually fail because the EvenChecker
threads are able to access the information in EvenGenerator while it’s
in an “incorrect” state.
The previous example shows a fundamental problem when using
threads: You never know when a thread might be run. Imagine sitting at a table
with a fork, about to spear the last piece of food on a platter, and as your
fork reaches for it, the food suddenly vanishes (because your thread was
suspended and another diner came in and ate the food). That’s the problem
you’re dealing with when writing concurrent programs.
Occasionally you don’t care if a resource is being accessed
at the same time you’re trying to use it. But in most cases you do care, and
for multithreading to work, you need some way to prevent two threads from
accessing the same resource, at least during critical periods.
Preventing this kind of collision is simply a matter of
putting a lock on a resource when one thread is using it. The first thread that
accesses a resource locks it, and then the other threads cannot access that
resource until it is unlocked, at which time another thread locks and uses it,
and so on. If the front seat of the car is the limited resource, the child who
shouts “Dibs!” acquires the lock.
Thus, we need to be able to prevent any other tasks from
accessing the storage when that storage is not in a proper state. That is, we
need to have a mechanism that excludes a second task from accessing the
storage when a first task is already using it. This idea is fundamental to all
multithreading systems and is called mutual exclusion; the mechanism used abbreviates this to mutex. The ZThread library contains a
mutex mechanism declared in the header Mutex.h.
To solve the problem in the above program, we identify the critical sections where mutual exclusion must apply; then we acquire
the mutex before entering the critical section and release it at the end
of the critical section. Only one thread can acquire the mutex at any time, so
mutual exclusion is achieved:
//: C11:MutexEvenGenerator.cpp {RunByHand}
// Preventing thread collisions with mutexes.
//{L} ZThread
#include <iostream>
#include "EvenChecker.h"
#include "zthread/ThreadedExecutor.h"
#include "zthread/Mutex.h"
using namespace ZThread;
using namespace std;
class MutexEvenGenerator : public Generator {
unsigned int currentEvenValue;
Mutex lock;
public:
MutexEvenGenerator() { currentEvenValue = 0; }
~MutexEvenGenerator() {
cout << "~MutexEvenGenerator"
<< endl;
}
int nextValue() {
lock.acquire();
++currentEvenValue;
Thread::yield(); // Cause failure faster
++currentEvenValue;
int rval = currentEvenValue;
lock.release();
return rval;
}
};
int main() {
EvenChecker::test<MutexEvenGenerator>();
} ///:~
MutexEvenGenerator adds a Mutex called lock
and uses acquire( ) and release( ) to create a critical
section within nextValue( ). In addition, a call to Thread::yield( )
is inserted between the two increments, to raise the likelihood of a
context switch while currentEvenValue is in an odd state. Because the
mutex prevents more than one thread at a time in the critical section, this
will not produce a failure, but calling yield( ) is a helpful way
to promote a failure if it’s going to happen.
Note that nextValue( ) must capture the return
value inside the critical section because if you return from inside the
critical section, you won’t release the lock and will thus prevent it from
being acquired again. (This usually leads to deadlock, which you’ll
learn about at the end of this chapter.)
The first thread that enters nextValue( )
acquires the lock, and any further threads that try to acquire the lock are
blocked from doing so until the first thread releases the lock. At that point,
the scheduling mechanism selects another thread that is waiting on the lock.
This way, only one thread at a time can pass through the code that is guarded
by the mutex.
The use of mutexes rapidly becomes complicated when
exceptions are introduced. To make sure that the mutex is always released, you must ensure that each possible exception path includes a call to release( ).
In addition, any function that has multiple return paths must carefully ensure
that it calls release( ) at the appropriate points.
These problems can be easily solved by using the fact that a
stack-based (auto) object has a destructor that is always called regardless of
how you exit from a function scope. In the ZThread library, this is implemented
as the Guard template. The Guard template creates objects that acquire( )
a Lockable object when constructed and release( ) that
lock when destroyed. Guard objects created on the local stack will
automatically be destroyed regardless of how the function exits and will always
unlock the Lockable object. Here’s the above example reimplemented using
Guards:
//: C11:GuardedEvenGenerator.cpp {RunByHand}
// Simplifying mutexes with the Guard template.
//{L} ZThread
#include <iostream>
#include "EvenChecker.h"
#include "zthread/ThreadedExecutor.h"
#include "zthread/Mutex.h"
#include "zthread/Guard.h"
using namespace ZThread;
using namespace std;
class GuardedEvenGenerator : public Generator {
unsigned int currentEvenValue;
Mutex lock;
public:
GuardedEvenGenerator() { currentEvenValue = 0; }
~GuardedEvenGenerator() {
cout << "~GuardedEvenGenerator"
<< endl;
}
int nextValue() {
Guard<Mutex> g(lock);
++currentEvenValue;
Thread::yield();
++currentEvenValue;
return currentEvenValue;
}
};
int main() {
EvenChecker::test<GuardedEvenGenerator>();
} ///:~
Note that the temporary return value is no longer necessary
in nextValue( ). In general, there is less code to write, and the
opportunity for user error is greatly reduced.
An interesting feature of the Guard template is that
it can be used to manipulate other guards safely. For example, a second Guard
can be used to temporarily unlock a guard:
//: C11:TemporaryUnlocking.cpp
// Temporarily unlocking another guard.
//{L} ZThread
#include "zthread/Thread.h"
#include "zthread/Mutex.h"
#include "zthread/Guard.h"
using namespace ZThread;
class TemporaryUnlocking {
Mutex lock;
public:
void f() {
Guard<Mutex> g(lock);
// lock is acquired
// ...
{
Guard<Mutex, UnlockedScope> h(g);
// lock is released
// ...
// lock is acquired
}
// ...
// lock is released
}
};
int main() {
TemporaryUnlocking t;
t.f();
} ///:~
A Guard can also be used to try to acquire a lock for a
certain amount of time and then give up:
//: C11:TimedLocking.cpp
// Limited time locking.
//{L} ZThread
#include "zthread/Thread.h"
#include "zthread/Mutex.h"
#include "zthread/Guard.h"
using namespace ZThread;
class TimedLocking {
Mutex lock;
public:
void f() {
Guard<Mutex, TimedLockedScope<500> >
g(lock);
// ...
}
};
int main() {
TimedLocking t;
t.f();
} ///:~
In this example, a Timeout_Exception will be thrown
if the lock cannot be acquired within 500 milliseconds.
Synchronizing entire
classes
The ZThread library also provides a GuardedClass
template to automatically create a synchronized wrapper for an entire class. This means that every member function in the class will automatically be guarded:
//: C11:SynchronizedClass.cpp {-dmc}
//{L} ZThread
#include "zthread/GuardedClass.h"
using namespace ZThread;
class MyClass {
public:
void func1() {}
void func2() {}
};
int main() {
MyClass a;
a.func1(); // Not synchronized
a.func2(); // Not synchronized
GuardedClass<MyClass> b(new MyClass);
// Synchronized calls, only one thread at a time
allowed:
b->func1();
b->func2();
} ///:~
Object a is a not synchronized, so func1( )
and func2( ) can be called at any time by any number of threads.
Object b is protected by the GuardedClass wrapper, so each member
function is automatically synchronized and only one function per object can be
called any time.
The wrapper locks at a class level of granularity, which may
affect performance. If
a class contains some unrelated functions, it may be better to synchronize
those functions internally with two different locks. However, if you find
yourself doing this, it means that one class contains groups of data that may
not be strongly associated. Consider breaking the class into two classes.
Guarding all member functions of a class with a mutex does
not automatically make that class thread-safe. You must carefully consider all
threading issues in order to guarantee thread safety.
A second way to eliminate the problem of tasks colliding
over shared resources is to eliminate the sharing of variables, which can be
done by creating different storage for the same variable, for each different
thread that uses an object. Thus, if you have five threads using an object with
a variable x, thread local storage automatically generates five
different pieces of storage for x. Fortunately, the creation and
management of thread local storage is taken care of automatically by ZThread’s ThreadLocal
template, as seen here:
//: C11:ThreadLocalVariables.cpp {RunByHand}
// Automatically giving each thread its own storage.
//{L} ZThread
#include <iostream>
#include "zthread/Thread.h"
#include "zthread/Mutex.h"
#include "zthread/Guard.h"
#include "zthread/ThreadedExecutor.h"
#include "zthread/Cancelable.h"
#include "zthread/ThreadLocal.h"
#include "zthread/CountedPtr.h"
using namespace ZThread;
using namespace std;
class ThreadLocalVariables : public Cancelable {
ThreadLocal<int> value;
bool canceled;
Mutex lock;
public:
ThreadLocalVariables() : canceled(false) {
value.set(0);
}
void increment() { value.set(value.get() + 1); }
int get() { return value.get(); }
void cancel() {
Guard<Mutex> g(lock);
canceled = true;
}
bool isCanceled() {
Guard<Mutex> g(lock);
return canceled;
}
};
class Accessor : public Runnable {
int id;
CountedPtr<ThreadLocalVariables> tlv;
public:
Accessor(CountedPtr<ThreadLocalVariables>&
tl, int idn)
: id(idn), tlv(tl) {}
void run() {
while(!tlv->isCanceled()) {
tlv->increment();
cout << *this << endl;
}
}
friend ostream&
operator<<(ostream& os, Accessor& a)
{
return os << "#" << a.id
<< ": " << a.tlv->get();
}
};
int main() {
cout << "Press <Enter> to quit"
<< endl;
try {
CountedPtr<ThreadLocalVariables>
tlv(new ThreadLocalVariables);
const int SZ = 5;
ThreadedExecutor executor;
for(int i = 0; i < SZ; i++)
executor.execute(new
Accessor(tlv, i));
cin.get();
tlv->cancel(); // All Accessors will quit
} catch(Synchronization_Exception& e) {
cerr << e.what() << endl;
}
} ///:~
When you create a ThreadLocal object by instantiating
the template, you are only able to access the contents of the object using the get( )
and set( ) member functions. The get( ) function
returns a copy of the object that is associated with that thread, and set( )
inserts its argument into the object stored for that thread, returning the old
object that was in storage. You can see this is use in increment( )
and get( ) in ThreadLocalVariables.
Since tlv is shared by multiple Accessor
objects, it is written as Cancelable so that the Accessors can be
signaled when we want to shut the system down.
When you run this program, you’ll see evidence that the
individual threads are each allocated their own storage.
In previous examples, we have seen the use of a “quit flag”
or the Cancelable interface in order to terminate a task. This is a
reasonable approach to the problem. However, in some situations the task must
be terminated more abruptly. In this section, you’ll learn about the issues and
problems of such termination.
First, let’s look at an example that not only demonstrates
the termination problem but is also an additional example of resource sharing.
To present this example, we’ll first need to solve the problem of iostream
collision
You may have noticed in previous examples that the output is
sometimes garbled. C++ iostreams were not created with threading in mind, so
there’s nothing to keep one thread’s output from interfering with another
thread’s output. Thus, you must write your applications so that they
synchronize the use of iostreams.
To solve the problem, we need to create the entire output
packet first and then explicitly decide when to try to send it to the console.
One simple solution is to write the information to an ostringstream and
then use a single object with a mutex as the point of output among all threads,
to prevent more than one thread from writing at the same time:
//: C11:Display.h
// Prevents ostream collisions.
#ifndef DISPLAY_H
#define DISPLAY_H
#include <iostream>
#include <sstream>
#include "zthread/Mutex.h"
#include "zthread/Guard.h"
class Display { // Share one of these among all threads
ZThread::Mutex iolock;
public:
void output(std::ostringstream& os) {
ZThread::Guard<ZThread::Mutex> g(iolock);
std::cout << os.str();
}
};
#endif // DISPLAY_H ///:~
This way, the standard operator<<( )
functions are predefined for us and the object can be built in memory using
familiar ostream operators. When a task wants to display output, it
creates a temporary ostringstream object that it uses to build up the
desired output message. When it calls output( ), the mutex prevents
multiple threads from writing to this Display object. (You must use only
one Display object in your program, as you’ll see in the following
examples.)
This just shows the basic idea, but if necessary, you can
build a more elaborate framework. For example, you could enforce the
requirement that there be only one Display object in a program by making
it a Singleton. (The ZThread library has a Singleton template to support
Singletons.)
In this simulation, the garden committee would like to know
how many people enter the garden each day through its multiple gates. Each gate
has a turnstile or some other kind of counter, and after the turnstile count is
incremented, a shared count is incremented that represents the total number of
people in the garden.
//: C11:OrnamentalGarden.cpp {RunByHand}
//{L} ZThread
#include <vector>
#include <cstdlib>
#include <ctime>
#include "Display.h"
#include "zthread/Thread.h"
#include "zthread/FastMutex.h"
#include "zthread/Guard.h"
#include "zthread/ThreadedExecutor.h"
#include "zthread/CountedPtr.h"
using namespace ZThread;
using namespace std;
class Count : public Cancelable {
FastMutex lock;
int count;
bool paused, canceled;
public:
Count() : count(0), paused(false), canceled(false) {}
int increment() {
// Comment the following line to see counting fail:
Guard<FastMutex> g(lock);
int temp = count ;
if(rand() % 2 == 0) // Yield half the time
Thread::yield();
return (count = ++temp);
}
int value() {
Guard<FastMutex> g(lock);
return count;
}
void cancel() {
Guard<FastMutex> g(lock);
canceled = true;
}
bool isCanceled() {
Guard<FastMutex> g(lock);
return canceled;
}
void pause() {
Guard<FastMutex> g(lock);
paused = true;
}
bool isPaused() {
Guard<FastMutex> g(lock);
return paused;
}
};
class Entrance : public Runnable {
CountedPtr<Count> count;
CountedPtr<Display> display;
int number;
int id;
bool waitingForCancel;
public:
Entrance(CountedPtr<Count>& cnt,
CountedPtr<Display>& disp, int idn)
: count(cnt), display(disp), number(0), id(idn),
waitingForCancel(false) {}
void run() {
while(!count->isPaused()) {
++number;
{
ostringstream os;
os << *this << " Total: "
<< count->increment() <<
endl;
display->output(os);
}
Thread::sleep(100);
}
waitingForCancel = true;
while(!count->isCanceled()) // Hold here...
Thread::sleep(100);
ostringstream os;
os << "Terminating " << *this
<< endl;
display->output(os);
}
int getValue() {
while(count->isPaused() &&
!waitingForCancel)
Thread::sleep(100);
return number;
}
friend ostream&
operator<<(ostream& os, const Entrance&
e) {
return os << "Entrance " <<
e.id << ": " << e.number;
}
};
int main() {
srand(time(0)); // Seed the random number generator
cout << "Press <ENTER> to quit"
<< endl;
CountedPtr<Count> count(new Count);
vector<Entrance*> v;
CountedPtr<Display> display(new Display);
const int SZ = 5;
try {
ThreadedExecutor executor;
for(int i = 0; i < SZ; i++) {
Entrance* task = new
Entrance(count, display, i);
executor.execute(task);
// Save the pointer to the task:
v.push_back(task);
}
cin.get(); // Wait for user to press <Enter>
count->pause(); // Causes tasks to stop counting
int sum = 0;
vector<Entrance*>::iterator it = v.begin();
while(it != v.end()) {
sum += (*it)->getValue();
++it;
}
ostringstream os;
os << "Total: " <<
count->value() << endl
<< "Sum of Entrances: " <<
sum << endl;
display->output(os);
count->cancel(); // Causes threads to quit
} catch(Synchronization_Exception& e) {
cerr << e.what() << endl;
}
} ///:~
Count is the class that keeps the master count of
garden visitors. The single Count object defined in main( )
as count is held as a CountedPtr in Entrance and thus is
shared by all Entrance objects. A FastMutex called lock is used in this example instead of an ordinary Mutex because a FastMutex uses
the native operating system mutex and will thus yield more interesting results.
A Guard is used with lock in increment( )
to synchronize access to count. This function uses rand( )
to cause a yield( ) roughly half the time, in between fetching count
into temp and incrementing and storing temp back into count.
Because of this, if you comment out the Guard object definition, you
will rapidly see the program break because multiple threads will be accessing
and modifying count simultaneously.
The Entrance class also keeps a local number
with the number of visitors that have passed through this particular entrance.
This provides a double-check against the count object to make sure that
the proper number of visitors is being recorded. Entrance::run( )
simply increments number and the count object and sleeps for 100
milliseconds.
In main, a vector<Entrance*> is loaded with
each Entrance that is created. After the user presses <Enter>,
this vector is used to iterate over all the individual Entrance
values and total them.
This program goes to quite a bit of extra trouble to shut
everything down in a stable fashion. Part of the reason for this is to show
just how careful you must be when terminating a multithreaded program, and part
of the reason is to demonstrate the value of interrupt( ), which
you will learn about shortly.
All the communication between the Entrance objects
takes place through the single Count object. When the user presses <Enter>,
main( ) sends the pause( ) message to count.
Since each Entrance::run( ) is watching the count object to
see whether it is paused, this causes each Entrance to move into the waitingForCancel
state, where it is no longer counting, but it is still alive. This is essential
because main( ) must still be able to safely iterate over the objects
in the vector<Entrance*>. Note that because there is a slight
possibility that the iteration might occur before an Entrance has
finished counting and moved into the waitingForCancel state, the getValue( )
function cycles through calls to sleep( ) until the object moves
into waitingForCancel. (This is one form of what is called a busy wait, which is undesirable. You’ll see the preferred approach of using wait( )
later in the chapter.) Once main( ) completes its iteration through
the vector<Entrance*>, the cancel( ) message is sent
to the count object, and once again all the Entrance objects are
watching for this state change. At this point, they print a termination message
and exit from run( ), which causes each task to be destroyed by the
threading mechanism.
As this program runs, you will see the total count and the count at each entrance displayed as people walk through a turnstile. If
you comment out the Guard object in Count::increment( ), you’ll
notice that the total number of people is not what you expect it to be. The
number of people counted by each turnstile will be different from the value in count. As long as the Mutex is there to synchronize
access to the Counter, things work correctly. Keep in mind that Count::increment( )
exaggerates the potential for failure by using temp and yield( ).
In real threading problems, the possibility for failure may be statistically
small, so you can easily fall into the trap of believing that things are
working correctly. Just as in the example above, there are likely to be hidden
problems that haven’t occurred to you, so be exceptionally diligent when
reviewing concurrent code.
Atomic operations
Note that Count::value( ) returns the value of count
using a Guard object for synchronization. This brings up an
interesting point because this code will probably work fine with most
compilers and systems without synchronization. The reason is that, in general,
a simple operation such as returning an int will be an atomic operation, which means that it will probably happen in a single microprocessor
instruction that will not get interrupted. (The multithreading mechanism is
unable to stop a thread in the middle of a microprocessor instruction.) That
is, atomic operations are not interruptible by the threading mechanism and thus
do not need to be guarded. In
fact, if we removed the fetch of count into temp and removed the yield( ),
and instead simply incremented count directly, we probably wouldn’t need
a lock because the increment operation is usually atomic, as well.
The problem is that the C++ Standard doesn’t guarantee
atomicity for any of these operations. Although operations such as returning an
int and incrementing an int are almost certainly atomic on most
machines, there’s no guarantee. And because there’s no guarantee, you have to
assume the worst. Sometimes you might investigate the atomicity behavior on a
particular machine (usually by looking at assembly language) and write code
based on those assumptions. That’s always dangerous and ill-advised. It’s too
easy for that information to be lost or hidden, and the next person that comes
along may assume that this code can be ported to another machine and then go
mad tracking down the occasional glitch caused by thread collisions.
So, while removing the guard on Count::value( )
seems to work, it’s not airtight, and thus on some machines you may see
aberrant behavior.
Entrance::run( ) in the previous
example includes a call to sleep( ) in the main loop. We know that sleep( )
will eventually wake up and the task will reach the top of the loop where it
has an opportunity to break out of that loop by checking the isPaused( )
status. However, sleep( ) is just one situation where a thread is blocked
from executing, and sometimes you must terminate a task that’s blocked.
Thread states
A thread can be in any one of four states:
1. New: A thread remains in this state only momentarily, as
it is being created. It allocates any necessary system resources and performs
initialization. At this point it becomes eligible to receive CPU time. The
scheduler will then transition this thread to the runnable or blocked
state.
2. Runnable: This means that a thread can be run when
the time-slicing mechanism has CPU cycles available for the thread. Thus, the
thread might or might not be running at any moment, but there’s nothing to
prevent it from being run if the scheduler can arrange it; it’s not dead or
blocked.
3. Blocked: The thread could be run, but something prevents
it. (It might be waiting for I/O to complete, for example.) While a thread is
in the blocked state, the scheduler will simply skip it and not give it any CPU
time. Until a thread reenters the runnable state, it won’t perform any
operations.
4. Dead: A thread in the dead state is no longer schedulable
and will not receive any CPU time. Its task is completed, and it is no longer runnable.
The normal way for a thread to die is by returning from its run( ) function.
Becoming blocked
A thread is blocked when it cannot continue running. A
thread can become blocked for the following reasons:
· You’ve put the thread to sleep by calling sleep(milliseconds),
in which case it will not be run for the specified time.
· You’ve suspended the execution of the thread with wait( ).
It will not become runnable again until the thread gets the signal( )
or broadcast( ) message. We’ll examine these in a later section.
· The thread is waiting for some I/O to complete.
· The thread is trying to enter a block of code that is guarded by
a mutex, and that mutex has already been acquired by another thread.
The problem we need to look at now is
this: sometimes you want to terminate a thread that is in a blocked state.
If you can’t wait for it to get to a point in the code where it can check a
state value and decide to terminate on its own, you have to force the thread
out of its blocked state.
As you might imagine, it’s much messier to break out of the
middle of a Runnable::run( ) function than it is to wait for that
function to get to a test of isCanceled( ) (or some other place
where the programmer is ready to leave the function). When you break out of a
blocked task, you might need to destroy objects and clean up resources. Because
of this, breaking out of the middle of a task’s run( ) is more like
throwing an exception than anything else, so in ZThreads, exceptions are used
for this kind of abort. (This walks the fine edge of being an inappropriate use
of exceptions, because it means you are often using them for control flow.) To return to
a known good state when terminating a task this way, carefully consider the
execution paths of your code and properly clean up everything inside the catch
clause. We’ll look at these issues in this section.
To terminate a blocked thread, the ZThread library provides
the Thread::interrupt( ) function. This sets the interrupted
status for that thread. A thread with its interrupted status set will throw
an Interrupted_Exception if it is already blocked or it attempts a
blocking operation. The interrupted status will be reset when the exception is
thrown or if the task calls Thread::interrupted( ). As you’ll see, Thread::interrupted( )
provides a second way to leave your run( ) loop, without throwing
an exception.
Here’s an example that shows the basics of interrupt( ):
//: C11:Interrupting.cpp
// Interrupting a blocked thread.
//{L} ZThread
#include <iostream>
#include "zthread/Thread.h"
using namespace ZThread;
using namespace std;
class Blocked : public Runnable {
public:
void run() {
try {
Thread::sleep(1000);
cout << "Waiting for get() in
run():";
cin.get();
} catch(Interrupted_Exception&) {
cout << "Caught
Interrupted_Exception" << endl;
// Exit the task
}
}
};
int main(int argc, char* argv[]) {
try {
Thread t(new Blocked);
if(argc > 1)
Thread::sleep(1100);
t.interrupt();
} catch(Synchronization_Exception& e) {
cerr << e.what() << endl;
}
} ///:~
You can see that, in addition to the insertion into cout,
run( ) contains two other points where blocking can occur: the call
to Thread::sleep(1000) and the call to cin.get( ). By giving
the program any command-line argument, you tell main( ) to sleep
long enough that the task will finish its sleep( ) and call cin.get( ). If you don’t
give the program an argument, the sleep( ) in main( )
is skipped. Here, the call to interrupt( ) will occur while the
task is sleeping, and you’ll see that this will cause Interrupted_Exception
to be thrown. If you give the program a command-line argument, you’ll discover
that a task cannot be interrupted if it is blocked on IO. That is, you can
interrupt out of any blocking operation except IO.
This is a little disconcerting if you’re creating a thread
that performs IO because it means that I/O has the potential of locking your
multithreaded program. The problem is that, again, C++ was not designed with
threading in mind; quite the opposite, it effectively pretends that threading
doesn’t exist. Thus, the iostream library is not thread-friendly. If the new C++
Standard decides to add thread support, the iostream library may need to be
reconsidered in the process.
Blocked by a mutex
If you try to call a function whose mutex has already been
acquired, the calling task will be suspended until the mutex becomes available.
The following example tests whether this kind of blocking is interruptible:
//: C11:Interrupting2.cpp
// Interrupting a thread blocked
// with a synchronization guard.
//{L} ZThread
#include <iostream>
#include "zthread/Thread.h"
#include "zthread/Mutex.h"
#include "zthread/Guard.h"
using namespace ZThread;
using namespace std;
class BlockedMutex {
Mutex lock;
public:
BlockedMutex() {
lock.acquire();
}
void f() {
Guard<Mutex> g(lock);
// This will never be available
}
};
class Blocked2 : public Runnable {
BlockedMutex blocked;
public:
void run() {
try {
cout << "Waiting for f() in
BlockedMutex" << endl;
blocked.f();
} catch(Interrupted_Exception& e) {
cerr << e.what() << endl;
// Exit the task
}
}
};
int main(int argc, char* argv[]) {
try {
Thread t(new Blocked2);
t.interrupt();
} catch(Synchronization_Exception& e) {
cerr << e.what() << endl;
}
} ///:~
The class BlockedMutex has a constructor that
acquires the object’s own Mutex and never releases it. For that reason,
if you try to call f( ), you will always be blocked because the Mutex
cannot be acquired. In Blocked2, the run( ) function will be
stopped at the call to blocked.f( ). When you run the program
you’ll see that, unlike the iostream call, interrupt( ) can break
out of a call that’s blocked by a mutex.
Checking for an interrupt
Note that when you call interrupt( ) on a
thread, the only time that the interrupt occurs is when the task enters, or is
already inside, a blocking operation (except, as you’ve seen, in the case of
IO, where you’re just stuck). But what if you’ve written code that may or may
not make such a blocking call, depending on the conditions in which it is run?
If you can only exit by throwing an exception on a blocking call, you won’t
always be able to leave the run( ) loop. Thus, if you call interrupt( )
to stop a task, your task needs a second opportunity to exit in the
event that your run( ) loop doesn’t happen to be making any
blocking calls.
This opportunity is presented by the interrupted status, which is set by the call to interrupt( ). You check for the
interrupted status by calling interrupted( ). This not only tells
you whether interrupt( ) has been called, it also clears the
interrupted status. Clearing the interrupted status ensures that the framework
will not notify you twice about a task being interrupted. You will be notified
via either a single Interrupted_Exception, or a single successful Thread::interrupted( )
test. If you want to check again to see whether you were interrupted, you can
store the result when you call Thread::interrupted( ).
The following example shows the typical idiom that you
should use in your run( ) function to handle both blocked and
non-blocked possibilities when the interrupted status is set:
//: C11:Interrupting3.cpp {RunByHand}
// General idiom for interrupting a task.
//{L} ZThread
#include <iostream>
#include "zthread/Thread.h"
using namespace ZThread;
using namespace std;
const double PI = 3.14159265358979323846;
const double E = 2.7182818284590452354;
class NeedsCleanup {
int id;
public:
NeedsCleanup(int ident) : id(ident) {
cout << "NeedsCleanup " << id
<< endl;
}
~NeedsCleanup() {
cout << "~NeedsCleanup " <<
id << endl;
}
};
class Blocked3 : public Runnable {
volatile double d;
public:
Blocked3() : d(0.0) {}
void run() {
try {
while(!Thread::interrupted()) {
point1:
NeedsCleanup n1(1);
cout << "Sleeping" <<
endl;
Thread::sleep(1000);
point2:
NeedsCleanup n2(2);
cout << "Calculating" <<
endl;
// A time-consuming, non-blocking operation:
for(int i = 1; i < 100000; i++)
d = d + (PI + E) / (double)i;
}
cout << "Exiting via while() test"
<< endl;
} catch(Interrupted_Exception&) {
cout << "Exiting via
Interrupted_Exception" << endl;
}
}
};
int main(int argc, char* argv[]) {
if(argc != 2) {
cerr << "usage: " << argv[0]
<< " delay-in-milliseconds"
<< endl;
exit(1);
}
int delay = atoi(argv[1]);
try {
Thread t(new Blocked3);
Thread::sleep(delay);
t.interrupt();
} catch(Synchronization_Exception& e) {
cerr << e.what() << endl;
}
} ///:~
The NeedsCleanup class emphasizes the necessity of
proper resource cleanup if you leave the loop via an exception. Note that no
pointers are defined in Blocked3::run( ) because, for exception
safety, all resources must be enclosed in stack-based objects so that the
exception handler can automatically clean them up by calling the destructor.
You must give the program a command-line argument which is
the delay time in milliseconds before it calls interrupt( ). By
using different delays, you can exit Blocked3::run( ) at different
points in the loop: in the blocking sleep( ) call, and in the
non-blocking mathematical calculation. You’ll see that if interrupt( )
is called after the label point2 (during the non-blocking operation),
first the loop is completed, then all the local objects are destructed, and finally
the loop is exited at the top via the while statement. However, if interrupt( )
is called between point1 and point2 (after the while
statement but before or during the blocking operation sleep( )),
the task exits via the Interrupted_Exception. In that case, only the
stack objects that have been created up to the point where the exception is
thrown are cleaned up, and you have the opportunity to perform any other
cleanup in the catch clause.
A class designed to respond to an interrupt( ) must
establish a policy that ensures it will remain in a consistent state. This
generally means that all resource acquisition should be wrapped inside
stack-based objects so that the destructors will be called regardless of how
the run( ) loop exits. Correctly done, code like this can be
elegant. Components can be created that completely encapsulate their
synchronization mechanisms but are still responsive to an external stimulus
(via interrupt( )) without adding any special functions to an
object’s interface.
As you’ve seen, when you use threads to run more than one
task at a time, you can keep one task from interfering with another task’s
resources by using a mutex to synchronize the behavior of the two tasks. That
is, if two tasks are stepping on each other over a shared resource (usually
memory), you use a mutex to allow only one task at a time to access that
resource.
With that problem solved, you can move on to the issue of
getting threads to cooperate, so that multiple threads can work together to solve a problem. Now the issue is not about interfering with one another, but
rather about working in unison, since portions of such problems must be solved
before other portions can be solved. It’s much like project planning: the
footings for the house must be dug first, but the steel can be laid and the
concrete forms can be built in parallel, and both of those tasks must be
finished before the concrete foundation can be poured. The plumbing must be in
place before the concrete slab can be poured, the concrete slab must be in
place before you start framing, and so on. Some of these tasks can be done in
parallel, but certain steps require all tasks to be completed before you can
move ahead.
The key issue when tasks are cooperating is handshaking between those tasks. To accomplish this handshaking, we use the same
foundation: the mutex, which in this case guarantees that only one task can
respond to a signal. This eliminates any possible race conditions. On top of
the mutex, we add a way for a task to suspend itself until some external state
changes (“the plumbing is now in place”), indicating that it’s time for that
task to move forward. In this section, we’ll look at the issues of handshaking
between tasks, the problems that can arise, and their solutions.
In ZThreads, the basic class that uses a mutex and allows
task suspension is the Condition, and you can suspend a task by calling wait( ) on a Condition. When external state changes take place that
might mean that a task should continue processing, you notify the task by
calling signal( ), to wake up one task, or broadcast( ), to wake up all tasks that have suspended themselves on that Condition object.
There are two forms of wait( ). The first form takes
an argument in milliseconds that has the same meaning as in sleep( ):
“pause for this period of time.” The second form takes no arguments; this
version is more commonly used. Both forms of wait( ) release the Mutex
that is controlled by the Condition object and suspends the thread until
that Condition object receives a signal( ) or broadcast( ).
The first form may also terminate if it times out before a signal( )
or broadcast( ) is received.
Because wait( ) releases the Mutex, it
means that the Mutex can be acquired by another thread. Thus, when you
call wait( ) you’re saying “I’ve done all I can right now so I’m
going to wait right here, but I want to allow other synchronized operations to
take place if they can.”
Typically, you use wait( ) when you’re waiting
for some condition to change that is under the control of forces outside the
current function. (Often, this condition will be changed by another thread.)
You don’t want to idly loop while testing the condition inside your thread;
this is called a “busy wait,” and it’s usually a bad use of CPU cycles. Thus, wait( )
suspends the thread while waiting for the world to change, and only when a signal( )
or broadcast( ) occurs (suggesting that something of interest may
have happened), does the thread wake up and check for changes. So wait( )
provides a way to synchronize activities between threads.
Let’s look at a simple example. WaxOMatic.cpp has two
processes: one to apply wax to a Car and one to polish it. The polishing
process cannot do its job until the application process is finished, and the
application process must wait until the polishing process is finished before it
can put on another coat of wax. Both WaxOn and WaxOff use the Car
object, which contains a Condition that it uses to suspend a thread
inside waitForWaxing( ) or waitForBuffing( ):
//: C11:WaxOMatic.cpp {RunByHand}
// Basic thread cooperation.
//{L} ZThread
#include <iostream>
#include <string>
#include "zthread/Thread.h"
#include "zthread/Mutex.h"
#include "zthread/Guard.h"
#include "zthread/Condition.h"
#include "zthread/ThreadedExecutor.h"
using namespace ZThread;
using namespace std;
class Car {
Mutex lock;
Condition condition;
bool waxOn;
public:
Car() : condition(lock), waxOn(false) {}
void waxed() {
Guard<Mutex> g(lock);
waxOn = true; // Ready to buff
condition.signal();
}
void buffed() {
Guard<Mutex> g(lock);
waxOn = false; // Ready for another coat of wax
condition.signal();
}
void waitForWaxing() {
Guard<Mutex> g(lock);
while(waxOn == false)
condition.wait();
}
void waitForBuffing() {
Guard<Mutex> g(lock);
while(waxOn == true)
condition.wait();
}
};
class WaxOn : public Runnable {
CountedPtr<Car> car;
public:
WaxOn(CountedPtr<Car>& c) : car(c) {}
void run() {
try {
while(!Thread::interrupted()) {
cout << "Wax On!" <<
endl;
Thread::sleep(200);
car->waxed();
car->waitForBuffing();
}
} catch(Interrupted_Exception&) { /* Exit */ }
cout << "Ending Wax On process"
<< endl;
}
};
class WaxOff : public Runnable {
CountedPtr<Car> car;
public:
WaxOff(CountedPtr<Car>& c) : car(c) {}
void run() {
try {
while(!Thread::interrupted()) {
car->waitForWaxing();
cout << "Wax Off!" <<
endl;
Thread::sleep(200);
car->buffed();
}
} catch(Interrupted_Exception&) { /* Exit */ }
cout << "Ending Wax Off process"
<< endl;
}
};
int main() {
cout << "Press <Enter> to quit"
<< endl;
try {
CountedPtr<Car> car(new Car);
ThreadedExecutor executor;
executor.execute(new WaxOff(car));
executor.execute(new WaxOn(car));
cin.get();
executor.interrupt();
} catch(Synchronization_Exception& e) {
cerr << e.what() << endl;
}
} ///:~
In Car’s constructor, a single Mutex is
wrapped in a Condition object so that it can be used to manage
inter-task communication. However, the Condition object contains no
information about the state of your process, so you need to manage additional
information to indicate process state. Here, Car has a single bool
waxOn, which indicates the state of the waxing-polishing process.
In waitForWaxing( ), the waxOn flag is
checked, and if it is false, the calling thread is suspended by calling wait( )
on the Condition object. It’s important that this occur inside a guarded
clause, where the thread has acquired the lock (here, by creating a Guard
object). When you call wait( ), the thread is suspended and the
lock is released. It is essential that the lock be released because, to
safely change the state of the object (for example, to change waxOn to true,
which must happen if the suspended thread is to ever continue), that lock must
be available to be acquired by some other task. In this example, when another
thread calls waxed( ) to tell it that it’s time to do something,
the mutex must be acquired in order to change waxOn to true.
Afterward, waxed( ) sends a signal( ) to the Condition
object, which wakes up the thread suspended in the call to wait( ).
Although signal( ) may be called inside a guarded clause—as it is
here—you are not required to do this.
In order for a thread to wake up from a wait( ),
it must first reacquire the mutex that it released when it entered the wait( ).
The thread will not wake up until that mutex becomes available.
The call to wait( ) is placed inside a while
loop that checks the condition of interest. This is important for two reasons:
· It is possible that when the thread gets a signal( ),
some other condition has changed that is not associated with the reason that we
called wait( ) here. If that is the case, this thread should be
suspended again until its condition of interest changes.
· By the time this thread awakens from its wait( ),
it’s possible that some other task has changed things such that this thread is
unable or uninterested in performing its operation at this time. Again, it
should be re-suspended by calling wait( ) again.
Because these two reasons are always present when you are
calling wait( ), always write your call to wait( )
inside a while loop that tests for your condition(s) of interest.
WaxOn::run( ) represents the first step in the
process of waxing the car, so it performs its operation (a call to sleep( )
to simulate the time necessary for waxing). It then tells the car that waxing
is complete, and calls waitForBuffing( ), which suspends this
thread with a wait( ) until the WaxOff process calls buffed( )
for the car, changing the state and calling notify( ). WaxOff::run( ),
on the other hand, immediately moves into waitForWaxing( ) and is
thus suspended until the wax has been applied by WaxOn and waxed( )
is called. When you run this program, you can watch this two-step process
repeat itself as control is handed back and forth between the two threads. When
you press the <Enter> key, interrupt( ) halts both
threads—when you call interrupt( ) for an Executor, it calls
interrupt( ) for all the threads it is controlling.
A common situation in threading problems is the producer-consumer relationship, where one task is creating objects and other
tasks are consuming them. In such a situation, make sure that (among other
things) the consuming tasks do not accidentally skip any of the produced
objects.
To show this problem, consider a machine that has three
tasks: one to make toast, one to butter the toast, and one to put jam on the
buttered toast.
//: C11:ToastOMatic.cpp {RunByHand}
// Problems with thread cooperation.
//{L} ZThread
#include <iostream>
#include <cstdlib>
#include <ctime>
#include "zthread/Thread.h"
#include "zthread/Mutex.h"
#include "zthread/Guard.h"
#include "zthread/Condition.h"
#include "zthread/ThreadedExecutor.h"
using namespace ZThread;
using namespace std;
// Apply jam to buttered toast:
class Jammer : public Runnable {
Mutex lock;
Condition butteredToastReady;
bool gotButteredToast;
int jammed;
public:
Jammer() : butteredToastReady(lock) {
gotButteredToast = false;
jammed = 0;
}
void moreButteredToastReady() {
Guard<Mutex> g(lock);
gotButteredToast = true;
butteredToastReady.signal();
}
void run() {
try {
while(!Thread::interrupted()) {
{
Guard<Mutex> g(lock);
while(!gotButteredToast)
butteredToastReady.wait();
++jammed;
}
cout << "Putting jam on toast "
<< jammed << endl;
{
Guard<Mutex> g(lock);
gotButteredToast = false;
}
}
} catch(Interrupted_Exception&) { /* Exit */ }
cout << "Jammer off" << endl;
}
};
// Apply butter to toast:
class Butterer : public Runnable {
Mutex lock;
Condition toastReady;
CountedPtr<Jammer> jammer;
bool gotToast;
int buttered;
public:
Butterer(CountedPtr<Jammer>& j)
: toastReady(lock), jammer(j) {
gotToast = false;
buttered = 0;
}
void moreToastReady() {
Guard<Mutex> g(lock);
gotToast = true;
toastReady.signal();
}
void run() {
try {
while(!Thread::interrupted()) {
{
Guard<Mutex> g(lock);
while(!gotToast)
toastReady.wait();
++buttered;
}
cout << "Buttering toast "
<< buttered << endl;
jammer->moreButteredToastReady();
{
Guard<Mutex> g(lock);
gotToast = false;
}
}
} catch(Interrupted_Exception&) { /* Exit */ }
cout << "Butterer off" <<
endl;
}
};
class Toaster : public Runnable {
CountedPtr<Butterer> butterer;
int toasted;
public:
Toaster(CountedPtr<Butterer>& b) :
butterer(b) {
toasted = 0;
}
void run() {
try {
while(!Thread::interrupted()) {
Thread::sleep(rand()/(RAND_MAX/5)*100);
// ...
// Create new toast
// ...
cout << "New toast " <<
++toasted << endl;
butterer->moreToastReady();
}
} catch(Interrupted_Exception&) { /* Exit */ }
cout << "Toaster off" <<
endl;
}
};
int main() {
srand(time(0)); // Seed the random number generator
try {
cout << "Press <Return> to
quit" << endl;
CountedPtr<Jammer> jammer(new Jammer);
CountedPtr<Butterer> butterer(new
Butterer(jammer));
ThreadedExecutor executor;
executor.execute(new Toaster(butterer));
executor.execute(butterer);
executor.execute(jammer);
cin.get();
executor.interrupt();
} catch(Synchronization_Exception& e) {
cerr << e.what() << endl;
}
} ///:~
The classes are defined in the reverse order that they
operate to simplify forward-referencing issues.
Jammer and Butterer both contain a Mutex,
a Condition, and some kind of internal state information that changes to
indicate that the process should suspend or resume. (Toaster doesn’t
need these since it is the producer and doesn’t have to wait on anything.) The
two run( ) functions perform an operation, set a state flag, and
then call wait( ) to suspend the task. The moreToastReady( )
and moreButteredToastReady( ) functions change their respective
state flags to indicate that something has changed and the process should
consider resuming and then call signal( ) to wake up the thread.
The difference between this example and the previous one is
that, at least conceptually, something is being produced here: toast. The rate
of toast production is randomized a bit, to add some uncertainty. And you’ll
see that when you run the program, things aren’t going right because many
pieces of toast appear to be getting dropped on the floor—not buttered, not
jammed.
Often, threading problems are based on the need for tasks to
be serialized—that is, to take care of things in order. ToastOMatic.cpp
must not only take care of things in order, it must be able to work on one
piece of toast without worrying that toast is falling on the floor in the
meantime. You can solve many threading problems by using a queue that
synchronizes access to the elements within:
//: C11:TQueue.h
#ifndef TQUEUE_H
#define TQUEUE_H
#include <deque>
#include "zthread/Thread.h"
#include "zthread/Condition.h"
#include "zthread/Mutex.h"
#include "zthread/Guard.h"
template<class T> class TQueue {
ZThread::Mutex lock;
ZThread::Condition cond;
std::deque<T> data;
public:
TQueue() : cond(lock) {}
void put(T item) {
ZThread::Guard<ZThread::Mutex> g(lock);
data.push_back(item);
cond.signal();
}
T get() {
ZThread::Guard<ZThread::Mutex> g(lock);
while(data.empty())
cond.wait();
T returnVal = data.front();
data.pop_front();
return returnVal;
}
};
#endif // TQUEUE_H ///:~
This builds on the Standard C++ Library deque by
adding:
1. Synchronization to ensure that no two threads add objects at the
same time.
2. wait( ) and signal( ) so that a consumer
thread will automatically suspend if the queue is empty, and resume when more
elements become available.
This relatively small amount of code can solve a remarkable
number of problems.
Here’s a simple test that serializes the execution of LiftOff
objects. The consumer is LiftOffRunner, which pulls each LiftOff
object off the TQueue and runs it directly. (That is, it uses its own
thread by calling run( ) explicitly rather than starting up a new
thread for each task.)
//: C11:TestTQueue.cpp {RunByHand}
//{L} ZThread
#include <string>
#include <iostream>
#include "TQueue.h"
#include "zthread/Thread.h"
#include "LiftOff.h"
using namespace ZThread;
using namespace std;
class LiftOffRunner : public Runnable {
TQueue<LiftOff*> rockets;
public:
void add(LiftOff* lo) { rockets.put(lo); }
void run() {
try {
while(!Thread::interrupted()) {
LiftOff* rocket = rockets.get();
rocket->run();
}
} catch(Interrupted_Exception&) { /* Exit */ }
cout << "Exiting LiftOffRunner"
<< endl;
}
};
int main() {
try {
LiftOffRunner* lor = new LiftOffRunner;
Thread t(lor);
for(int i = 0; i < 5; i++)
lor->add(new LiftOff(10, i));
cin.get();
lor->add(new LiftOff(10, 99));
cin.get();
t.interrupt();
} catch(Synchronization_Exception& e) {
cerr << e.what() << endl;
}
} ///:~
The tasks are placed on the TQueue by main( )
and are taken off the TQueue by the LiftOffRunner. Notice that LiftOffRunner
can ignore the synchronization issues because they are solved by the TQueue.
Proper toasting
To solve the ToastOMatic.cpp problem, we can run the
toast through TQueues between processes. And to do this, we will need
actual toast objects, which maintain and display their state:
//: C11:ToastOMaticMarkII.cpp {RunByHand}
// Solving the problems using TQueues.
//{L} ZThread
#include <iostream>
#include <string>
#include <cstdlib>
#include <ctime>
#include "zthread/Thread.h"
#include "zthread/Mutex.h"
#include "zthread/Guard.h"
#include "zthread/Condition.h"
#include "zthread/ThreadedExecutor.h"
#include "TQueue.h"
using namespace ZThread;
using namespace std;
class Toast {
enum Status { DRY, BUTTERED, JAMMED };
Status status;
int id;
public:
Toast(int idn) : status(DRY), id(idn) {}
#ifdef __DMC__ // Incorrectly requires default
Toast() { assert(0); } // Should never be called
#endif
void butter() { status = BUTTERED; }
void jam() { status = JAMMED; }
string getStatus() const {
switch(status) {
case DRY: return "dry";
case BUTTERED: return "buttered";
case JAMMED: return "jammed";
default: return "error";
}
}
int getId() { return id; }
friend ostream& operator<<(ostream& os,
const Toast& t) {
return os << "Toast " << t.id
<< ": " << t.getStatus();
}
};
typedef CountedPtr< TQueue<Toast> >
ToastQueue;
class Toaster : public Runnable {
ToastQueue toastQueue;
int count;
public:
Toaster(ToastQueue& tq) : toastQueue(tq),
count(0) {}
void run() {
try {
while(!Thread::interrupted()) {
int delay = rand()/(RAND_MAX/5)*100;
Thread::sleep(delay);
// Make toast
Toast t(count++);
cout << t << endl;
// Insert into queue
toastQueue->put(t);
}
} catch(Interrupted_Exception&) { /* Exit */ }
cout << "Toaster off" <<
endl;
}
};
// Apply butter to toast:
class Butterer : public Runnable {
ToastQueue dryQueue, butteredQueue;
public:
Butterer(ToastQueue& dry, ToastQueue&
buttered)
: dryQueue(dry), butteredQueue(buttered) {}
void run() {
try {
while(!Thread::interrupted()) {
// Blocks until next piece of toast is
available:
Toast t = dryQueue->get();
t.butter();
cout << t << endl;
butteredQueue->put(t);
}
} catch(Interrupted_Exception&) { /* Exit */ }
cout << "Butterer off" <<
endl;
}
};
// Apply jam to buttered toast:
class Jammer : public Runnable {
ToastQueue butteredQueue, finishedQueue;
public:
Jammer(ToastQueue& buttered, ToastQueue&
finished)
: butteredQueue(buttered), finishedQueue(finished) {}
void run() {
try {
while(!Thread::interrupted()) {
// Blocks until next piece of toast is
available:
Toast t = butteredQueue->get();
t.jam();
cout << t << endl;
finishedQueue->put(t);
}
} catch(Interrupted_Exception&) { /* Exit */ }
cout << "Jammer off" << endl;
}
};
// Consume the toast:
class Eater : public Runnable {
ToastQueue finishedQueue;
int counter;
public:
Eater(ToastQueue& finished)
: finishedQueue(finished), counter(0) {}
void run() {
try {
while(!Thread::interrupted()) {
// Blocks until next piece of toast is
available:
Toast t = finishedQueue->get();
// Verify that the toast is coming in order,
// and that all pieces are getting jammed:
if(t.getId() != counter++ ||
t.getStatus() != "jammed") {
cout << ">>>> Error:
" << t << endl;
exit(1);
} else
cout << "Chomp! " << t
<< endl;
}
} catch(Interrupted_Exception&) { /* Exit */ }
cout << "Eater off" << endl;
}
};
int main() {
srand(time(0)); // Seed the random number generator
try {
ToastQueue dryQueue(new TQueue<Toast>),
butteredQueue(new TQueue<Toast>),
finishedQueue(new TQueue<Toast>);
cout << "Press <Return> to
quit" << endl;
ThreadedExecutor executor;
executor.execute(new Toaster(dryQueue));
executor.execute(new
Butterer(dryQueue,butteredQueue));
executor.execute(
new Jammer(butteredQueue, finishedQueue));
executor.execute(new Eater(finishedQueue));
cin.get();
executor.interrupt();
} catch(Synchronization_Exception& e) {
cerr << e.what() << endl;
}
} ///:~
Two things are immediately apparent in this solution: first,
the amount and complexity of code within each Runnable class is
dramatically reduced by the use of the TQueue because the guarding,
communication, and wait( )/signal( ) operations are now taken
care of by the TQueue. The Runnable classes don’t have Mutexes
or Condition objects anymore. Second, the coupling between the classes
is eliminated because each class communicates only with its TQueues.
Notice that the definition order of the classes is now independent. Less code
and less coupling are always good things, which suggests that the use of the TQueue
has a positive effect here, as it does on most problems.
The signal( ) function wakes up one thread that
is waiting on a Condition object. However, multiple threads may be
waiting on the same condition object, and in that case you might want to wake
them all up using broadcast( ) instead of signal( ).
As an example that brings together many of the concepts in
this chapter, consider a hypothetical robotic assembly line for automobiles.
Each Car will be built in several stages, and in this example we’ll look
at a single stage: after the chassis has been created, at the time when the
engine, drive train, and wheels are attached. The Cars are transported
from one place to another via a CarQueue, which is a type of TQueue.
A Director takes each Car (as a raw chassis) from the incoming CarQueue
and places it in a Cradle, which is where all the work is done. At this
point, the Director tells all the waiting robots (using broadcast( ))
that the Car is in the Cradle ready for the robots to work on it.
The three types of robots go to work, sending a message to the Cradle
when they finish their tasks. The Director waits until all the tasks are
complete and then puts the Car onto the outgoing CarQueue to be transported
to the next operation. Here, the consumer of the outgoing CarQueue is a Reporter
object, which just prints the Car to show that the tasks have been
properly completed.
//: C11:CarBuilder.cpp {RunByHand}
// How broadcast() works.
//{L} ZThread
#include <iostream>
#include <string>
#include "zthread/Thread.h"
#include "zthread/Mutex.h"
#include "zthread/Guard.h"
#include "zthread/Condition.h"
#include "zthread/ThreadedExecutor.h"
#include "TQueue.h"
using namespace ZThread;
using namespace std;
class Car {
int id;
bool engine, driveTrain, wheels;
public:
Car(int idn) : id(idn), engine(false),
driveTrain(false), wheels(false) {}
// Empty Car object:
Car() : id(-1), engine(false),
driveTrain(false), wheels(false) {}
// Unsynchronized -- assumes atomic bool operations:
int getId() { return id; }
void addEngine() { engine = true; }
bool engineInstalled() { return engine; }
void addDriveTrain() { driveTrain = true; }
bool driveTrainInstalled() { return driveTrain; }
void addWheels() { wheels = true; }
bool wheelsInstalled() { return wheels; }
friend ostream& operator<<(ostream& os,
const Car& c) {
return os << "Car " << c.id
<< " ["
<< " engine: " << c.engine
<< " driveTrain: " <<
c.driveTrain
<< " wheels: " << c.wheels
<< " ]";
}
};
typedef CountedPtr< TQueue<Car> > CarQueue;
class ChassisBuilder : public Runnable {
CarQueue carQueue;
int counter;
public:
ChassisBuilder(CarQueue& cq) :
carQueue(cq),counter(0) {}
void run() {
try {
while(!Thread::interrupted()) {
Thread::sleep(1000);
// Make chassis:
Car c(counter++);
cout << c << endl;
// Insert into queue
carQueue->put(c);
}
} catch(Interrupted_Exception&) { /* Exit */ }
cout << "ChassisBuilder off"
<< endl;
}
};
class Cradle {
Car c; // Holds current car being worked on
bool occupied;
Mutex workLock, readyLock;
Condition workCondition, readyCondition;
bool engineBotHired, wheelBotHired,
driveTrainBotHired;
public:
Cradle()
: workCondition(workLock), readyCondition(readyLock)
{
occupied = false;
engineBotHired = true;
wheelBotHired = true;
driveTrainBotHired = true;
}
void insertCar(Car chassis) {
c = chassis;
occupied = true;
}
Car getCar() { // Can only extract car once
if(!occupied) {
cerr << "No Car in Cradle for
getCar()" << endl;
return Car(); // "Null" Car object
}
occupied = false;
return c;
}
// Access car while in cradle:
Car* operator->() { return &c; }
// Allow robots to offer services to this cradle:
void offerEngineBotServices() {
Guard<Mutex> g(workLock);
while(engineBotHired)
workCondition.wait();
engineBotHired = true; // Accept the job
}
void offerWheelBotServices() {
Guard<Mutex> g(workLock);
while(wheelBotHired)
workCondition.wait();
wheelBotHired = true; // Accept the job
}
void offerDriveTrainBotServices() {
Guard<Mutex> g(workLock);
while(driveTrainBotHired)
workCondition.wait();
driveTrainBotHired = true; // Accept the job
}
// Tell waiting robots that work is ready:
void startWork() {
Guard<Mutex> g(workLock);
engineBotHired = false;
wheelBotHired = false;
driveTrainBotHired = false;
workCondition.broadcast();
}
// Each robot reports when their job is done:
void taskFinished() {
Guard<Mutex> g(readyLock);
readyCondition.signal();
}
// Director waits until all jobs are done:
void waitUntilWorkFinished() {
Guard<Mutex> g(readyLock);
while(!(c.engineInstalled() &&
c.driveTrainInstalled()
&& c.wheelsInstalled()))
readyCondition.wait();
}
};
typedef CountedPtr<Cradle> CradlePtr;
class Director : public Runnable {
CarQueue chassisQueue, finishingQueue;
CradlePtr cradle;
public:
Director(CarQueue& cq, CarQueue& fq,
CradlePtr cr)
: chassisQueue(cq), finishingQueue(fq), cradle(cr) {}
void run() {
try {
while(!Thread::interrupted()) {
// Blocks until chassis is available:
cradle->insertCar(chassisQueue->get());
// Notify robots car is ready for work
cradle->startWork();
// Wait until work completes
cradle->waitUntilWorkFinished();
// Put car into queue for further work
finishingQueue->put(cradle->getCar());
}
} catch(Interrupted_Exception&) { /* Exit */ }
cout << "Director off" <<
endl;
}
};
class EngineRobot : public Runnable {
CradlePtr cradle;
public:
EngineRobot(CradlePtr cr) : cradle(cr) {}
void run() {
try {
while(!Thread::interrupted()) {
// Blocks until job is offered/accepted:
cradle->offerEngineBotServices();
cout << "Installing engine"
<< endl;
(*cradle)->addEngine();
cradle->taskFinished();
}
} catch(Interrupted_Exception&) { /* Exit */ }
cout << "EngineRobot off" <<
endl;
}
};
class DriveTrainRobot : public Runnable {
CradlePtr cradle;
public:
DriveTrainRobot(CradlePtr cr) : cradle(cr) {}
void run() {
try {
while(!Thread::interrupted()) {
// Blocks until job is offered/accepted:
cradle->offerDriveTrainBotServices();
cout << "Installing DriveTrain"
<< endl;
(*cradle)->addDriveTrain();
cradle->taskFinished();
}
} catch(Interrupted_Exception&) { /* Exit */ }
cout << "DriveTrainRobot off"
<< endl;
}
};
class WheelRobot : public Runnable {
CradlePtr cradle;
public:
WheelRobot(CradlePtr cr) : cradle(cr) {}
void run() {
try {
while(!Thread::interrupted()) {
// Blocks until job is offered/accepted:
cradle->offerWheelBotServices();
cout << "Installing Wheels"
<< endl;
(*cradle)->addWheels();
cradle->taskFinished();
}
} catch(Interrupted_Exception&) { /* Exit */ }
cout << "WheelRobot off" <<
endl;
}
};
class Reporter : public Runnable {
CarQueue carQueue;
public:
Reporter(CarQueue& cq) : carQueue(cq) {}
void run() {
try {
while(!Thread::interrupted()) {
cout << carQueue->get() << endl;
}
} catch(Interrupted_Exception&) { /* Exit */ }
cout << "Reporter off" <<
endl;
}
};
int main() {
cout << "Press <Enter> to quit"
<< endl;
try {
CarQueue chassisQueue(new TQueue<Car>),
finishingQueue(new TQueue<Car>);
CradlePtr cradle(new Cradle);
ThreadedExecutor assemblyLine;
assemblyLine.execute(new EngineRobot(cradle));
assemblyLine.execute(new DriveTrainRobot(cradle));
assemblyLine.execute(new WheelRobot(cradle));
assemblyLine.execute(
new Director(chassisQueue, finishingQueue,
cradle));
assemblyLine.execute(new Reporter(finishingQueue));
// Start everything running by producing chassis:
assemblyLine.execute(new
ChassisBuilder(chassisQueue));
cin.get();
assemblyLine.interrupt();
} catch(Synchronization_Exception& e) {
cerr << e.what() << endl;
}
} ///:~
You’ll notice that Car takes a shortcut: it assumes
that bool operations are atomic, which, as previously discussed, is sometimes
a safe assumption but requires careful thought. Each Car
begins as an unadorned chassis, and different robots will attach different
parts to it, calling the appropriate “add” function when they do.
A ChassisBuilder simply creates a new Car
every second and places it into the chassisQueue. A Director
manages the build process by taking the next Car off the chassisQueue,
putting it into the Cradle, telling all the robots to startWork( ),
and suspending itself by calling waitUntilWorkFinished( ). When the
work is done, the Director takes the Car out of the Cradle
and puts in into the finishingQueue.
The Cradle is the crux of the signaling operations. A
Mutex and a Condition object control both the working of the
robots and indicate whether all the operations are finished. A particular type
of robot can offer its services to the Cradle by calling the “offer”
function appropriate to its type. At this point, that robot thread is suspended
until the Director calls startWork( ), which changes the
hiring flags and calls broadcast( ) to tell all the robots to show
up for work. Although this system allows any number of robots to offer their
services, each one of those robots has its thread suspended by doing so. You
could imagine a more sophisticated system where the robots register themselves
with many different Cradles without being suspended by that registration
process and then reside in a pool waiting for the first Cradle that
needs a task completed.
After each robot finishes its task (changing the state of
the Car in the process), it calls taskFinished( ), which
sends a signal( ) to the readyCondition, which is what the Director
is waiting on in waitUntilWorkFinished( ). Each time the director
thread awakens, the state of the Car is checked, and if it still isn’t
finished, that thread is suspended again.
When the Director inserts a Car into the Cradle,
you can perform operations on that Car via the operator->( ).
To prevent multiple extractions of the same car, a flag causes an error report
to be generated. (Exceptions don’t propagate across threads in the ZThread
library.)
In main( ), all the necessary objects are
created and the tasks are initialized, with the ChassisBuilder begun
last to start the process. (However, because of the behavior of the TQueue,
it wouldn’t matter if it were started first.) Note that this program follows
all the guidelines regarding object and task lifetime presented in this
chapter, and so the shutdown process is safe.
Because threads can become blocked and because
objects can have mutexes that prevent threads from accessing that object until
the mutex is released, it’s possible for one thread to get stuck waiting for
another thread, which in turn waits for another thread, and so on, until the
chain leads back to a thread waiting on the first one. You get a continuous
loop of threads waiting on each other, and no one can move. This is called deadlock.
If you try running a program and it deadlocks right away,
you immediately know you have a problem, and you can track it down. The real
problem is when your program seems to be working fine but has the hidden
potential to deadlock. In this case, you may get no indication that deadlocking
is a possibility, so it will be latent in your program until it unexpectedly
happens to a customer. (And you probably won’t be able to easily reproduce it.)
Thus, preventing deadlock through careful program design is a critical part of
developing concurrent programs.
Let’s look at the classic demonstration of deadlock,
invented by Edsger Dijkstra: the dining philosophers problem. The basic description specifies five philosophers (but the example shown here
will allow any number). These philosophers spend part of their time thinking
and part of their time eating. While they are thinking, they don’t need any
shared resources, but they eat using a limited number of utensils. In the
original problem description, the utensils are forks, and two forks are
required to get spaghetti from a bowl in the middle of the table, but it seems
to make more sense to say that the utensils are chopsticks. Clearly, each
philosopher will require two chopsticks in order to eat.
A difficulty is introduced into the problem: as
philosophers, they have very little money, so they can only afford five
chopsticks. These are spaced around the table between them. When a philosopher
wants to eat, they must pick up the chopstick to the left and the one to the
right. If the philosopher on either side is using a desired chopstick, our
philosopher must wait until the necessary chopsticks become available.
//: C11:DiningPhilosophers.h
// Classes for Dining Philosophers.
#ifndef DININGPHILOSOPHERS_H
#define DININGPHILOSOPHERS_H
#include <string>
#include <iostream>
#include <cstdlib>
#include "zthread/Condition.h"
#include "zthread/Guard.h"
#include "zthread/Mutex.h"
#include "zthread/Thread.h"
#include "Display.h"
class Chopstick {
ZThread::Mutex lock;
ZThread::Condition notTaken;
bool taken;
public:
Chopstick() : notTaken(lock), taken(false) {}
void take() {
ZThread::Guard<ZThread::Mutex> g(lock);
while(taken)
notTaken.wait();
taken = true;
}
void drop() {
ZThread::Guard<ZThread::Mutex> g(lock);
taken = false;
notTaken.signal();
}
};
class Philosopher : public ZThread::Runnable {
Chopstick& left;
Chopstick& right;
int id;
int ponderFactor;
ZThread::CountedPtr<Display> display;
int randSleepTime() {
if(ponderFactor == 0) return 0;
return rand()/(RAND_MAX/ponderFactor) * 250;
}
void output(std::string s) {
std::ostringstream os;
os << *this << " " << s
<< std::endl;
display->output(os);
}
public:
Philosopher(Chopstick& l, Chopstick& r,
ZThread::CountedPtr<Display>& disp, int
ident,int ponder)
: left(l), right(r), id(ident), ponderFactor(ponder),
display(disp) {}
virtual void run() {
try {
while(!ZThread::Thread::interrupted()) {
output("thinking");
ZThread::Thread::sleep(randSleepTime());
// Hungry
output("grabbing right");
right.take();
output("grabbing left");
left.take();
output("eating");
ZThread::Thread::sleep(randSleepTime());
right.drop();
left.drop();
}
} catch(ZThread::Synchronization_Exception& e)
{
output(e.what());
}
}
friend std::ostream&
operator<<(std::ostream& os, const
Philosopher& p) {
return os << "Philosopher " <<
p.id;
}
};
#endif // DININGPHILOSOPHERS_H
///:~
No two Philosophers can take( ) a Chopstick
at the same time, since take( ) is synchronized with a Mutex.
In addition, if the chopstick has already been taken by one Philosopher,
another can wait( ) on the available Condition until the Chopstick
becomes available when the current holder calls drop( ) (which must
also be synchronized to prevent race conditions and ensure memory visibility in
multiprocessor systems).
Each Philosopher holds references to their left and
right Chopstick so they can attempt to pick those up. The goal of the Philosopher
is to think part of the time and eat part of the time, and this is expressed in
main( ). However, you will observe that if the Philosophers
spend very little time thinking, they will all be competing for the Chopsticks
while they try to eat, and deadlock will happen much more quickly. So you can
experiment with this, the ponderFactor weights the length of time that a
Philosopher tends to spend thinking and eating. A smaller ponderFactor
will increase the probability of deadlock.
In Philosopher::run( ), each Philosopher
just thinks and eats continuously. You see the Philosopher thinking for
a randomized amount of time, then trying to take( ) the right
and then the left Chopstick, eating for a randomized amount of
time, and then doing it again. Output to the console is synchronized as seen
earlier in this chapter.
This problem is interesting because it demonstrates that a
program can appear to run correctly but actually be deadlock prone. To show
this, the command-line argument adjusts a factor to affect the amount of time
each philosopher spends thinking. If you have lots of philosophers or they
spend a lot of time thinking, you may never see the deadlock even though it
remains a possibility. A command-line argument of zero tends to make it
deadlock fairly quickly:
//: C11:DeadlockingDiningPhilosophers.cpp {RunByHand}
// Dining Philosophers with Deadlock.
//{L} ZThread
#include <ctime>
#include "DiningPhilosophers.h"
#include "zthread/ThreadedExecutor.h"
using namespace ZThread;
using namespace std;
int main(int argc, char* argv[]) {
srand(time(0)); // Seed the random number generator
int ponder = argc > 1 ? atoi(argv[1]) : 5;
cout << "Press <ENTER> to quit"
<< endl;
enum { SZ = 5 };
try {
CountedPtr<Display> d(new Display);
ThreadedExecutor executor;
Chopstick c[SZ];
for(int i = 0; i < SZ; i++) {
executor.execute(
new Philosopher(c[i], c[(i+1) % SZ], d,
i,ponder));
}
cin.get();
executor.interrupt();
executor.wait();
} catch(Synchronization_Exception& e) {
cerr << e.what() << endl;
}
} ///:~
Note that the Chopstick objects do not need internal
identifiers; they are identified by their position in the array c. Each
Philosopher is given a reference to a left and right Chopstick
object when constructed; these are the utensils that must be picked up before
that Philosopher can eat. Every Philosopher except the last one
is initialized by situating that Philosopher between the next pair of Chopstick
objects. The last Philosopher is given the zeroth Chopstick for
its right Chopstick, so the round table is completed. That’s because the
last Philosopher is sitting right next to the first one, and they both
share that zeroth chopstick. With this arrangement, it’s possible at some point
for all the philosophers to be trying to eat and waiting on the philosopher
next to them to put down their chopstick, and the program will deadlock.
If your threads (philosophers) are spending more time on
other tasks (thinking) than eating, then they have a much lower probability of
requiring the shared resources (chopsticks), and thus you can convince yourself
that the program is deadlock free (using a nonzero ponder value), even
though it isn’t.
To repair the problem, you must understand that deadlock can occur if four conditions are simultaneously met:
1. Mutual exclusion. At least one resource used by the threads must not be
shareable. In this case, a chopstick can be used by only one philosopher at a
time.
2. At least one process must be holding a resource and waiting to acquire a
resource currently held by another process. That is, for deadlock to occur, a
philosopher must be holding one chopstick and waiting for another one.
3. A resource cannot be preemptively taken away from a process. Processes
only release resources as a normal event. Our philosophers are polite and they
don’t grab chopsticks from other philosophers.
4. A circular wait can happen, whereby a process waits on a resource held
by another process, which in turn is waiting on a resource held by another
process, and so on, until one of the processes is waiting on a resource held by
the first process, thus gridlocking everything. In DeadlockingDiningPhilosophers.cpp,
the circular wait happens because each philosopher tries to get the right
chopstick first and then the left.
Because all these conditions must be met to cause deadlock,
you need to stop only one of them from occurring to prevent deadlock. In this
program, the easiest way to prevent deadlock is to break condition four. This
condition happens because each philosopher is trying to pick up their
chopsticks in a particular sequence: first right, then left. Because of that,
it’s possible to get into a situation where each of them is holding their right
chopstick and waiting to get the left, causing the circular wait condition.
However, if the last philosopher is initialized to try to get the left
chopstick first and then the right, that philosopher will never prevent the
philosopher on the immediate right from picking up their left chopstick. In
this case, the circular wait is prevented. This is only one solution to the
problem, but you could also solve it by preventing one of the other conditions
(see advanced threading books for more details):
//: C11:FixedDiningPhilosophers.cpp {RunByHand}
// Dining Philosophers without Deadlock.
//{L} ZThread
#include <ctime>
#include "DiningPhilosophers.h"
#include "zthread/ThreadedExecutor.h"
using namespace ZThread;
using namespace std;
int main(int argc, char* argv[]) {
srand(time(0)); // Seed the random number generator
int ponder = argc > 1 ? atoi(argv[1]) : 5;
cout << "Press <ENTER> to quit"
<< endl;
enum { SZ = 5 };
try {
CountedPtr<Display> d(new Display);
ThreadedExecutor executor;
Chopstick c[SZ];
for(int i = 0; i < SZ; i++) {
if(i < (SZ-1))
executor.execute(
new Philosopher(c[i], c[i + 1], d, i,
ponder));
else
executor.execute(
new Philosopher(c[0], c[i], d, i, ponder));
}
cin.get();
executor.interrupt();
executor.wait();
} catch(Synchronization_Exception& e) {
cerr << e.what() << endl;
}
} ///:~
By ensuring that the last philosopher picks up and puts down
their left chopstick before their right, the deadlock is removed, and the
program will run smoothly.
There is no language support to help prevent deadlock; it’s
up to you to avoid it by careful design. These are not comforting words to the
person who’s trying to debug a deadlocking program.
The goal of this chapter was to give you the foundations of
concurrent programming with threads:
1. You
can run multiple independent tasks.
2. You
must consider all the possible problems when these tasks shut down. Objects or
other tasks may disappear before tasks are finished with them.
3. Tasks
can collide with each other over shared resources. The mutex is the basic tool
used to prevent these collisions.
4. Tasks
can deadlock if they are not carefully designed.
However, there are multiple additional facets of threading
and tools to help you solve threading problems. The ZThreads library contains a
number of these tools, such as semaphores and special types of queues,
similar to the one you saw in this chapter. Explore that library as well as
other resources on threading to gain more in-depth knowledge.
It is vital to learn when to use concurrency and when to avoid it. The main reasons to use it are:
· To manage a number of tasks whose intermingling use the computer
more efficiently (including the ability to transparently distribute the tasks
across multiple CPUs).
· To allow better code organization.
· To be more convenient for the user.
The classic example of resource balancing is to use the CPU
during I/O waits. The classic example of user convenience is to monitor a
“stop” button during long downloads.
An additional advantage to threads is that they provide
“light” execution context switches (on the order of 100 instructions) rather
than “heavy” process context switches (thousands of instructions). Since all
threads in a given process share the same memory space, a light context switch
changes only program execution and local variables. A process change—the heavy
context switch—must exchange the full memory space.
The main drawbacks to multithreading are:
· Slowdown occurs while waiting for shared resources.
· Additional CPU overhead is required to manage threads.
· Unrewarded complexity arises from poor design decisions.
· Opportunities are created for pathologies such as starving,
racing, deadlock, and livelock.
· Inconsistencies occur across platforms. When developing the
original material (in Java) for this chapter, we discovered race conditions
that quickly appeared on some computers but wouldn’t appear on others. The C++
examples in this chapter behaved differently (but usually acceptably) under
different operating systems. If you develop a program on a computer and things
seem to work right, you might get an unwelcome surprise when you distribute it.
One of the biggest difficulties with threads occurs because
more than one thread might be sharing a resource—such as the memory in an
object—and you must make sure that multiple threads don’t try to read and
change that resource at the same time. This requires judicious use of
synchronization tools, which must be thoroughly understood because they can
quietly introduce deadlock situations.
In addition, there’s a certain art to the application of
threads. C++ is designed to allow you to create as many objects as you need to
solve your problem—at least in theory. (Creating millions of objects for an
engineering finite-element analysis, for example, might not be practical.) However,
there is usually an upper bound to the number of threads you’ll want to create,
because at some number, threads may become balky. This critical point can be
difficult to detect and will often depend on the OS and thread library; it
could be fewer than a hundred or in the thousands. As you often create only a
handful of threads to solve a problem, this is typically not much of a limit;
but in a more general design it becomes a constraint.
Regardless of how simple threading can seem using a
particular language or library, consider it a black art. There’s always
something you haven’t considered that can bite you when you least expect it.
(For example, note that because the dining philosophers problem can be adjusted
so that deadlock rarely happens, you can get the impression that everything is
OK.) An appropriate quote comes from Guido van Rossum, creator of the Python
programming language:
In any project that is multithreaded,
most bugs will come from threading issues. This is regardless of programming
language—it’s a deep, as yet un-understood property of threads.
For more advanced discussions of threading, see Parallel
and Distributed Programming Using C++, by Cameron Hughes and Tracey Hughes,
Addison Wesley 2004.
Solutions
to selected exercises can be found in the electronic document The Thinking
in C++ Volume 2 Annotated Solution Guide, available for a small fee from www.MindView.net.
1. Inherit a class from Runnable and override the run( )
function. Inside run( ), print a message, and then call sleep( ).
Repeat this three times, and then return from run( ). Put a
start-up message in the constructor and a shut-down message when the task
terminates. Make several thread objects of this type, and run them to see what
happens.
2. Modify BasicThreads.cpp to make LiftOff threads
start other LiftOff threads.
3. Modify ResponsiveUI.cpp to eliminate any possible race
conditions. (Assume bool operations are not atomic.)
4. In Incrementer.cpp, modify the Count class to use a
single int instead of an array of int. Explain the resulting
behavior.
5. In EvenChecker.h, correct the potential problem in the Generator
class. (Assume bool operations are not atomic.)
6. Modify EvenGenerator.cpp to use interrupt( )
instead of quit flags.
7. In MutexEvenGenerator.cpp, change the code in MutexEvenGenerator::nextValue( )
so that the return expression precedes the release( ) statement and
explain what happens.
8. Modify ResponsiveUI.cpp to use interrupt( )
instead of the quitFlag approach.
9. Look up the Singleton documentation in the ZThreads
library. Modify OrnamentalGarden.cpp so that the Display object
is controlled by a Singleton to prevent more than one Display
from being accidentally created.
10. In OrnamentalGarden.cpp, change the Count::increment( )
function so that it does a direct increment of count (that is, it just
does a count++). Now remove the guard and see if that causes a failure.
Is this safe and reliable?
11. Modify OrnamentalGarden.cpp so that it uses interrupt( )
instead of the pause( ) mechanism. Make sure that your solution
doesn’t prematurely destroy objects.
12. Modify WaxOMatic.cpp by adding more instances of the Process
class so that it applies and polishes three coats of wax instead of just one.
13. Create two Runnable subclasses, one with a run( )
that starts and calls wait( ). The other class’s run( )
should capture the reference of the first Runnable object. Its run( )
should call signal( ) for the first thread after some number of
seconds have passed so that first thread can print a message.
14. Create an example of a “busy wait.” One thread sleeps for awhile
and then sets a flag to true. The second thread watches that flag inside
a while loop (this is the “busy wait”) and, when the flag becomes true,
sets it back to false and reports the change to the console. Note how
much wasted time the program spends inside the “busy wait,” and create a second
version of the program that uses wait( ) instead of the “busy
wait.” Extra: run a profiler to show the time used by the CPU in each case.
15. Modify TQueue.h to add a maximum allowable element count.
If the count is reached, further writes should be blocked until the count drops
below the maximum. Write code to test this behavior.
16. Modify ToastOMaticMarkII.cpp to create peanut-butter and
jelly on toast sandwiches using two separate assembly lines and an output TQueue
for the finished sandwiches. Use a Reporter object as in CarBuilder.cpp
to display the results.
17. Rewrite C07:BankTeller.cpp to use real threading instead
of simulated threading.
18. Modify CarBuilder.cpp to give identifiers to the robots,
and add more instances of the different kinds of robots. Note whether all
robots get utilized.
19. Modify CarBuilder.cpp to add another stage to the
car-building process, whereby you add the exhaust system, body, and fenders. As
with the first stage, assume these processes can be performed simultaneously by
robots.
20. Modify CarBuilder.cpp so that Car has synchronized
access to all the bool variables. Because Mutexes cannot be
copied, this will require significant changes throughout the program.
21. Using the approach in CarBuilder.cpp, model the
house-building story that was given in this chapter.
22. Create a Timer class with two options: (1) a one-shot
timer that only goes off once (2) a timer that goes off at regular intervals.
Use this class with C10:MulticastCommand.cpp to move the calls to TaskRunner::run( )
from the procedures into the timer.
23. Change both of the dining philosophers examples so that the
number of Philosophers is controlled on the command line, in addition to
the ponder time. Try different values and explain the results.
24. Change DiningPhilosophers.cpp so that the Philosophers
just pick the next available chopstick. (When a Philosopher is done with
their chopsticks, they drop them into a bin. When a Philosopher wants to
eat, they take the next two available chopsticks from the bin.) Does this
eliminate the possibility of deadlock? Can you reintroduce deadlock by simply
reducing the number of available chopsticks?
The C++ Programming Language, 3rd edition,
by Bjarne Stroustrup (Addison Wesley 1997). To some degree, the goal of the
book that you’re currently holding is to allow you to use Bjarne’s book as a
reference. Since his book contains the description of the language by the
author of that language, it’s typically the place where you’ll go to resolve
any uncertainties about what C++ is or isn’t supposed to do. When you get the
knack of the language and are ready to get serious, you’ll need it.
C++ Primer, 3rd Edition, by Stanley
Lippman and Josee Lajoie (Addison Wesley 1998). Not that much of a primer
anymore; it’s evolved into a thick book filled with lots of detail, and the one
that I reach for along with Stroustrup’s when trying to resolve an issue. Thinking
in C++ should provide a basis for understanding the C++ Primer as
well as Stroustrup’s book.
Accelerated C++, by Andrew Koenig and Barbara Moo (Addison
Wesley, 2000). Takes you through C++ by programming topic instead of language
feature. Excellent introductory book.
The C++ Standard Library, by Nicolai Josuttis (Addison
Wesley, 1999).
Readable tutorial and reference for the entire C++ library, including STL.
Assumes familiarity with language concepts.
STL Tutorial and Reference Guide, 2nd Edition, by
David R. Musser et al (Addison Wesley, 2001). Gentle but thorough introduction
to the concepts underlying STL. Contains an STL reference manual.
The C++ ANSI/ISO Standard. This is not free,
unfortunately (I certainly didn’t get paid for my time and effort on the
Standards Committee—in fact, it cost me a lot of money). But at least you can
buy the electronic form in PDF for only $18 at http://www.ncits.org/cplusplus.htm.
Listed in order of publication. Not all these are currently
available.
Computer Interfacing with Pascal & C, (Self-published
via the Eisys imprint, 1988. Only available via www.MindView.net). An
introduction to electronics from back when CP/M was still king and DOS was an
upstart. I used high-level languages and often the parallel port of the
computer to drive various electronic projects. Adapted from my columns in the
first and best magazine I wrote for, Micro Cornucopia. (To paraphrase
Larry O’Brien, long-time editor of Software Development Magazine: The
best computer magazine ever published—they even had plans for building a robot
in a flower pot!) Alas, Micro C became lost long before the Internet appeared.
Creating this book was an extremely satisfying publishing experience.
Using C++, (Osborne/McGraw-Hill, 1989).
One of the first books out on C++. This is out of print and replaced by its
second edition, the renamed C++ Inside & Out.
C++ Inside & Out, (Osborne/McGraw-Hill,
1993). As noted, this is actually the second edition of Using C++. The
C++ in this book is reasonably accurate, but it’s circa 1992 and Thinking in
C++ is intended to replace it. You can find out more about this book and
download the source code at www.MindView.net.
Thinking in C++, 1st Edition,
(Prentice Hall, 1995). Winner of the Software Development Magazine Jolt
Award for best book of 1995.
Thinking in C++, 2nd Edition, Volume 1,
(Prentice Hall, 2000). Downloadable from www.MindView.net.
Black Belt C++: the Master’s Collection, Bruce
Eckel, editor (M&T Books, 1994). Out of print (often available through
out-of-print services on the Web). A collection of chapters by various C++
luminaries based on their presentations in the C++ track at the Software
Development Conference, which I chaired. The cover on this book stimulated me
to gain control over all future cover designs.
Thinking in Java, 1st Edition,
(Prentice Hall, 1998). The first edition of this book won the Software
Development Magazine Productivity Award, the Java Developer’s
Journal Editor’s Choice Award, and the JavaWorld Reader’s Choice Award
for best book. On the CD ROM in the back of this book, and downloadable
from www.MindView.net.
Thinking in Java, 2nd Edition,
(Prentice Hall, 2000). This edition won the JavaWorld Editor’s Choice Award
for best book. On the CD ROM in the back of this book, and downloadable
from www.MindView.net.
Thinking in Java, 3rd Edition,
(Prentice Hall, 2002). This edition won the Software Development Magazine
Jolt Award for best book of 2002, and the Java Developer’s Journal Editor’s
Choice Award. The new CD ROM in the back of this book now includes the first
seven lectures from the 2nd edition of the Hands-On Java CD ROM.
The Hands-On Java CD ROM, 3rd
edition (MindView, 2004). Over 15 hours of Bruce’s lectures and slides covering
the basics of the Java language, based on Thinking in Java, 3rd
Edition. Available only at www.MindView.net.
C & C++ Code Capsules, by Chuck Allison
(Prentice-Hall, 1998). An in-the-trenches guide for practical C and C++
programming. Thoroughly covers the 1998 ISO C++ standard, especially library
features, and serves as a bridge to more advanced topics. Based on Chuck’s
well-known column in the C/C++ Users Journal.
Thinking in C: Foundations for Java & C++, by
Chuck Allison (not a book, but a MindView, Inc. Seminar on CD ROM, 1999,
bundled with Thinking in Java and Thinking in C++, Volume 1). A
multimedia course including lectures and slides in the foundations of the C
Language, to prepare you to learn Java or C++. This is not an exhaustive course
in C; only the necessities for moving on to the other languages are included.
An extra section covering features for the C++ programmer is included.
Prerequisite: experience with a high-level programming language, such as Pascal,
BASIC, FORTRAN, or LISP.
Books that go more deeply into topics of the language, and
help you avoid the typical pitfalls inherent in developing C++ programs.
Large-Scale C++ Software Design, by John Lakos (Addison
Wesley, 1996). Motivates and presents in-the-trenches techniques for large C++
projects.
Effective C++, 2nd Edition, by Scott Meyers (Addison Wesley,
1997).
Classic book of techniques to improve C++ designs. Codifies many of the things
that programmers have to learn the hard way.
More Effective C++, by Scott Meyers (Addison Wesley,
1995)
Continuation of Effective C++ (above). Another C++ classic.
Effective STL, by Scott Meyers (Addison Wesley, 2001).
Extremely practical, in-depth coverage of how to use the STL. Contains expert
advice found nowhere else.
Generic Programming and the STL, by Matt Austern (Addison
Wesley, 1998). Explores the conceptual underpinnings of the design of the STL.
Heavy on theory, but imparts a visionary look into the design of generic
libraries.
Exceptional C++, by Herb Sutter (Addison Wesley, 2000).
Leads the reader through a progression of problems and their solution. Gives
easy-to-remember advice for solid design of modern C++ programs.
More Exceptional C++, by Herb Sutter (Addison Wesley,
2001).
Continuation of Exceptional C++ (above).
C++ FAQs, 2nd Edition, by Marshall Cline, Greg Lomow,
and Mike Girou
(Addison Wesley, 1998). Nicely-structured compendium of common C++ questions
and their answers. Covers a broad range of topics, from beginner to advanced.
C++ Gotchas, by Stephen Dewhurst (Addison Wesley,
2002). Contemporary catalog of easy-to-discover but hard-to-remedy C++ quirks
by a widely-renowned recognized C++ expert.
C++ Templates, The Complete Guide, by Daveed Vandevoorde
and Nicolai M. Josuttis (Addison Wesley, 2002). The first and only book devoted
completely to templates. The definitive reference.
Standard C++ iostreams and Locales, by Angelika Langer and Klaus Kreft (Addison Wesley, 2000). The most in-depth coverage
of iostreams available. Plumbs the depths of streams implementation and
idiomatic use. A handy reference as well as tutorial.
Design & Evolution of C++, by Bjarne Stroustrup (Addison
Wesley, 1994). Traces the complete history of C++, documenting the design
decisions that were made along the way. If you want to know why C++ is the way
it is, this is the book with the answers, written by the designer of the
language.
Modern C++ Design, by Andrei Alexandrescu (Addison Wesley,
2001). The standard text on policy-based design in C++. Filled with practical,
advanced uses of templates.
Parallel and Distributed Programming Using C++,
Cameron Hughes and Tracey Hughes (Addison Wesley, 2004). Thorough and readable
coverage of all aspects of concurrency, including basic concepts, threads, and
multi-processing. For beginners and experts alike.
Generative Programming, by Krzysztof Czarnecki and
Ulrich Eisencecker, (Addison Wesley, 2000). Ground-breaking book on
highly-advanced C++ techniques. Takes software automation to the next level.
Multi-Paradigm Design for C++, by James O. Coplien (Addison
Wesley, 1998). Advanced text showing how to harmonize the use of procedural,
object-oriented, and generic programming for effective C++ designs.
Design Patterns, by Erich Gamma et. al. (Addison Wesley,
1995).
The revolutionary book that introduced design patterns to the industry.
Catalogs a selection of design patterns with motivation and examples (using C++
and a little SmallTalk).
Pattern-Oriented System Architecture, Volume 1: A System
of Patterns, by Frank Buschmann et al (John Wiley & Son, 1996).
Another look at design patterns in practice. Introduces new design patterns.
This appendix contains files that are required to build the examples
in Volume 2.
//: :require.h
// Test for error conditions in programs.
#ifndef REQUIRE_H
#define REQUIRE_H
#include <cstdio>
#include <cstdlib>
#include <fstream>
inline void require(bool requirement,
const char* msg = "Requirement failed") {
// Local "using namespace std" for old
compilers:
using namespace std;
if(!requirement) {
fputs(msg, stderr);
fputs("\n", stderr);
exit(EXIT_FAILURE);
}
}
inline void requireArgs(int argc, int args,
const char* msg = "Must use %d arguments")
{
using namespace std;
if(argc != args + 1) {
fprintf(stderr, msg, args);
fputs("\n", stderr);
exit(EXIT_FAILURE);
}
}
inline void requireMinArgs(int argc, int minArgs,
const char* msg = "Must use at least %d
arguments") {
using namespace std;
if(argc < minArgs + 1) {
fprintf(stderr, msg, minArgs);
fputs("\n", stderr);
exit(EXIT_FAILURE);
}
}
inline void assure(std::ifstream& in,
const char* filename = "") {
using namespace std;
if(!in) {
fprintf(stderr, "Could not open file
%s\n", filename);
exit(EXIT_FAILURE);
}
}
inline void assure(std::ofstream& in,
const char* filename = "") {
using namespace std;
if(!in) {
fprintf(stderr, "Could not open file
%s\n", filename);
exit(EXIT_FAILURE);
}
}
inline void assure(std::fstream& in,
const char* filename = "") {
using namespace std;
if(!in) {
fprintf(stderr, "Could not open file
%s\n", filename);
exit(EXIT_FAILURE);
}
}
#endif // REQUIRE_H ///:~
//: C0B:Dummy.cpp
// To give the makefile at least
// one target for this directory.
int main() {} ///:~
The Date class files:
//: C02:Date.h
#ifndef DATE_H
#define DATE_H
#include <string>
#include <stdexcept>
#include <iosfwd>
class Date {
int year, month, day;
int compare(const Date&) const;
static int daysInPrevMonth(int year, int mon);
public:
// A class for date calculations
struct Duration {
int years, months, days;
Duration(int y, int m, int d)
: years(y), months(m) ,days(d) {}
};
// An exception class
struct DateError : public std::logic_error {
DateError(const std::string& msg =
"")
: std::logic_error(msg) {}
};
Date();
Date(int, int, int) throw(DateError);
Date(const std::string&) throw(DateError);
int getYear() const;
int getMonth() const;
int getDay() const;
std::string toString() const;
friend Duration duration(const Date&, const
Date&);
friend bool operator<(const Date&, const
Date&);
friend bool operator<=(const Date&, const
Date&);
friend bool operator>(const Date&, const
Date&);
friend bool operator>=(const Date&, const
Date&);
friend bool operator==(const Date&, const
Date&);
friend bool operator!=(const Date&, const
Date&);
friend std::ostream&
operator<<(std::ostream&,
const Date&);
friend std::istream&
operator>>(std::istream&, Date&);
};
#endif // DATE_H ///:~
//: C02:Date.cpp {O}
#include "Date.h"
#include <iostream>
#include <sstream>
#include <cstdlib>
#include <string>
#include <algorithm> // For swap()
#include <ctime>
#include <cassert>
#include <iomanip>
using namespace std;
namespace {
const int daysInMonth[][13] = {
{ 0, 31, 28, 31, 30, 31, 30, 31, 31, 30, 31, 30, 31
},
{ 0, 31, 29, 31, 30, 31, 30, 31, 31, 30, 31, 30, 31
}
};
inline bool isleap(int y) {
return y%4 == 0 && y%100 != 0 || y%400 ==
0;
}
}
Date::Date() {
// Get current date
time_t tval = time(0);
struct tm *now = localtime(&tval);
year = now->tm_year + 1900;
month = now->tm_mon + 1;
day = now->tm_mday;
}
Date::Date(int yr,int mon,int dy)
throw(Date::DateError) {
if(!(1 <= mon && mon <= 12))
throw DateError("Bad month in Date
ctor");
if(!(1 <= dy && dy <=
daysInMonth[isleap(year)][mon]))
throw DateError("Bad day in Date ctor");
year = yr;
month = mon;
day = dy;
}
Date::Date(const std::string& s)
throw(Date::DateError) {
// Assume YYYYMMDD format
if(!(s.size() == 8))
throw DateError("Bad string in Date
ctor");
for(int n = 8; --n >= 0;)
if(!isdigit(s[n]))
throw DateError("Bad string in Date
ctor");
string buf = s.substr(0, 4);
year = atoi(buf.c_str());
buf = s.substr(4, 2);
month = atoi(buf.c_str());
buf = s.substr(6, 2);
day = atoi(buf.c_str());
if(!(1 <= month && month <= 12))
throw DateError("Bad month in Date
ctor");
if(!(1 <= day && day
<=
daysInMonth[isleap(year)][month]))
throw DateError("Bad day in Date ctor");
}
int Date::getYear() const { return year; }
int Date::getMonth() const { return month; }
int Date::getDay() const { return day; }
string Date::toString() const {
ostringstream os;
os.fill('0');
os << setw(4) << year
<< setw(2) << month
<< setw(2) << day;
return os.str();
}
int Date::compare(const Date& d2) const {
int result = year - d2.year;
if(result == 0) {
result = month - d2.month;
if(result == 0)
result = day - d2.day;
}
return result;
}
int Date::daysInPrevMonth(int year, int month) {
if(month == 1) {
--year;
month = 12;
}
else
--month;
return daysInMonth[isleap(year)][month];
}
bool operator<(const Date& d1, const Date&
d2) {
return d1.compare(d2) < 0;
}
bool operator<=(const Date& d1, const Date&
d2) {
return d1 < d2 || d1 == d2;
}
bool operator>(const Date& d1, const Date&
d2) {
return !(d1 < d2) && !(d1 == d2);
}
bool operator>=(const Date& d1, const Date&
d2) {
return !(d1 < d2);
}
bool operator==(const Date& d1, const Date& d2)
{
return d1.compare(d2) == 0;
}
bool operator!=(const Date& d1, const Date& d2)
{
return !(d1 == d2);
}
Date::Duration
duration(const Date& date1, const Date& date2)
{
int y1 = date1.year;
int y2 = date2.year;
int m1 = date1.month;
int m2 = date2.month;
int d1 = date1.day;
int d2 = date2.day;
// Compute the compare
int order = date1.compare(date2);
if(order == 0)
return Date::Duration(0,0,0);
else if(order > 0) {
// Make date1 precede date2 locally
using std::swap;
swap(y1, y2);
swap(m1, m2);
swap(d1, d2);
}
int years = y2 - y1;
int months = m2 - m1;
int days = d2 - d1;
assert(years > 0 ||
years == 0 && months > 0 ||
years == 0 && months == 0 && days
> 0);
// Do the obvious corrections (must adjust days
// before months!) - This is a loop in case the
// previous month is February, and days < -28.
int lastMonth = m2;
int lastYear = y2;
while(days < 0) {
// Borrow from month
assert(months > 0);
days += Date::daysInPrevMonth(
lastYear, lastMonth--);
--months;
}
if(months < 0) {
// Borrow from year
assert(years > 0);
months += 12;
--years;
}
return Date::Duration(years, months, days);
}
ostream& operator<<(ostream& os, const
Date& d) {
char fillc = os.fill('0');
os << setw(2) << d.getMonth() <<
‘-‘
<< setw(2) << d.getDay() << ‘-‘
<< setw(4) << setfill(fillc) <<
d.getYear();
return os;
}
istream& operator>>(istream& is,
Date& d) {
is >> d.month;
char dash;
is >> dash;
if(dash != '-')
is.setstate(ios::failbit);
is >> d.day;
is >> dash;
if(dash != '-')
is.setstate(ios::failbit);
is >> d.year;
return is;
} ///:~
The file test.txt used in Chapter 6:
//: C06:Test.txt
f a f d A G f d F a A F h f A d f f a a
///:~
<cctype> · 252
<cstdlib> · 215
<ctime> · 212
<exception> · 38
<fstream> · 169
<functional> · 338
<iomanip> · 196
<iosfwd> · 163
<limits> · 181, 203, 285
<memory> · 35
<sstream> · 179
<stdexcept> · 38
<typeinfo> · 557
abort( ) · 27
Abstract Factory design pattern · 651
abstraction, in program design · 614
accumulate algorithm · 413
activation record instance · 58
adaptable function object · 341
Adapter design pattern · 636
adaptor: container · 433, 487; function object · 338;
function pointer · 351; iterator · 487
adjacent_difference algorithm · 415
adjacent_find algorithm · 378
aggregation, design patterns · 616
Alexandrescu, Andrei · 294, 305
algorithm: accumulate · 413; adjacent_difference
· 415; adjacent_find · 378; applicators · 405; binary_search ·
395; complexity · 333; copy · 326, 365; copy_backward · 372; count
· 370; count_if · 334, 371; counting · 370; creating your own · 419; equal
· 327, 385; equal_range · 396; fill · 369; fill_n · 369;
filling and generating · 368; find · 334, 377; find_end · 379; find_first_of
· 378; find_if · 378; for_each · 355, 405; general utilities ·
417; generate · 369; generate_n · 369; generic · 325; heap
operations · 403; includes · 400; inner_product · 414; inplace_merge
· 399; iter_swap · 419, 457; lexicographical_compare · 385; lower_bound
· 395; make_heap · 404; manipulating sequences · 372; max · 419; max_element
· 380; merge · 399; merging · 398; min · 418; min_element
· 379; mismatch · 386; next_permutation · 373; nth_element
· 394; numeric · 413; ordering · 393; partial_sort · 394; partial_sort_copy
· 394; partial_sum · 414; partition · 374; pop_heap · 404;
predicate · 329; prev_permutation · 373; push_heap · 404; random_shuffle
· 374; range of sequence in · 326; remove · 389; remove_copy ·
389; remove_copy_if · 329, 339, 350, 390; remove_if · 389;
removing elements · 389; replace · 380; replace_copy · 380; replace_copy_if
· 330, 380; replace_if · 330, 380; reverse · 372; reverse_copy
· 372; rotate · 373; rotate_copy · 373; search · 379; search_n
· 379; searching and replacing · 377; set operations · 400; set_difference
· 401; set_intersection · 401; set_symmetric_difference · 402; set_union
· 401; sort · 366, 393; sort_heap · 404; sorting · 393; stable_partition
· 374; stable_sort · 366, 393; swap · 419; swap_ranges ·
373; transform · 347, 349, 355, 405; unique · 390; unique_copy
· 390; upper_bound · 395; utilities · 417
ANSI/ISO C++ Committee · 9
applicator algorithms · 405
applicator, iostreams manipulator · 200
applying a function to a container · 255
argument_type · 342
argument-dependent lookup · 274, 278; disabling · 275
assert macro · 66
assertion · 66; side effects in an · 67
Assignable · 337
associative container · 433, 513
atof( ) · 181
atoi( ) · 181
atomic operation · 732
auto_ptr · 35; not for containers · 437
automated testing · 71
automatic type conversion, and exception handling · 23
back_insert_iterator · 448, 482
back_inserter( ) · 328, 370, 372, 418, 448
bad_cast exception class · 40, 557
bad_exception class · 44
bad_typeid exception class · 40, 559
badbit · 165
basic_istream · 158, 216
basic_ostream · 158, 217
basic_string · 134, 217, 241
Becker, Pete · 11
before( ), RTTI function · 559
behavioral design patterns · 616
bidirectional iterator · 446
BidirectionalIterator · 364
binary files · 172, 214
binary function · 337
binary predicate · 337
binary search · 63
binary_function · 342, 353; first_argument_type
· 342; result_type · 342; second_argument_type · 342
binary_negate function object · 341
binary_search algorithm · 395
bind1st function object adaptor · 339
bind2nd function object adaptor · 338, 350, 371
binder1st function object · 339
binder2nd function object · 339
bitset · 229, 506, 540; to_string( ) ·
241
blocking, and threads · 734
book errors, reporting · 10
Bright, Walter · 8, 11
broadcast( ), threading · 734, 742, 757
buffering, stream · 173
Builder design pattern · 660
busy wait, threading · 732, 743
cancel( ), ZThread library function · 717
Cancelable, ZThread library class · 717
cast: downcast · 551; dynamic_cast · 555; runtime ·
551; runtime type identification, casting to intermediate levels · 560
catch · 20; catching any exception · 25
cerr · 158
cfront · 574
Chain of Responsibility design pattern · 642
chaining, in iostreams · 159
change, vector of change · 614
char_traits · 217, 241, 287
character traits · 217; compare( ) · 217
cin · 158
class: hierarchies and exception handling · 24; invariant ·
69; maintaining library source · 204; wrapping · 151
class template: partial ordering · 263; partial
specialization · 263
cleaning up the stack during exception handling · 28
clear( ) · 166, 175
close( ) · 168
code bloat, of templates · 268
code invariant · 63
cohesion · 49
Collecting Parameter design pattern (idiom) · 618
command line, interface · 162
Command pattern · 626; decoupling · 628
Committee, ANSI/ISO C++ · 9
compilation, of templates · 315
compile time: assertions · 304; error checking · 155;
looping · 299; selection · 303
complexity of algorithms · 333
compose non-standard function object adaptor · 360
composition, and design patterns · 614, 615
concurrency · 691; blocking · 734; Command pattern · 628;
when to use it · 771
ConcurrentExecutor (Concurrency) · 704
Condition class, threading · 742
console I/O · 162
constructor: default constructor synthesized by the compiler
· 620; design patterns · 616; exception handling · 29, 30, 57; failing · 57;
order of constructor and destructor calls · 562; private constructor · 620;
protected · 581; simulating virtual constructors · 654; virtual functions
inside constructors · 654
container · 429; adaptor · 433, 487; associative · 433, 513;
bitset · 506, 540; cleaning up · 437, 534; combining STL containers ·
530; creating custom · 536; deque · 434, 465; duplicate keys · 523;
extended STL containers · 440; list · 434, 471; map · 513, 521; multimap
· 513, 523; multiple membership problem · 438; multiset · 513, 527; of
pointers · 436; priority_queue · 496; queue · 491; reversible ·
445; sequence · 433; sequence operations · 454; set · 479, 513; stack
· 487; valarray · 540; value-based · 434; vector · 434, 457; vector<bool>
· 506, 511
contract, design by · 68
conversion, automatic type conversions and exception
handling · 23
cooperation between threads · 741
Coplien, James · 296, 655
copy algorithm · 326, 365
copy_backward algorithm · 372
copy-on-write · 634
count algorithm · 370
count_if algorithm · 334, 371
CountedPtr, reference-counting template in ZThread
library (Concurrency) · 714
counting algorithms · 370
cout · 158
covariance, of exception specifications · 47
Crahen, Eric · 11, 694
creational design patterns · 615
critical section, in thread programming · 719
curiously recurring template pattern · 294, 624
Cygwin, and ZThreads · 696
Czarnecki, Krysztof · 300
datalogger · 211
dead thread · 734
deadlock · 720, 764; conditions for · 769
debugging · 87
dec · 187
declaration, forward · 163
default constructor: synthesized by the compiler · 620
dependent base class · 278
dependent name · 274
deque · 434, 465
design: abstraction in program design · 614; cohesion · 49;
decisions · 66; exception-neutral · 52; exception-safe · 48
design by contract · 68
design patterns · 613; Abstract Factory · 651; Adapter ·
636; aggregation · 616; behavioral · 616; Builder · 660; Chain of Responsibility
· 642; Collecting Parameter idiom · 618; Command · 626; constructors · 616;
creational · 615; destructors · 616; Double Dispatching · 679; Factory Method ·
581, 645; Messenger idiom · 617; Multiple Dispatching · 679; Observer · 667;
Proxy · 632; simulating virtual constructors · 654; Singleton · 460, 619; State
· 634; Strategy · 640; structural · 615; Template Method · 639; vector of
change · 614; Visitor · 683
destructor · 659; design patterns · 616; exception handling
· 28, 57; explicit call · 453; order of constructor and destructor calls · 562;
virtual · 581
diamond inheritance · 588
difference_type · 370
dining philosophers, threading · 764
dispatching: Double Dispatching design pattern · 679;
Multiple Dispatching design pattern · 679
distance( ) · 417
divides function object · 341
documentation, library · 101
document-view architecture · 667
domain_error exception class · 40
dominance · 601
Double Dispatching design pattern · 653, 679
downcast · 551
dynamic type, of an object · 557
dynamic_cast · 555; casting to intermediate levels ·
560; difference between dynamic_cast and typeid, runtime type
identification · 561; for polymorphic types · 556
effectors · 201
efficiency: runtime type identification · 565; threads and ·
693
Eisenecker, Ulrich · 300
ellipses, with exception handling · 25
endl · 195
envelope, and letter classes · 655
eofbit · 166
epsilon( ) · 181
equal algorithm · 327, 385
equal_range algorithm · 396
equal_to function object · 339, 341
EqualityComparable · 337
errno · 16
error: handling · 15; handling, in C · 16; recovery · 15;
reporting errors in book · 10
event-driven programming, and the Command pattern · 628
exception class · 38; what( ) · 38
exception handling · 15; asynchronous events · 53; atomic
allocations for safety · 32; automatic type conversions · 23; bad_cast
exception class · 40, 557; bad_exception class · 44; bad_typeid
exception class · 40, 559; catching an exception · 20; catching any exception ·
25, 26; catching by reference · 23; catching via accessible base · 25; class
hierarchies · 24; cleaning up the stack during a throw · 28; constructors · 29,
30, 57; destructors · 28, 36, 57; domain_error exception class · 40;
ellipses · 25; exception class · 38; exception class, what( )
· 38; exception handler · 20; exception hierarchies · 56; exception matching ·
23; exception neutral · 52; exception safety · 48; exception specifications ·
40; exception type · 39; incomplete objects · 29; inheritance · 24; invalid_argument
exception class · 40; length_error exception class · 40; logic_error
class · 38; memory leaks · 29; multiple inheritance · 56; naked pointers · 30;
object slicing and · 23; out_of_range exception class · 40; overhead of
· 58; programming guidelines · 52; references · 34, 56; resource management ·
30; rethrowing an exception · 26, 52; runtime_error class · 38; set_terminate( )
· 27; set_unexpected( ) · 41; specifications, and inheritance · 46;
specifications, covariance of · 47; specifications, when not to use · 47; stack
unwinding · 19; Standard C++ library exceptions · 38; terminate( )
· 44; termination vs. resumption · 22; testing · 79; throwing & catching
pointers · 57; throwing an exception · 18, 19; typical uses of exceptions · 54;
uncaught exceptions · 26, 28; unexpected( ) · 41; when to avoid ·
52; zero-cost model · 60; ZThreads (Concurrency) · 708
exception specifications · 40; covariance of · 47;
inheritance · 46; when not to use · 47
exclusion, mutual, in threads · 719
Executors, ZThread (Concurrency) · 702
explicit instantiation, of templates · 316
export keyword · 319
exported templates · 319
expression templates · 308
extractor, stream · 158
Extreme Programming (XP) · 71, 615
facet: locale · 220
Factory Method design pattern · 581, 645
fail( ) · 175
failbit · 160, 166
Fibonacci · 298, 636
file streams, close( ) · 168
file, iostreams · 156, 162
FILE, stdio · 152
fill algorithm · 369
fill_n algorithm · 369
filling and generating algorithms · 368
find algorithm · 334, 377
find_end algorithm · 379
find_first_of algorithm · 378
find_if algorithm · 378
first_argument_type · 342
flock( ), and SynchronousExecutor (Concurrency)
· 705
flush, iostreams · 195
for_each algorithm · 355, 405
format fields · 188
format flags: dec · 187; hex · 187; ios;
showbase · 187; showpoint · 187; showpos · 187; skipws
· 187; unitbuf · 187; uppercase · 187; oct · 187
formatted I/O · 186
formatting: in-core · 179; manipulators, iostreams · 194;
output stream · 186
forward declaration · 163
forward iterator · 446
forward_iterator_tag · 447
ForwardIterator · 363
framework, unit test · 75
friend template · 284
friends, of templates · 279
front_insert_iterator · 448
front_inserter( ) · 418, 448
fseek( ) · 176
fstream · 168; simultaneous input and output · 172
function: applying a function to a container · 255; binary ·
337; unary · 337
function object · 335, 626; adaptable · 341; adaptor · 338; binary_negate
· 341; bind1st adaptor · 339; bind2nd adaptor · 338, 350; binder1st
· 339; binder2nd · 339; classification · 336; divides · 341; equal_to
· 339, 341; greater · 338, 341, 371; greater_equal · 341; less
· 341; less_equal · 341; logical_and · 341; logical_not ·
341; logical_or · 341; minus · 340; modulus · 341; multiplies
· 341; negate · 341; not_equal_to · 341; not1 adaptor ·
339; plus · 340; unary_negate · 341
function object adaptor · 338; bind2nd · 371; not1
· 352; pointer_to_binary_function · 353; pointer_to_unary_function
· 352
function pointer adaptor · 351; ptr_fun · 351
function template · 245; address of · 251; explicit
qualification · 246; overloading · 249; partial ordering of · 259;
specialization · 261; type deduction parameters in · 245
function-call operator · 335
function-level try blocks · 36
functor · 626; see function object · 335
Gang of Four (GoF) · 613
general utility algorithms · 417
generate algorithm · 369
generate_n algorithm · 369
generator · 337, 369
generic algorithms · 325
get pointer · 177
get( ) · 170; overloaded versions · 165
getline( ) · 164, 171
getline( ), for strings · 129
getPriority( ) · 711
GoF, Gang of Four · 613
goodbit · 166
greater function object · 338, 341, 371
greater_equal function object · 341
Guard template, ZThread (concurrency) · 721
handler, exception · 20
handshaking, between concurrent tasks · 742
hash_map non-standard container · 539
hash_multimap non-standard container · 539
hash_multiset non-standard container · 539
hash_set non-standard container · 539
heap operations · 403
hex · 187
hierarchy, object-based · 573
I/O: console · 162; interactive · 162; raw · 165; threads,
blocking · 737
i18n, see internationalization · 216
ifstream · 156, 168, 174
ignore( ) · 170
imbue( ) · 220
implementation inheritance · 579
includes algorithm · 400
inclusion model, of template compilation · 315
incomplete type · 163
in-core formatting · 179
inheritance: design patterns · 614; diamond · 588;
hierarchies · 573; implementation · 579; interface · 575
inheritance, multiple · 573, 673; avoiding · 603; dominance
· 601; name lookup · 599; runtime type identification · 560, 563, 570
initialization: controlling initialization order · 621; lazy
· 620; object · 596; Resource Acquisition Is Initialization (RAII) · 32, 36,
582; zero initialization · 522
inner class idiom, adapted from Java · 671
inner_product algorithm · 414
inplace_merge algorithm · 399
input iterator · 446
input_iterator_tag · 447
InputIterator · 363
insert( ) · 448
insert_iterator · 372, 448, 482
inserter( ) · 372, 418, 448
inserter, stream · 158
instantiation, template · 260
interactive I/O · 162
interface: class · 576; command-line · 162; extending an ·
603; inheritance · 575; repairing an interface with multiple inheritance · 603;
responsive user · 700
internationalization · 216
interrupt( ), threading · 735
interrupted status, threading · 739
Interrupted_Exception, threading · 739
invalid_argument exception class · 40
invalidation, iterator · 463
invariant: class · 69; code · 63; loop · 64
ios: app · 172; ate · 172; basefield
· 188; beg · 176; binary · 172, 214; cur · 176; end
· 176; failbit · 160; fill( ) · 190; in · 171; out
· 172; precision( ) · 190; showbase · 187; showpoint ·
187; showpos · 187; skipws · 187; trunc · 172; unitbuf
· 187; uppercase · 187; width( ) · 190
ios_base · 157
iostate · 168
iostreams · 156; applicator · 200; automatic · 189; badbit
· 165; binary mode · 172, 214; buffering · 173; clear function · 166, 175;
dec manipulator · 195; endl manipulator · 195; eofbit ·
166; errors · 165; exceptions · 167; exceptions function · 167;
extractor · 158; fail function · 175; failbit · 166; failure
exception type · 167; files · 162; fill( ) · 190; fixed ·
196; flags( ) · 186; flush · 195; fmtflags type ·
186; format fields · 188; format flags · 186; formatting · 186; fseek( )
· 176; get( ) · 170; getline( ) · 171; goodbit ·
166; hex manipulator · 195; ignore( ) · 170; imbue( )
· 220; inserter · 158; internal · 196; ios::basefield · 188; ios::dec
· 189; ios::fixed · 189; ios::hex · 189; ios::internal ·
190; ios::left · 190; ios::oct · 189; ios::right · 190; ios::scientific
· 189; iostate type · 168; left · 196; locales · 216;
manipulators · 194; manipulators, creating · 199; narrow · 216; narrow
function · 218; noshowbase · 195; noshowpoint · 196; noshowpos
· 195; noskipws · 196; nouppercase · 195; oct manipulator
· 195; open modes · 171; operator << · 158; operator >>
· 158; positioning · 175; precision( ) · 190, 213; resetiosflags
manipulator · 196; right · 196; scientific · 196; seeking in ·
175; setbase manipulator · 197; setf( ) · 187, 188, 213; setfill
manipulator · 197; setiosflags manipulator · 196; setprecision
manipulator · 197; setstate function · 166; setw manipulator ·
197, 213; showbase · 195; showpoint · 196; showpos · 195; skipws
· 196; smanip type · 201; string I/O with · 179; text mode · 172;
threads, colliding output · 727; unsetf( ) · 188; uppercase
· 195; wide · 216; widen function · 218; width( ) · 190; write( )
· 213; ws manipulator · 195
istream · 156; get( ) · 164; getline( )
· 164; read( ) · 165; seekg( ) · 176; tellg( )
· 176
istream_iterator · 333, 446, 450
istreambuf_iterator · 446, 451, 481
istringstream · 156, 179
iter_swap algorithm · 419, 457
iterator · 429, 615; adapting a class to produce · 637;
adaptor · 487; bidirectional · 446; categories · 446; forward · 446; input ·
446; invalidation · 463; istream · 333; ostream · 332; output · 446;
past-the-end · 443; random-access · 446; reverse · 445; stream · 331; stream
iterator · 450; tag · 447; traits · 366
iterator_traits · 366
Josuttis, Nico · 101
King, Jamie · 10
Koenig, Andrew · 274
Kreft, Klaus · 314, 780
Lajoie, Josee · 60
Langer, Angelika · 314, 780
lazy initialization · 620, 634
length_error exception class · 40
less function object · 341
less_equal function object · 341
LessThanComparable · 337
letter, envelope and letter classes · 655
lexicographical_compare algorithm · 385
library: documentation · 101; maintaining class source · 204
line input · 162
linear search · 377
Linux, and ZThreads · 696
list · 434, 471; merge( ) · 474; remove( )
· 474; reverse( ) · 472; sort( ) · 472; unique( )
· 474; vs. set · 476
locale · 216, 218; collate category · 219; ctype
category · 219; facet · 220; iostreams · 216; messages category · 219; monetary
category · 219; money_get facet · 220; money_punct facet · 220; money_put
facet · 220; numeric category · 219; time category · 219; time_get
facet · 220; time_put facet · 220
localtime( ) · 213
logic_error class · 38
logical_and function object · 341
logical_not function object · 341
logical_or function object · 341
longjmp( ) · 16
loop: invariant · 64; unrolling · 301
lower_bound algorithm · 395
machine epsilon · 181
maintaining class library source · 204
make_heap algorithm · 404, 499
make_pair( ) · 417
manipulating sequences · 372
manipulators · 160; creating · 199; iostreams formatting ·
194; with arguments · 196
map · 521; keys and values · 521
max algorithm · 419
max_element algorithm · 380
mem_fun member pointer adaptor · 355
mem_fun_ref member pointer adaptor · 355
member templates · 242; vs. virtual · 245
memory leaks · 90
memory management, and threads · 711
merge algorithm · 399
merging algorithms · 398
Messenger design pattern (idiom) · 617
metaprogramming · 297; compile-time assertions · 304;
compile-time looping · 299; compile-time selection · 303; loop unrolling · 301;
Turing completeness of · 298
Meyer, Bertrand · 68
Meyers, Scott · 60, 623
min algorithm · 418
min_element algorithm · 379
minus function object · 340
mismatch algorithm · 386
mixin: class · 579; parameterized · 583
model-view-controller (MVC) · 667
modulus function object · 341
money_get · 220
money_punct · 220
money_put · 220
multimap · 523
Multiple Dispatching design pattern · 679
multiple inheritance · 573, 673; avoiding · 603; dominance ·
601; duplicate subobjects · 585; exception handling · 56; name lookup · 599;
repairing an interface · 603; runtime type identification · 560, 563, 570
multiplies function object · 341
multiprocessor machine, and threading · 692
multiset · 527; equal_range( ) · 529
multitasking · 691
multithreading · 691; drawbacks · 771; ZThread library for
C++ · 694
mutex: simplifying with the Guard template · 721; threading
· 742; ZThread FastMutex · 731
mutual exclusion, in threads · 719
Myers, Nathan · 11, 251, 285, 452, 481, 482
naked pointers, and exception handling · 30
name lookup, and multiple inheritance · 599
name( ), RTTI function · 559
narrow streams · 216
narrow( ) · 218
negate function object · 341
new, placement · 91
newline, differences between DOS and Unix · 172
next_permutation algorithm · 373
not_equal_to function object · 341
not1 function object adaptor · 339, 352
nth_element algorithm · 394
numeric algorithms · 413
numeric_limits · 203, 285
object: initialization · 596; object-based hierarchy · 573;
slicing, and exception handling · 23
Observable · 668
Observer design pattern · 667
oct · 187
ofstream · 156, 168
one-definition rule · 622
open modes, iostreams · 171
operator new( ) · 90
operator void*( ), for streams · 167
operator( ) · 229, 335, 339
operator++( ) · 234
optimization, throughput, with threading · 692
order: controlling initialization · 621; of constructor and
destructor calls · 562
ordering: algorithms · 393; strict weak · 337
ostream · 156; fill( ) · 160;
manipulators · 160; seekp( ) · 176; setfill( ) · 160; setw( )
· 160; tellp · 176; write( ) · 165
ostream_iterator · 332, 365, 446, 451
ostreambuf_iterator · 446, 451
ostringstream · 156, 179; str( ) · 182
out_of_range exception class · 40
output: iterator · 446; stream formatting · 186
output_iterator_tag · 447
OutputIterator · 363
overhead, exception handling · 58
overloading, function template · 249
parameter, template · 227
parameterized mixin · 583
Park, Nick · 257
partial ordering: class templates · 263; function templates
· 259
partial specialization, template · 263
partial_sort algorithm · 394
partial_sort_copy algorithm · 394
partial_sum algorithm · 414
partition algorithm · 374
past-the-end iterator · 443
patterns, design patterns · 613
perror( ) · 16
philosophers, dining, and threading · 764
placement new · 91
Plauger, P. J. · 101
plus function object · 340
pointer to member adaptor: mem_fun · 355; mem_fun_ref
· 355
pointer, smart · 437
pointer_to_binary_function function object adaptor ·
353
pointer_to_unary_function function object adaptor ·
352
policies · 291
policy class · 293
polymorphism · 564
PoolExecutor (Concurrency) · 703
pop_heap algorithm · 404, 499
POSIX standard · 145
postcondition · 68
precision( ) · 213
precondition · 68
predicate · 329; binary · 337; unary · 337
prev_permutation algorithm · 373
printf( ) · 154; error code · 15
priority, thread · 709
priority_queue · 496; as a heap · 499; pop( )
· 500
private constructor · 620
process, threading and · 691
producer-consumer, threading · 747
programming paradigms · 573
protected constructor · 581
Proxy design pattern · 632
ptr_fun function pointer adaptor · 351
pure virtual function · 576
push_back( ) · 434, 448, 482
push_front( ) · 434, 448
push_heap algorithm · 404, 499
put pointer · 176
qualified name · 274, 278
queue · 491
queues, thread, for problem-solving · 750
quicksort · 366
race condition · 717
RAII · 32, 36, 582
raise( ) · 16
rand( ) · 215
RAND_MAX · 215
random_shuffle algorithm · 374
random-access iterator · 446
RandomAccessIterator · 364
range, of sequence · 326
raw byte I/O · 165
raw_storage_iterator · 446, 452
rbegin( ) · 445, 448
rdbuf( ) · 174
read( ) · 165
refactoring · 70
reference counting · 582, 634; ZThreads (Concurrency) · 712
references: bad_cast · 557; exception handling · 34,
56
remove algorithm · 389
remove_copy algorithm · 389
remove_copy_if algorithm · 329, 339, 350, 390
remove_if algorithm · 389
removing elements, algorithm · 389
rend( ) · 445, 448
reordering, stable and unstable · 366
replace algorithm · 380
replace_copy algorithm · 380
replace_copy_if algorithm · 330, 380
replace_if algorithm · 330, 380
reporting errors in book · 10
requirements · 70
reserve( ) · 458
resize( ) · 456
Resource Acquisition Is Initialization (RAII) · 32, 36, 582
responsive user interfaces · 700
result_type · 342
resumption, vs. termination, exception handling · 22
rethrow, exception · 26, 52
reverse algorithm · 372
reverse_copy algorithm · 372
reverse_iterator · 445, 448, 487
reversible container · 445
rope non-standard string class · 539
rotate algorithm · 373
rotate_copy algorithm · 373
Runnable · 696
runtime cast · 551
runtime stack · 228
runtime type identification · 551; casting to intermediate
levels · 560; const and volatile and · 558; difference between dynamic_cast
and typeid · 561; efficiency · 565; mechanism & overhead · 570;
misuse · 564; multiple inheritance · 560, 563, 570; templates and · 562; type_info
· 570; type_info class · 557; type_info::before( ) · 559; type_info::name( )
· 559; typeid operator · 557; void pointers · 561; VTABLE · 570; when to
use it · 564
runtime_error class · 38
Saks, Dan · 282
Schwarz, Jerry · 201
search algorithm · 379
search_n algorithm · 379
searching and replacing algorithms · 377
second_argument_type · 342
seekg( ) · 176
seeking in iostreams · 175
seekp( ) · 176
separation model, of template compilation · 319
sequence: at( ) · 470; container · 433;
converting between sequences · 467; deque · 465; erase( ) ·
457; expanding with resize( ) · 456; insert( ) · 457; list
· 471; operations · 454; operator[ ] · 471; random-access · 470; swap(
) · 457; swapping sequences · 477; vector · 457
serialization: object · 215; thread · 750
set · 479, 513; find( ) · 480; operations
· 400; ordering of · 480; STL set class example · 432; vs. list · 476
set_difference algorithm · 401
set_intersection algorithm · 401
set_symmetric_difference algorithm · 402
set_terminate( ) · 27
set_unexpected( ) · 41
set_union algorithm · 401
setf( ) · 187, 213
setjmp( ) · 16
setPriority( ) · 711
setw( ) · 213
Sieve of Eratosthenes · 119
signal( ) · 16, 53; threading · 734, 742
Singleton · 460, 619; implemented with curiously recurring
template pattern · 624; Meyers’ Singleton · 623; ZThreads library (concurrency)
· 728
sleep( ), threading · 707, 734
slice, valarray · 542
slicing, object slicing and exception handling · 23
slist non-standard container · 539
Smalltalk · 573
smanip · 201
smart pointer · 437
software quality · 63
sort algorithm · 366, 393
sort_heap algorithm · 404
sorting algorithms · 393
specialization: function template · 261; template · 260
specification, exception · 40
srand( ) · 214
stable reordering · 366
stable_partition algorithm · 374
stable_sort algorithm · 366, 393
stack · 487; exception safety of · 489; pop( )
· 489; push( ) · 489; top( ) · 489
stack frame · 58
stack unwinding · 19
Standard C · 9
Standard C++ · 9; concurrency · 694; exception types · 38
State design pattern · 634
stdio · 151
STL extensions · 538
Strategy design pattern · 640
strcmp( ) · 217
stream · 156; errors · 165; iterator · 331, 450; output
formatting · 186; state · 165
streambuf · 173; get( ) · 174; rdbuf( )
· 174
streampos · 176
strict weak ordering · 337
StrictWeakOrdering · 374, 403
string · 103; append( ) · 110; at( )
· 132; c_str( ) · 131; capacity( ) · 111;
case-insensitive search · 120; character traits · 134; compare( ) ·
131; concatenation · 117; empty( ) · 356; erase( ) ·
126; find( ) · 115; find_first_not_of( ) · 118; find_first_of( )
· 118; find_last_not_of( ) · 118; find_last_of( ) ·
118; getline( ) · 129; indexing operations · 133; insert( ) ·
110; iterator · 108; length( ) · 111; memory management · 110, 114;
npos member · 114; operator!= · 129; operator[ ] ·
132; operator+ · 117; operator+= · 117; operator< ·
129; operator<= · 129; operator== · 129; operator> ·
129; operator>= · 129; reference-counted · 104; relational operators
· 129; replace( ) · 112; reserve( ) · 111; resize( )
· 111; rfind( ) · 118; size( ) · 111; stream I/O · 156;
substr( ) · 107; swap( ) · 132; transforming strings to
typed values · 181
string streams · 179
stringbuf · 183
stringizing, preprocessor operator · 193
Stroustrup, Bjarne · 101
struct tm · 213
structural design patterns · 615
subobject, duplicate subobjects in multiple inheritance ·
585
subtasks · 691
suite, test · 79
surrogate, in design patterns · 631
swap algorithm · 419
swap_ranges algorithm · 373
synchronization: (concurrency) example of problem from lack
of synchronization · 732; blocking · 734; thread · 719
Synchronization_Exception, ZThread library · 698, 703
synchronized, threading, wrapper for an entire class · 723
SynchronousExecutor (Concurrency) · 705
tag, iterator tag classes · 447
task, defining for threading · 696
tellg( ) · 176
tellp( ) · 176
template: argument-dependent lookup in · 274; code bloat,
preventing · 268; compilation · 274; compilation models · 315; compilation,
two-phase · 274; curiously recurring template pattern · 294; default arguments
· 230; dependent names in · 274; explicit instantiation · 316; export ·
319; expression templates · 308; friend template · 284; friends · 279; function
· 245; idioms · 285; inclusion compilation model · 315; instantiation · 260;
keyword · 240; member · 242; member, and virtual keyword · 245;
metaprogramming · 297; name lookup issues · 273; names in · 273; non-type
parameters · 228; parameters · 227; partial ordering of class templates · 263;
partial ordering of function templates · 259; partial specialization · 263;
policy-based design · 291; qualified names in · 274, 278; runtime type identification
and · 562; separation compilation model · 319; specialization · 260; template
template parameters · 232; traits · 285
Template Method design pattern · 639
terminate( ) · 27, 44; uncaught exceptions · 26
terminating threads · 735
termination problem, concurrency · 727
termination, vs. resumption, exception handling · 22
test: automated unit testing · 71; Boolean expressions in
testing · 72; framework · 75; suite · 79; test-first programming · 71; unit ·
70
Test class · 76
TestSuite framework · 75
text processing · 103
thread · 691; atomic operation · 732; blocked · 734; broadcast( )
· 734, 742, 757; busy wait · 732, 743; Cancelable, ZThread library class
· 717; colliding over resources, improperly accessing shared resources · 715;
concurrency · 691; Condition class for wait( ) and signal( )
· 742; cooperation · 741; dead state · 734; deadlock · 720, 764; deadlock, and
priorities · 709; dining philosophers · 764; drawbacks · 771; example of
problem from lack of synchronization · 732; getPriority( ) · 711;
handshaking between tasks · 742; I/O and threads, blocking · 737; interrupt( )
· 735; interrupted status · 739; Interrupted_Exception · 739; iostreams
and colliding output · 727; memory management · 711; multiple, for
problem-solving · 741; mutex, for handshaking · 742; mutex, simplifying with
the Guard template · 721; new state · 734; order of task shutdown · 717;
order of thread execution · 708; priority · 709; producer-consumer · 747; queues
solve problems · 750; race condition · 717; reference counting · 712; reference
counting with CountedPtr · 714; runnable state · 734; serialization ·
750; setPriority( ) · 711; sharing resources · 711; signal( )
· 734, 742; sleep( ) · 707, 734; states · 734; synchronization ·
719; synchronization and blocking · 734; synchronized wrapper for an entire
class · 723; termination · 735; termination problem · 727; thread local storage
· 724; threads and efficiency · 693; TQueue, solving threading problems with ·
750; wait( ) · 734, 742; when to use threads · 771; yield( )
· 706; ZThread FastMutex · 731
ThreadedExecutor (Concurrency) · 702
throughput, optimize · 692
throw · 19
throwing an exception · 18
time( ) · 214
time_get · 220
time_put · 220
tolower · 252
toupper · 252
TQueue, solving threading problems with · 750
trace: file · 88; macro · 87
traits · 285; iterator · 366
transform algorithm · 252, 347, 349, 355, 405
transforming character strings to typed values · 181
try · 20
try block · 20; function-level · 36
type: automatic type conversions and exception handling ·
23; deduction, of function template parameters · 245; incomplete · 163; runtime
type identification (RTTI) · 551
type_info: name function · 244; structure ·
570
type_info class · 557
type_info::before( ) · 559
type_info::name( ) · 559
typeid operator · 244, 557; difference between dynamic_cast
and typeid, runtime type identification · 561
typename: keyword · 237; typedef · 240; versus
class · 240
typing, weak · 579
unary function · 337
unary predicate · 337
unary_composer non-standard function object · 360
unary_function · 342, 352; argument_type ·
342; result_type · 342
unary_negate function object · 341
uncaught exceptions · 26
uncaught_exception( ) · 52
unexpected( ) · 41
Unicode · 216
unique algorithm · 390
unique_copy algorithm · 390
unit buffering · 188
unit test · 70
unstable reordering · 366
upcast · 603
upper_bound algorithm · 395
Urlocker, Zack · 608
user interface, responsive, with threading · 692, 700
utility algorithms · 417
valarray · 540; slice · 542
value_type · 450
van Rossum, Guido · 773
Vandevoorde, Daveed · 308
vector · 457; reserve( ) · 458
vector of change · 614
vector<bool> · 263, 506, 511
Veldhuizen, Todd · 308
virtual: base class · 563, 589; base, initialization of ·
592; destructor · 581; function table · 654; pure virtual functions · 576;
simulating virtual constructors · 654; virtual functions inside constructors ·
654
Visitor design pattern · 683
void · 561
VPTR · 654
VTABLE · 654; runtime type identification · 570
wait( ), threading · 734, 742
wchar_t · 216
wcscmp( ) · 217
weak typing · 579
web servers, multiprocessor · 692
wide: character · 216; stream · 216; stream function, wcscmp( )
· 217
widen( ) · 218
Will-Harris, Daniel · 11
wrapping, class · 151
write( ) · 165, 213
ws · 195
XP, Extreme Programming · 71, 615
yield( ), threading · 706
zero initialization · 522
Zolman, Leor · 320
ZThread: Cancelable class · 717; Executors · 702;
installing the library · 695; multithreading library for C++ · 694